Page Table of Contents
About the Author
Hot Topics
Updated on Jan 29, 2026
Many users have reported an error where they get a black screen instead of the normal desktop interface after logging into their Windows 11 operating system. There's not just a single culprit; multiple factors play their part in it. It can arise from your graphics driver, corrupt system files, or hardware issues.
EaseUS will introduce you to multiple fixes for this issue, which you can follow depending on your specific scenario.
- Tip
- Before proceeding, please verify if your monitor is powered on with a proper connection and configured to the right video input source.
For Emergency: Using Boot Repair Tool
If you are in a hurry to fix the black screen problem and expect to be able to access the files on your computer immediately, then I recommend you resort to EaseUS Partition Master Professional. It's a trustworthy Windows boot repair utility that allows users to fix most system issues like black screen, blue screen, file system errors, PC stuck, PC not launching, etc.
Its Boot Repair feature is user-friendly for beginners, and with that, users can access their normal functioning Windows 10 or Windows 11 after running a repair session. Also, they can create bootable media and boot the PC from USB anytime needed. To learn more about it, give a quick view of some other features of this tool.
Step 1. Start EaseUS Partition Master after connecting the external drive/USB to your computer, go to "Bootable Media," and click "Create bootable media."

Step 2. Select an available USB Drive or CD/DVD and click "Create." You can also burn the Windows ISO file to the storage media.
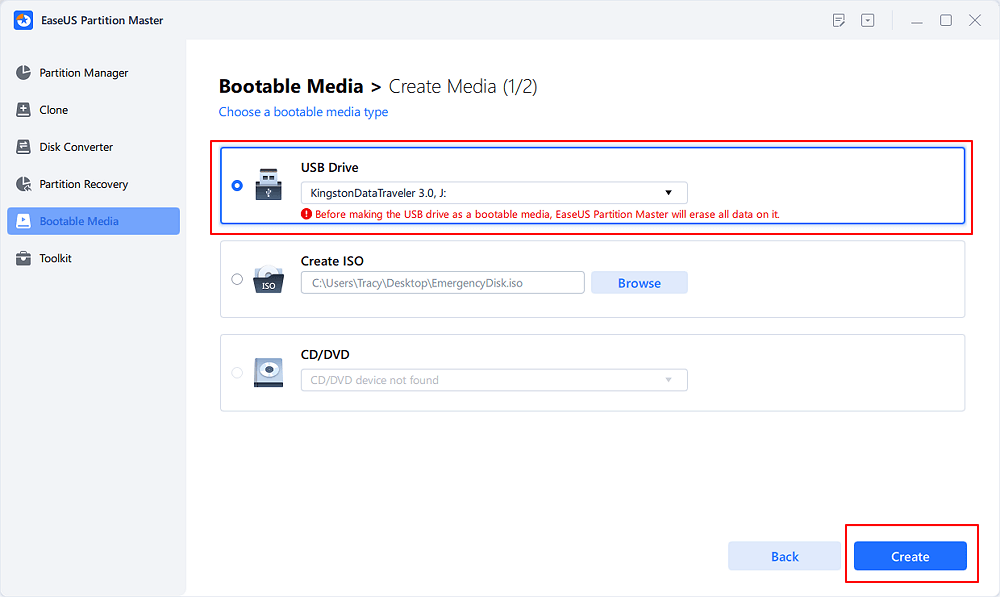
Step 3. Connect the created bootable drive to the new computer and reboot the computer by pressing and holding F2/Del to enter the BIOS. Then, set the WinPE bootable drive as the boot disk and press F10 to exit.
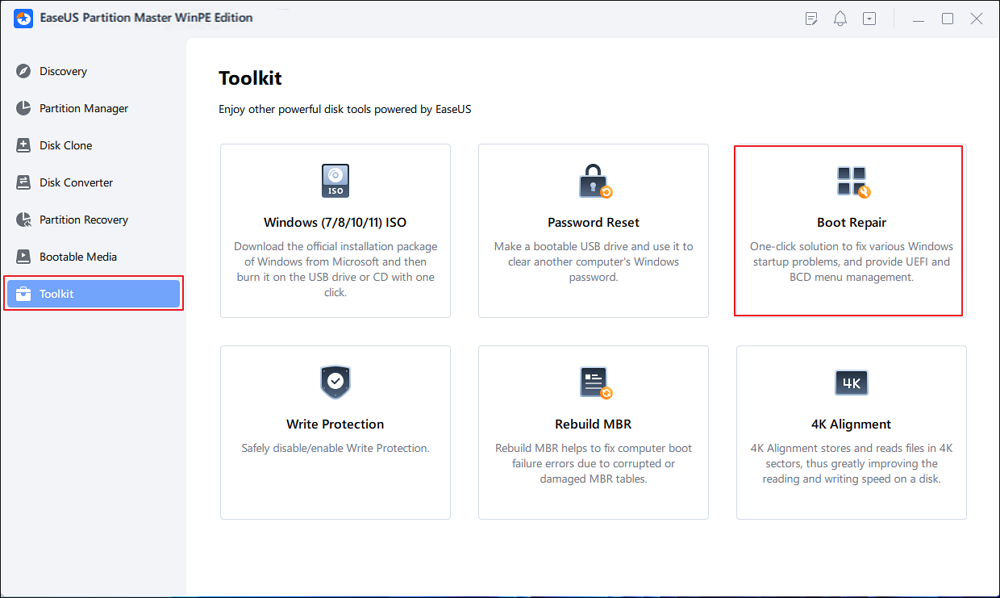
Step 4. Boot the computer again and enter the WinPE interface. Then, open EaseUS Partition Master and click "Boot Repair" under the "Toolkit" option.
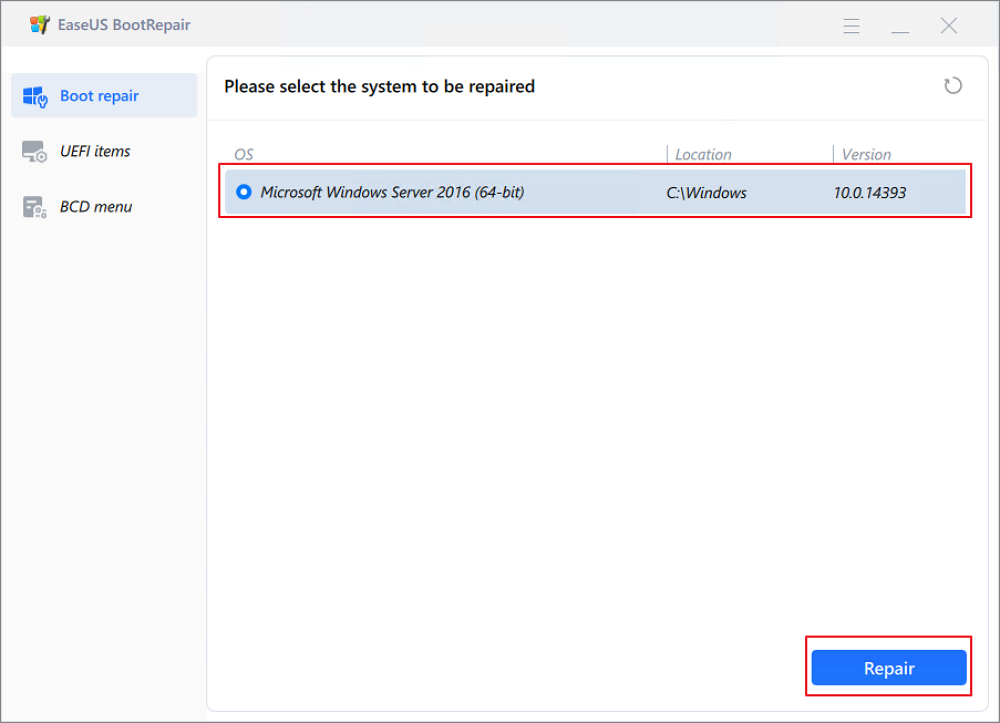
Step 5: Select the system you want to repair and click "Repair."
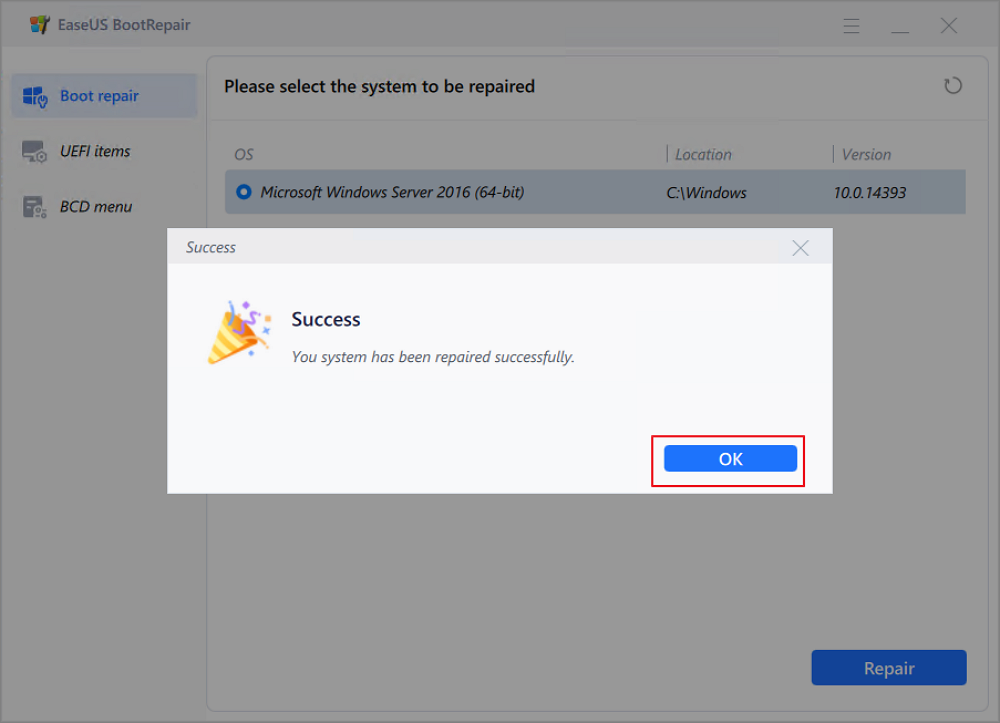
Step 6. Wait a moment, and you will receive an alert that the system has been successfully repaired. Click "OK" to complete the boot repair process.
If you think you should get benefits from this tool and relieve yourself from the worries of Windows technical problems, you're just one step away. Download this tool right now and try it out for free.
8 Manual Fixes for Windows 10/11 Black Screen After Signing in
Other than fixing the Windows 11 black issue after login issue through the EaseUS Partition Master tool, you can go for some manual fixes that may be fruitful. This section will let you explore the best eight manual troubleshooting fixes that you can opt for on Windows 11:
Fix 1. Use Keyboard Shortcuts
While keyboard shortcuts may not directly address the root cause of the black screen problem, they can provide some general level of fixes. It means they can let you access the system functions and perform troubleshooting steps when the display interface is inaccessible. Several keyboard shortcuts on Windows 10/11 are programmed to deal with different kinds of scenarios.
One of the most used shortcuts is "Ctrl + Alt + Delete," which lets you access the "Security Options" screen. Alternatively, you can press the "Ctrl + Shift + Esc" keys to open the "Task Manager" directly, even during the black screen issue. You can also press and hold "Shift" before your Windows 11 starts to get to the "Advanced Options" screen and enter Safe Mode.
There are some related topics you may like:
Fix 2. Run Startup Repair
Startup Repair scans the system for issues related to the boot configuration, such as missing or corrupted boot files. If the black screen problem arises from a boot configuration issue, Startup Repair can automatically resolve it.
Moreover, some incorrect registry settings can cause the Windows 11 black screen after login issues. Thus, by running Startup Repair, you can automatically tackle this problem by following these straightforward steps to execute this fix:
Step 1. Begin by restarting your operating system and pressing the keep holding the "Shift" button. After restarting, you will enter into a window with multiple options. From there, choose the "Troubleshoot" option.
Step 2. Afterward, click "Advanced Options" and wait for further options to load. Now, hit the "Startup Repair" option, and it will run after some confirmation prompts.

Fix 3. Disable Automatic Applications
Installing numerous third-party applications on operating systems for work or entertainment purposes is common. However, a drawback is that these applications can run in the background and negatively impact Windows system processes.
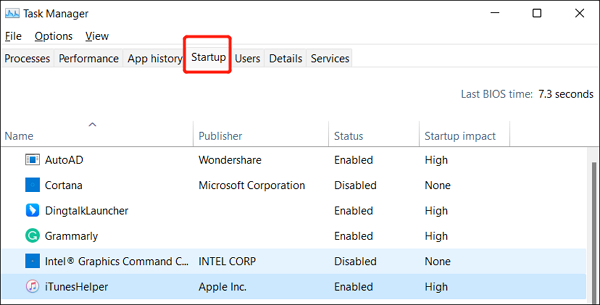
Therefore, it proves to be effective in performing a clean boot on your Windows. It also turns off startup programs and helps you indicate if any startup program is responsible for the black screen. To perform a clean boot in Windows 10/11, see this guide:
Step 1. First, use the "Win + R" shortcut combination to open the "Run" dialog box. In that box, type the "msconfig" command and press "Enter" to open System Configuration.
Step 2. Afterward, go to the "Services" tab and check "Hide all Microsoft services." Then, hit "Disable all" to turn off all the non-Microsoft services. Once done, open the "Startup" tab and click "Open Task Manager."
Step 3. From there, select each unwanted startup item and click "Disable." At last, hit "OK" and restart your Windows 11.
We know you must be feeling grateful to be here reading this guide and getting yourself out of this frustrating Windows 11 black screen after the login issue. Share it with others so that they may get the same benefits, too.
Fix 4. Boot into Safe Mode
Safe Mode in Windows bypasses unnecessary drivers and third-party applications, loading only essential system services. This enables the diagnosis of black screen issues caused by conflicts with specific drivers or applications. Additionally, it facilitates the use of repair tools to address corrupted or missing system files. To learn how to get into Safe Mode, go through this guide to fix the Windows 11 black screen after login:
Step 1. First, restart your OS through the "Power" options by holding the "Shift" key and tapping on the "Restart" option. Afterward, select the "Troubleshoot" option and hit "Advanced Options."
Step 2. On the next screen, click "Startup Settings" and then click the "Restart" button to proceed. After this, you will see many startup modes. Finally, hit the "F4" key to enter Safe Mode successfully.
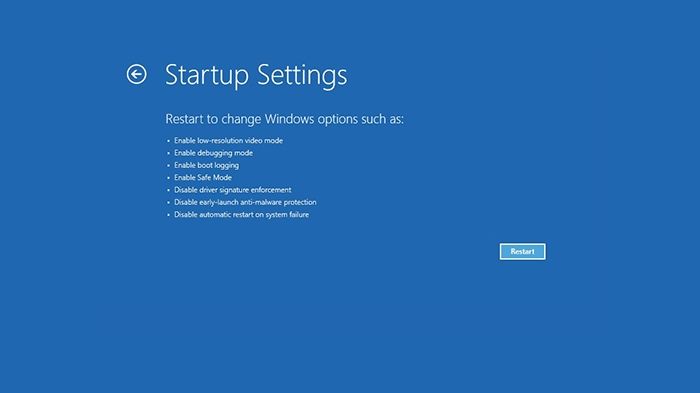
Once entering Safe Mode, you can investigate the possible causes of the problem, such as recently installed software, drivers, programs, etc.
Fix 5. System Restore or Check Windows Update
If you've encountered a Windows 11 black screen after logging in due to recent changes in settings or files, you can resolve it using System Restore. This feature reverts your computer's system files and settings to a previously functional state. Furthermore, you can also update your Windows, which includes bug fixes and security patches for your system. Here's the easiest way to use System Restore on your PC:
Step 1. Launch the "Run" dialog by hitting the "Win + R" keys. Then, type the "rstrui.exe" command and hit "OK." A new window will appear; simply hit "Next."
Step 2. Now, choose any restore point that you had created previously. After that, click the "Next" button and finish the configurational settings to execute a System Restore.
Fix 6. Fresh Reinstall Windows 11
If you have tried all other ways and nothing works for you well, there's one more potential fix left. You can reinstall your Windows 11, which removes all installed programs and drivers and gives you a fresh and clean start.
This approach can solve the Windows 11 black screen after login problem without a doubt if the issue lies in the software. Moreover, Microsoft is planning to add the Reinstall feature directly in Windows 11 to help users save time.
This link helps you reinstall Windows 11 without losing data.
Fix 7. Check Monitor Cables and Then Restart Windows 11
The black screen issue may occur due to a simple hardware problem, like improperly connected monitor cables. Troubleshooting hardware connections helps to rule out external factors that may contribute to the black screen problem. It's one of the basic steps, and you just have to ensure that the cables are properly connected. Once checked and adjusted, simply restart your Windows 11 by following the instructions given here.
Instructions: Hit the "Windows" key on your keyboard or go to the "Start" button from your desktop taskbar to access the Start Menu. From there, click the "Power" icon to get several options. Finally, choose the "Restart" option and wait for it to restart automatically.
Fix 8. Disconnect All Peripherals
Sometimes, the peripheral devices connected to your system may conflict with the display and may cause issues. These devices may include printers, external monitors, external storage drives, etc. Thus, a wise approach is to disconnect them all and see if the issue persists. If it gets resolved, you can connect them all and then disconnect them one by one to isolate the root cause.
If you find this article helpful, don't just keep it to yourself; be a nice person and share it with others to spread awareness.
Why Does Windows 10/11 Get a Black Screen After Login
Why does my computer go black after logging in? After we solve the error, it is important to understand why Windows 11 sometimes goes black after logging in to avoid this error. In most cases, the following are the main triggers of Win 11 black screen after login issue:
- Hardware issues such as a damaged monitor or loose wires.
- The installed display driver may be incompatible or outdated.
- Your system may have a firmware-related issue.
- Important processes required to load the display on your computer may not load correctly during startup.
- Changes in display adapter settings may also cause the screen to malfunction.
- Deadlocks or faulty processes in the system.
- Not enough disk space.
- The firmware has been corrupted by malware.
- Notice:
- Windows 10 will end support on October 14, 2025. If you are currently using Windows 10, we suggest promptly reviewing this Windows 10 upgrade and replacement guide.
Conclusion
In summary, many aspects can trigger the Windows 11 black screen after a login problem on your system. So, it's vital to find the right cause and then go for the right solution to fix this issue. We have gathered for you the best eight manual fixes that you can efficiently perform by yourself to get rid of.
You can choose between any of them by isolating the cause of that issue and then applying the relevant fix. Additionally, we have favored you by letting you know about a tool that can automatically diagnose the cause and fix it. EaseUS Partition Master is the most innovative tool that you can try to resolve any technical issue with your operating system.
Windows 10 Black Screen With Cursor After Login FAQs
For your ease, we have collected some of the commonly asked queries over the internet and have provided you with appropriate answers. Take a look at these questions to see if they interest you.
1. Why does my computer go to a black screen after logging in?
As we also mentioned in the guide, several factors may lead to this situation. It may be the improperly plugged monitor cables or the outdated graphics driver causing the black screen. Some third-party services may interfere with Windows startup and contribute to the issue. Or else, it may be any damaged system files that need to be repaired or restored.
2. How do I fix Windows 11 no login screen?
To fix the Windows 11 no login screen issue, you can follow the instructions:
Press Ctrl+Alt +Delete to open the Security Options screen, then press Esc to view your desktop. If the issue persists, press Win+Ctrl+Shift+B. You may notice your screen flash a few times, but it's a normal behavior and should help you eliminate the black screen.
3. What causes a black screen before login?
Improperly connected cables, outdated or corrupted graphics drivers, faulty hardware components, or any conflicting third-party services may disrupt the boot process and cause a black screen before login.
How Can We Help You
About the Author
Updated by Joey Albert
Joey is an enthusiast of science and technology. With a passion for uncovering the latest tech innovations, she creates clear, engaging how-to guides that make technology accessible and enjoyable for all.
Sherly joined EaseUS in 2022 and she has always loved writing articles and enjoys the fun they bring. She receives professional training here, focusing on product performance and other relative knowledge. She has written over 200 articles to help people overcome computing issues.
Product Reviews
-
I love that the changes you make with EaseUS Partition Master Free aren't immediately applied to the disks. It makes it way easier to play out what will happen after you've made all the changes. I also think the overall look and feel of EaseUS Partition Master Free makes whatever you're doing with your computer's partitions easy.
Read More -
Partition Master Free can Resize, Move, Merge, Migrate, and Copy disks or partitions; convert to local, change label, defragment, check and explore partition; and much more. A premium upgrade adds free tech support and the ability to resize dynamic volumes.
Read More -
It won't hot image your drives or align them, but since it's coupled with a partition manager, it allows you do perform many tasks at once, instead of just cloning drives. You can move partitions around, resize them, defragment, and more, along with the other tools you'd expect from a cloning tool.
Read More
Related Articles
-
Blue Screen While Playing Games? 2026 Fixes Here
![author icon]() Sherly/2026/01/29
Sherly/2026/01/29 -
How to Fix RunDll Error on Startup [Step-by-step]
![author icon]() Cici/2026/01/29
Cici/2026/01/29 -
How Do I Clone HDD to SSD in Windows 11 and Make It Bootable? 2026 Complete Guide
![author icon]() Tracy King/2026/01/29
Tracy King/2026/01/29 -
5 Best HDD Benchmark Tools Recommend in 2026 [100% Working]
![author icon]() Tracy King/2026/01/29
Tracy King/2026/01/29
Hot Topics
EaseUS Partition Master

Version 20.0 is here - full exFAT support, easier disk partitioning, and PC performance optimization.


