
Content
Page Table of Contents
About the Author
Hot Topics
- How to Speed Up an SSD without Upgrading
- Essential SSD Optimization Steps Every User Should Check First
- OS-Level SSD Optimization (Windows and macOS)
- Hardware, BIOS, and Firmware Tweaks to Unlock Full SSD Speed
- Advanced SSD Optimization and Performance Monitoring
- Long-Term SSD Performance Maintenance Best Practices
- FAQ About SSD Performance and Optimization
Why do SSDs slow down? What does optimization really mean? Many users assume that when an SSD feels slower, it must be aging or failing. In reality, most SSD performance issues have nothing to do with hardware damage. They are caused by how the operating system manages storage over time. Before jumping into solutions, it is important to understand why SSDs slow down.
|
Common causes include write amplification, inefficient garbage collection, insufficient free space, background services, and power or firmware limitations. (Conclude from r/buildapc on Reddit) |
This guide focuses on restoring expected performance and maintaining peak speed, not on unrealistic "boosts." Everything below works without upgrading your SSD or buying new hardware.
How to Speed Up an SSD without Upgrading
Before diving into specific fixes, it helps to understand where SSD performance actually comes from. Unlike traditional hard drives, SSD speed is influenced by multiple layers working together, not just the drive itself. In practical terms, speeding up an SSD without upgrading hardware means optimizing three core areas: system configuration, operating system behavior, and hardware-level settings.
Understanding this structure will help you apply the right fixes and avoid changes that either do nothing or make things worse.
The Three Main Ways to Speed Up an SSD (Without Replacing It)
| Ways | Details |
|---|---|
| 1. System & Usage-Level Optimization (User-Controlled) |
|
| 2. Operating System Optimization (Windows & macOS Behavior) |
|
| 3. Firmware, BIOS, and Hardware Configuration |
|
It is equally important to set realistic expectations.
SSD optimization cannot:
- Turn a SATA SSD into an NVMe drive
- Exceed the physical limits of the interface (SATA, PCIe 3.0, etc.)
- Fix failing NAND or worn-out flash memory
What SSD optimization can do is:
- Restore lost performance
- Eliminate unnecessary latency
- Maintain peak speed over time
- Extend usable lifespan
In other words, the goal is performance consistency and efficiency, not artificial benchmarks. Now, let's get started.
Essential SSD Optimization Steps Every User Should Check First
Before diving into advanced system tweaks, it is critical to start with the fundamentals. These checks address the most common misconfigurations and account for the majority of real-world SSD slowdowns.
If you only follow one section of this guide, make it this one.
1. Is TRIM Enabled on Your SSD?
TRIM is the foundation of long-term SSD performance. Without it, even the fastest SSD will gradually slow down. TRIM allows the operating system to inform the SSD which data blocks are no longer in use, enabling efficient garbage collection and preventing unnecessary write amplification.
How to check TRIM on Windows
- Open Command Prompt as Administrator
- Run: fsutil behavior query DisableDeleteNotify
- A result of 0 means TRIM is enabled
How to enable TRIM on macOS (Refer to BestReviews)
- Apple SSDs: enabled by default
- Third-party SSDs: sudo trimforce enable
If TRIM is disabled, no other optimization will deliver consistent results. Learn more about TRIM and SSDs in this Reddit post:
Should I turn SSD Trim on in the scheduler? If so, how frequently? I have only 2 SSDs in a mirrored pool on my build.
byu/NicoleMay316 inunRAID
2. Update Storage-Related Drivers (Not Just the SSD Driver)
Once TRIM is confirmed, the next bottleneck often lies outside the SSD itself. Many users overlook that SSD performance depends heavily on:
- Chipset drivers
- SATA or NVMe storage controller drivers
- Intel RST or AMD storage drivers (if used)
Outdated drivers can introduce latency, unstable transfer speeds, or reduced NVMe throughput. Always update drivers directly from your motherboard or system manufacturer, not only from Windows Update.
3. Disable HDD-Oriented Optimizations (Without Hurting SSD Usability)
Modern operating systems still include legacy features designed for hard drives. While some are harmless, others quietly add unnecessary writes.
Check scheduled optimization
- Open Optimize Drives
- Ensure your SSD is optimized via TRIM, not traditional defragmentation
- Fine-tune Windows Search Indexing
Instead of disabling indexing entirely:
- Exclude large, constantly changing folders (Downloads, VM files, caches)
- Keep indexing for documents and system files
This approach preserves fast search results while minimizing background write activity.
4. Free Up Disk Space to Restore SSD Performance
SSD controllers rely on free blocks to maintain speed. When an SSD is nearly full, performance degradation is unavoidable.
Best practice
- Keep at least 10–20% free space
- Avoid sustained usage above 85–90%
Helpful tools
Windows Storage Sense
macOS Storage Management
EaseUS Partition Master (Both for Mac and Windows)
EaseUS Partition Master can directly extend the C drive with/without unallocated space. It works smoothly on Windows 11/10/8/7. For beginners, it's easy to use, helps locate what is taking up the most disk space, and one click free up space on the target SSD.
5. Reduce Startup Apps and Background Disk Activity
Even with a healthy SSD, excessive background programs can create constant random reads and writes.
Use:
- Windows Task Manager > Startup
- macOS Login Items
Disabling non-essential startup apps reduces boot time, system latency, and SSD I/O pressure.
If these basic checks helped you identify a real performance issue, consider sharing this guide. Many SSD slowdowns are caused by simple settings most users never think to check.

OS-Level SSD Optimization (Windows and macOS)
Once the fundamentals are in place, operating system behavior becomes the next performance limiter. This section focuses on OS-level tuning that affects how aggressively your system accesses the SSD.
Windows SSD Optimization Settings That Matter
1. Switch to High Performance Power Plan
Balanced power plans may throttle PCIe and NVMe devices to save energy.
- Control Panel > Power Options > High Performance
This reduces NVMe latency and prevents aggressive link power management.
2. Disable SysMain (Superfetch) on SSD Systems
SysMain was designed to improve HDD performance. On SSDs, it offers little benefit and can generate unnecessary background writes.
- Open Services
- Disable SysMain
3. Optimize Virtual Memory (Page File) Based on Your Setup
There is no universal "best" page file setting.
Options include:
- Default system-managed on SSD (best stability)
- Fixed size to avoid resizing overhead
- Moving to HDD to reduce SSD writes (with performance trade-offs)
Avoid disabling the page file entirely unless you fully understand the risks.
4. Disable Hibernation to Reclaim SSD Space
Hibernation creates a large system file that may consume several gigabytes. You can type the command line in Command Prompt to disable it:
- powercfg /hibernate off
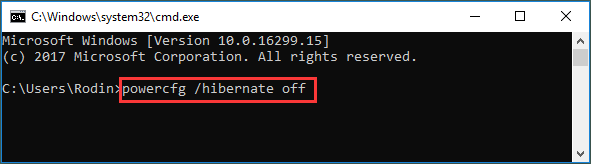
This instantly frees space and reduces write activity on system SSDs.
macOS SSD Optimization (Commonly Missed)
1. Reduce Spotlight Indexing Pressure
Exclude folders with frequent file changes while keeping Spotlight enabled for normal use.
2. Manage Time Machine Local Snapshots
Local snapshots can silently consume SSD space.
- tmutil listlocalsnapshots /
- tmutil deletelocalsnapshots
3. Disable Hibernation and Remove Sleep Image
- sudo pmset -a hibernatemode 0
- sudo rm /var/vm/sleepimage
This step alone can reclaim multiple gigabytes on macOS systems. If you found macOS or Windows tweaks here that you hadn't seen elsewhere, sharing this article can help others avoid unnecessary SSD upgrades.
Hardware, BIOS, and Firmware Tweaks to Unlock Full SSD Speed
If software optimizations are complete but performance still falls short, the limitation may exist at the firmware or hardware configuration level.
1️⃣Check BIOS/UEFI Storage Settings
- SATA SSDs: Confirm AHCI mode
- NVMe SSDs: Verify correct PCIe detection
Advanced users
- Review PCIe power management or ASPM settings
- Lower latency improves performance but may increase power usage
2️⃣Verify Physical Connections
For SATA SSDs
- Use native SATA 6 GB/s ports
- Replace low-quality cables
For NVMe SSDs
- Install in a PCIe x4-capable M.2 slot
- Avoid chipset-limited slots when possible
3️⃣Update SSD Firmware Using Official Tools
Firmware updates often fix:
- Performance inconsistencies
- Stability issues
- Compatibility bugs
Always use manufacturer utilities such as Samsung Magician, Kingston SSD Manager, or Crucial Storage Executive.
Advanced SSD Optimization and Performance Monitoring
This section is designed for advanced users who want finer control, long-term performance stability, and clear visibility into what is actually happening at the disk level. The following techniques focus on sustained performance, diagnostics, and bottleneck identification, rather than one-time speed boosts.
✔️Enable Over-Provisioning for Sustained Performance
Over-provisioning reserves unused space to improve:
- Write consistency
- Garbage collection
- Drive endurance
This can be configured via manufacturer tools or partition managers.
✔️Check Partition Alignment (Mostly for Cloned Systems)
Modern OS installations align partitions automatically. This step matters mainly after disk cloning or legacy upgrades. EaseUS Partition Master can help improve SSD performance after cloning by 4K alignment.
Here is how:
Step 1. Go to "Toolkit" and choose "4K Alignment".
Step 2. Select the disk you want to align. Click the "Start" button.
✔️Diagnose SSD Bottlenecks with Monitoring Tools
Running health monitoring and performance testing helps determine whether slowdowns are caused by disk health issues, insufficient free space, misaligned partitions, or continuous background I/O. EaseUS Partition Master offers Disk Health and DiskMark features, allowing users to check SSD health status and test SSD read/write speed.
- Free
- Support macOS and Windows.
- A portable version is available.
- Manage disk space smartly for SSDs.
- Support SSD health check and speed test.
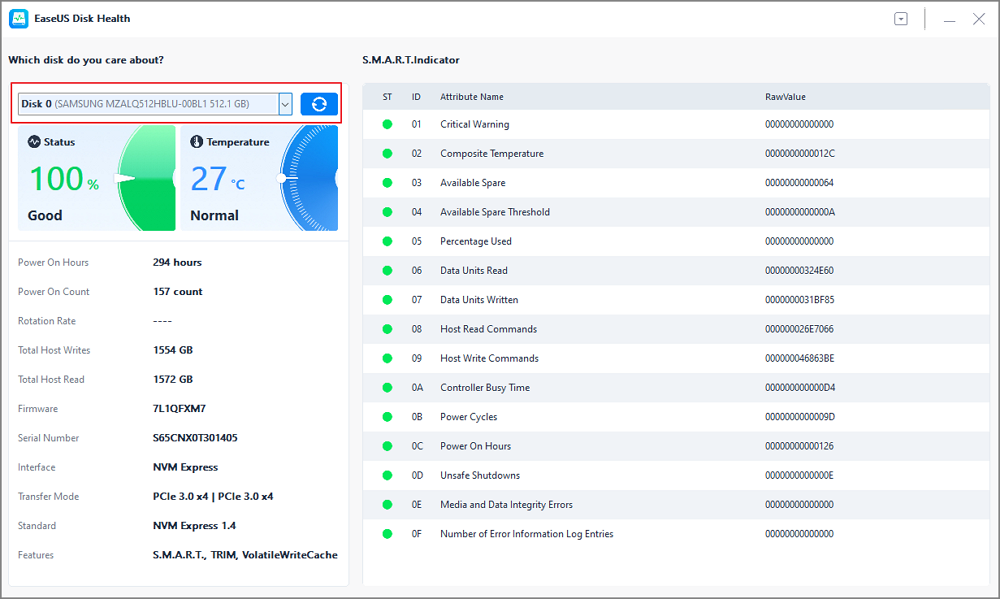
Run an SSD health check:
Step 1. Launch EaseUS Partition Master and click the blue arrow to activate the "Disk Health" feature under the "Discovery" section.
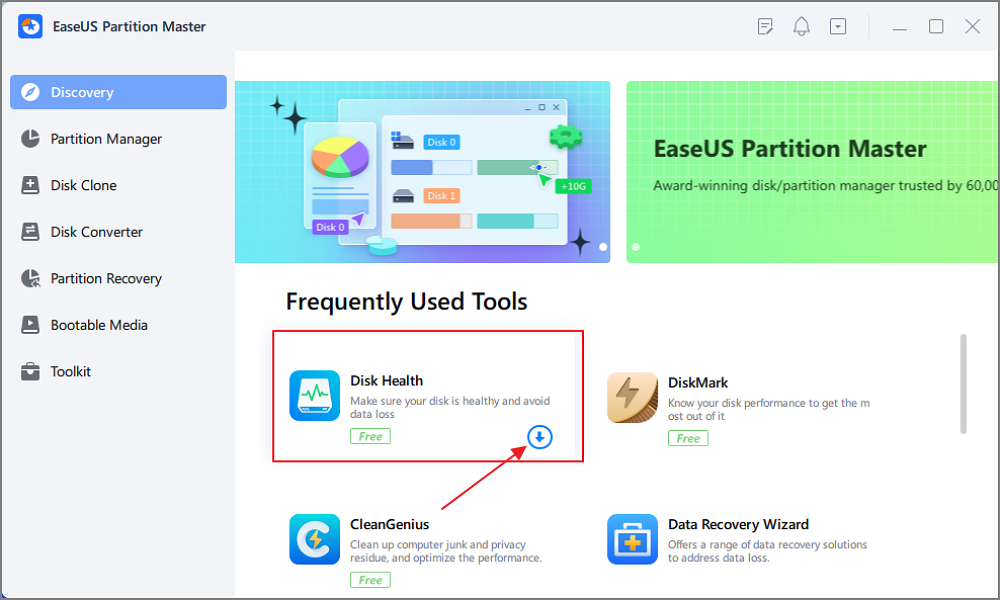
Step 2. Select the target disk and click the "Refresh" button. Then, you can see the health condition of your disk.
Run an SSD speed test with EaseUS Partition Master:
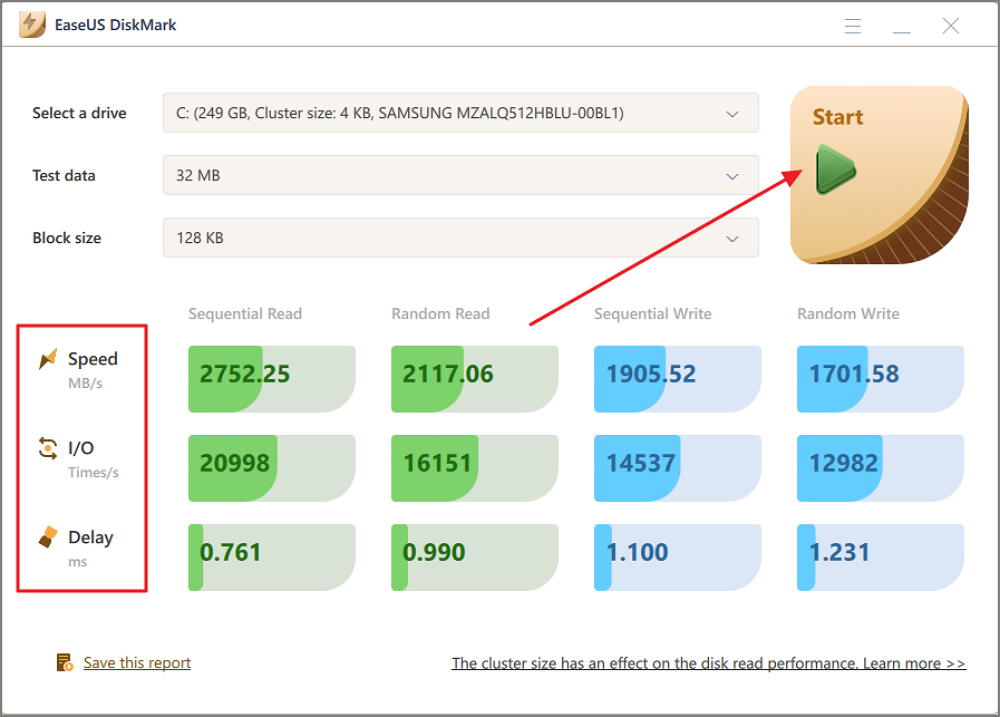
Step 1. Launch EaseUS Partition Master. And click the download button to activate the "DiskMark" feature under the "Discovery" section.
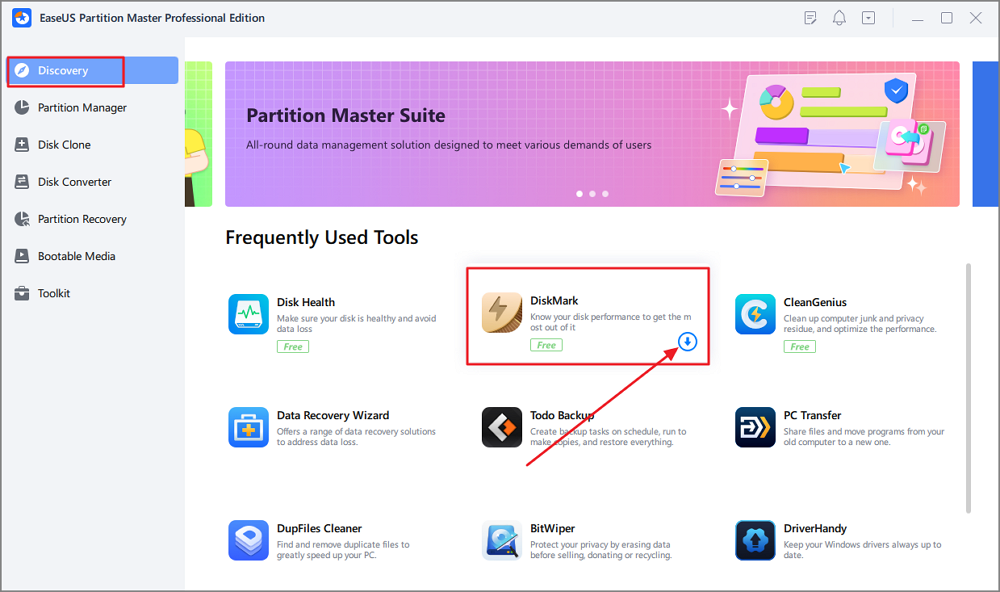
Step 2. Click on the drop-down box to choose the target drive, test data, and block size.
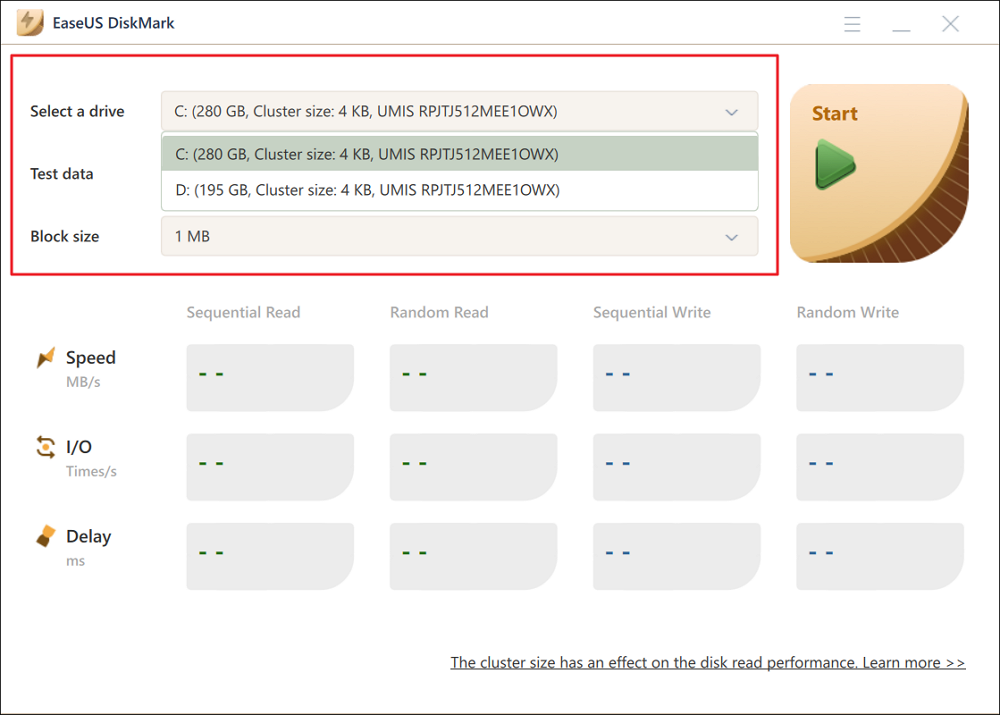
Step 3. Once everything is configured, click "Start" to begin the disk test. Then, you can see the Sequential or Random read/write speed, I/O, and Delay data.
If this section helped you pinpoint the exact cause of SSD slowdowns, sharing it can save others hours of guesswork and unnecessary upgrades.
Long-Term SSD Performance Maintenance Best Practices
Optimization is not a one-time task. Long-term performance depends on consistent habits.
- Avoid running SSDs near full capacity
- Reduce unnecessary continuous writes
- Relocate browser cache or temp folders if possible
- Ensure proper cooling for NVMe SSDs
- Perform quarterly checks:
- Free space
- Drive health
- Firmware and driver updates
Conclusion
Speeding up an SSD without upgrading is not about tricks or myths. It is about correct initial configuration, informed system tuning, and disciplined long-term maintenance.
- Most users achieve 90% of real-world gains by completing Parts 1 and 2
- Advanced users can extract the remaining performance through firmware tuning and diagnostics
A properly optimized SSD should remain fast, responsive, and reliable for years without replacement.
FAQ About SSD Performance and Optimization
1. Does an SSD slow down as it gets older?
SSDs do not slow down simply due to age. Performance degradation is usually caused by insufficient free space, disabled TRIM, background write activity, or outdated drivers.
2. Should I defragment an SSD to make it faster?
No. Traditional defragmentation is unnecessary and potentially harmful for SSDs. SSDs rely on TRIM and internal wear leveling instead.
3. How much free space should I keep on an SSD?
Ideally, keep 10–20% free space. Running an SSD close to full capacity can significantly reduce write performance.
4. Is disabling SysMain safe for SSDs?
Yes. SysMain provides minimal benefit on SSD systems and disabling it can reduce unnecessary background disk activity.
5. Can firmware updates really improve SSD performance?
Yes. Firmware updates often include performance optimizations, bug fixes, and stability improvements that are not achievable through software tweaks alone.
How Can We Help You
About the Author
Sherly joined EaseUS in 2022 and she has always loved writing articles and enjoys the fun they bring. She receives professional training here, focusing on product performance and other relative knowledge. She has written over 200 articles to help people overcome computing issues.
Product Reviews
-
I love that the changes you make with EaseUS Partition Master Free aren't immediately applied to the disks. It makes it way easier to play out what will happen after you've made all the changes. I also think the overall look and feel of EaseUS Partition Master Free makes whatever you're doing with your computer's partitions easy.
Read More -
Partition Master Free can Resize, Move, Merge, Migrate, and Copy disks or partitions; convert to local, change label, defragment, check and explore partition; and much more. A premium upgrade adds free tech support and the ability to resize dynamic volumes.
Read More -
It won't hot image your drives or align them, but since it's coupled with a partition manager, it allows you do perform many tasks at once, instead of just cloning drives. You can move partitions around, resize them, defragment, and more, along with the other tools you'd expect from a cloning tool.
Read More
Related Articles
-
How to Set SSD as Boot Drive [2026 Updated]
![author icon]() Jean/2026/06/30
Jean/2026/06/30 -
How to Format SD Card to NTFS on Android and PC [2026 Step-by-Step Guide]
![author icon]() Tracy King/2026/06/29
Tracy King/2026/06/29 -
Clone USB to USB for Free with Simplest Tutorial Guide
![author icon]() Tracy King/2026/06/17
Tracy King/2026/06/17 -
How to Downgrade and Rollback Windows 11 24H2 | Safe & Fast
![author icon]() Cici/2026/06/30
Cici/2026/06/30


