Page Table of Contents
About the Author
Hot Topics
Updated on Jan 29, 2026
Can the deleted partition be recovered on Windows 11? Yes, you can recover the deleted partition on Windows 11. After deleting a partition, it will be marked as invisible in Windows Explorer. In fact, the data in this partition is not immediately deleted from the hard disk but is marked as rewritable space. EaseUS provides you with four methods to recover deleted space on Windows 11 to avoid data loss.
How to Recover Deleted Partition in Windows 11
In this section, four methods to recover Windows 11 partition will be explained. Check out the step-by-step instructions below.
Method 1. Recover Deleted Partition on Windows 11 - No Data Loss
How to recover deleted hard drive partition in Windows 11? One of the most comprehensive and user-friendly solutions is to use EaseUS Partition Master Professional. It can recover accidentally deleted partitions in one click without losing data. Moreover, it does not require you to have any computing knowledge, which means you can undelete the deleted partitions on Windows 11 without knowing any possible causes. EaseUS Partition Master works smoothly on all Windows versions.
Download EaseUS Partition Master and follow the steps to recover a Windows 11 deleted partition:
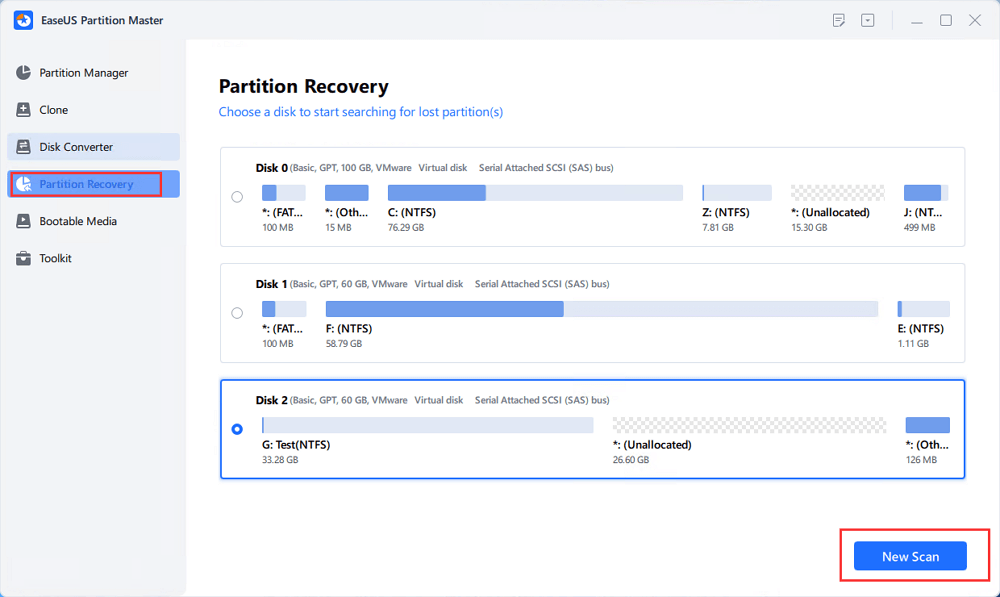
Step 1. Open EaseUS Partition Master and click "Partition Recovery". Select the target disk with your lost partition and click "New Scan".

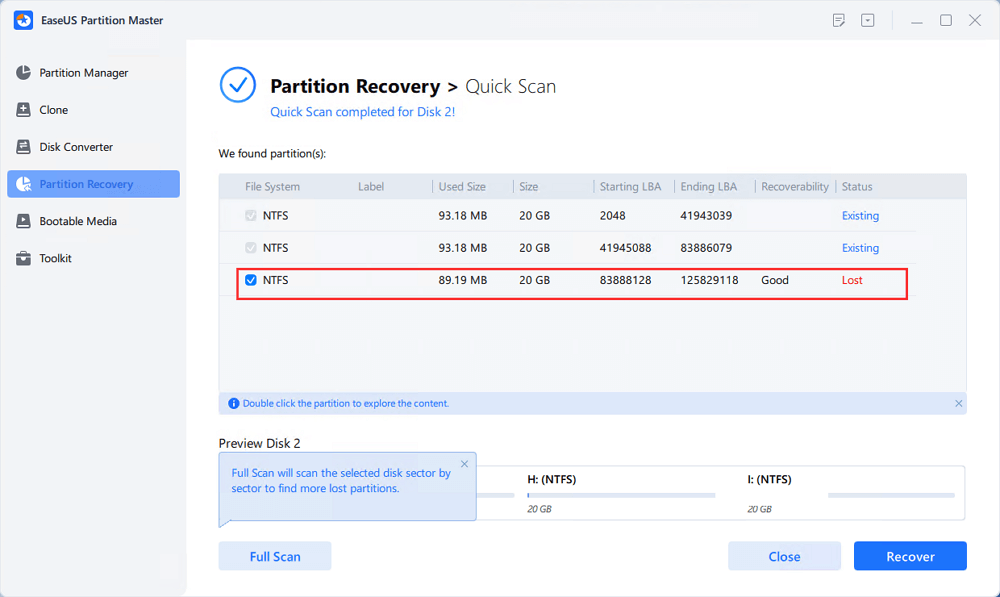
Step 2. Wait patiently to let the software execute "Quick Scan" and "Full Scan" operation. It will mark your deleted partition as "lost" as the Status section. Select the lost partition, and click "Recover".

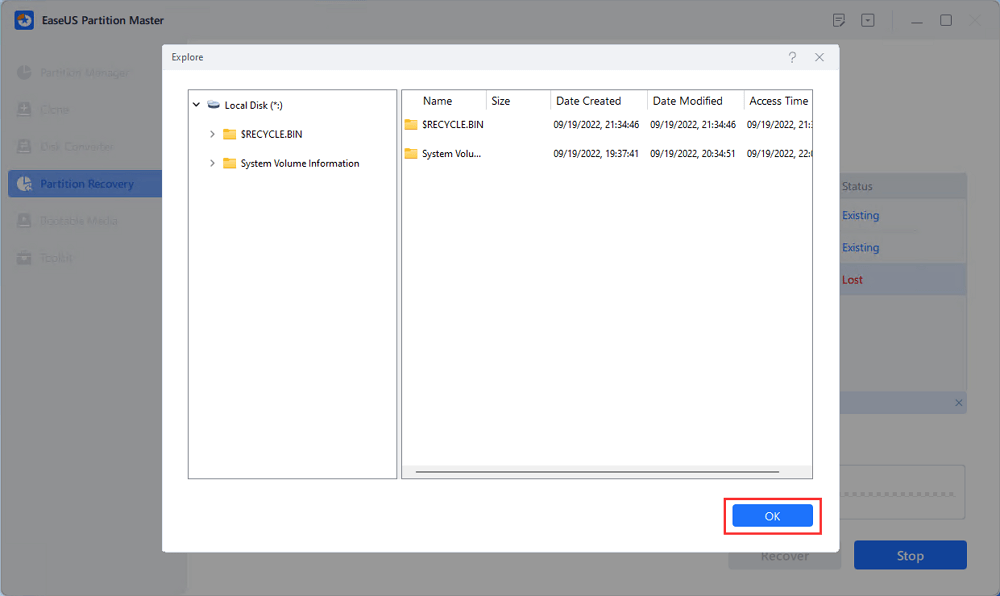
You can also double click on the partition you're looking for to preview its content and click "OK" to confirm.

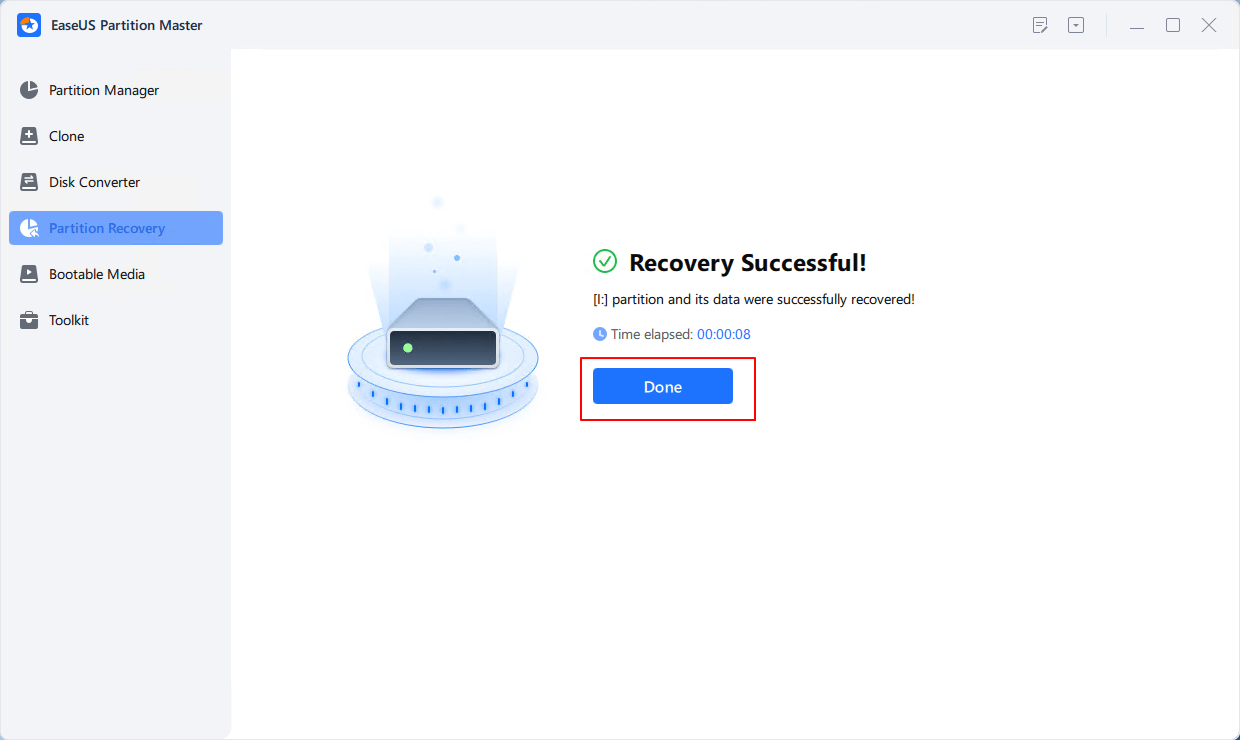
Step 3. Wait patiently and click "Done" when the partition recovery process completes.

As a professional disk management software, EaseUS Partition Master allows users to create partitions using unallocated space, delete partitions, merge partitions, and split partitions.
Method 2. Assign a New Drive Letter
You can use two ways to assign a new drive letter to the deleted partition to make it show up again in Disk Management. Follow the 2 guides to try.
Guide 1. Use EaseUS Partition Master
You can try to recover a deleted or lost partition on Windows 11 by assigning a drive letter to the deleted partition. But note that this method is only effective when the partition loss problem occurs due to the loss of drive letter and partition name.
EaseUS Partition Master can help with this. Here is how:
Step 1. Run EaseUS Partition Master, right-click the target partition, and choose "Change Drive Letter".
Step 2. In the new window, click the down arrow and choose a drive letter for the partition from the drop-down menu, then click "OK".
Step 3. Click the "Execute 1 Task(s)" button in the top-left corner, check the changes, and click "Apply" to change the drive letter of the selected partition.
Guide 2. Use Command Prompt
You can also use Command Prompt to assign a new drive letter. Follow these steps:
Step 1: Find the lost partition in Windows 11 Disk Management. (Deleted partitions will be marked as "Unallocated" in Disk Management). Open Disk Management and locate the deleted partition and remember the size of the partition.
Step 2: Type cmd in the Windows 11 search box, then right-click "Command Prompt" and click "Run as administrator."
Step 3: In CMD, type the following command lines and press Enter after each line to execute them:
- diskpart
- list disk
- select disk 0 (0 represents the number of the disk where the partition is missing)
- list volume
- select volume 1 (1 stands for the number of the lost partition)
- assign letter=f (you can replace f with other drive letters)

After these commands, you can open File Explorer to see if you can find the deleted or lost partition. If these methods help, share this article to help more users.
Method 3. Use TestDisk
You can use TestDisk to recover deleted partitions. It is a free data recovery tool that can be used to recover deleted partitions. However, it lacks a GUI, and for users without computer experience, recovering deleted partitions is a difficult and dangerous task.
Step 1. Install and launch TestDisk
Launch TestDisk, click [Create], select the disk where the partition is lost, select the partition table type, and then select [Analyze]. Then, directly select [Quick Search] in the new window to continue.

Step 2. Search for partitions
Wait for the analysis process to complete. TestDisk may display some warnings. You can just click "Continue". Then you will get the scan results, which are shown below. Existing partitions and lost partitions are listed.

Step 3. Find the deleted partition
You can check if the lost partition is listed by its start and end location. Alternatively, you can highlight the partition and press "p" to check the files in that partition. In this way, you can determine if the partition is the one you want to recover.
Step 4. Recover deleted partitions
If all partitions are available and the data is listed correctly, press Enter to continue. Then select [Write] to save the partition structure. After that, the lost partition will be restored quickly. You need to open the Disk Management tool to add a drive letter to the partition.
After that, you can use the partition as usual.
Method 4. System Restore
System Restore is an embedded feature in Windows 11/10 that allows you to create a snapshot of your computer's current working state and save it as a restore point. When you want to recover a partition that was accidentally deleted, you can perform a system restore on Windows 11. However, this method will change all your previous settings and changes, which may cause data loss.
Step 1: Enter "Create a restore point" in the search bar of Windows 11 and select System Restore.
Step 2: Click System Restore in the System Properties window. Then, off-season, the "Next" button continues.

Step 3: In the next window, select a restore point (before you delete the partition) and click "Next."
Step 4: Confirm the disk to be recovered and click Next.
Step 5: You can view the specific applications that will be removed after recovery by clicking on the "Scan for affected programs" link. After confirming that everything is correct, click "Finish" to end the process.
You will then see a warning window stating that System Restore cannot be interrupted once started. Click "Yes" and wait for the recovery process to complete. Once the process is over, you will be able to see and access the partition that previously disappeared.
Why Partitions Are Lost on Windows 11?
Partitions on your computer can be lost for various reasons. A common cause is accidental deletion. Other factors such as hard drive corruption, virus attacks, malware activity, improper system shutdown, hard drive corruption, excessive bad sectors, power surge, improper formatting, corrupted partition table, and incorrect partitioning can also cause Windows 11 partition deletion.
Share this article and let more users know about the reasons why they try to recover a deleted partition on Windows 11.
Conclusion
Accidentally deleting a partition on Windows 11 is not the end of the world. There are many ways to help recover accidentally lost partitions and rescue data. This article discusses four methods to recover deleted partitions. Among them, EaseUS Partition Master is the most powerful partition management software. It can not only recover the deleted partitions but also check disk health to prevent partition loss caused by too many bad sectors or other hard disk health problems.
Here are some other topics related to deleted partitions recovery; check them to learn more details if you need them.
Undelete Windows 11 Deleted Partitions FAQs
Do you know how to recover a partition on Windows 11 now? Check the following related questions and answers to get more details.
1. Can deleted partitions be recovered?
Sure. If a partition is deleted and the space on the disk becomes Unallocated. You can scan the space to find deleted partition and retrieve data from it or even restore it back.
2. How do you make a recovery partition for Windows 11?
To create a recovery drive on Windows 11, follow these steps
- Search for Create a recovery drive in Windows 11 search box and then select "Create a recovery drive." At this moment, you might be asked to enter the admin password or confirm your choice.
- When the program opens, make sure "Back up system files to the recovery drive" option is selected and then click Next.
- Connect a USB drive to the Windows 11 PC, select it, and then select Next.
- Select Create. Since there are many files to be copied to the recovery drive, it might take a while.
3. How do I recover a deleted drive in Windows 11?
If you have created a system restore point on Windows 11 before, things will become easier. The following steps can perform system restore. By doing this, you can recover deleted Windows 11 partition.
Step 1: Enter "Create Restore Point" in the search bar and click on this option from the search results.
Step 2: Click on the System Restore option in the System Properties window.
Step 3: In the System Restore window, click the "Next" button to continue.
Step 4: Select your desired restore point in the next window and click Next.
Step 5: Confirm the disk to be recovered and click Next.
Step 6: You can view the specific applications that will be removed after recovery by clicking on the "Scan for affected programs" link. After confirming that everything is correct, click "Finish" to end the process.
Step 7: You will see a warning window stating that the system restore cannot be interrupted once started. Click "Yes" and wait for the system restore to complete. Once the process is over, you will see the lost partition again.
How Can We Help You
About the Author
Sherly joined EaseUS in 2022 and she has always loved writing articles and enjoys the fun they bring. She receives professional training here, focusing on product performance and other relative knowledge. She has written over 200 articles to help people overcome computing issues.
Product Reviews
-
I love that the changes you make with EaseUS Partition Master Free aren't immediately applied to the disks. It makes it way easier to play out what will happen after you've made all the changes. I also think the overall look and feel of EaseUS Partition Master Free makes whatever you're doing with your computer's partitions easy.
Read More -
Partition Master Free can Resize, Move, Merge, Migrate, and Copy disks or partitions; convert to local, change label, defragment, check and explore partition; and much more. A premium upgrade adds free tech support and the ability to resize dynamic volumes.
Read More -
It won't hot image your drives or align them, but since it's coupled with a partition manager, it allows you do perform many tasks at once, instead of just cloning drives. You can move partitions around, resize them, defragment, and more, along with the other tools you'd expect from a cloning tool.
Read More
Related Articles
-
How to Fix Current Read-Only State Yes [Tested & Safe Ways]
![author icon]() Jean/2026/01/29
Jean/2026/01/29 -
How to Format SD Card to FAT32 Successfully? [2026]
![author icon]() Daisy/2026/01/29
Daisy/2026/01/29 -
Top 5 Free Disk Formatter Recommend for Windows & Mac
![author icon]() Tracy King/2026/01/29
Tracy King/2026/01/29 -
How to Reset PIN on Windows 10 | 3 Quick Ways
![author icon]() Sherly/2026/01/29
Sherly/2026/01/29
Hot Topics
EaseUS Partition Master

Version 20.0 is here - full exFAT support, easier disk partitioning, and PC performance optimization.


