
Content
Page Table of Contents
About the Author
Hot Topics
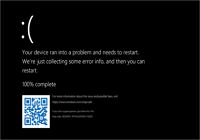
Errors like the Blue Screen of Death or the Black Screen of Death may be familiar to you. Then, have you encountered a yellow screen of death error that says, "Your PC ran into a problem and needed to restart. We're just collecting some error info, and then we'll restart for you" when you started your Windows 10 computer? If yes, you cannot enter the Windows until the process is 100% complete. Take it easy. EaseUS will provide 5+ solutions to help you repair this error.
What Caused the Yellow Screen of Death in Windows 10?
ASP.NET is an open-source web that web developers use on Windows OS to create web pages. And the yellow screen of death usually happens after the ASP.NET web application crashes or encounters issues. We have listed some other potential reasons that may cause this issue:
- Outdated or faulty drivers
- Corrupted file system
- Software/applications incompatibility
- Windows 10 updates issues
After going through the main reasons for this error, let's delve into the seven methods to help you identify and resolve the yellow screen of death error. Click the buttons below to share this excellent post that contains seven reliable solutions for the yellow screen of death error on your social media:
How to Fix the Yellow Screen of Death - 7 Ways
In this section, we will introduce seven frequently used solutions for the yellow screen of death with detailed information and a comprehensive guide. Now, let's check out the list of these methods:
- Way 1. Perform Boot Repair
- Way 2. Boot in Safe Mode
- Way 3. Update Driver/Reinstall Driver
- Way 4. Run Windows 10 Update/Restore Windows System
- Way 5. Use Clean Boot
- Way 6. Perform Automatic Repair
- Way 7. Rebuild MBR
Way 1. Perform Boot Repair - EaseUS Partition Master
When it comes to fixing boot issues or screen of death errors, EaseUS Partition Master is the best choice. It offers a "Boot Repair" tool, a one-click solution for various startup problems, including the blue/black/green/white screens of death. In addition, this user-friendly software doesn't require complicated operations.
Below is a full how-to-do guide with quick steps:
- Preparation
- Since you cannot boot from this Windows computer, you need to prepare one healthy Windows computer and a USB to create bootable media.
Step 1. Start EaseUS Partition Master after connecting the external drive/USB to your computer, go to "Bootable Media," and click "Create bootable media."

Step 2. Select an available USB Drive or CD/DVD and click "Create." You can also burn the Windows ISO file to the storage media.

Step 3. Connect the created bootable drive to the new computer and reboot the computer by pressing and holding F2/Del to enter the BIOS. Then, set the WinPE bootable drive as the boot disk and press F10 to exit.
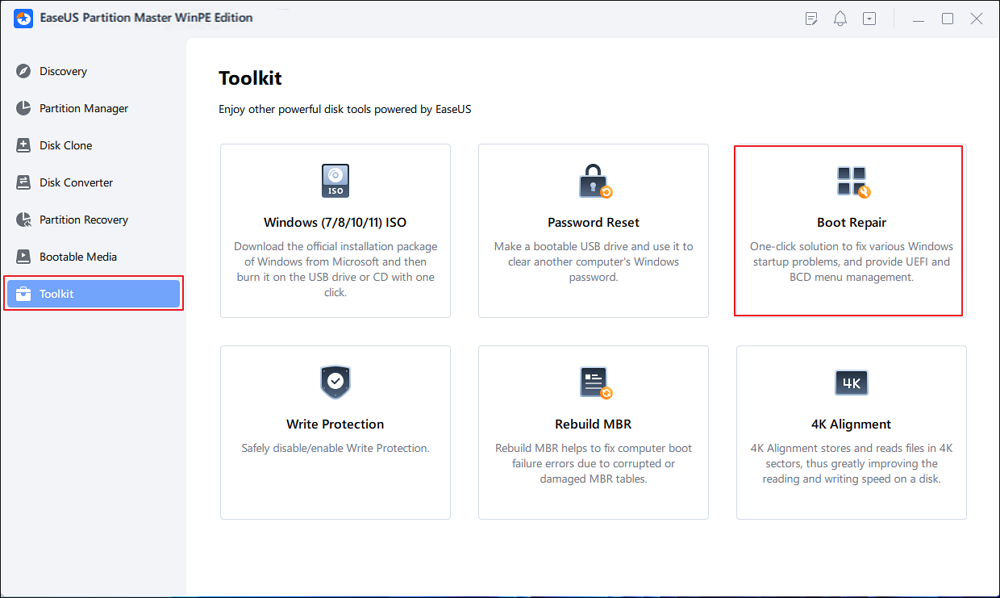
Step 4. Boot the computer again and enter the WinPE interface. Then, open EaseUS Partition Master and click "Boot Repair" under the "Toolkit" option.
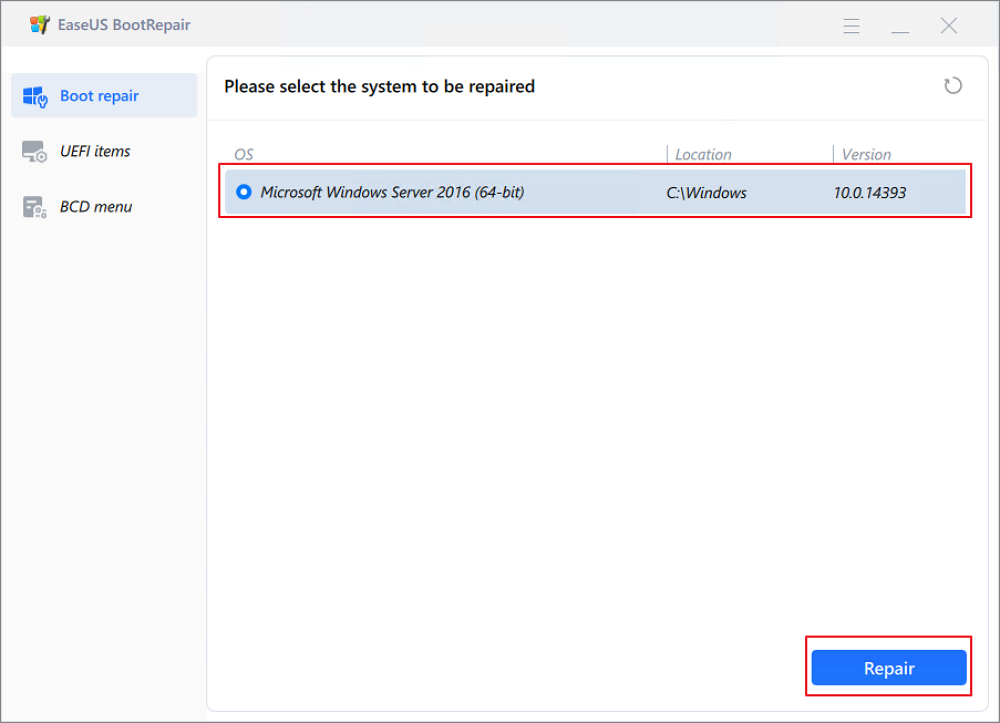
Step 5: Select the system you want to repair and click "Repair."
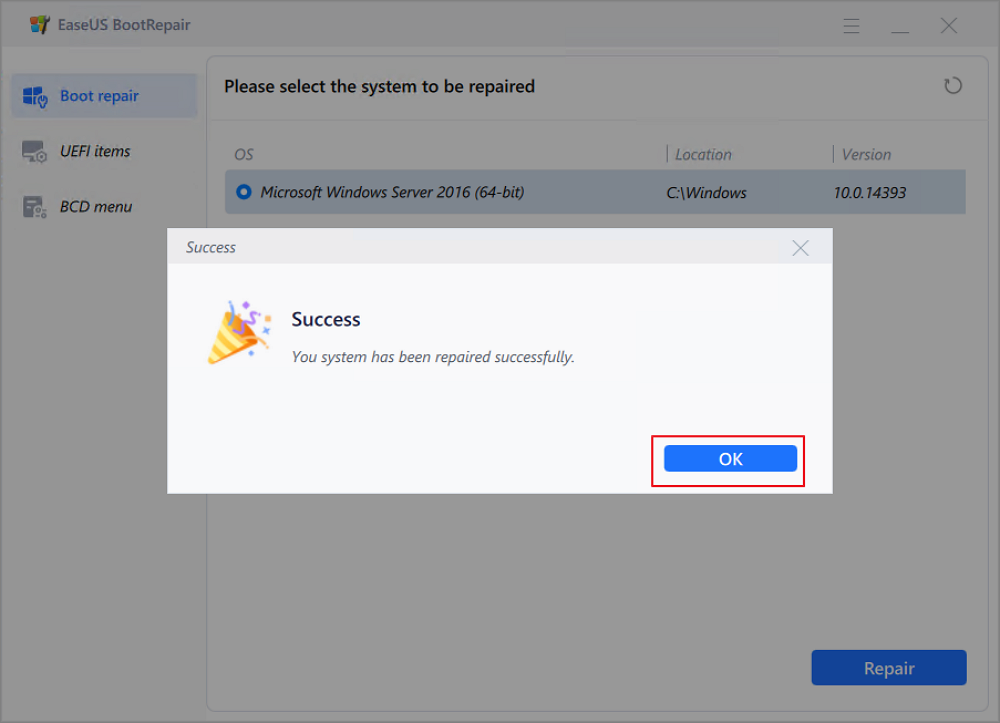
Step 6. Wait a moment, and you will receive an alert that the system has been successfully repaired. Click "OK" to complete the boot repair process.
More Valuable Features of EaseUS Partition Master
Beyond resolving the yellow screen of death, EaseUS can also apply to the scenarios below:
- Fix Lenovo Laptop Stuck in Boot Loop.
- Fix Windows 10 BSOD effectively.
- Fix disk boot failure in Windows 10.
- Resolve Windows 11/10/8/7 cannot boot from SSD.
- Fix Green Screen of Death on Windows PC
Don't let these boot failures or startup errors ruin your experience with Windows computers. Begin a new life today!
Way 2. Boot in Safe Mode
One frequently used solution to the yellow screen of death is to reboot your Windows in safe mode. Follow the steps carefully to do that:
Step 1. Power up (hold the Start button for 10 seconds) and power down your Windows computer three times. And on the third time, it will enter the Advanced Recovery environment.
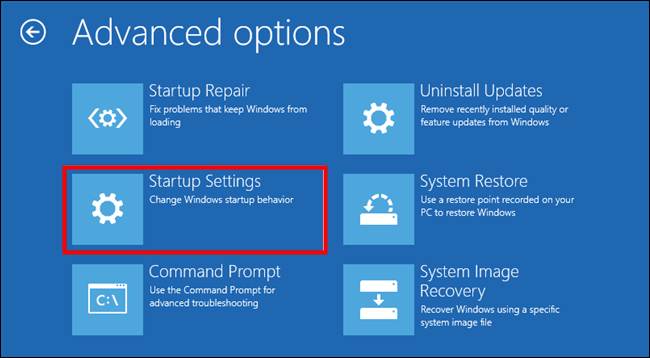
Step 2. Select "Troubleshooting" > "Advanced Options" >"Startup Settings" > "Restart."
Step 3. After restarting, there will be several options. Choose four or press F4 to boot your computer in safe mode.
Way 3. Update Driver/Reinstall Driver
The main reason for such screen-of-death errors is outdated or faulty graphic drivers. Therefore, the third way you should try to update or reinstall the driver.
Option 1. Update the Driver
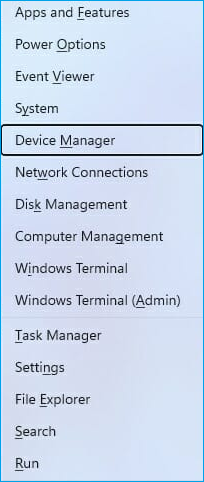
Step 1. Locate the start icon and select "Device Manager."
Step 2. Choose "Display adapters" to expand the option and locate "Update driver."
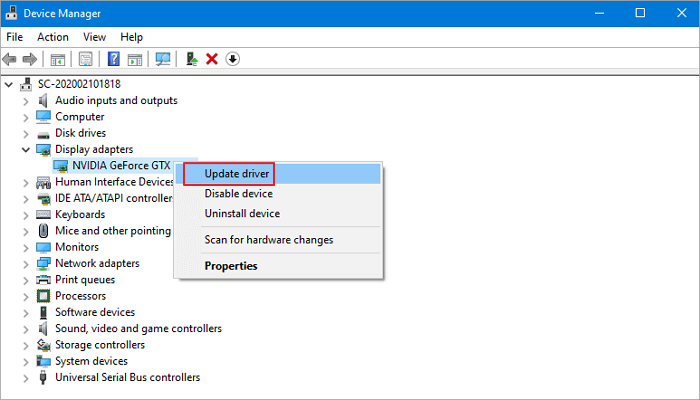
Step 3. Select the "Search automatically for drivers" option to find and update the latest driver.
Option 2. Reinstall the Driver
If you can't find the available updates or updating the driver still does not work, you can delete the driver and perform reinstallation. Here is how to do it:
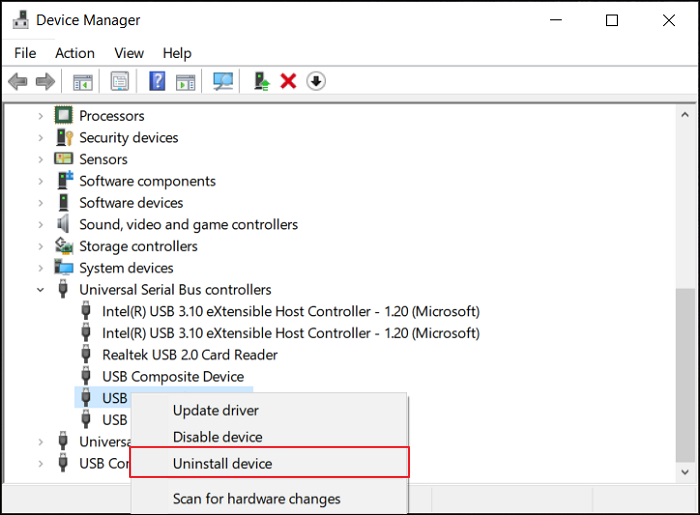
Step 1. In Device Manager, right-click the target driver and choose "Uninstall device."
Step 2. In the next window, press "Uninstall" to confirm the deletion.
Step 3. Navigate to the manufacturer's website to download and install the latest graphics driver.
Way 4. Run Windows 10 Update/Restore Windows System
The yellow screen of death may result from the errors that occur during Windows 10 updates. To solve this problem, you can run a Windows 10 update to a higher version or restore the Windows system to the previous system edition.
Option 1. Run Windows 10 Update
Before starting, you need to make a bootable media to get into the WinPE environment and proceed with the update operation. Then, follow the tutorial below:
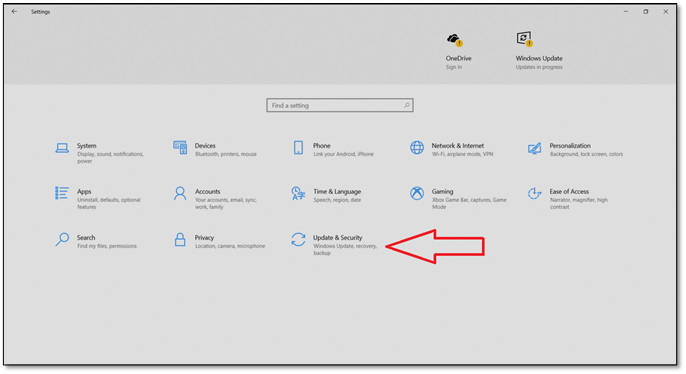
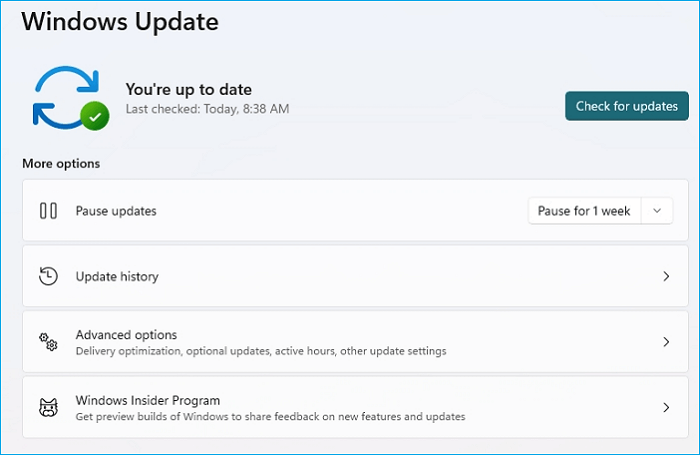
Step 1. Press the "Start" icon and choose "Settings."
Step 2. Navigate to "Update & Security" in the "Settings" window.
Step 3. You will enter the "Windows Update" box and tap "Check for updates" to download and install the available Windows system edition.
Option 2. Restore Windows System
If you cannot resolve the Yellow Screen of Death Windows 10 issue, you can try to perform a system restore. All settings, preferences, and apps will be restored to the time when the system restore point was created.
- Warning
- This process will delete the data, requiring you to back up them in advance.
Step 1. Write and open "Create a restore point in the Windows research box," then click "System Restore."
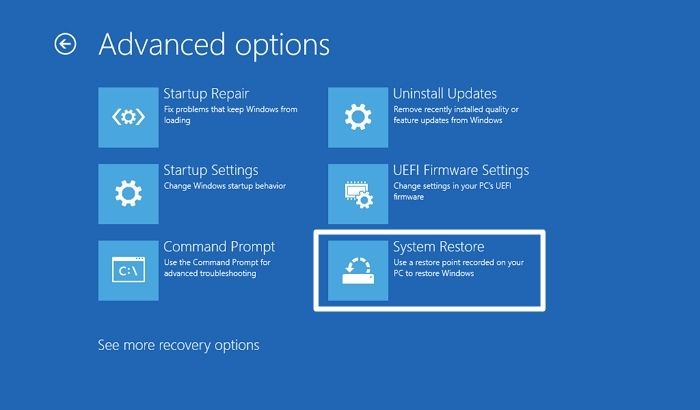
Step 2. Hit the "Choose a different restore point" option and click "Next."
Step 3. Select the target restore point in the list, click "Next," and choose "Finish" when the operation is done.
The above methods can also apply to the black screen of death in Windows, and you can find more available solutions for such an error in the following article:
How to Fix Asus Laptop Black Screen with 10 Efficient Ways
This page will guide you through the causes of the issue and provide ten efficient fixes for your black screen on an Asus laptop.
Way 5. Use Clean Boot
When you use clean boot, Windows can be launched with a minimal collection of drivers and startup applications, which means software incompatibility will be significantly eliminated.
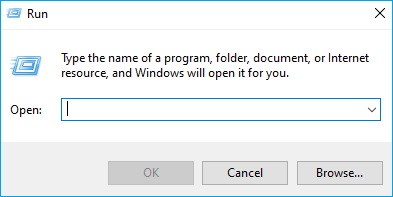
Step 1. Press "Windows + R," write msconfig, and choose "Yes."
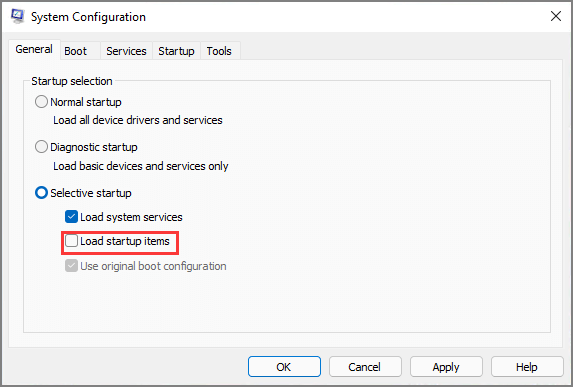
Step 2. Select "System configuration" and enter the "General" tab. Check all boxes under the "Selective startup" tab, but leave "Load startup items" unchecked.
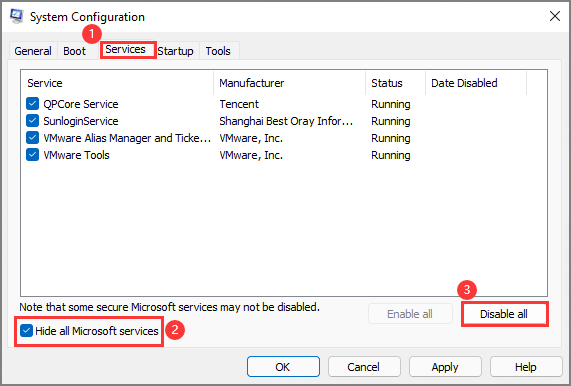
Step 3. Navigate to the "Service" tab to check the box "Hide all Microsoft services." Click "Disable all" > "OK."
Step 4. Go to the "Startup" window and choose "Open Task Manager." Disable all the listed startup items before restarting your computer.
Way 6. Perform Automatic Repair
Automatic Repair is one of the Windows built-in utilities that can help users check and repair the boot failure. Ensure that you prepare a Windows installation media before proceeding. Below are the easy steps:
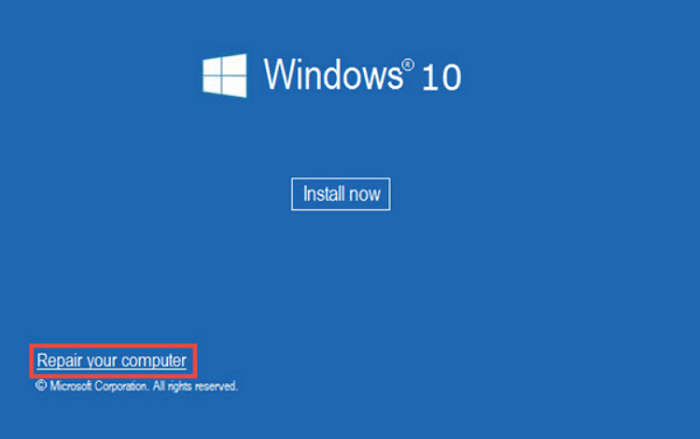
Step 1. Plug the Windows installation media into the computer with a yellow screen error, and restart your PC.
A message will pop up - "Press any key to boot from DVD." Do as it says.
Step 2. Select "Repair your computer" on the "Install Windows" page to enter Windows Recovery Environment (WinRE).
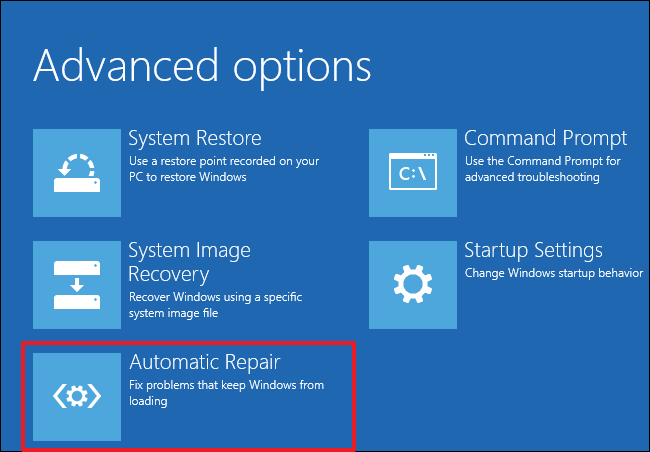
Step 3. Navigate to the "Choose an option" screen and click "Troubleshoot" > "Advanced options" > "Automatic Repair."
Way 7. Rebuild MBR
Corrupted Windows system boot files may lead to the yellow screen of death. In this case, you should rely on professional disk expert software that can rebuild MBR safely. EaseUS Partition Master is our best recommendation, as it can effectively repair your corrupted MBR table and fix boot failure.
If you have tried the first method and created a bootable USB, you can skip to step 2:
Step 1. Create a WinPE bootable disk
- Launch EaseUS Partition Master, and click "Bootable Media" on the toolbar. Select "Create bootable media".
- Click "Next" to finish the process.
Step 2. Boot EaseUS Partition Master Bootable USB
- Connect the bootable USB or CD/DVD to your PC.
- Press F2 or Del when you restart the computer to enter the BIOS screen. Set and boot your computer from "Removable Devices" or "CD-ROM Drive". And then EaseUS Partition Master will run automatically.
Step 3. Rebuild MBR
- Click "Toolkit" and choose "Rebuild MBR".

- Select the disk and the type of MBR. Then, click "Rebuild".

- After that, you can see "MBR has been successfully rebuilt on Disk X".

Conclusion
In this article, we discussed what may lead to the yellow screen of death error and how users can get rid of this problem using seven reliable methods. Since the yellow screen of death is quite challenging, you must try complex methods suitable for developers. To release you from hard work and restraints, we recommend you use EaseUS Partition Master, which is the safest and easiest solution for this case. Below are tutorials for other screen-of-death errors:
FAQ of How to Fix Yellow Screen of Death
In this FAQ part, we have collected some additional questions related to the yellow screen of death error. You can check the answers for more information as follows:
1. What causes all the screen of death?
The screen of death is typically brought on by faulty, outdated, or improperly installed hardware and by malfunctioning or incompatible software. If driver upgrades for your graphics card or other hardware components don't work with the rest of your system, they may result in a blue screen of death.
2. How do I fix the blue screen of death in Windows 10?
If you encounter a Windows 10 BSOD, you can reboot Windows 10 in safe mode. Here are the detailed steps:
Step 1. Repeat restarting Windows by holding the power button for 10 seconds three times.
Step 2. Then, your computer will boot into the safe mode.
Step 3. Choose "Troubleshoot" > "Advanced options" > "Startup Settings" > click "Restart."
3. Which screen of death is the most fatal?
The blue screen of death (BSOD), often known as the stop screen or stop error, is one of the most annoying errors and the second-worst predictor of a bad day for a user, right after malware or ransomware. It happens suddenly, and all previously unsaved work is lost.
How Can We Help You
About the Author
Oliver is an EaseUS professional writer who dares explore new areas. With a passion for solving tech issues with straightforward guides for common users, Oliver keeps honing his writing craft by developing in-depth solutions for disk and partition management, computer boot-up issues, file transfer, etc.
Roxanne is one of the main contributors to EaseUS and has created over 200 posts that help users solve multiple issues and failures on digital devices like PCs, Mobile phones, tablets, and Macs. She loves to share ideas with people of the same interests.
Product Reviews
-
I love that the changes you make with EaseUS Partition Master Free aren't immediately applied to the disks. It makes it way easier to play out what will happen after you've made all the changes. I also think the overall look and feel of EaseUS Partition Master Free makes whatever you're doing with your computer's partitions easy.
Read More -
Partition Master Free can Resize, Move, Merge, Migrate, and Copy disks or partitions; convert to local, change label, defragment, check and explore partition; and much more. A premium upgrade adds free tech support and the ability to resize dynamic volumes.
Read More -
It won't hot image your drives or align them, but since it's coupled with a partition manager, it allows you do perform many tasks at once, instead of just cloning drives. You can move partitions around, resize them, defragment, and more, along with the other tools you'd expect from a cloning tool.
Read More
Related Articles
-
7 Ways to Fix 99% Disk Usage on Windows | 🔥
![author icon]() Cici/2024/11/26
Cici/2024/11/26 -
How to Use SD Card as Internal Storage in Windows 11/10?
![author icon]() Tracy King/2025/01/10
Tracy King/2025/01/10 -
How to Extend Windows Server Partition [Server Guide]
![author icon]() Tracy King/2024/10/29
Tracy King/2024/10/29 -
Windows Vista Password Reset Without Disk | How to Guide
![author icon]() Sherly/2024/12/17
Sherly/2024/12/17
Hot Topics in 2024


EaseUS Partition Master

Manage partitions and optimize disks efficiently