
Content
Page Table of Contents
About the Author
Hot Topics
Experiencing 99% disk usage on a Windows system can be maddening. It slows down your computer to a crawl and impedes your productivity. This problem can surface for various reasons, such as background processes, faulty drivers, or malware.
If you're grappling with this frustrating bottleneck, fear not! EaseUS is here to assist you in resolving this nagging problem swiftly and efficiently. Following the steps outlined below, you'll be equipped with seven effective methods to tackle your Windows system's 99% disk usage issue.
Check What Causes 99% Disk Usage in Windows 10/11
First, you need to ascertain the specifics of your disk usage and identify which files or programs might be causing the 99% disk usage. Consider using tools like EaseUS Partition Master Professional and its powerful feature, Space Analyzer. EaseUS Partition Master provides a comprehensive view of your disk partitions and their usage. The Space Analyzer helps visualize space allocation to different files and applications.
Using the Space Analyzer, you can accurately find the exact storage taken by the files and apps on your computer. You can use the following steps to run Space Analyzer on your computer:
Step 1: Head to the official website of EaseUS and download the latest version of Partition Master software. Then, install it on your Windows system.
Step 2: Open the installed software and navigate to the space analyzer feature. It is located in the "Discovery" tab, which you can access from the left side panel.
Step 3: Move to "Choose a disk you want to analyze" and select the targeted disk. Next, select "Analyze" to enable the software to scan and display a comprehensive breakdown of disk space utilization.
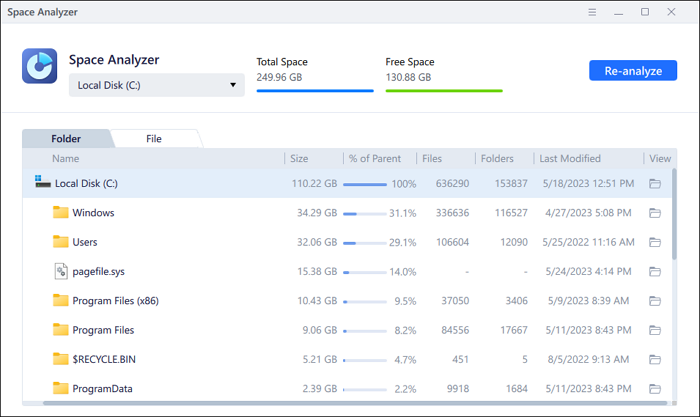
Following these steps provides valuable insights into disk space usage, aiding in identifying the causes of high usage. With this information, take necessary actions to optimize performance and resolve the 99% disk usage issue.

How to Check/View Disk Storage/Usage on Windows 10/11
How to check or view disk space on a computer or laptop? Learn the easiest methods to view disk usage on your Windows PC and Mac. Read more >>
7 Ways to Resolve 99% Disk Usage
After pinpointing the factors leading to heightened disk usage on your Windows system, it's crucial to tackle and mitigate the issue. Follow these seven proven methods below to reduce disk usage and restore your system's peak performance.
- Way 1. Stop Running Unnecessary Programs
- Way 2. Disable Windows Defragmentation
- Way 3. Clean Up Junk Files and Unneeded Programs
- Way 4. Check for Malware
- Way 5. Replace the Hard Drive to a New/Bigger One
- Way 6. Disable Superfetch
- Way 7. Perform Clean Boot
These steps are designed to tackle various potential causes, providing a comprehensive approach to resolving the 99% disk usage problem. If you think these solutions are helpful, don't forget to share them with others in need.
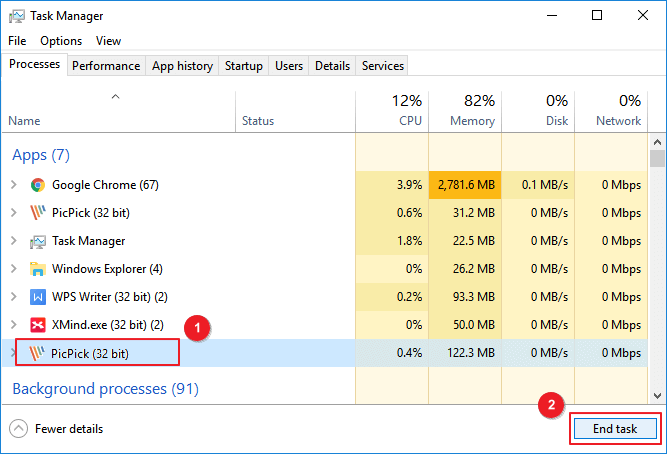
Way 1. Stop Running Unnecessary Programs
To combat high disk usage, it's crucial to terminate unnecessary processes that might consume system resources. This can alleviate the strain on your disk and reduce overall disk usage. Follow these steps using the Task Manager to end processes:
Step 1: You will need to open Task Manager by right-clicking on the taskbar and selecting "Task Manager." The other way is to use the shortcut keys "Ctrl + Shift + Esc" for immediate access.
Step 2: In Task Manager, proceed to the "Processes" section. It will allow you to view a list of active processes and their respective resource consumption.
Step 3. Identify processes consuming high disk usage. Right-click on the specific process and select "End task" to stop it. Exercise caution not to end critical system processes.
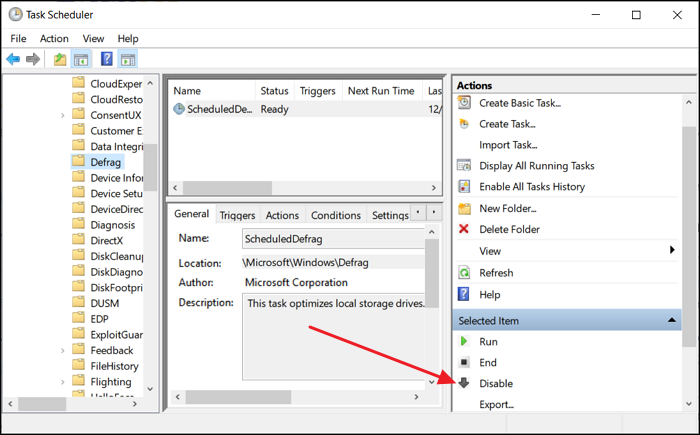
Way 2. Disable Windows Defragmentation
Disabling Windows' automatic defragmentation can help reduce unnecessary disk activity. It is especially recommended if running frequently and contributing to high disk usage. Follow these step-by-step instructions to turn off Windows defragmentation:
Step 1. Press the "Win + S" keys to access the Windows search bar and look for Task Scheduler. Once it appears, click "Open" to launch it.
Step 2. Tap "Task Scheduler Library" and navigate to the "Microsoft" folder. Now click the "Windows" folder, find, and tap the "Defrag" task.
Step 3. Click "Disable" in the right pane of the task window. Subsequently, close the Task Scheduler and restart your computer to ensure the changes are applied successfully.
Way 3. Clean Up Junk Files and Unneeded Programs
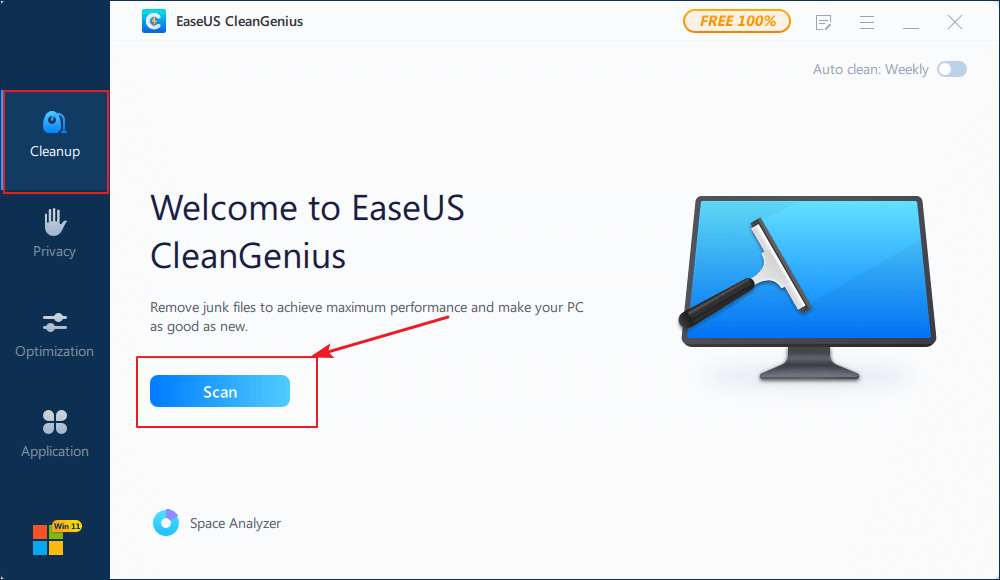
EaseUS CleanGenius, a feature within the EaseUS Partition Master toolkit, can help you deal with junk files and unnecessary programs. It can effectively assist in eliminating junk files and unnecessary programs that might contribute to high disk usage. With this tool, you can set up Auto Clean of your computer every week. Follow these steps to utilize EaseUS CleanGenius and fix the 99% disk usage or 100% disk usage issue:
Step 1. DOWNLOAD and install EaseUS Partition Master for free and launch it on your Windows PC.
On the suite, hover your mouse on "PC Cleaner", click the Download icon to install and launch EaseUS CleanGenius.
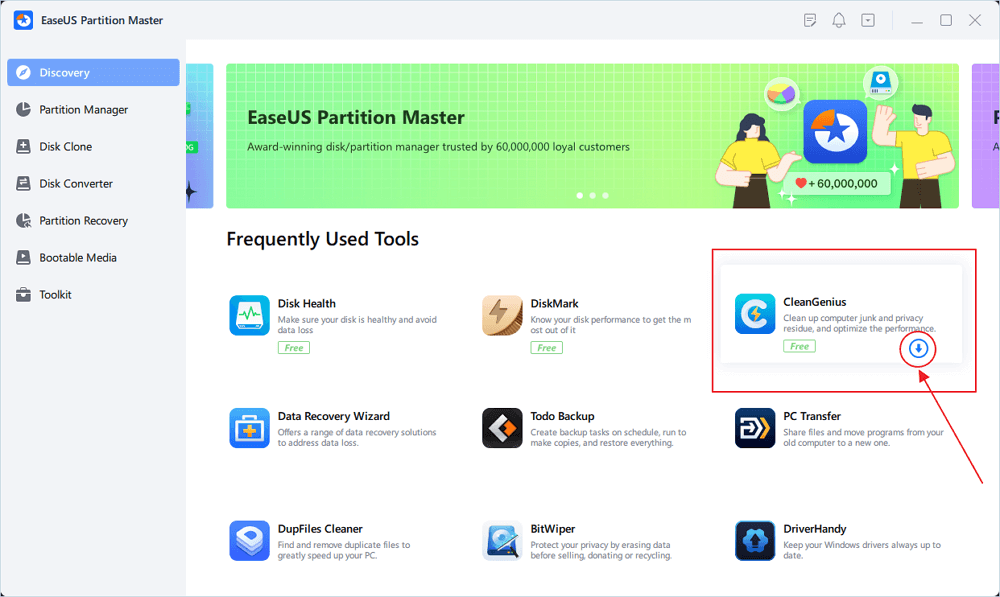
Step 2. On EaseUS CleanGenius, select "Cleanup" on the main screen, and click "Scan" to start scanning.
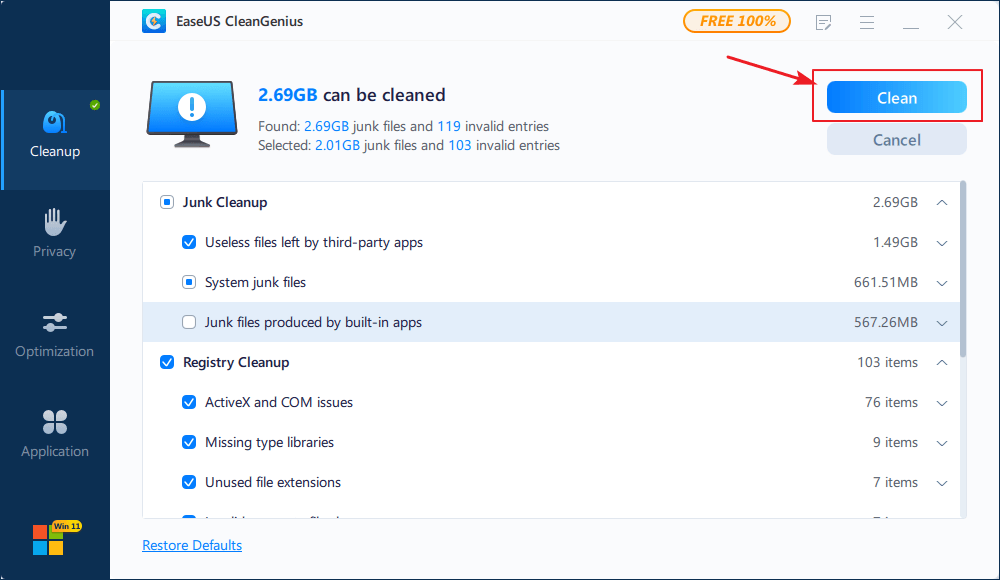
Step 3. When the scanning process completes, select useless large files and click "Clean" to clean large files.
Step 4. When EaseUS CleanGenius completes cleaning the files you choose, click "Done" to finish the process.

Way 4. Check for Malware
Malware infections can significantly impact system performance. It can potentially cause high disk usage, among other issues. Conducting a thorough antivirus check of your system is imperative to detect and eliminate malicious software.
You can use a reliable antivirus program to scan your Windows system comprehensively. A complete system antivirus check can help identify and remove any malware. This reduces the strain on your disk and improves overall system performance.
TotalAV is an Award Winning Antivirus and Security Software. It Provides Real-Time Protection from Viruses, Malware & Online Threats.
Antivirus Protection Enabled
Way 5. Replace the Hard Drive to a New/Bigger One
Transitioning from troubleshooting methods to hardware upgrades, consider upgrading your hard drive to a newer or larger one to potentially resolve the persistent disk usage issue. EaseUS Partition Master provides a convenient 'Clone Disk' functionality.
It allows you to effortlessly transfer all data from your existing disk to a new or larger one without the risk of data loss. This upgrade could provide a fresh start. It can resolve the high disk usage problem while giving you more storage space.
Step 1. Select the source disk.
- Click the "Clone" from the left menu. Select the "Clone OS Disk" or "Clone Data Disk" and click "Next".
- Choose the source disk and click "Next".
Step 2. Select the target disk.
- Choose the wanted HDD/SSD as your destination and click "Next" to continue.
- Read Warning message and confirm "Yes" button.
Step 3. View the disk layout and edit the target disk partition size.
Then click "Continue" when the program warns it will wipe out all data on the target disk. (If you have valuable data on the target disk, back up it in advance.)
You can select "Autofit the disk", "Clone as the source" or "Edit disk layout" to customize your disk layout. (Select the last one if you want to leave more space for C drive.)
Step 4. Click "Start" to start the disk cloning process.
Way 6. Disable Superfetch
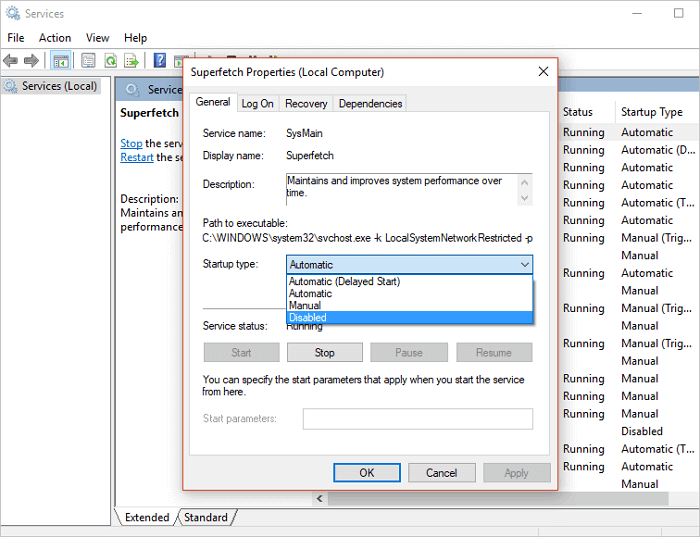
Superfetch is a Windows feature that improves system performance by preloading frequently used applications into memory. It might sometimes contribute to high disk usage. Disabling Superfetch could alleviate this issue, improving your system's performance. Follow these steps to disable Superfetch on your computer:
Step 1. Initially, launch the Run dialog box using the "Win + R" key combination. Then type "services. msc" and hit Enter.
Step 2. In the Services window, locate "Superfetch" from the list of services. Following this, right-click, choose "Properties," set "Startup Type" to "Disabled," and finally, click "Apply" and then "OK" to confirm and save changes.
Way 7. Perform Clean Boot
Performing a clean boot helps identify if third-party applications or services are causing the high disk usage. Turning off non-essential services and startup programs helps isolate the cause of high disk usage. This allows you to pinpoint the problematic software. Here is how to perform a clean boot on your computer to fix the 99% disk usage problem:
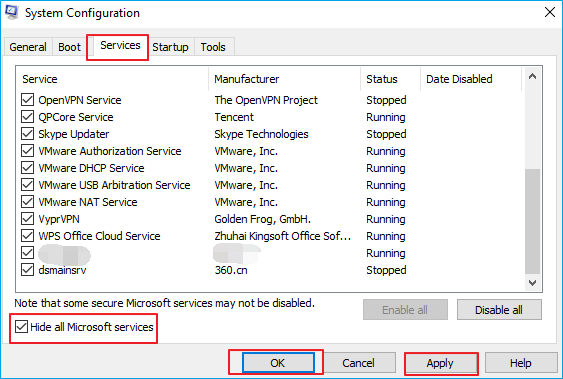
Step 1. Initiate the Run function by pressing "Win+ R" on your computer. Enter "msconfig" in the provided dialog box and press "Enter" to access System Configuration.
Step 2. In the System Configuration window, access the "Services" tab. Enable "Hide all Microsoft Services" and then select "Disable all" to deactivate non-Microsoft services.
Step 3. Afterward, go to the "Startup" tab and select "Open Task Manage." Here, disable startup programs one by one by right-clicking and selecting "Disable." Exit Task Manager and select "OK" within the Startup tab to initiate the clean boot environment on your computer.
Read Also: 100% Disk Usage in Windows 10
Why Is My Disk Usage at 99%
Experiencing 99% disk usage can be frustrating, impacting your system's performance. Here is a typical case:
Several factors could contribute to this issue, and understanding these potential causes is crucial for effective troubleshooting. Here are some possible reasons for the high disk usage:
- Viral Infection: Malware or viruses can cause a surge in disk activity, leading to high disk usage.
- Hard Disk Damage: Physical damage or malfunctioning components within the hard disk can increase usage.
- Software Damage: Corrupted or malfunctioning software may excessively utilize system resources, causing high disk usage.
- Unwanted Files and Programs: Accumulation of unnecessary files or running redundant programs can strain the disk, causing higher usage.
- Virtual Memory Misconfiguration: Improperly configured virtual memory settings might increase disk activity and high usage.
- Multiple Programs: Running numerous applications simultaneously can overload the disk, resulting in high disk usage.
Identifying and addressing these potential causes is essential to alleviate the 99% disk usage issue. Refer to the guidelines in this article to systematically troubleshoot and resolve the problem, restoring your system's performance to its optimal state.
Conclusion
This guide offers a comprehensive approach to addressing the frustrating 99% disk usage on Windows. Following the outlined solutions, you can tackle various causes, optimize performance, and regain control. For efficient disk management and troubleshooting, consider leveraging EaseUS Partition Master — a recommended tool for resolving disk-related issues effectively.
FAQs About 99% Disk Usage
Encountering persistent issues related to high disk usage can be perplexing. If you seek further clarification or solutions, explore these commonly asked questions below. Feel free to refer back to this resource for answers and guidance:
1. Is 99 percent disk usage bad?
Yes, 99% disk usage can severely impact system performance, causing slow responsiveness, application crashes, and overall sluggishness. It's crucial to resolve this issue to ensure optimal functionality.
2. Why is disk usage at 100% when nothing is running?
This issue can occur due to background processes, system updates, or misconfigurations. To address it, open Task Manager using the "Ctrl + Shift + Esc" key combination. Here, identify high disk usage processes and end unnecessary processes.
3. How do I fix my disk drive is full?
To free up space on a full disk, follow these steps:
Way 1. Start by deleting the unnecessary files and programs from the full disk.
Way 2. Use disk cleanup tools like EaseUS CleanGenius to remove junk files.
Way 3. Move sizable data to an external drive or cloud storage for better management.
How Can We Help You
About the Author
Sherly joined EaseUS in 2022 and she has always loved writing articles and enjoys the fun they bring. She receives professional training here, focusing on product performance and other relative knowledge. She has written over 200 articles to help people overcome computing issues.
Cici is the junior editor of the writing team of EaseUS. She accepted the systematic training on computers at EaseUS for over one year. Now, she wrote a lot of professional articles to help people resolve the issues of hard drive corruption, computer boot errors, and disk partition problems.
Product Reviews
-
I love that the changes you make with EaseUS Partition Master Free aren't immediately applied to the disks. It makes it way easier to play out what will happen after you've made all the changes. I also think the overall look and feel of EaseUS Partition Master Free makes whatever you're doing with your computer's partitions easy.
Read More -
Partition Master Free can Resize, Move, Merge, Migrate, and Copy disks or partitions; convert to local, change label, defragment, check and explore partition; and much more. A premium upgrade adds free tech support and the ability to resize dynamic volumes.
Read More -
It won't hot image your drives or align them, but since it's coupled with a partition manager, it allows you do perform many tasks at once, instead of just cloning drives. You can move partitions around, resize them, defragment, and more, along with the other tools you'd expect from a cloning tool.
Read More
Related Articles
-
How to Fix USB Shows Read Only Windows 11? [Solved]
![author icon]() Tracy King/2026/06/08
Tracy King/2026/06/08 -
D Drive Not Showing Up in Windows 10/11 | 4 Methods to Fix
![author icon]() Tracy King/2026/01/29
Tracy King/2026/01/29 -
Fix the Item Can Not Be Copied Because It Is Too Large for the Volume's Format
![author icon]() Cedric/2026/01/29
Cedric/2026/01/29 -
How to Clone SD Card on Mac [Beginner's Guide]
![author icon]() Oliver/2026/01/29
Oliver/2026/01/29
Hot Topics


EaseUS Partition Master

Version 20.0 is here - full exFAT support, easier disk partitioning, and PC performance optimization.