
Content
Page Table of Contents
About the Author
Hot Topics
- Microsoft (diskpart)
What do you know about it? Is it a beginner's tool? What can normal Windows users do with this tool on computers? Follow this page, and we'll show you what Diskpart is and what you can do with this tool on Windows 11/10 or even older Windows computers.
In this article, you'll learn:
- What Is Diskpart
- How Does DiskPart Work
- What Are the Benefits of Using DiskPart? Pros & Cons
- DiskPart Top Used Commands
- How Do You Enable Diskpart
- DiskPart: How to Create, Format, and Manage Partitions [Step-by-Step Guide]
- DiskPart Alternative Tool Free Download
Note: Tips here apply to run DiskPart in Windows 11/10/8/7, older Windows, and Windows Servers.
What Is DiskPart?
DiskPart, a free command-line utility, processes orders to Windows operating systems to execute some disk partitioning tasks through diverse command lines.
DiskPart was introduced in Windows 2000, and its later versions in Windows operating systems as a successor of fdisk. As introduced, DiskPart is a disk partitioning tool that assists experienced and professional Windows users in managing their OS drives, data disks, external hard drives, USB flash drives, and even SD cards, etc.
How Does DiskPart Work?
So how does DiskPart work? Some of you may wonder how does DiskPart conveys the command lines to the operating system and then order the computer to execute respective operations, right?
Microsoft has precisely described how DiskPart interprets commands to help Windows users manage their computer disks and partitions.
Here is the process:
Step 1. Open DiskPart.
Step 2. List available objects, such as disk, volume, Partition, and even vdisk.
- list disk - Display all the disks on the computer.
- volume - Display all the volumes on the computer.
- list partition - Display the partitions on the disk that has focused on the computer.
- list vdisk - Display all the virtual disks on the computer.
Step 3. Determine focus - you need to decide which object to focus on.
It could be a disk, a volume, a partition, or even a virtual disk, such as:
- select disk 1
- list volume
- select volume 5
These commands tell the computer to focus on volume 5 on disk 1.
Step 4. Interpret commands to the operating system through Syntax parameters.
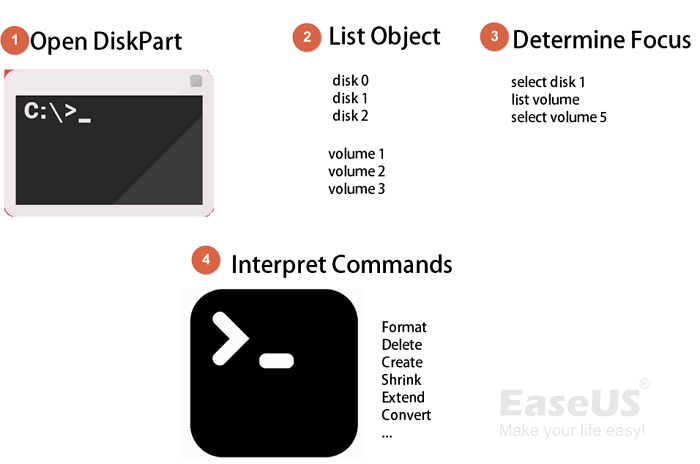
Note: The overall procedure will only work when you open and run the DiskPart command as an administrator.
What Are the Benefits of Using DiskPart? Pros & Cons
So what benefits can I get by using DiskPart? Here is a table that lists the Pros and Cons of running DiskPart command lines to manage disk partitions in Windows computers:
| Pros of DiskPart | Cons of DiskPart |
|---|---|
|
|
So who is DiskPart designed for? Windows professionals, developers, and experienced administrators are the target users of DiskPart.
Note: If you are not familiar with DiskPart, or you are a Windows beginner, DiskPart alternative tools like Disk Management or other partition manager software are more user-friendly for you to try.
Most Used DiskPart Commands in Managing Disks
Here we collected some top most frequently used DiskPart commands in managing disk partitions that you can see what you can do with this tool:
| Type | Commands |
|---|---|
| Manage Partitions |
|
| Manage Disks |
|
So how do you use DiskPart to execute these tasks on your computer? First, you need to enable and open DiskPart. Then, follow the two guides below and manage disk partitions on your computer with success.
Guide 1: How Do You Open or Enable DiskPart?
Here we'll present you a normal way that most Windows users apply to open and enable DiskPart on their computers.
Here are the steps:
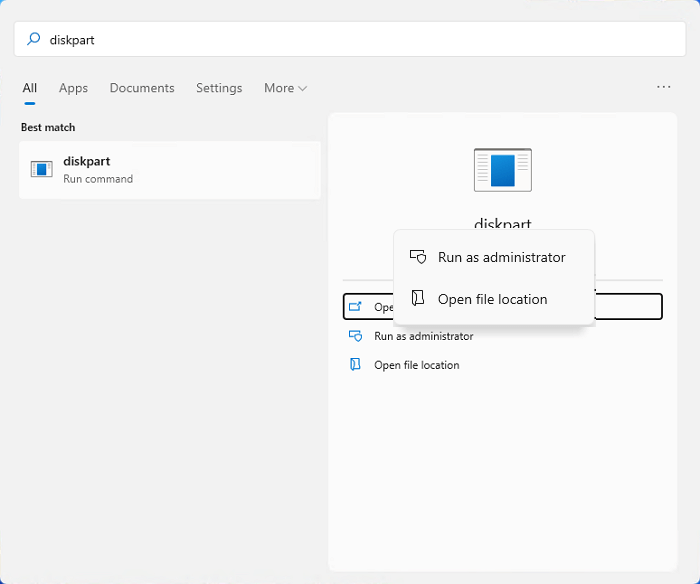
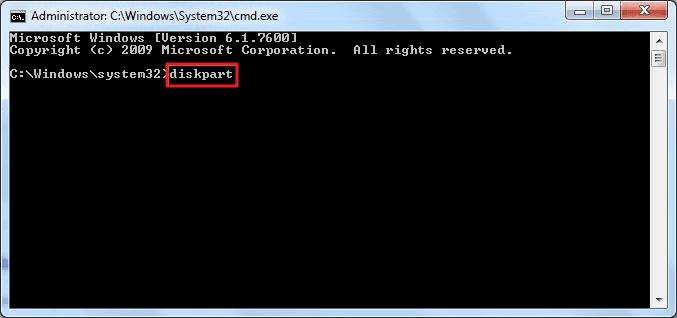
#1. Open DiskPart in Windows 11:
- Press Windows + S keys, type diskpart.
- Right-click on it and select "Run as administrator".
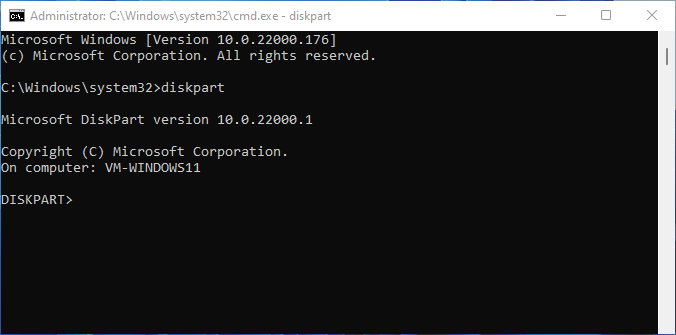
#2. Open DiskPart in Windows 10:
- Press Windows + R keys, type cmd.
- Click "OK" to open Command Prompt.
- Type diskpart and hit Enter to open DiskPart.
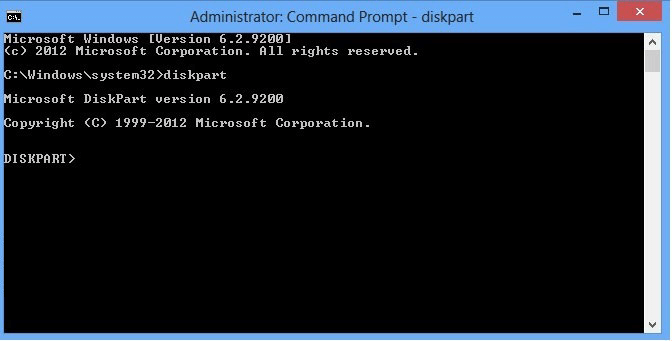
#3. Open DiskPart in Windows 8:
- Click the start menu, select search, and type cmd in the search box.
- Right-click Command Prompt and select "Run as administrator".
- Type diskpart in Command Prompt and hit Enter.
#4. Open DiskPart in Windows 7:
- Click Start, and type cmd.
- Find Command Prompt from the search list, right-click on it and select "Run as Administrator".
- Type diskpart in Command Prompt and hit Enter.
Once DiskPart is enabled on your computer, you can now follow Guide 2 below to create, format, or manage your disk partitions with ease.
Guide 2: How to Create, Format, and Manage Partitions with DiskPart [Step-by-step guide]
#1. How to Use DiskPart to Manage Partitions in Windows
Here in this part, we'll show you the process of running DiskPart commands to manage partitions on your computer. Let's get started.
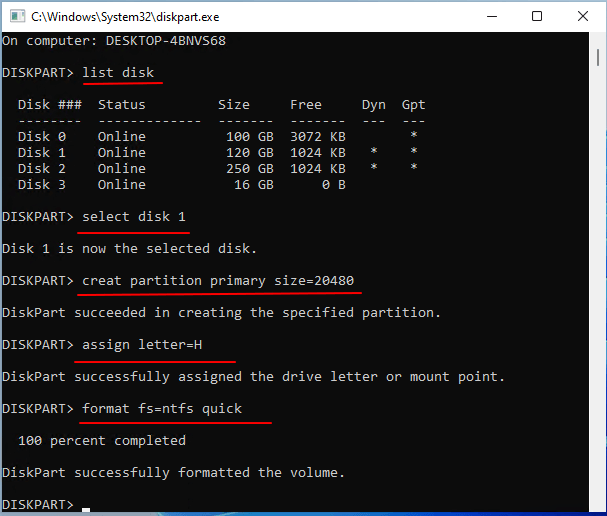
To Create Partition in DiskPart:
- Open DiskPart and type the following command lines to create Partition.
- Remember to hit Enter each time:
- list disk
- select disk * (Replace * with your selected disk.)
- list partition
- create partition primary size=1024 (1024MB is equal to 1 GB.) (You can also replace this command with "create partition extended size =*" and "create partition logical =*")
- assign letter=*
- exit
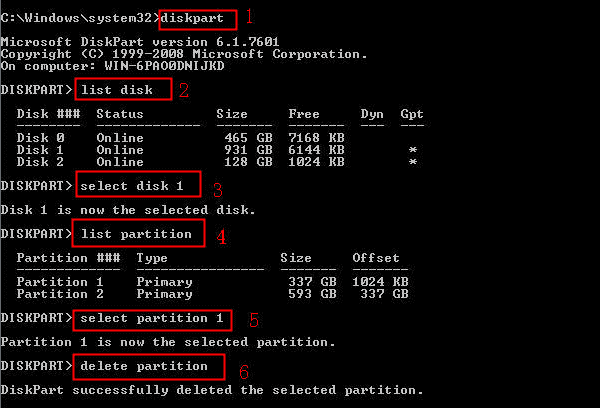
To Delete Volume Using DiskPart:
- Open DiskPart and type the following command lines one by one.
- Hit Enter each time:
- list disk
- select disk * (Replace * with the disk number of your disk)
- list partition
- select Partition * (Replace * with the partition number that you tend to delete)
- delete Partition
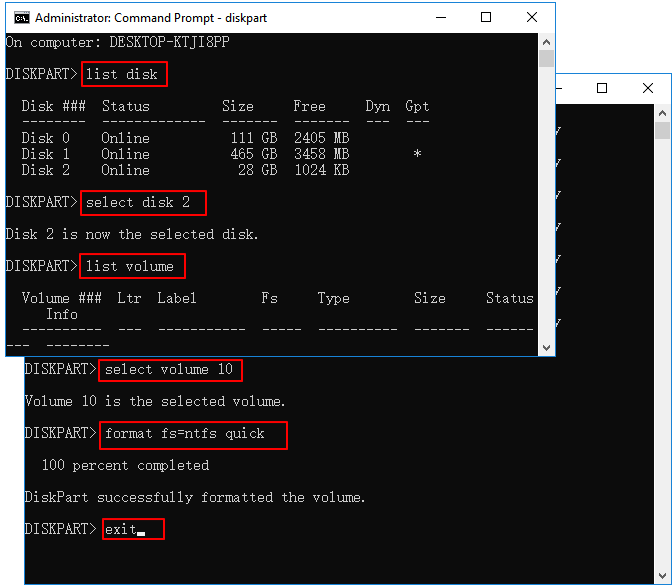
To Format Partition Using DiskPart:
- Open DiskPart in Windows and type the commands one by one.
- Hit Enter each time:
- diskpart
- list disk
- select disk + number (Replace 2 with the number of your USB drive.)
- list volume
- select volume + number (Replace 10 with the volume number of your USB flash drive.)
- format fs=ntfs quick (You can also replace NTFS with FAT32 or exFAT.)
- exit
To Assign Drive Letter Using DiskPart:
- Open DiskPart, and type the following command lines one by one.
- Hit Enter each time:
- list volume
- select volume * (Replace * with the target volume number.)
- assign letter=* ( Replace * with the drive letter that you want to assign to the target volume.)

To Extend Partition via DiskPart:
- Open DiskPart and type the following command lines one by one.
- Hit Enter each time:
- list volume
- select volume * (replace * with the volume number that you need to extend.)
- extend or extend size=* (replace * with the partition size that you want to add to the target volume.)
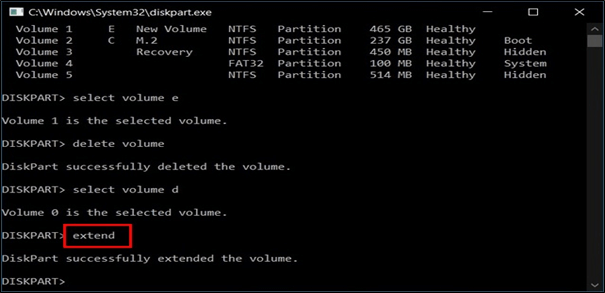
Note that this operation requires you have unallocated space left behind the target volume. If not, you'll need to shrink or delete a neighbor volume first.
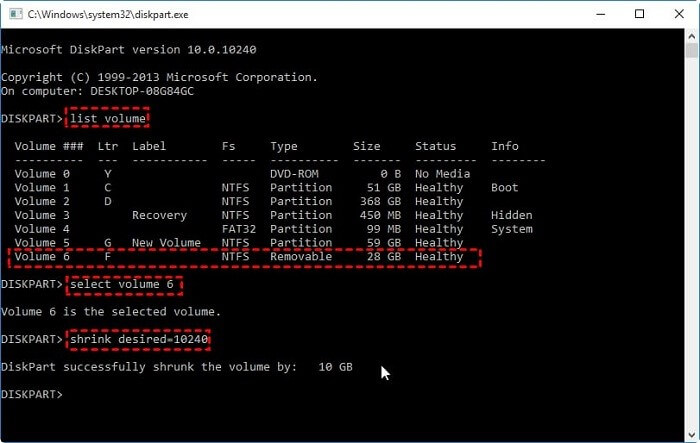
To Shrink Partition with DiskPart:
- Open DiskPart in Windows and type the following commands one by one.
- Hit Enter each time:
- list volume
- select volume * (Replace * with the volume number that you need to shrink.)
- shrink desired=* (Replace * with the volume size that you want to shrink and get from the selected volume.)
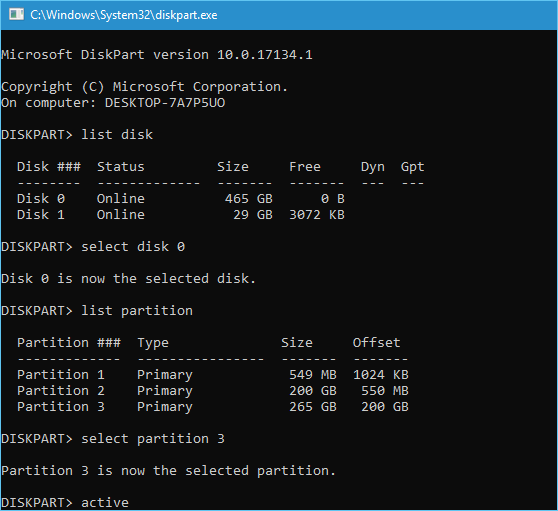
To Mark Partition as Active with DiskPart:
- Open DiskPart and type the following command one by one.
- Hit Enter each time:
- list disk
- select disk *
- list partition
- select partition *
- active
#2. How to Use DiskPart to Manage Disks (HDD/SSD, External) in Windows
Aside from managing partitions, DiskPart also supports Windows users to manage disks on their own, such as how to clean up a drive or convert disk type to MBR/GPT.
Here are the guidelines that you can follow to execute these operations on your computer.
Note: Remember to back up all essential content on your target disk before executing these tasks.
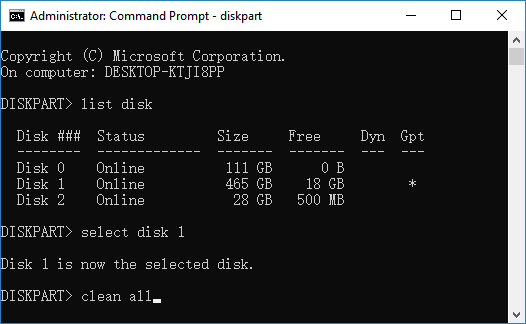
To Clean or Erase Disk with DiskPart:
- Open DiskPart and type the following commands one by one.
- Hit Enter each time:
- diskpart
- list disk
- select disk *
- clean, or clean all (To clean all data and partitions, use the clean command. To erase the disk, use the clean all command.)
- exit
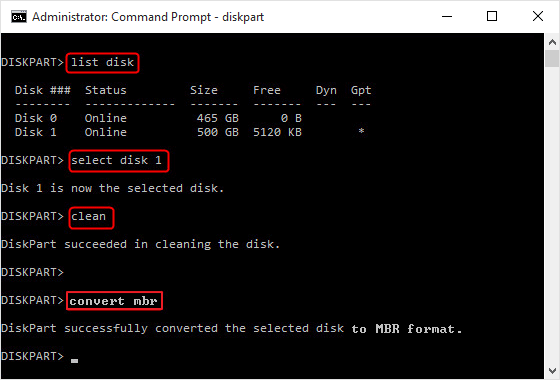
To Convert Disk to MBR or GPT Using DiskPart:
- Open DiskPart and type the following commands one by one.
- Hit Enter each time:
- diskpart
- select disk *
- clean
- convert mbr (or convert gpt)
DiskPart Alternative Tool Free Download (For Windows Beginners)
To most experienced Windows users, DiskPart may be a handy tool for executing some specific tasks, especially when Windows is not booting. However, it's somehow complex for many Windows beginners.
If you are looking for a qualified tool that could replace DiskPart to fulfill disk management demands, a professional partition manager - EaseUS Partition Master, is perfect for you to try.
This tool assists you in partitioning and managing hard drive partitions, external HDD/SSDs, or even virtual disks within only a few simple clicks.
See how can EaseUS Partition Master help:
#1. Partition Hard Drive
Step 1. Launch EaseUS Partition Master to check for free space at the Partition Manager section.
- If your hard drive has unallocated space, jump to Step 3 to create partition.
- If the hard drive has no unallocated space, continue with Step 2.
Step 2. Shrink a disk partition to create unallocated space.
Right-click on the target drive partition with a lot free space and select "Resize/Move".
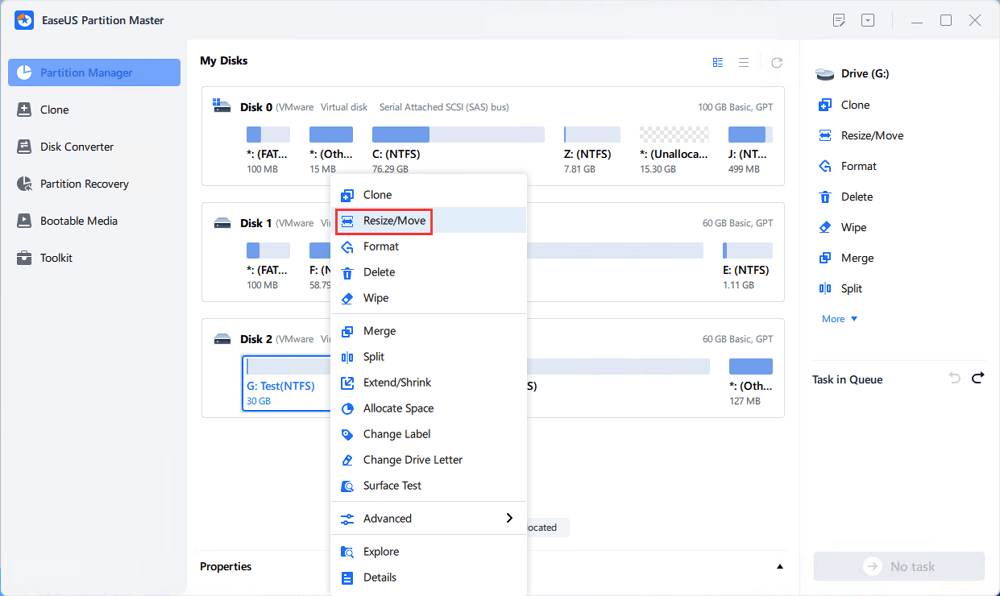
Drag either end of the partition rightwards or leftwards to shrink the partition size so as to get ample unallocated space. You can visually know how much space you've decreased in the "Size of partition" area. Click "OK".
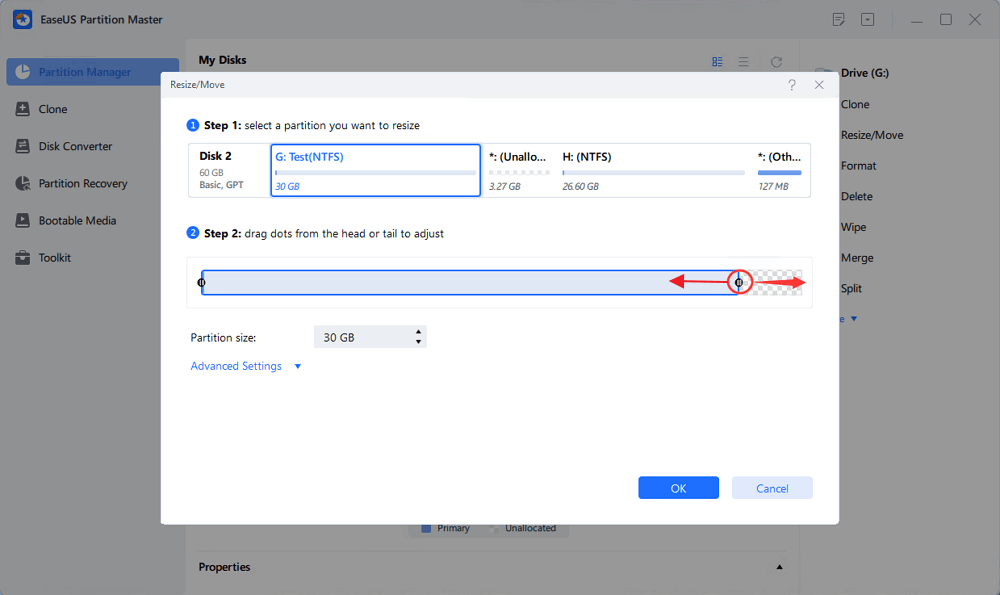
Click "Execute xx Task" and then "Apply" to save all the changes.

Go back to Partition Manager, there should be unallocated space appearing on the same disk and you can continue with the next step to create new partition on your hard drive.
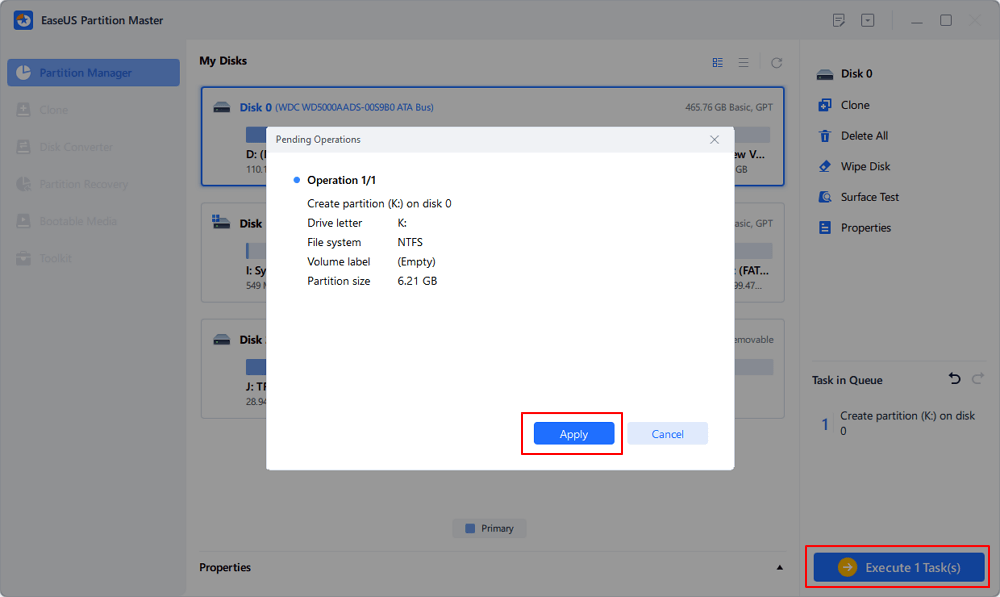
Step 3. Create a new partition with unallocated space on the target hard drive.
Right-click on the unallocated space and choose "Create".
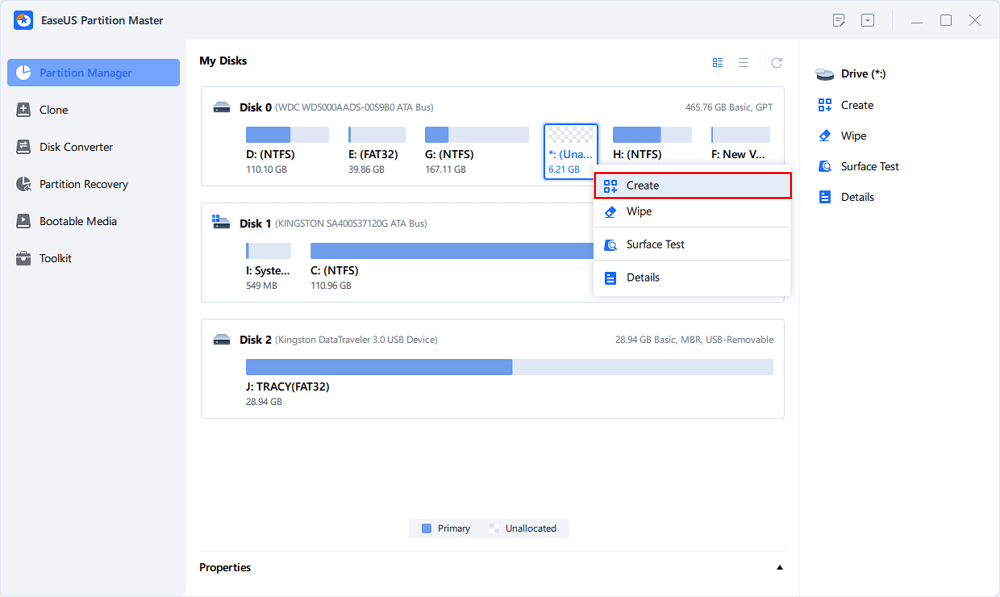
Customize the partition size, partition drive letter, partition label, file system (NTFS, FAT32, EXT2/3/4, exFAT) and more in the Advanced Settings. Click "OK".
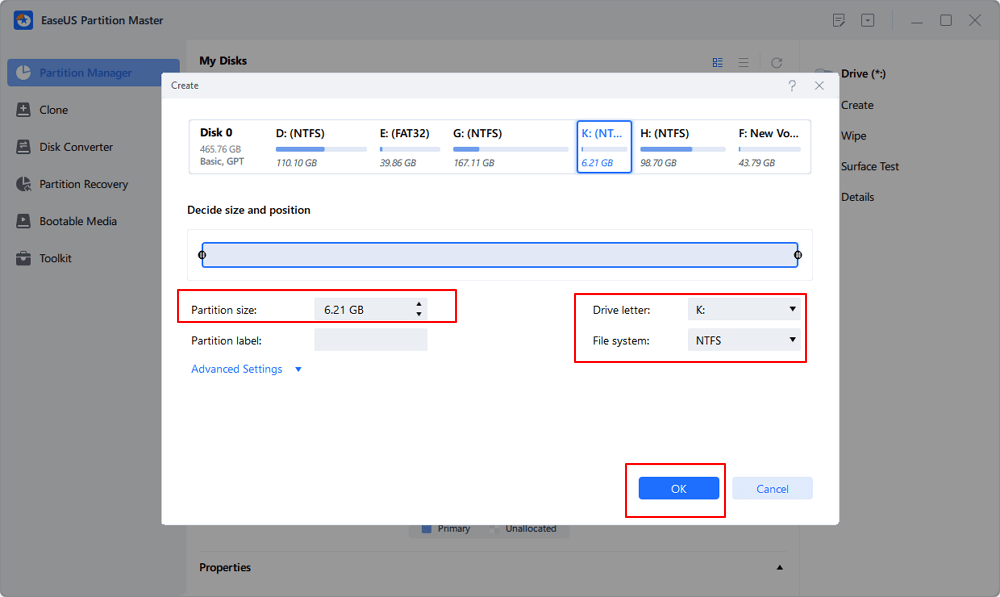
Finally, click "Execute * Task" and "Apply" to complete creating partition with the unallocated space on your disk. Repeat the steps to partition a hard drive and get many more partitions.
#2. Convert Disk to MBR/GPT
Step 1. Download and launch EaseUS Partition Master on your computer.
Step 2. Go to Disk Converter, select "MBR => GPT" and click "Next" to continue.

Step 3. Select the target MBR disk that you tend to convert to GPT, and click "Convert" to start the conversion.

#3. Migrate OS to HDD/SSD
Aside from the above features, you can apply this software to:
- Create, resize, format, merge, split partitions
- Convert NTFS to FAT32, or FAT32 to NTFS
- Check file system error
- Clone OS disk to larger or smaller HDD/SSD
- Partition recovery
- 1-click to partition the new disk
- 4k alignment SSD
Conclusion
On this page, we discussed what DiskPart is, how DiskPart works, and the most commonly used commands.
We also showed you how to enable DiskPart and run different commands to execute diverse tasks in Windows 11/10/8/7. Alongside DiskPart, we also introduced a DiskPart alternative tool - EaseUS Partition Master to Windows beginners.
Compared to DiskPart, EaseUS partitioning software is qualified and works even better in managing disk partitions. It's easier and covers more features to assist Windows users in making full use of their disk partitions and storage devices. For an efficient and easy tool to manage hard drive partitions and disks, don't miss it.
How Can We Help You
About the Author
Oliver is an EaseUS professional writer who dares explore new areas. With a passion for solving tech issues with straightforward guides for common users, Oliver keeps honing his writing craft by developing in-depth solutions for disk and partition management, computer boot-up issues, file transfer, etc.
Written by Tracy King
Tracy became a member of the EaseUS content team in 2013. Being a technical writer for over 10 years, she is enthusiastic about sharing tips to assist readers in resolving complex issues in disk management, file transfer, PC & Mac performance optimization, etc., like an expert.
Product Reviews
-
I love that the changes you make with EaseUS Partition Master Free aren't immediately applied to the disks. It makes it way easier to play out what will happen after you've made all the changes. I also think the overall look and feel of EaseUS Partition Master Free makes whatever you're doing with your computer's partitions easy.
Read More -
Partition Master Free can Resize, Move, Merge, Migrate, and Copy disks or partitions; convert to local, change label, defragment, check and explore partition; and much more. A premium upgrade adds free tech support and the ability to resize dynamic volumes.
Read More -
It won't hot image your drives or align them, but since it's coupled with a partition manager, it allows you do perform many tasks at once, instead of just cloning drives. You can move partitions around, resize them, defragment, and more, along with the other tools you'd expect from a cloning tool.
Read More
Related Articles
-
[Fixed] Windows Resource Protection Found Corrupt Files but Was Unable to Fix Some of Them
![author icon]() Jean/2024/10/12
Jean/2024/10/12 -
How to Format External Hard Drive for PS3 [2024 Full Guide]
![author icon]() Cici/2024/10/29
Cici/2024/10/29 -
Full Guide to Check and Fix Disk Error in Windows 11
![author icon]() Tracy King/2024/10/15
Tracy King/2024/10/15 -
6 Ways to Fix Winload.efi Missing on Windows 11/10
![author icon]() Cici/2024/11/27
Cici/2024/11/27
Hot Topics in 2024


EaseUS Partition Master

Manage partitions and optimize disks efficiently