
Content
Page Table of Contents
About the Author
Hot Topics
Updated on Jun 30, 2026
Key Takeaways of Wiping SSD in Windows 11:
- Wiping SSD will ensure you make full use of the existing space on the SSD disk.
- To wipe SSD will cause serious data loss issues, so make sure that you have created a backup of SSD essentials in advance.
On this page, we will present you with complete procedures on how to securely erase SSD on Windows 11 so that you can use it for new purposes.
Follow the guide, and you'll learn what methods you can take so as to wipe SSD:
In this article, you'll learn:
- #1. Wipe SSD Windows 11 with SSD Wipe Software
- #2. Reset PC to Wipe SSD
- #3. Secure Erase SSD via BIOS Settings
Things to Do Before Wiping Your Hard Drive
Here below is a checklist that you need to mark before you wipe SSD Windows 11:
- ✔️ Data Backup: Create a backup before wiping SSD in case of losing your SSD essentials.
- ✔️ App Migration: Not necessarily, but useful. Shut down running programs and transfer installed apps to another hard drive. See Also: Move Installed Programs to Another Drive in Windows 11.
- ✔️ Power Supply: Charge your laptop or PC in case of any unexpected shutdown due to insufficient power supply while wiping SSD.
Here are some practical SSD wiping methods that you can take a quick view and select the most suitable method, then follow to execute SSD erasing operations instantly:
| Methods to Wipe SSD Windows 11 | Complexity | Targe Users |
|---|---|---|
| #1. Wipe SSD Windows 11 with SSD Wipe Software🏆🏅 | ⭐ | Beginners & Professionals |
| #2. Reset PC to Wipe SSD | ⭐⭐ | Advanced users |
| #3. Secure Erase SSD via BIOS Settings | ⭐⭐⭐ | Professionals |
1 - How to Wipe SSD Windows 11 with SSD Wipe Software
- ⏱️ Duration: 10-30 minutes, depending on the data capacity on SSD.
- 🧰 Tools: SSD, Windows PC, SSD wipe software - EaseUS Partition Master
- 👩🏼💻 Target: Wipe the entire SSD disk or wipe partial partition data on SSD.
The question is how to wipe SSD Windows 11 securely. You need a reliable tool that can wipe your SSD or hard drive entirely and make your data unretrievable. There are many tools available, but not all of them are trustworthy.
EaseUS Partition Master is a reliable SSD wipe tool, and we recommend you download it for a try. It ensures your data is safely and permanently erased with its Wipe Data and Wipe Disk features.
Here is how to use EaseUS Partition Master and obtain its ability to wipe your SSD Windows 11:
Hint: To wipe SSD data but keep partitions, follow the first guide. To wipe the entire SSD disk, follow the second guide.
We've set two options for you to wipe data. Choose the one you need.
Option 1. Wipe Partition
- Right-click the partition you want to erase data from, and choose "Wipe".
- In the new window, set the time for which you want to wipe your partition, then click "OK".
- Click the "Execute 1 Task(s)" button in the lower right corner, check the changes, then click "Apply".
Option 2. Wipe Disk
- Select the HDD/SSD. And right-click to choose "Wipe Disk".
- Set the number of times to wipe data. (You can set to 10 at most.) Then Click "OK".
- Click "Execute 1 Task(s)" and then click "Apply".
PLUS: Aside from wiping SSD, EaseUS Partition Master also has multiple useful features that you can apply to optimize your SSD performance efficiently, such as partitioning SSD, migrating OS to SSD, 4K aligning SSD, etc.
If you think this method is efficient and helpful in helping you wipe SSD on Windows 11, feel free to share the guide with other people around you so to help your friends reset their SSDs like an expert:
If you need a further guide on wiping and cleaning up your hard drive, follow this tutorial page for help:
How to Completely Wipe Hard Drive
How to completely wipe a hard drive so it cannot be recovered? This article will explain how to completely wipe your hard drive or computer on Windows 10/11 to ensure data privacy.

2 - Reset Your PC to Wipe SSD in Windows 11
- ⏱️ Duration: 20-35 minutes, depending on the data capacity on SSD.
- 🧰 Tools: SSD, Windows PC, Reset this PC feature in Windows Settings.
- 👩🏼💻 Target: Wipe entire SSD volumes except for the system volume.
Some experienced Windows users recommend using the "Reset this PC" feature in Windows 11 to wipe SSD disks, as it's free for each Windows user. It efficiently works in wiping SSD partitions when it works as the system disk, and you can keep the OS intact with this method.
Here are the steps to reset your PC originally provided by Microsoft:
Step 1: Go to the start menu and click on settings. After the "settings" tab opens, find the "Update and Security" option or type "reset" in the search bar, and you will be shown the "reset your PC" option.
Step 2: Click on the "Reset your PC" option, and Windows will show you three options. Reset this PC; Go back to an earlier version of Windows 10; and Advanced Startup.
We recommend selecting the option "Reset your PC" option as it is best for starting fresh.
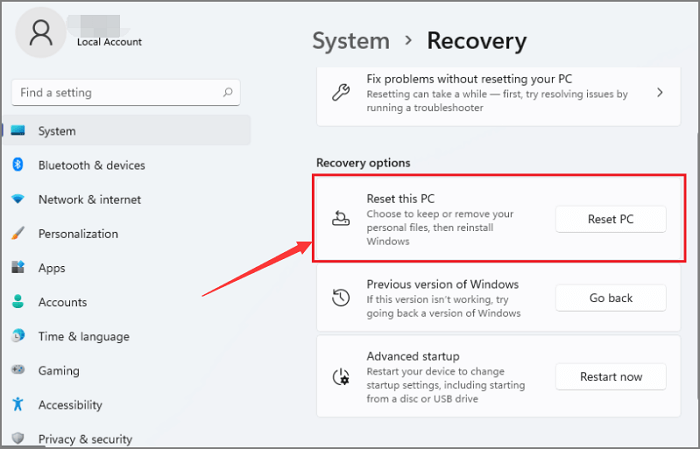
"Advanced Startup" allows you to boot off a recovery USB drive or disc.
Step 3: You will see "Get Started" under the Reset PC option. Click on it.
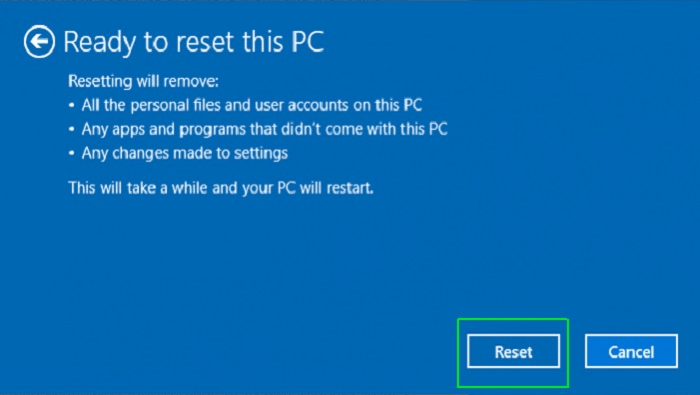
Step 4: After clicking on "Get Started" you will get two options; "Keep my files" and "Remove everything".
Select your desired option. If you are going to give your hard drive to someone else, select "remove everything". It will take some time but data will be removed.
In case you are keeping your laptop and want to keep your data, select "keep files".
Step 5: Whichever option you choose, you will be directed to a tab that will ask you to install Windows via the cloud or locally.
Step 6: Click Next when windows inform you that you won't be able to go back to a prior version of the OS.
Step 7: Click "Reset" when they ask you if you are ready and you are done.
If you encounter Reset This PC not working issue, you may revert back to Method 1 to securely erase your SSD disk. Or, you can follow this tutorial guide for help:
Reset This PC Not Working on Windows 11
This page provides you with tried-and-true solutions to fix the "reset This PC feature not working" error on Windows 11. Follow to get rid of this error on your PC now.

3 - Using BIOS to Secure Erase SSD
- ⏱️ Duration: 25-40 minutes, depending on the data capacity on SSD.
- 🧰 Tools: SSD, Windows PC, BISO Settings.
- 👩🏼💻 Target: Erase SSD without boot OS.
When Windows 11 cannot boot up or SSD fails to boot up, you can boot PC into the BIOS settings and erase your SSD manually.
Let's see how you can erase data securely from BIOS
- The first step is to shut down your computer and restart it. You want to make sure that you have a backup before you start to erase data.
- Enter your computer's BIOS screen by pressing the key (or keys) indicated at the beginning of the computer's start-up process. Usually, it is "Del" or "F8."
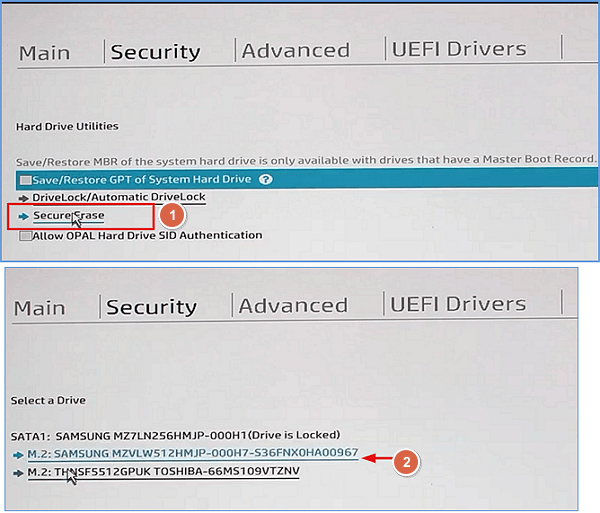
- Go to the Security tab, select "Hard Drive Utilities", or click "Hard Drive Tools".
- Click "Secure Erase" and select the SSD you nee to erase.
- Click "Continue" to confirm the operation.
Why Do You Need to Wipe SSD? Reasons and Benefits
Installing a new version of Windows is the most common reason for removing data from a hard drive. There can be many other reasons, here is a list of reasons and benefits that could explain why:
- Upgrade laptop: You have bought a new laptop, and your younger brother wants your old one. Or, you bought a new PC but want to use your old hard drive.
- PC gets slow: Your PC has become slow, and you want to create storage on your hard drive.
- Clean up personal information: Your personal data or images that are no longer relevant and you want to erase them.
- Clean up PC for sale: You want to clean up the PC for selling.
- Refresh disk performance: Wipe SSD could simultaneously clean up all junk files or useless content to optimize its performance.
Whatever your goal is, wiping SSD is an efficient way to clean up the entire disk data and refresh your disk performance. For the most efficient SSD erasing solution, I'd like to recommend you try EaseUS Partition Master personally. Not only it works to wipe SSD data, but also it supports wiping the entire disk with simple clicks.
To Sum Up
On this page, we provided 3 tried and tested tools with detailed tutorial steps to assist you in resetting and wiping SSD on Windows 11. We strongly recommend you try EaseUS Partition Master, as it has incredible features to optimize the performance of your PC.
We hope you find this blog helpful. Also, you can share this blog to more friends online and help them clean their SSD or hard drives efficiently like a professional:
FAQs About Wiping SSD Windows 11
Here we find some hot topics that you may also be interested in, follow and find answers here:
1. Can I wipe free space only on SSD?
Yes, sure. You can wipe the free space on SSD by using processional disk wiping software. You can turn to a reliable disk wipe utility - EaseUS BitWiper, with its Wipe Free Space feature, to simply wipe the free space on your SSD disk.
2. How do I wipe a write-protected SSD?
When your SSD is write-protected, you have two options:
- One is to directly wipe the SSD when you don't have valuable content saved on the disk.
- The other one is to remove write protection from SSD and backup SSD essentials to another location at first. Then, you can wipe the drive.
EaseUS Partition Master, with its Wipe Disk and Remove Write Protection features, enables you to fulfill the task no matter which method you decide to choose for SSD wiping.
3. Does the factory reset clear SSD?
It depends. When your SSD is an OS disk, applying the Factory Reset feature on a Windows computer could affect your SSD data. And this depends on how you choose to reset the PC - by keeping your files or removing everything.
If the SSD is a second data disk, when you use Windows factory reset feature on computer, the second disk with its data disk won't be affected at all.
How Can We Help You
About the Author
Updated by Tracy King
Tracy became a member of the EaseUS content team in 2013. Being a technical writer for over 10 years, she is enthusiastic about sharing tips to assist readers in resolving complex issues in disk management, file transfer, PC & Mac performance optimization, etc., like an expert.
Product Reviews
-
I love that the changes you make with EaseUS Partition Master Free aren't immediately applied to the disks. It makes it way easier to play out what will happen after you've made all the changes. I also think the overall look and feel of EaseUS Partition Master Free makes whatever you're doing with your computer's partitions easy.
Read More -
Partition Master Free can Resize, Move, Merge, Migrate, and Copy disks or partitions; convert to local, change label, defragment, check and explore partition; and much more. A premium upgrade adds free tech support and the ability to resize dynamic volumes.
Read More -
It won't hot image your drives or align them, but since it's coupled with a partition manager, it allows you do perform many tasks at once, instead of just cloning drives. You can move partitions around, resize them, defragment, and more, along with the other tools you'd expect from a cloning tool.
Read More
Related Articles
-
Check & Repair Hard Disk Partition Errors in Windows 10 for Free
![author icon]() Tracy King/2026/07/01
Tracy King/2026/07/01 -
Partition Wizard Software (Full Version) Free Download for Windows Servers in 2026
![author icon]() Tracy King/2026/06/30
Tracy King/2026/06/30 -
Best Paid and Free Partition Manager for Windows Server Recommend
![author icon]() Tracy King/2026/07/01
Tracy King/2026/07/01 -
How to Stop Disk Checking and Stock CHKDSK on Startup in Windows 11
![author icon]() Tracy King/2026/06/17
Tracy King/2026/06/17


