Page Table of Contents
About the Author
Hot Topics
Updated on Jan 29, 2026
SSDs are a major upgrade over hard drives HDDs. It is relatively faster and improves system performance. But sometimes it can cause problems too. For example, some users report that SSD does not show up in Disk Management. EaseUS focuses on this issue and provides four efficient fixes in this article. Continue to read.
Quick Fixes for SSD Not Showing Up in Disk Management
The reason behind the SSD not showing up in the Disk Management issue could be a hardware or software issue. You can fix an SSD not detected or not showing up in Windows Disk Management with these quick solutions:
- 1. Check if the SSD is properly installed on the expansion slot
- 2. Check Connectors, Ports, and Cables for damage
- 3. Check if the port you are connected to supports the corresponding SSD
- 4. Check if the motherboard supports the corresponding SSD type
- 5. Connect the SSD to another device to check if the SSD is working properly (Click here to check SSD health on Windows 10/11)
After confirming that the problem has nothing to do with hardware, we will continue to discuss how to solve SSD not showing up in Disk Management on Windows through software settings.
Besides the possible hardware errors mentioned above, the basic reasons why an SSD is not showing up in Disk management are as follows:
- 🛞SSD is not initialized
- Ⓜ️The drive letter of SSD is missing
- ✂️Disk drivers are outdated
- 🔨Wrong BIOS settings
Hence, we will fix this error based on the four reasons. Continue to read and learn how to fix "SSD doesn't show up in Disk Management on Windows 11/10/8/7."
4 Fixes for SSD Not Showing Up in Disk Management on Windows 10/11/8/7
If your Windows 11/10/7 computer does not recognize your target SSD and it does not show up in Disk Management, the following methods may help you fix this error:
- Fix 1. Initialize SSD
- Fix 2. Assign Drive Letter to SSD
- Fix 3. Update Disk Driver
- Fix 4. Change BIOS Settings
First of all, if your SSD is a brand new one, then you should learn Fix 1 first.
Fix 1. Initialize SSD
If the drive is not initialized, Windows will also not recognize the drive. Therefore, SSD will not be displayed or detected in Disk Management. EaseUS Partition Master can help you initialize your new SSD to MBR or GPT and create partitions on the SSD. Its clear interface makes the process easy, and you can initialize your SSD to put it into use with simple clicks. Now, click the button to download this tool on your PC. Then, follow the tutorial to help make SSD show up in Disk Management.
Step 1. Open EaseUS Partition Master and got to Partition Manager.
Step 2. Right-click the target disk - HDD or SSD and select "Initialize to MBR" or "Initialize to GPT". Click "Execute Task" and "Apply" to save the changes.
0:00-0:18 Initialize to MBR; 0:19-0:44 Initialize to GPT;
Related Article:
How to Fix SSD Shows Up in BIOS But Not Windows Issue
Although properly connected to the computer and recognized by the BIOS, it may not appear in This PC, File Explorer, and Disk Management. This is also the problem that EaseUS wants to focus on in this article.

Fix 2. Assign Drive Letter to SSD
If Windows doesn't assign any letter to the SSD, then it won't be recognized by the system. Fortunately, EaseUS Partition Master is an all-in-one tool that can not only help you initialize SSD but also assign a drive letter to your SSD. During the process, you don't need to type any commands, and you can assign a new drive letter to your SSD.
Now, download EaseUS Partition Master by clicking the button above and follow the guide to try:
Step 1. Run EaseUS Partition Master, right-click the target partition, and choose "Change Drive Letter".
Step 2. In the new window, click the down arrow and choose a drive letter for the partition from the drop-down menu, then click "OK".
Step 3. Click the "Execute 1 Task(s)" button in the top-left corner, check the changes, and click "Apply" to change the drive letter of the selected partition.
You may also want to know what else EaseUS Partition Master can do. Continue to read and learn more features of this tool:
- Merge partitions on SSD
- Test SSD read/write speed
- Check SSD health on Windows 10/11.8.7
- Check SSD temperature on Windows 10
- 4K Align to fix SSD slow write speed error
- And more
If you want to manage your SSD well and make it work properly on your PC, EaseUS Partition Master will make these tasks easier for you. Download it to try.
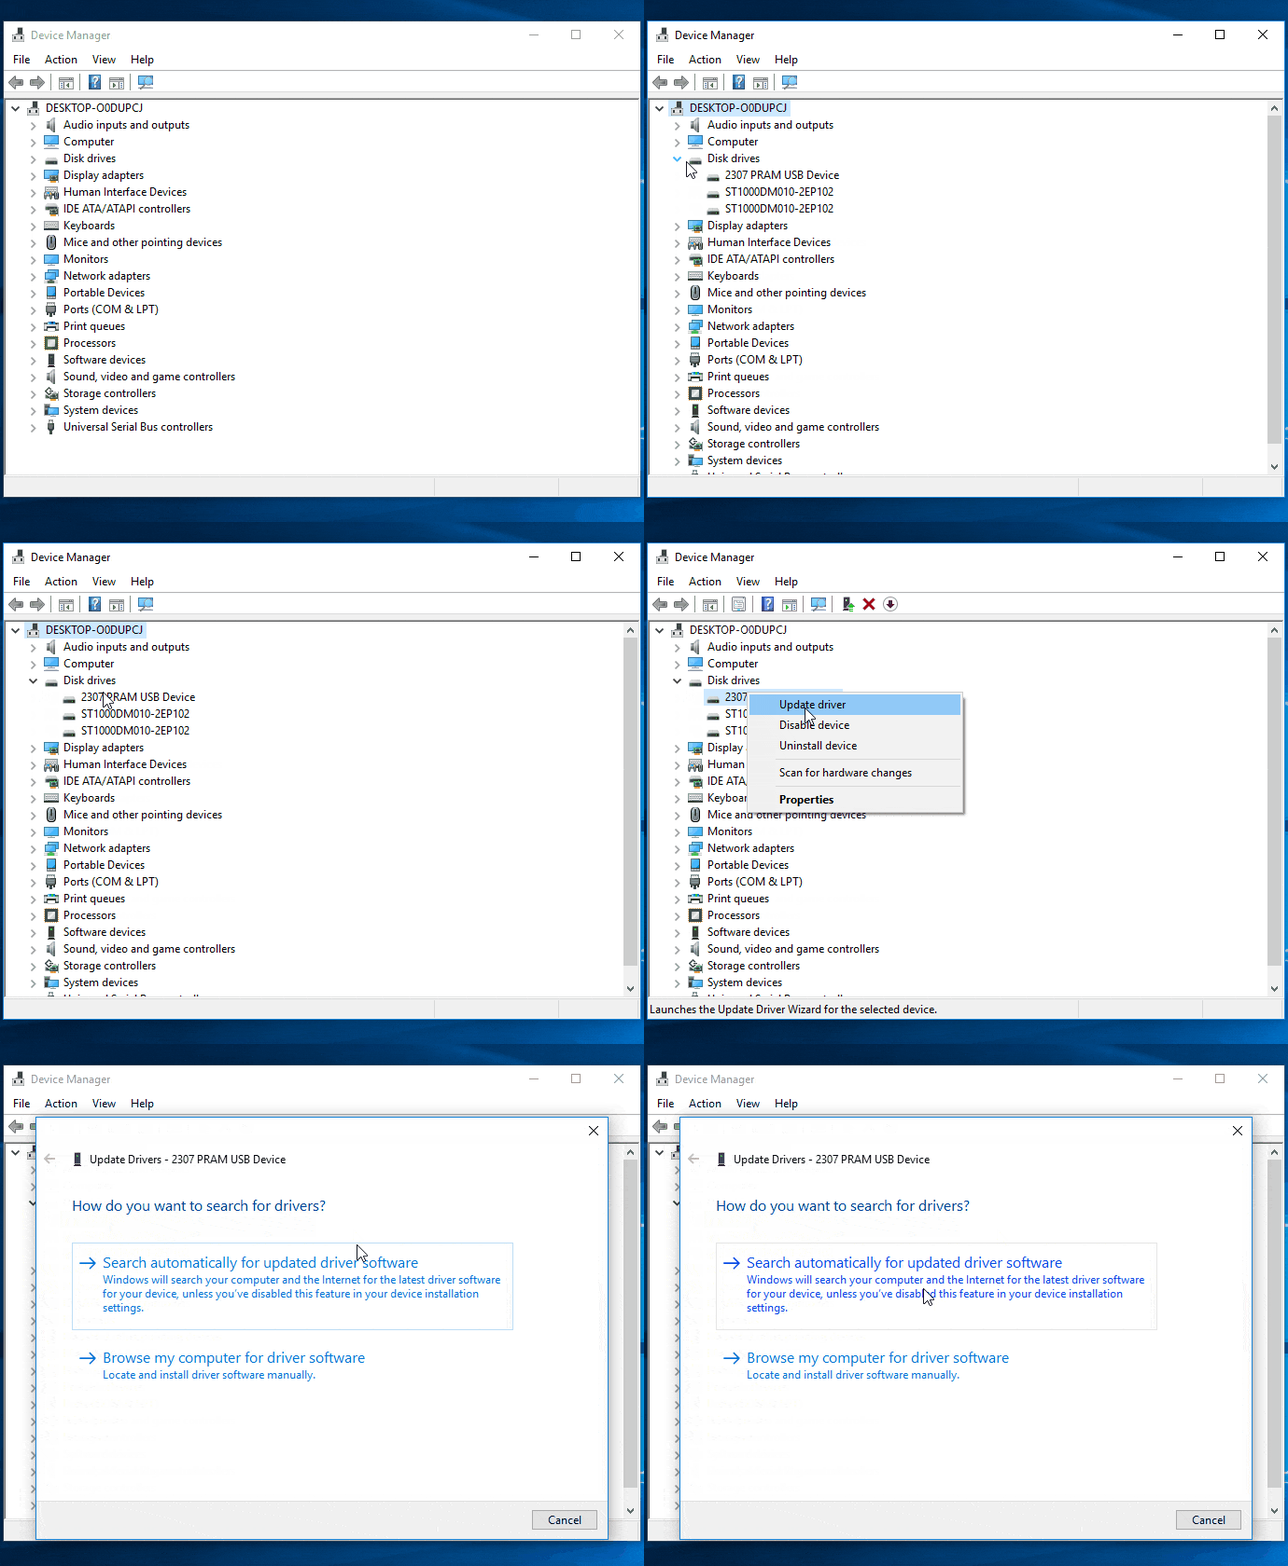
Fix 3. Update Disk Driver
Outdated drivers can also cause the above problems. As a solution, you must download the latest driver update. Below are the steps you should follow:
Step 1. Press Windows + I to navigate to Windows "Settings" menu.
Step 2. Click the Windows Update option. Navigate to Advanced Options > Optional Updates.
Step 3. You will get a list of all available updates for your system in this window, including disk drivers.
Step 4. Install available updates to help SSD show up in Disk Management.

Updating drivers may help your SSD show up in Windows and Disk Management. Share this article to let more users learn about this way.
Fix 4. Change BIOS Settings
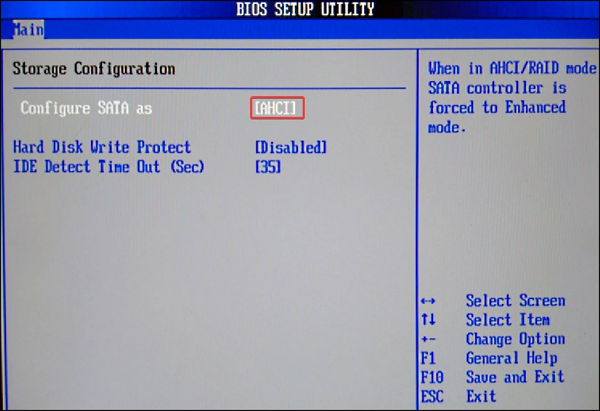
If the SSD doesn't show up in Disk Management, you can change the SATA operation mode in the BIOS.
- Notice:
- Different systems have different ways to open the BIOS window. You can visit the manufacturer's website to see exactly how.
Then try the following:
Step 1. Go to System Configuration.
Step 2. Select SATA Operations, and set it to AHCI. Then, click Apply and exit the BIOS.

You May Also Like the following:
If you meet the issues above, click the corresponding links to learn how to fix them.
Conclusion
By default or normally, Windows and Disk Management can automatically recognize any SSD you plug into the system. But when they don't, real problems arise. If you experience an error that your SSD is not showing up in Disk Management, possible causes include damaged parts, incompatibility issues, and device driver issues. First, check if your hardware is broken. If everything is fine, then try the four safe fixes above.
In most cases, the reason behind the issue is that the SSD is not initialized or the SSD doesn't get a drive letter yet. Hence, initializing SSD and assigning a new drive letter is what you need to do first. To do so, EaseUS Partition Master can help you a lot. Download this tool to try.
SSD Not Showing Up in Disk Management FAQs
Have you fixed the SSD not showing up in the Disk Management issue? This part lists some other related questions. Read them to help.
1. Why is the SSD not showing up in Disk Management but showing in BIOS?
SSD shows up in BIOS instead of Disk Management, possibly due to incompatible file format, uninitialized SSD, old drivers, or missing drive letters. It can be fixed by formatting the SSD, initializing it, assigning a drive letter to the SSD, or updating the drivers.
2. Why is my SSD not being detected by BIOS?
If the data cable is damaged or not connected properly, the BIOS will not be able to detect the SSD. Serial ATA cables, in particular, sometimes come off the connection, so you first need to check that your SATA cable is securely connected to the SATA port connection. Then consider changing the BIOS settings to fix the problem.
3. How to fix my external SSD not showing up in Disk Management?
When your connected external hard drive cannot be detected in Disk Management, it may be caused by the following reasons: Windows 10/1 manually hides the hard drive, unstable USB interface or cable connection, damaged external SSD, outdated disk driver, and the external drive letter is incorrect.
How Can We Help You
About the Author
Updated by Tracy King
Tracy became a member of the EaseUS content team in 2013. Being a technical writer for over 10 years, she is enthusiastic about sharing tips to assist readers in resolving complex issues in disk management, file transfer, PC & Mac performance optimization, etc., like an expert.
Sherly joined EaseUS in 2022 and she has always loved writing articles and enjoys the fun they bring. She receives professional training here, focusing on product performance and other relative knowledge. She has written over 200 articles to help people overcome computing issues.
Product Reviews
-
I love that the changes you make with EaseUS Partition Master Free aren't immediately applied to the disks. It makes it way easier to play out what will happen after you've made all the changes. I also think the overall look and feel of EaseUS Partition Master Free makes whatever you're doing with your computer's partitions easy.
Read More -
Partition Master Free can Resize, Move, Merge, Migrate, and Copy disks or partitions; convert to local, change label, defragment, check and explore partition; and much more. A premium upgrade adds free tech support and the ability to resize dynamic volumes.
Read More -
It won't hot image your drives or align them, but since it's coupled with a partition manager, it allows you do perform many tasks at once, instead of just cloning drives. You can move partitions around, resize them, defragment, and more, along with the other tools you'd expect from a cloning tool.
Read More
Related Articles
-
Can I Clone Windows from MBR to GPT? Sure! [2026 Full Guide]
![author icon]() Tracy King/2026/01/29
Tracy King/2026/01/29 -
How to Convert MBR to GPT without Reinstalling Windows
![author icon]() Brithny/2026/01/29
Brithny/2026/01/29 -
Fixed: Boot Drive Not Showing Up in BIOS | 2026 Best Tips🔥
![author icon]() Cici/2026/01/29
Cici/2026/01/29 -
NTFS or exFAT: Which Format is Better for External Hard Drive
![author icon]() Tracy King/2026/01/29
Tracy King/2026/01/29
Hot Topics
EaseUS Partition Master

Version 20.0 is here - full exFAT support, easier disk partitioning, and PC performance optimization.


