
Content
Page Table of Contents
About the Author
Hot Topics
The eMMC (embedded MultiMediaCard) drive a compact and reliable storage medium, and it's widely used in different electronic devices. Our main motive is to provide a comprehensive guide on effectively formatting an eMMC drive. After completely reading this article, you'll understand the formatting process for eMMC drives. EaseUS will provide step-by-step instructions to format eMMC through Linux or Windows.
So, let's learn all about the eMMC Drive formatting process on Windows and Linux.
| ⏱️Duration | 3-5 minutes |
| 💻Supported System | Windows, Linux |
| ⛏️Required Tools |
✔️Windows format tool: EaseUS Partition Master ✔️Linux tool: fdisk |
| 👣Steps |
1️⃣Format eMMC on Windows - Easy 2️⃣Format eMMC on Linux - Difficult |
What Is eMMC Format?
Understanding the format of an eMMC drive is essential as it enables users to manage their storage and optimize device performance effectively. The two most commonly used formats for eMMC drives are EXT4 and FAT format.
1. EXT4 Format: EXT4 is a widely adopted file system format for eMMC drives in various operating systems, including Linux. It offers robustness, reliability, and support for larger file sizes and partitions, making it ideal for devices that handle significant data volumes, such as smartphones and embedded systems. The EXT4 format ensures efficient data management and can handle frequent read and write operations effectively.
2. FAT Format: The FAT (File Allocation Table) format is another widely compatible file system for eMMC drives. It is compatible with multiple platforms, including Windows, macOS, and embedded systems. The FAT format is suitable for simpler devices and ensures ease of data interchange between different devices. However, compared to EXT4, it might have limitations regarding file size support and system management capabilities.
It's important to choose the appropriate format based on the specific requirements of the device and its intended usage.
- Tip
- For instance, if you are looking for a reliable and robust file system with larger file support and better performance, EXT4 would be the preferred choice. On the other hand, if cross-platform compatibility and simplicity are more essential, the FAT format may be a suitable option.
How to Format eMMC Drive?
Whether you are using Windows or Linux system, we'll guide you through the formatting process on both platforms in this section. Let's begin by looking at how to format an eMMC drive on Windows.
Guide 1. Format eMMC on Windows
To format an eMMC drive on Windows, we recommend downloading the "EaseUS Partition Master Free" tool. EaseUS Partition Master is a user-friendly disk management software that allows you to perform various tasks, including formatting, resizing, and moving partitions. This tool lets users quickly and easily format their eMMC drive to the EXT4 or FAT format.
With a user-friendly interface for easy navigation, even if you are new to a PC. You can format eMMC drive quickly and easily. Follow the steps to format an eMMC drive on Windows using EaseUS Partition Master:
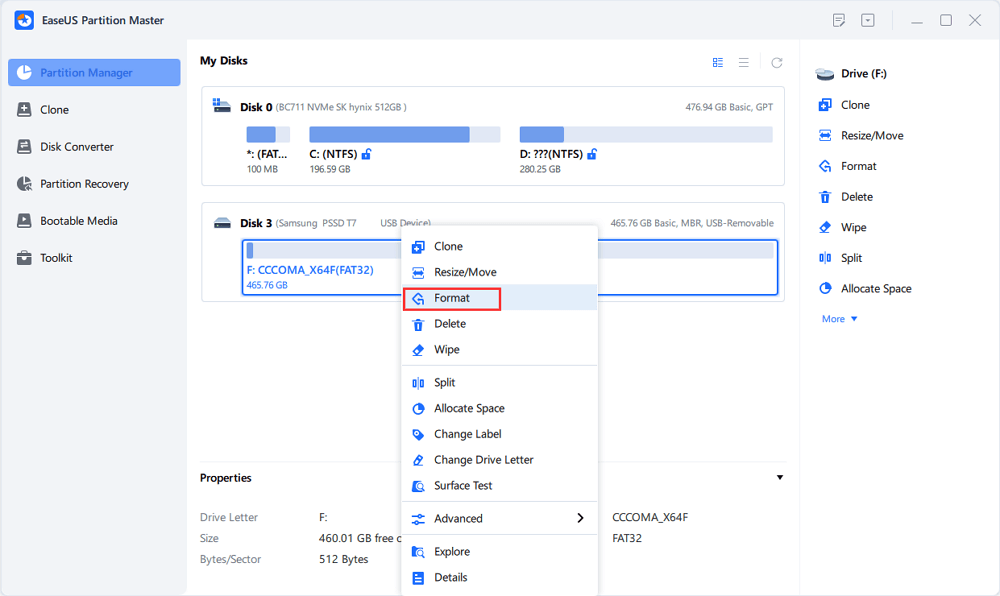
Step 1. Launch EaseUS Partition Master, right-click the partition on your external hard drive/USB/SD card which you want to format and choose the "Format" option.
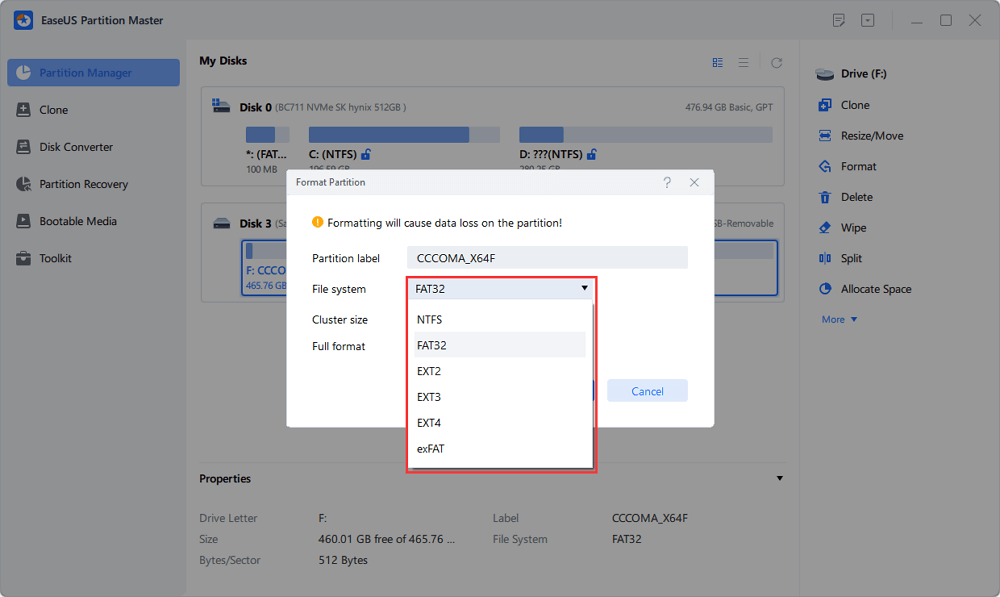
Step 2. Assign a new partition label, file system (NTFS/FAT32/EXT2/EXT3/EXT4/exFAT), and cluster size to the selected partition, then click "OK".
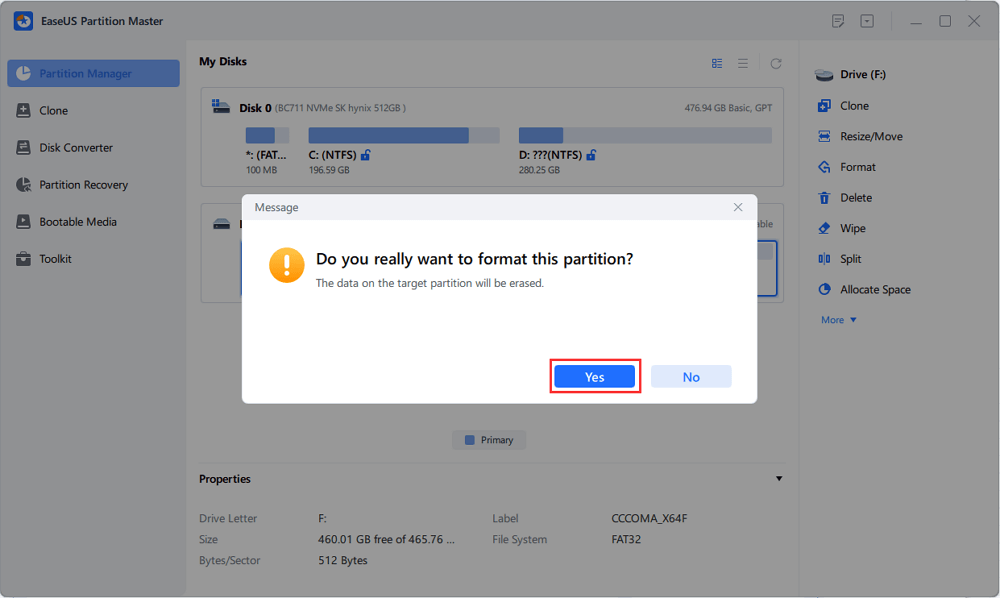
Step 3. In the Warning window, click "Yes" to continue.
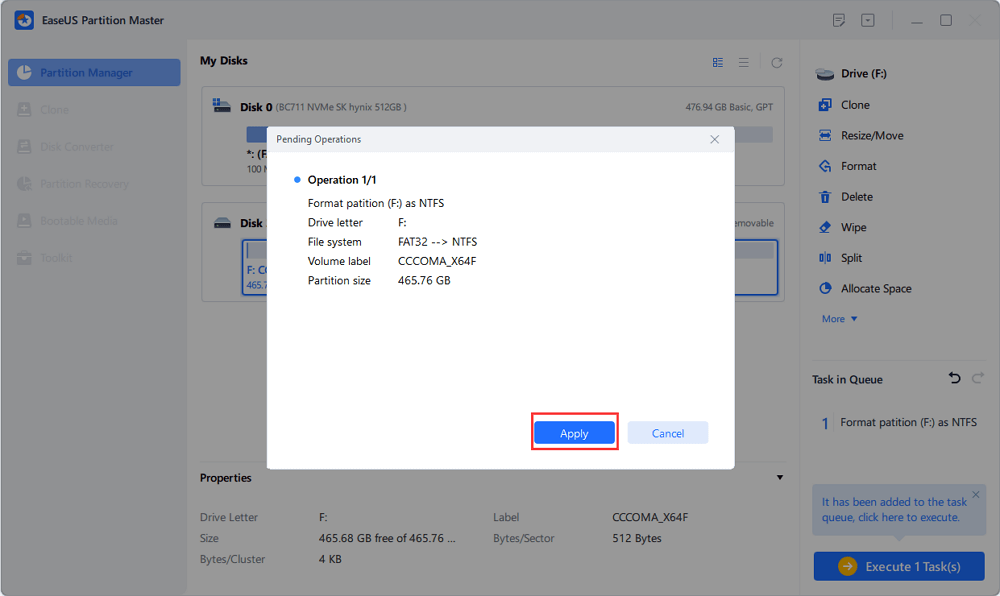
Step 4. Click the "Execute 1 Task(s)" button in the top-left corner to review the changes, then click "Apply" to start formatting your external hard drive/USB/SD card.
We highly recommend EaseUS Partition Master for its user-friendly interface and comprehensive disk management capabilities. Download EaseUS Partition Master now, and perform routine tasks easily by enjoying its various useful and incredible features!
You May Also Like:
Guide 2. Format eMMC on Linux
fdisk is a command line partition editor to help you manage and control drives. A series of steps are required to utilize the 8GB eMMC storage as a writable volume in Linux. Firstly, you'll need to remove the existing partitions. After that, you can create a new partition, format it, and mount it. Here's a step-by-step guide to achieving this:
- Notice:
- This section gives the full procedure for using the built-in 8GB eMMC storage as a writable volume in Linux. If you just want to learn about formatting with fdisk please see the command guide on another page: Use Fdisk Format Partition in Linux
Step 1. Begin by deleting the existing partitions. Open a terminal and enter the following command:
sudo fdisk /dev/mmcblk1
Step 2. Use the 'p' key to list all existing partitions, then use the 'd' key followed by a partition number to delete each partition. Confirm each deletion and use the 'w' key to save the changes.
Step 3. Next, create a new partition. In the same terminal, enter the following command:
sudo fdisk /dev/mmcblk1
Step 4. Use the 'n' key to create a new partition, accept all the default settings, and then use the 'w' key to save the changes.
Step 5. Now, format the newly created partition to the desired file system (in this case, we'll use ext4). Enter the following command:
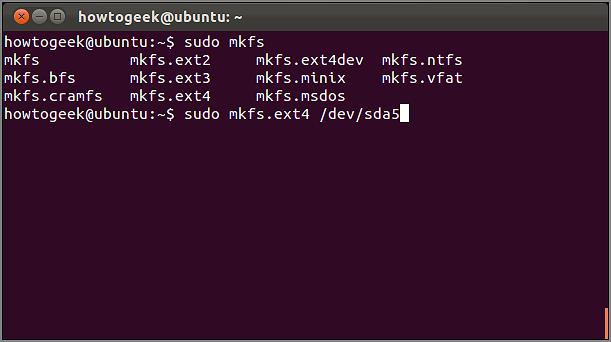
sudo mkfs.ext4 -L "emmc" /dev/mmcblk1p1
Step 6. Create a mount point directory for the eMMC storage:
sudo mkdir /emmc
Step 7. Finally, mount the formatted partition to the newly created directory:
sudo mount /dev/mmcblk1p1 /emmc
Following these steps will allow you to use the eMMC storage as a writable volume in Linux on your Orange Pi Plus. If this tutorial helps you to format eMMC drive successfully, you can also click the button and share it with others in need.
Conclusion
In this article, we explored the two most commonly used formats for eMMC drives: EXT4 and FAT format, understanding their advantages and use cases. To perform eMMC drive formatting, we offered step-by-step instructions for both Windows and Linux users. On Windows, we recommended using "EaseUS Partition Master," a user-friendly disk management tool capable of efficiently formatting eMMC drives to the desired EXT4 or FAT format.
We provided detailed steps for Linux users to format the eMMC drive manually, ensuring that the Orange Pi Plus users could utilize their eMMC storage effectively.
FAQs About How to Format eMMC Drive
If you have further questions or queries about formatting eMMC drives, the below FAQs may help you.
1. Can I replace eMMC with SSD?
Yes, in some cases, it is possible to replace the eMMC storage with an SSD in certain devices. However, this is a complex process and requires technical expertise. Not all devices support SSD upgrades, so checking your device's specifications and compatibility is essential before attempting any changes.
2. Does Raspberry Pi have eMMC?
The standard Raspberry Pi models do not have built-in eMMC storage. Instead, they use microSD cards for storage. However, some Raspberry Pi models, like the Raspberry Pi Compute Module, offer options for eMMC storage.
3. How to partition eMMC?
To partition an eMMC drive, use disk management tools like "fdisk" on Linux or "EaseUS Partition Master" on Windows. These tools let you create, delete, or format partitions on the eMMC drive to organize and optimize your storage.
How Can We Help You
About the Author
Updated by Tracy King
Tracy became a member of the EaseUS content team in 2013. Being a technical writer for over 10 years, she is enthusiastic about sharing tips to assist readers in resolving complex issues in disk management, file transfer, PC & Mac performance optimization, etc., like an expert.
Cici is the junior editor of the writing team of EaseUS. She accepted the systematic training on computers at EaseUS for over one year. Now, she wrote a lot of professional articles to help people resolve the issues of hard drive corruption, computer boot errors, and disk partition problems.
Product Reviews
-
I love that the changes you make with EaseUS Partition Master Free aren't immediately applied to the disks. It makes it way easier to play out what will happen after you've made all the changes. I also think the overall look and feel of EaseUS Partition Master Free makes whatever you're doing with your computer's partitions easy.
Read More -
Partition Master Free can Resize, Move, Merge, Migrate, and Copy disks or partitions; convert to local, change label, defragment, check and explore partition; and much more. A premium upgrade adds free tech support and the ability to resize dynamic volumes.
Read More -
It won't hot image your drives or align them, but since it's coupled with a partition manager, it allows you do perform many tasks at once, instead of just cloning drives. You can move partitions around, resize them, defragment, and more, along with the other tools you'd expect from a cloning tool.
Read More
Related Articles
-
What Is FAT32 Partition Size Limit and How to Break It
![author icon]() Brithny/2026/06/17
Brithny/2026/06/17 -
Windows 10 Not Accepting Password? 7 Quick Solutions
![author icon]() Sherly/2026/06/17
Sherly/2026/06/17 -
FAT File System Format (FAT12, FAT16, FAT32) | 2026 Full Guide
![author icon]() Tracy King/2026/06/30
Tracy King/2026/06/30 -
There Is No Disk in the Drive. Please Insert a Disk into Drive
![author icon]() Tracy King/2026/06/17
Tracy King/2026/06/17


