
Content
Page Table of Contents
About the Author
Hot Topics
Did you clone your old drive, and now your SSD isn't showing the full capacity? Well, if this is the problem you're facing, then you're at the right place. This article from EaseUS will help you get around the cloning issue and let you access your SSD without any problems.
SSDs are essential for all modern-day PCs and offer a substantial performance boost. Moreover, they're affordable and should be included in all new PC builds. So, if you got a new SSD and are having issues showing total capacity after cloning your hard drive, follow the fixes below.
Why SSD Not Showing Full Capacity After Clone
Why is your SSD not showing full capacity after the clone? Upgrading to a larger and faster SSD can be beneficial to your PC. However, you can face many challenges, and your SSD can be stuck at the same capacity or size as the old cloned drive.
This issue often appears when copying all contents, including Windows boot records, local files, system settings, and apps present on the previous drive to the new SSD. As a result, a partition is created on your new SSD drive that is identical to the partition size of your original drive. This means an exact copy of your source drive is created, which is why your SSD doesn't show the total capacity.
The extra space that exceeds the size of your original drive may remain unallocated. Unfortunately, unallocated disk space isn't visible on Windows File Explorer. So you won't be able to access the space or write any new data.
However, there are some ways to fix this issue. Follow the fixes below to make your SSD show its full capacity. You can share the fixes below to help others.
3 Fixes for SSD Not Showing Full Capacity After Clone
While the following fixes will help solve your SSD problem, they take different approaches. So, make sure you choose the fix that suits your needs. Here's a table to compare all the pros and cons of the fixes.
| 🆚Comparison | 👍Pros | 👎Cons |
|---|---|---|
| 🥇EaseUS Partition Master |
|
|
| 🥈Disk Management |
|
|
| 🥉Diskpart |
|
|
With that said, I highly recommend using the EaseUS Partition Master fix, as it is the easiest and fastest. You don't need to learn any code or use the terminal to fix your SSD issue.
Fix 1. Solve SSD Not Showing Full Capacity After Clone via EaseUS Partition Master
Fixing your SSD partition is easy with EaseUS Partition Master. The app helps you format the unallocated space as the standard usable partition using the "Extend Volume" feature. You can get started by following the steps below:
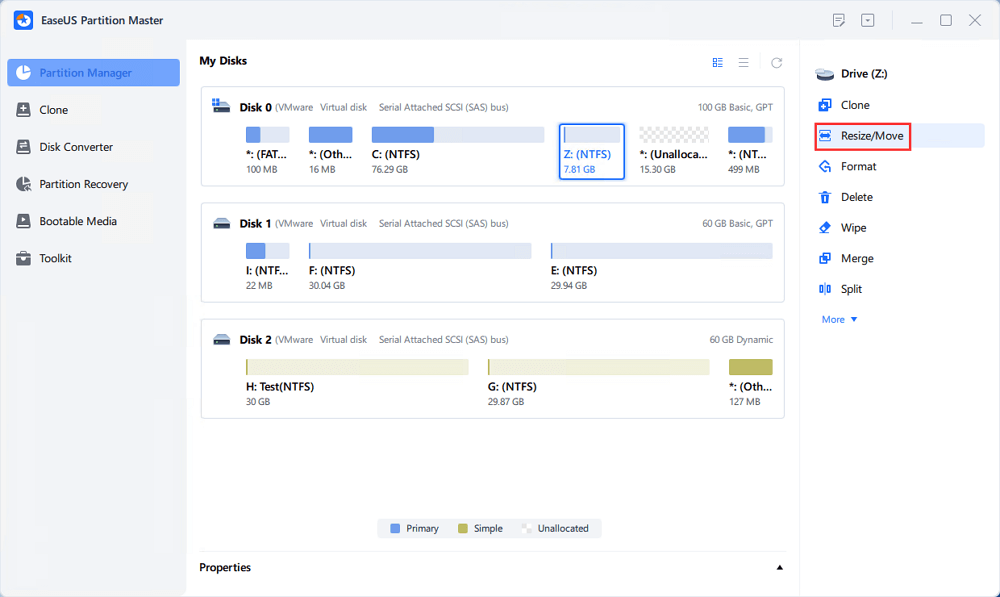
Step 1. Locate the Target Partition.
Go to Partition Manager, locate the target partition and select "Resize/Move".
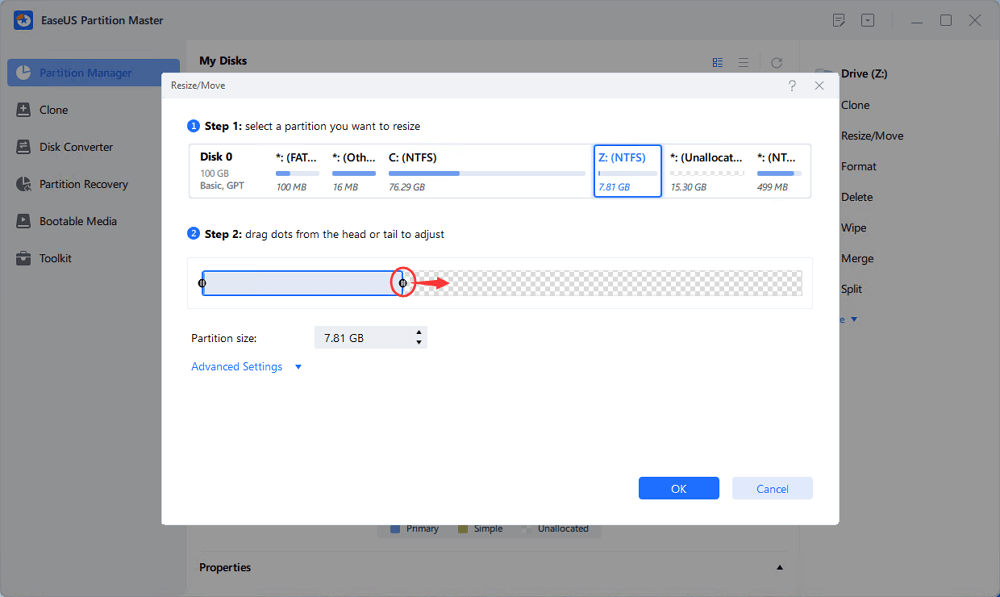
Step 2. Extend the Target Partition.
Drag the partition panel rightward or leftward to add the unallocated space into your current partition, or you can click click "fill in all unallocated" to allocate all space to the target partition. Then, click "OK" to confirm.
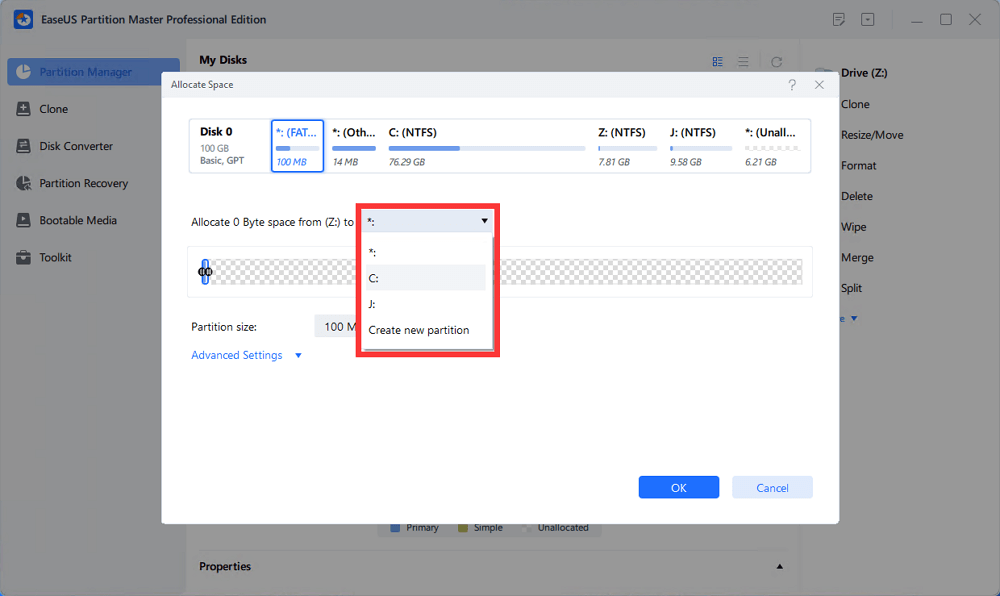
Extra Option: Get Space from Another Drive
If there is not enough unallocated space on your disk, right-click on a big partition with enough free space, select "Allocate space".
Then select the target partition that you want to extend at the allocate space to column.
Step 3. Execute Operations to Extend Partition.
Drag the dots of the target partition into the unallocated space and click "OK".
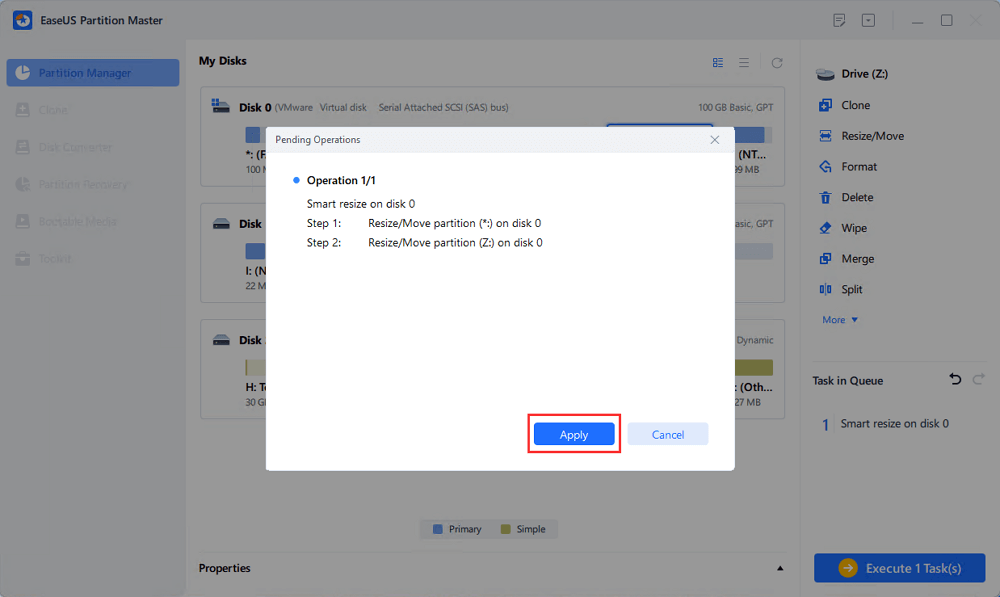
Then Click the "Execute Task" button and click "Apply" to keep all the changes.
- Notice:
- If you have an SSD larger than 2 TB, then make sure to convert the drive from MBR (Master Boot Record) to GPT (GUID Partition Table) format. This helps you create partitions and manage your high-capacity SSD without issues. If you still format your disk with MBR, you'll only be able to use 2 TB capacity.
Moreover, you get a lot more features with EaseUS Partition Master. The app helps you manage all your drives, storage space, unused capacities, and more. Here are some of the most beneficial features that you can use to get an edge on disk management:
- Optimize SSD performance
- 4K alignment for SSDs
- Fix low disk space concerns
- Check SSD health on Windows 11/10/8/7
- Manage SSD drive capacity
With that said, just access the official webpage and download EaseUS Partition Master today to fix all your SSD capacity or performance issues.
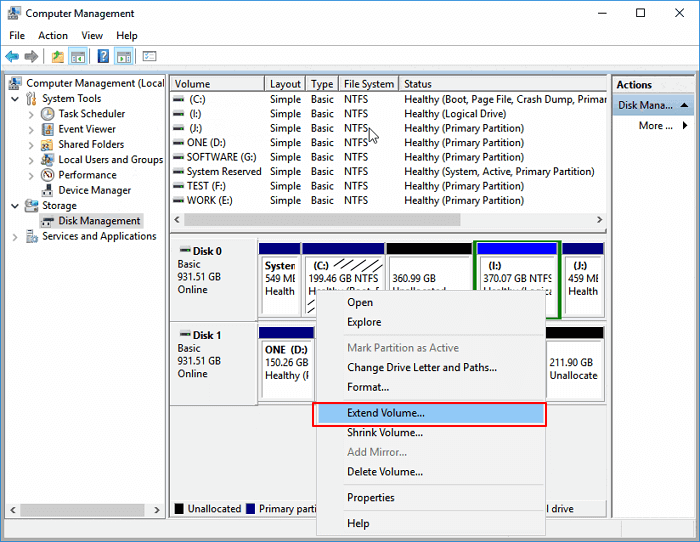
Fix 2. Solve SSD Not Showing Full Capacity After Clone via Disk Management
Another method is by using Disk Management to allocate or extend your SSD partition using the unallocated space. This can be challenging for beginners; you can even format your SSD if you make a mistake.
So, I recommend you make a backup of your data beforehand and follow the steps listed below:
Step 1. Run the built-in Disk Management app by clicking the "Windows + X" keys and choosing the "Disk Management" option.
Step 2. Now, select your drive and right-click on your new SSD.
💡Note: Ensure you see the grey "Unallocated" space on your SSD.
Step 3. Click on the "Extend Volume" button and follow the on-screen instructions to increase the storage space of your SSD.
Fix 3. Solve SSD Not Showing Full Capacity After Clone via Diskpart
This is the most complicated fix and requires you to use the Windows Terminal (Command Prompt or PowerShell) and enter a few commands. So, I only recommend using this fix if you're comfortable using the terminal and entering a few codes.
With that said, here's how you can fix the SSD not showing full capacity after the cloning error using the Diskpart commands:
Step 1. Hit the "Windows + X" keys and select the "Terminal (Admin)" option.
Step 2. Now, type the following commands to select your disk and volume.
- diskpart (enables the diskpart function)
- list disk (lists all available drives)
- select disk 0 (Type the target disk number)
- list partition (lists the volumes present in your selected drive)
- select partition 2
💡Note: Replace "2" with the respective disk and volume number. For example, disk 1 and volume 4.
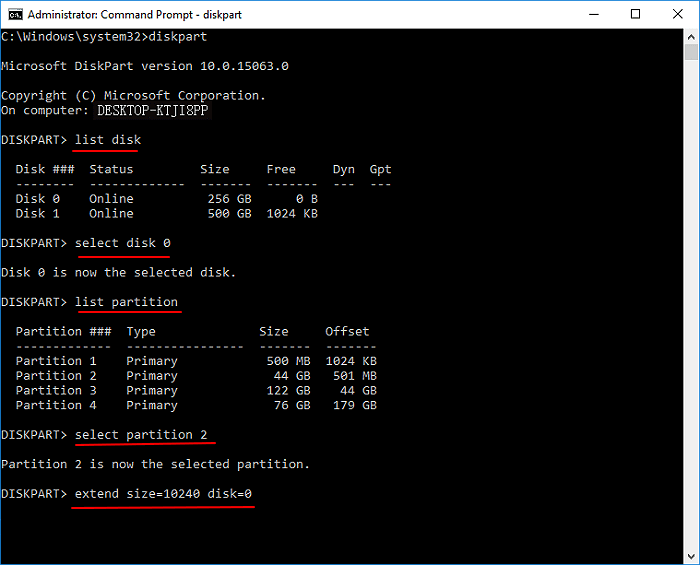
Step 3. Enter the following command, and Diskpart will automatically extend the volume.
- extend size=10240 disk 0
💡Note: Replace "10240" with the amount of MBs you want to extend the volume with. For example, size=5000.
Bonus Tip: Avoid SSD Not Showing Full Capacity After Clone
If you haven't yet cloned your old drive and want to avoid the SSD not showing the full capacity issue, here is the best solution.
Ensure you use professional cloning software like EaseUS Partition Master to clone your old drive to a larger SSD without losing capacity. This will help you make an exact clone without the partition issues.
Here are the steps to use EaseUS Partition Master:
Step 1. Select the source disk.
- Click the "Clone" from the left menu. Select the "Clone OS Disk" or "Clone Data Disk" and click "Next".
- Choose the source disk and click "Next".
Step 2. Select the target disk.
- Choose the wanted HDD/SSD as your destination and click "Next" to continue.
- Read Warning message and confirm "Yes" button.
Step 3. View the disk layout and edit the target disk partition size.
Then click "Continue" when the program warns it will wipe out all data on the target disk. (If you have valuable data on the target disk, back up it in advance.)
You can select "Autofit the disk", "Clone as the source" or "Edit disk layout" to customize your disk layout. (Select the last one if you want to leave more space for C drive.)
Step 4. Click "Start" to start the disk cloning process.
However, your SSD can run into other problems, such as the SSD not booting. So, if your cloned SSD doesn't boot, read our guide on how to fix this error.
Conclusion
While extending your disk volume might seem daunting at first, it can easily be resolved by using the unallocated space of your SSD. This will help you fix the SSD not showing full capacity after the cloning error and regain your entire SSD's storage capacity.
The three fixes in this article help you do just that with easy-to-follow instructions. However, I still recommend using EaseUS Partition Master for the job, as it makes everything much more straightforward, simpler, and faster.
Download the software and follow the abovementioned steps. This will extend the volume of your SSD or even help you clone the drive without facing the SSD not showing full capacity after the cloning error.
SSD Not Showing Full Capacity After Clone FAQs
I hope the fixes above have helped you get around the issue. However, if you still have questions or queries about the issues, follow the FAQs below.
1. Why does the partition size on the destination disk remain unchanged by default?
When you clone a drive, the end goal is to create an exact copy of the original drive. This means the data stored on your old disk, the partition, and the entire structure of the disk will remain unchanged and mirror the source's partition.
2. How to use the unallocated space on the larger destination SSD after cloning?
You can use the unallocated space on the larger SSD after cloning by a few methods. Just follow the steps below and get started:
Step 1. Hit the 'Windows + X' keys and select 'Disk Management' from the options.
Step 2. Now, select the drive and right-click on it to choose the 'Extend Volume' option.
Step 3. Follow the on-screen instructions and extend the space on your SSD.
However, this can feel a bit challenging to beginners. So, I highly recommend using a third-party tool like EaseUS Partition Master to expand your SSD's storage space.
3. How to fix the hard drive showing the wrong capacity on Windows 10?
If your hard drive shows the wrong capacity on Windows 10, several causes might exist. However, you can use the Diskpart command, Disk Management tool, or the EaseUS Partition Master app to solve the problem.
How Can We Help You
About the Author
"I hope my articles can help solve your technical problems. If you are interested in other articles, you can check the articles at the bottom of this page. Similarly, you can also check my Twitter to get additional help."
Sherly joined EaseUS in 2022 and she has always loved writing articles and enjoys the fun they bring. She receives professional training here, focusing on product performance and other relative knowledge. She has written over 200 articles to help people overcome computing issues.
Product Reviews
-
I love that the changes you make with EaseUS Partition Master Free aren't immediately applied to the disks. It makes it way easier to play out what will happen after you've made all the changes. I also think the overall look and feel of EaseUS Partition Master Free makes whatever you're doing with your computer's partitions easy.
Read More -
Partition Master Free can Resize, Move, Merge, Migrate, and Copy disks or partitions; convert to local, change label, defragment, check and explore partition; and much more. A premium upgrade adds free tech support and the ability to resize dynamic volumes.
Read More -
It won't hot image your drives or align them, but since it's coupled with a partition manager, it allows you do perform many tasks at once, instead of just cloning drives. You can move partitions around, resize them, defragment, and more, along with the other tools you'd expect from a cloning tool.
Read More
Related Articles
-
3 Ways| How to Fix Disk Management Format Option Greyed Out in Windows 11/10/8/7
![author icon]() Tracy King/2026/06/30
Tracy King/2026/06/30 -
Best Paid and Free Partition Manager for Windows Server Recommend
![author icon]() Tracy King/2026/07/02
Tracy King/2026/07/02 -
Free Download Kingston DT 101 G2 Repair/Format Tool
![author icon]() Tracy King/2026/06/17
Tracy King/2026/06/17 -
Fixed: Change Block Size From 4K to 64K | 2026 Full Guide
![author icon]() Cici/2026/06/17
Cici/2026/06/17


