Page Table of Contents
About the Author
Hot Topics
Updated on Jan 29, 2026
Are you having the "disk is write-protected" issue when you try to modify or save any data on your Kingston DT50 USB drive? Below is a real case from a technology forum:
If the answer is Yes, you are coming to the right place. In this article, EaseUS will provide four solid methods to help you remove the write protection and regain full control over your USB drive's read and write capabilities. Furthermore, we will also explain why the write protection and the read-only issues happen so that you can avoid them next time.
How to Disable Write Protection on Kingston DT50 - 4 Ways
You will find a lock switch on either side of most USB flash drives, which is used to turn on or off the write protection. To disable the read-only status of the USB, you can toggle the physical switch to "OFF." However, Kingston DT50 has no write protection lock switch, so we rounded up some other effective ways. Here is the overview of all the solutions that can be applied to disable the write protection on the Kingston DT50:
- Fix 1. Use the Write Protection Removal Tool
- Fix 2. Run Command Lines
- Fix 3. Perform Anti-virus Software
- Fix 4. Use Registry Editor
Note: In case something goes wrong during this process, make a backup of your files before taking any action.
Please share this guideline on social media if you find the mentioned solutions successfully disable the write protection on your Kingston DT50:
Way 1. Use the Write Protection Removal Tool
EaseUS Partition Master will remove the write protection on your Kingston DT50 USB and give you a fresh start. With the help of its free "Write Protection" tool, you can disable the write protection on all external storage devices with ease. In addition, this software also provides reliable technical support to assist users in maintaining the excellent performance of their hard drives.
Follow the simple tutorial to remove the write protection on your Kingston DT50 USB:
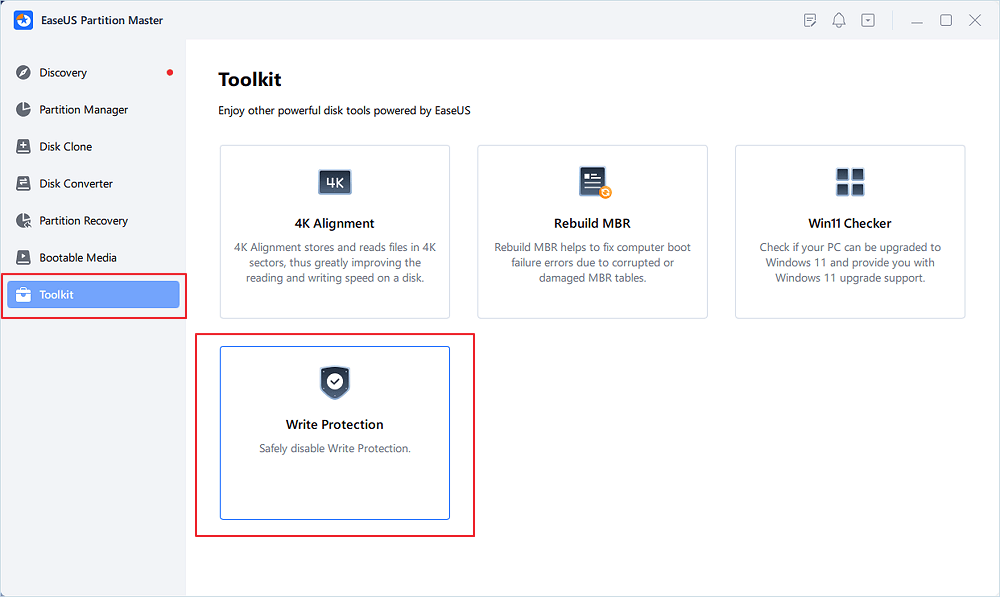
Step 1. Download and install EaseUS Partition Master, go to the Toolkit section, and click "Write Protection".
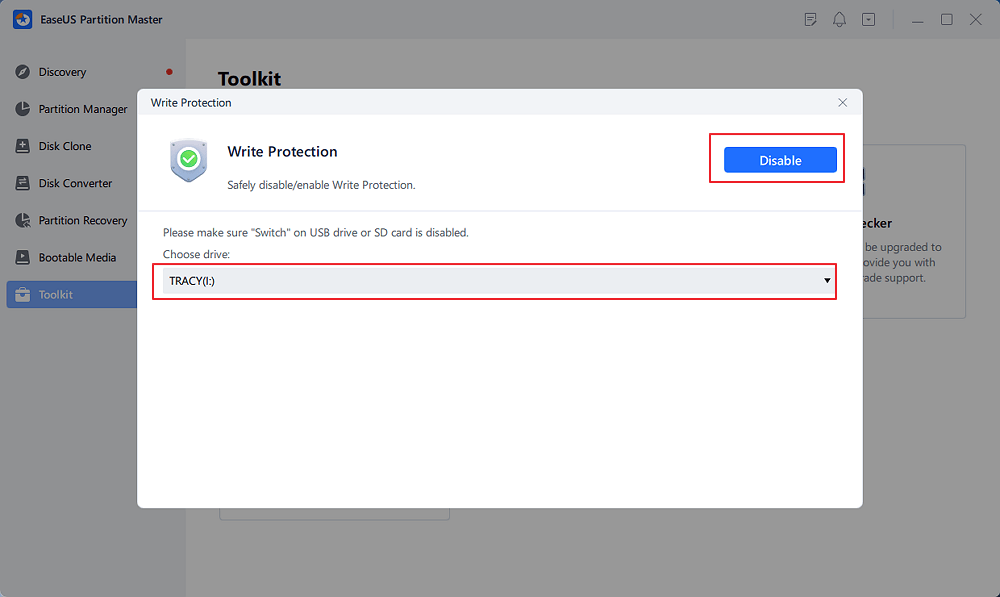
Step 2. Select your write protected USB, USB external disk or SD card, and click "Disable".
The Versatility of EaseUS Partition Master
- Adjust partition sizes without data loss.
- Combine partitions in Windows 10 free.
- Move data to a new disk or create backups effortlessly.
- Identify and repair bad sectors on hard drives.
Install and launch this all-in-one disk manager to enhance your experience of computing.
Way 2. Run Command Lines
If your hard drive is write-protected or read-only, you can run Diskpart command lines to clear the read-only state and make it writable again. Be careful when you follow these commands since any incorrect moderation may harm your drive or the data on it:
Step 1. Connect your Kinston DT50 USB to the computer first.
Step 2. Press the "Windows + R" keys, input cmd in the Run box, and hit "OK."
Step 3. Write diskpart and hit "Enter" to open the program.
Step 4. Type the following commands and tap "Enter" after each:
- list disk
- select disk $ ($ is the USB flash drive number of your write-protected Kingston DT50.)
- attributes disk clear readonly
- exit(To close the Diskpart utility.)
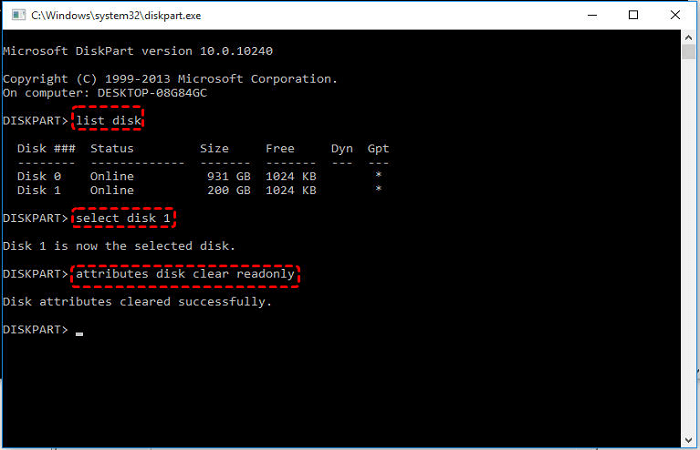
After all is done, reconnect your Kingston DT50 USB to the computer and check if it's writable now. For your information, we have prepared some extended reading articles as follows:
Way 3. Perform Anti-virus Software
If some unknown viruses or malware attacks your USB flash drive, it may trigger the write protection that aims to protect your data. Therefore, you can download some efficient anti-virus software to repair the USB and disable write protection.
Here are the quick steps:
Step 1. Download and install anti-virus software from the official site on your computer.
Step 2. Plug the write-protected USB into your computer.
Step 3. Run anti-virus software to scan the USB and eliminate the virus.
Way 4. Use Registry Editor
Registry Editor is an advanced program that can fix write-protected and read-only errors on the USB, SD card, or internal/external hard drive. However, the complexity increases if you remove write protection using Registry Editor. If you are not sure what you are doing, you can retort to the easy-to-use software EaseUS Partition Master.
Connect your write-protected USB with the computer and refer to the guide below:
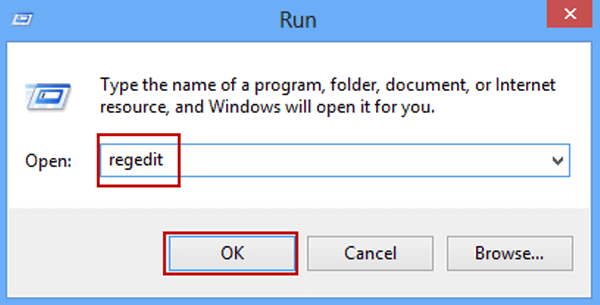
Step 1. By hitting "Windows + R" and entering regedit into the Run box, you may access the Registry Editor.
Step 2. Type and go to HKEY_LOCAL_MACHINE\SYSTEM\CurrentControlSet\Control\StorageDevicePolicies.
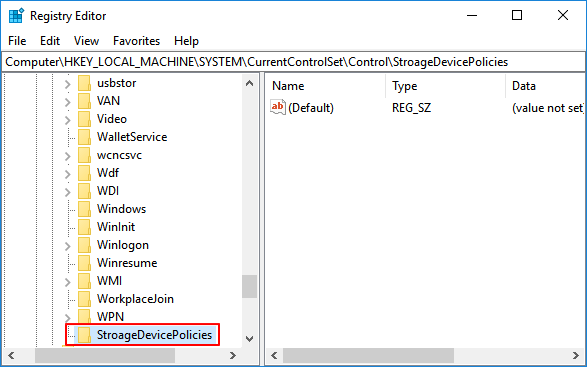
Step 3. Change the DWORD value to 0 and check Storage Device Policies. Next, select OK.
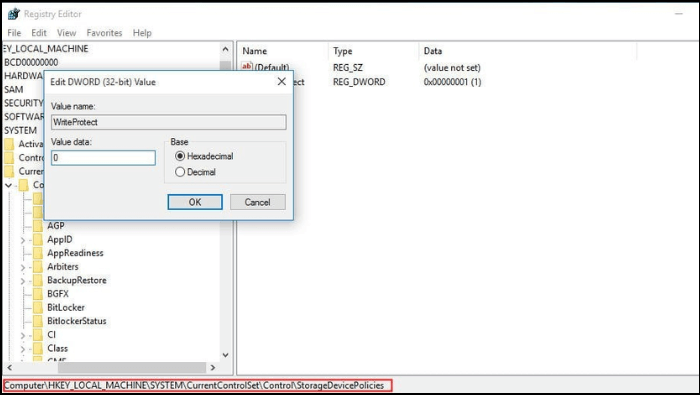
At the end, close the Registry Editor and reboot your computer to see if you successfully turn off the write protection on the Kingston DT50 USB.
Why Is My Kingston DT50 Write Protected
The write protection security feature on a USB flash drive is usually used to protect the data stored on the drive from being accidentally deleted or modified. Here are the main reasons why Kingston DT50 became write-protected:
Physical write-protection switch: Some USB drives have a physical switch that can be toggled to enable or disable write protection. If this switch is in the locked position, the drive will be write-protected.
Malware or virus infection: Many malicious software or viruses can enable write protection on a USB drive to prevent users from losing data.
File system errors: Errors in the file system of the USB drive can cause it to become write-protected. This can happen due to improper ejection, sudden power loss, or software bugs.
Registry policy settings: In some cases, write protection can be enabled or disabled through changes in the Windows Registry Editor, which can be done intentionally by the normal user or administrators to restrict write access to USB drives.
Conclusion
This beginner's guideline analyzes why Kingston DT50 became write-protected in-depth, and it also offers four practical solutions to help users cope with this problem. Among these methods, EaseUS Partition Master stands out as it can help users seamlessly disable the write protection on their hard disks, USB flash drives, SD cards, and so on. Furthermore, it has beginner-friendly operations and other fantastic features. Thus, we highly recommend you download this tool for better solutions:
FAQs About How to Disable Write Protection on Kingston DT50
If you expect more related questions about disabling write protection on Kingston DT50, you can walk through this FAQ section and find what you need.
1. What should I do to remove write protection from my SSD?
Many different reasons can cause the write protection on SSD. Thus, you need a versatile utility that can help you remove it. EaseUS Partition Master can solve your problem perfectly as follows:
Step 1. Download and install EaseUS Partition Master, go to the Toolkit section, and click "Write Protection."
Step 2. Select your write-protected USB, USB external disk, or SD card, and click "Disable."
2. How do I unlock a read-only USB flash drive?
Most USB flash drives have a physical switch that can enable or disable the write protection. Thus, the easiest way is to slide the switch to the offside. Then, you can reconnect the USB to your PC and see if the data on it is writable.
3. Can I format a write-protected USB?
You can still format a write-protected USB and erase its data. Here is a tutorial on how to format a write-protected USB flash drive:
Step1. Open File Explorer and right-click This PC.
Step 2. Locate your write-protected USB drive and right-click on it.
Step 3. From the menu, select Format. Wait for the process to be completed.
How Can We Help You
About the Author
Updated by Tracy King
Tracy became a member of the EaseUS content team in 2013. Being a technical writer for over 10 years, she is enthusiastic about sharing tips to assist readers in resolving complex issues in disk management, file transfer, PC & Mac performance optimization, etc., like an expert.
Cici is the junior editor of the writing team of EaseUS. She accepted the systematic training on computers at EaseUS for over one year. Now, she wrote a lot of professional articles to help people resolve the issues of hard drive corruption, computer boot errors, and disk partition problems.
Product Reviews
-
I love that the changes you make with EaseUS Partition Master Free aren't immediately applied to the disks. It makes it way easier to play out what will happen after you've made all the changes. I also think the overall look and feel of EaseUS Partition Master Free makes whatever you're doing with your computer's partitions easy.
Read More -
Partition Master Free can Resize, Move, Merge, Migrate, and Copy disks or partitions; convert to local, change label, defragment, check and explore partition; and much more. A premium upgrade adds free tech support and the ability to resize dynamic volumes.
Read More -
It won't hot image your drives or align them, but since it's coupled with a partition manager, it allows you do perform many tasks at once, instead of just cloning drives. You can move partitions around, resize them, defragment, and more, along with the other tools you'd expect from a cloning tool.
Read More
Related Articles
-
How to Format SD Card on Windows 11? Here Are 4 Ways for You in 2026
![author icon]() Tracy King/2026/01/29
Tracy King/2026/01/29 -
Free Partition Manager for Windows 7/Windows 10 64 Bit
![author icon]() Jean/2026/01/29
Jean/2026/01/29 -
How to Fix Windows 11 Startup Repair Not Working | 7 Tips
![author icon]() Cici/2026/01/29
Cici/2026/01/29 -
How to Resize/Move/Clone BitLocker Partition on Windows 11/10 Without Decryption
![author icon]() Cedric/2026/01/29
Cedric/2026/01/29
Hot Topics
EaseUS Partition Master

Version 20.0 is here - full exFAT support, easier disk partitioning, and PC performance optimization.


