- Method 1. How to Delete Photos Manually on Mac in Photos App
- Method 2. How to Delete Albums on Mac in Photos App
- Method 3. How to Delete Photos on Mac but Not iCloud
- Method 4. How to Delete Photos on Mac in Photo Library
- Method 5. How to Delete Photos on Mac with Shortcuts
- Method 6. How to Delete Photos on Mac with Trash Folder
Before learning how to delete photos on Mac, maybe you should know why you need to delete photos on Mac. When using the Mac devices such as MacBook Air and MacBook Pro, the internal hard disk storage space is limited. If users have many photos and videos on their Mac device, the Mac will run slow and may cause other system issues. To free up space on Macintosh HD, you should first delete photos and videos on Mac.
It is possible that some new Mac users don't know how to delete photos on Mac. We are here to help users delete pictures in the Photos app, Library, Trash folder, or with delete shortcuts. If you accidentally deleted some important images, you can skip to part 7 to recover deleted photos on Mac.
Maybe you should download this software in advance.
Method 1. How to Delete Photos Manually on Mac in Photos App
The first method to delete photos on Mac is the basic way that Apple Support recommends. It is simple enough for new Mac users, and you can select the unwanted photos and recordings in the macOS Photos app on Mac.
Step 1. Usually, the Photos app will stick on the Dock. Click the icon to launch it.
Step 2. Click Photos from the sidebar, and select the pictures you don't want to keep in your Photos app.
Step 3. A window will show up to ask you if you really want to delete these items. You can choose "Cancel" if you regret it. If you are sure about the deletion, click "Delete".
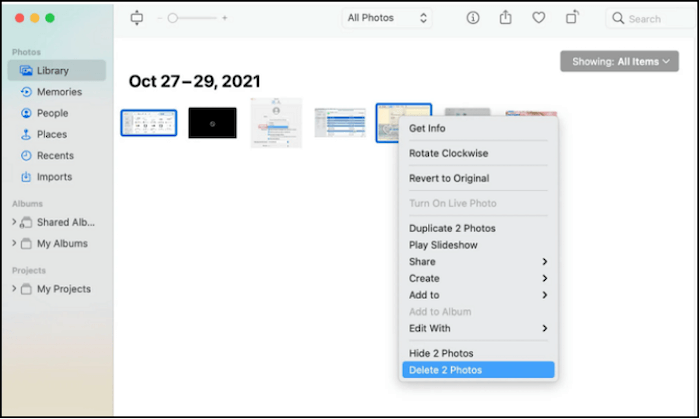
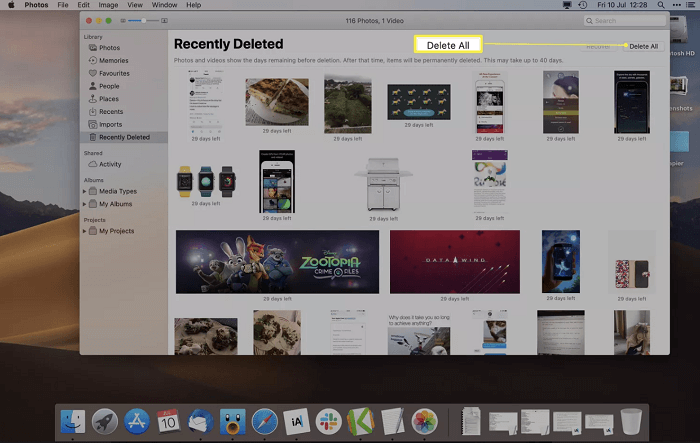
Step 4. The deleted photos can be found in the Recently Deleted album. If you don't want to recover these photos, you can click "Delete All" to erase them in one click.
Method 2. How to Delete Albums on Mac in Photos App
macOS will divide your photos into different albums, and delete duplicate photos on Mac easily by deleting the duplicate album.
Step 1. Open the Photos window on Mac, and move your pointer to the Album section.
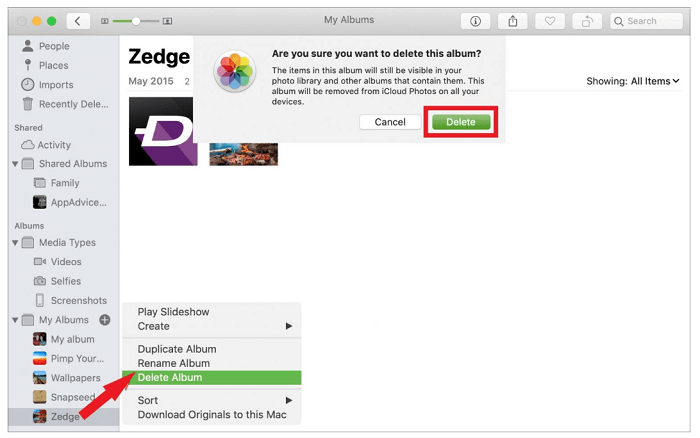
Step 2. You will see all the default albums and customized albums here. Select the albums you want to remove.

Step 3. After right-clicking the target album, you should choose "Delete Album". Confirm your operation, and the pictures in the album will be deleted from your Mac.
If you think the methods we provide in this passage are helpful, you can share this passage with your friends!
Method 3. How to Delete Photos on Mac but Not iCloud
If you sync with iCloud on Mac, the pictures deleted from the Photos app will delete from iCloud, too. If you need to recover deleted photos from iCloud on Mac, you can choose not to sync with iCloud. Check the following tutorial to disable iCloud sync photos.
Step 1. Open the System Preferences on Mac.
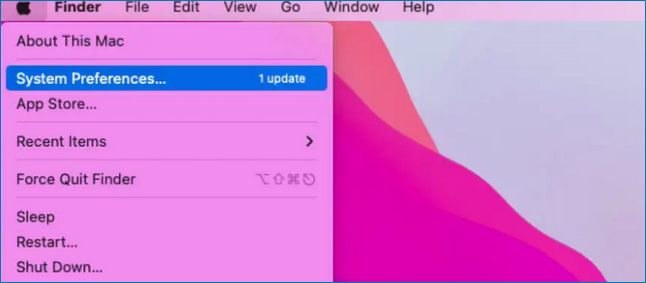
Step 2. Then, click the iCloud icon to open it.
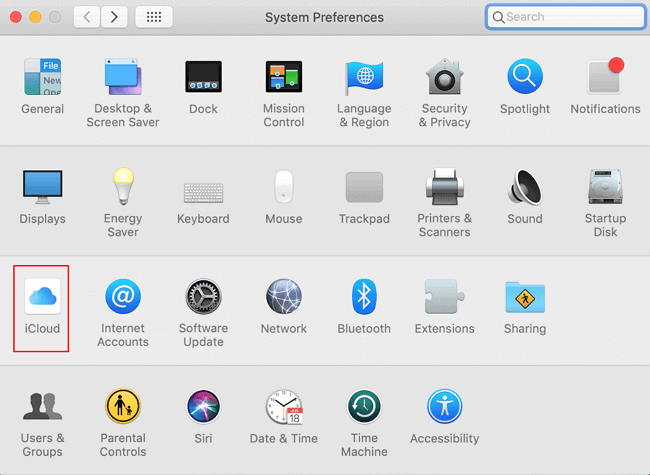
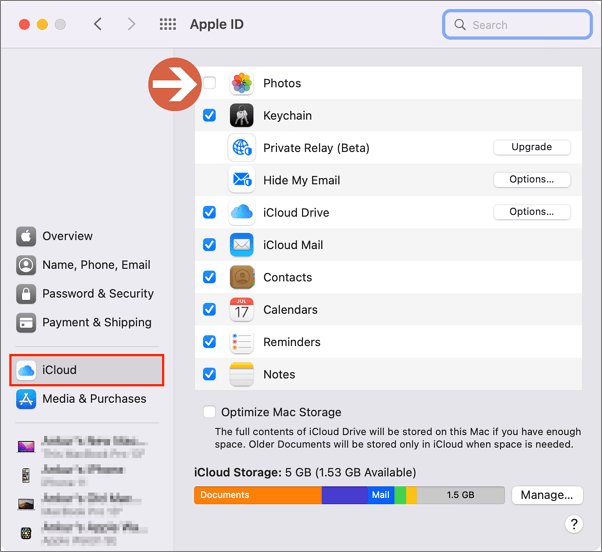
Step 3. You will see all the apps on this Mac that use iCloud. Uncheck the Photos app.
Method 4. How to Delete Photos by Deleting the Photo Library
Mac users can also delete photos on Mac by deleting the whole Photo Library. This method is also very simple. You should back up your photos in case you want to recover them after deletion. Check the detailed tutorial here:
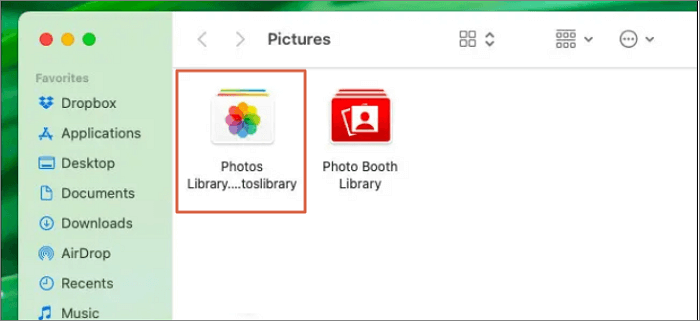
Step 1. Open the Finder > Go > Home.
Step 2. Then, you should go to the Pictures folder.
Step 3. Right-click the Photo Library and delete it.
Method 5. How to Delete Photos on Mac with Shortcuts
There are some shortcuts you can use to delete photos on Mac quickly:
Shortcut 1. Command + Delete is a set of the move to Trash shortcut on Mac, and it will delete all the selected photos, and these photos will contain in the Trash folder.

Shortcut 2. Option + Command + Delete will delete selected photos permanently without putting them into the Trash folder. It can also help you a lot if you don't know how to delete files on Mac that won't delete.
Shortcut 3. Command + Shift + Delete can delete photos in Trash. Actually, that shortcut can empty Trash Mac.
Method 6. How to Delete Photos on Mac with Trash Folder
Do you know what Mac Trash is and where is Trash on Mac? This special folder can keep deleted files for you, and you can find them from the Dock. When you need to delete photos that are already in the Trash or want to permanently delete some photos, you can use this method:
Step 1. Find the photos you want to delete and select them. You can use the command key to choose multiple photos.
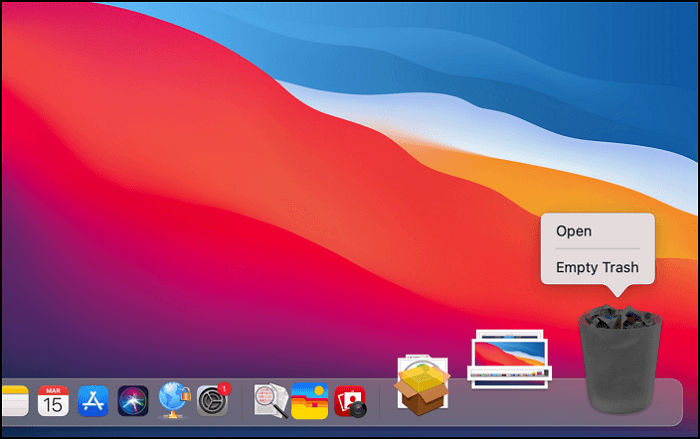
Step 2. Drag these photos to the Trash folder. (You don't need to open the Trash folder. You can drag these photos to the Trash icon. The photos will be moved to the Trash folder.)

Step 3. Then, you can right-click the Trash icon > Empty Trash. All the files in the Trash folder will be deleted immediately.
How to Recover Deleted Photos on Mac with Software
When you force empty Trash on Mac or permanently delete some photos on Mac, you think the photos will disappear from your Mac forever. It is not like that, and the data remains on your disk. When you want to recover deleted files Mac, you can restore the deleted files with photo recovery software.
EaseUS Data Recovery Wizard for Mac will not disappoint you, and it can be a handy tool for Mac users. With its powerful functions and user-friendly interface, you will enjoy using it. We offer an opportunity to download the free trial of EaseUS Data Recovery Wizard, don't hesitate and click the following button to get it!
To help you learn more about this reliable Mac photo recovery software, here are some highlights you don't want to miss:
- Support Mac Trash recovery, this software will help you get back deleted photos even after emptying the Trash folder on your Mac.
- Retrieve deleted or lost photos, videos, audio, documents, and emails from different storage devices. You can recover different kinds of files with this tool.
- Perform data recovery on Mac from various storage devices: Mac hard drive recovery, USB flash drive recovery, Pen drive recovery, and digital camera recovery.
After installing this safe Mac recovery program on your Mac, you can recover deleted photos on your Mac step by step:
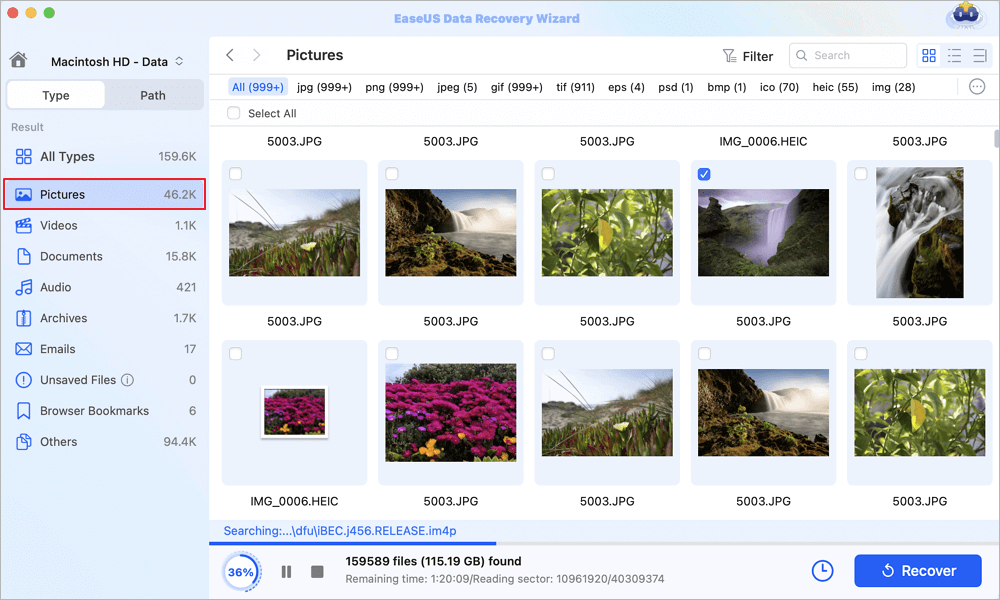
Step 1. Scan for lost photos
Select the location where your valuable photos were lost and click the "Search for lost files" button.

Step 2. Select wanted photos
EaseUS Data Recovery Wizard for Mac will immediately start a scan on your selected disk volume. Meanwhile, the scanning results will be presented in the left pane. By Path and Type, you can quickly filter the photos you've lost earlier.
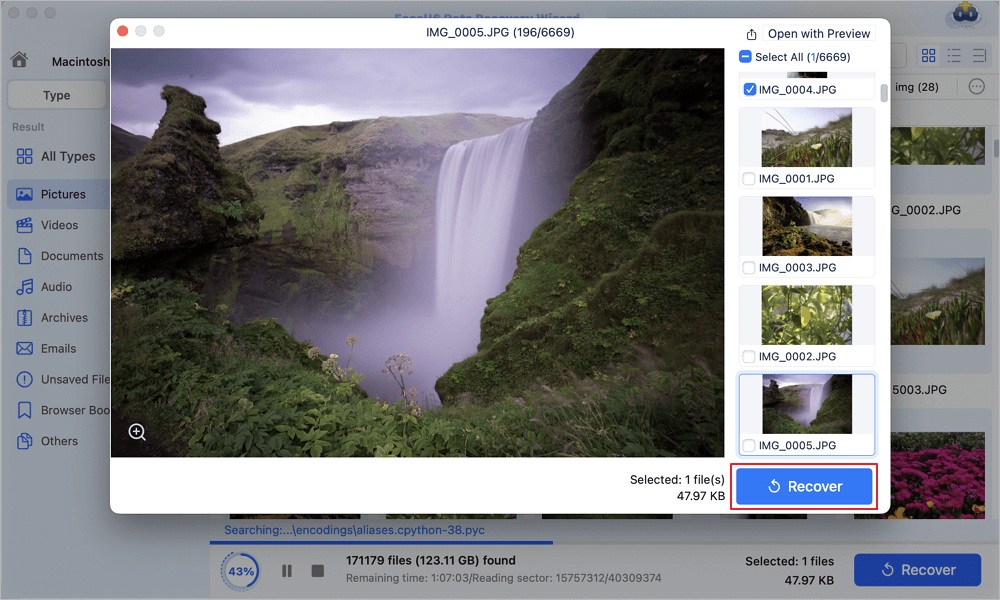
Step 3. Recover lost photos
Select the target photos and click the "Recover" button to get them back at once.
Conclusion
We hope the six methods we have introduced in this article will help you solve the problem. You'd better download EaseUS Data Recovery Wizard for Mac in case you want to recover some deleted images on Mac. By the way, it can also help you repair corrupted videos on Mac. Get the free trial of this software today!
How to Delete Photos on Mac FAQs
This is the last part of this tutorial, and you can check the extra information here:
1. How to delete an album on Mac?
Mac users can use three methods to delete an album on Mac:
- 1. Delete the album on Mac with a control click.
- 2. Delete the album on Mac with Mac Terminal.
- 3. Delete the album from iCloud.
2. Can I recover deleted photos from the Canon camera?
Yes, you can recover deleted photos from Canon camera on Mac with EaseUS Data Recovery Wizard for Mac:
- 1. Remove the SD card from your Canon camera, and select it in the recovery software.
- 2. There are two modes to scan your Canon SD card. If the quick scan cannot find the target photos, try a deep scan.
- 3. Select all the wanted pictures and hit the Recover button.
3. What is the most recommended Mac photo recovery software?
Here are some good Mac recovery programs:
- 1. EaseUS Data Recovery Wizard for Mac
- 2. Recoverit for Mac
- 3. Data Rescue 6
- 4. PhotoRec
- 5. Disk Drill
- 6. Stellar Data Recovery for Mac
- 7. DM Disk Editor and Data Recovery Software
- 8. AnyRecover for Mac
4. Can I delete all the pictures on my Mac?
You can delete all pictures in the Photos app by selecting all the images and deleting them all, or you can delete all the albums in the Photos app. If you want all the photos to disappear, try to delete the whole Photo Library on Mac.
Was This Page Helpful?
Dany is an editor of EaseUS who lives and works in Chengdu, China. She focuses on writing articles about data recovery on Mac devices and PCs. She is devoted to improving her writing skills and enriching her professional knowledge. Dany also enjoys reading detective novels in her spare time.
-
EaseUS Data Recovery Wizard is a powerful system recovery software, designed to enable you to recover files you’ve deleted accidentally, potentially lost to malware or an entire hard drive partition.
Read More -
EaseUS Data Recovery Wizard is the best we have seen. It's far from perfect, partly because today's advanced disk technology makes data-recovery more difficult than it was with the simpler technology of the past.
Read More -
EaseUS Data Recovery Wizard Pro has a reputation as one of the best data recovery software programs on the market. It comes with a selection of advanced features, including partition recovery, formatted drive restoration, and corrupted file repair.
Read More
Related Articles
-
How to View Tesla Dashcam Footage [Model X, Model 3, and Model Y]
![author icon]() Brithny/Jun 17, 2026
Brithny/Jun 17, 2026 -
6 Best Ways to Restore Disappeared Desktop on Mac [Step-by-Step Tutorial]
![author icon]() Brithny/Jun 30, 2026
Brithny/Jun 30, 2026 -
My Mac Keeps Crashing After Tahoe Update: How to Fix
![author icon]() Jaden/Jun 17, 2026
Jaden/Jun 17, 2026 -
Fix WD Hard Drive Not Showing Up in Disk Utility with 4 Ways
![author icon]() Brithny/Jun 30, 2026
Brithny/Jun 30, 2026