-
![]() Fix Video_Scheduler_Internal_Error on Windows 10/11
Fix Video_Scheduler_Internal_Error on Windows 10/11 January 29,2026
 6 min read
 -
![]() How to Fix Drive Is Not Accessible Access Is Denied on Windows 11
How to Fix Drive Is Not Accessible Access Is Denied on Windows 11 February 12,2026
 6 min read
 -
![]() How to Remove Shortcut Virus from Hard Disk/USB/Pen Drive Without Losing Data
How to Remove Shortcut Virus from Hard Disk/USB/Pen Drive Without Losing Data January 29,2026
 6 min read
 -
![]() [Updated 2026] How to Fix Windows 11 Start Menu Not Working
[Updated 2026] How to Fix Windows 11 Start Menu Not Working February 12,2026
 6 min read
 -
![]()
-
![]() Bootable Data Recovery Software Full Information | for Beginner
Bootable Data Recovery Software Full Information | for Beginner January 29,2026
 6 min read
 -
![]()
-
![]() How to Reset Windows 10 Password in 4 Ways (Step-by-Step Tutorial)
How to Reset Windows 10 Password in 4 Ways (Step-by-Step Tutorial) January 29,2026
 6 min read
 -
![]()
-
![]() How to Recover Uninstalled Programs on Windows 11/10
How to Recover Uninstalled Programs on Windows 11/10 February 12,2026
 6 min read
Page Table of Contents
PAGE CONTENT:
Have your Windows machine become stuck on the "Please Wait" screen? Worry no more! This error may arise for various reasons, such as damaged system files, incompatibilities with third-party applications, Windows update issues, or even hardware malfunctions. This guide will address how to solve this irritating issue.
We'll go into the details of the problem, look into probable reasons, and provide you with 6 top-notch solutions to get rid of it for good. Whether you're using Windows 10 or the newest version of Windows 11, our solutions are designed to assist you in solving this problem.
Before we get into the answers, you can unplug unnecessary peripheral devices, which may frequently serve as a quick repair.
🌟Recover Data from the Stuck Windows PC with Recovery Software
When you're trapped on the "Please Wait" page, it's inconvenient and may raise worries about your data's security. This is where EaseUS Data Recovery Wizard Pro comes in. This sophisticated data recovery program is your dependable partner when dealing with a frozen Windows PC.
When your Windows machine refuses to start, maybe owing to the "Please Wait" error, you may be concerned that your data is unavailable or lost. You may, however, get files off a computer that won't turn on comfortably with EaseUS Data Recovery Wizard Pro. Let's explore some of the key features of this software and recover deleted files.
- ✅Recover data from SSD that won't boot. EaseUS data recovery software can help you create a bootable USB to perform data recovery.
- ✅Support data recovery from hard disks, SSDs, USB drives, external hard drives, SD cards, and more is among its many functions.
- ✅This program can recover data when encountering Windows updates stuck at 100%, system crashes, viruses, and "Please Wait" errors.
You can easily protect and restore your crucial information with EaseUS Data Recovery Wizard Pro:
Step 1. Create a bootable disk
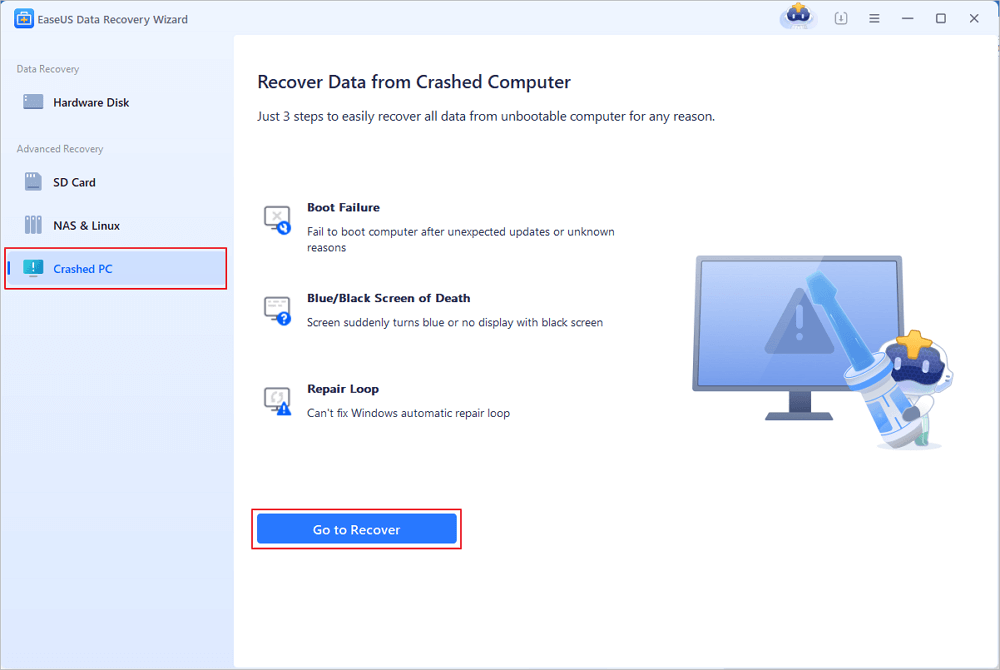
Launch EaseUS Data Recovery Wizard, choose "Crashed PC" and click "Go to Recover".
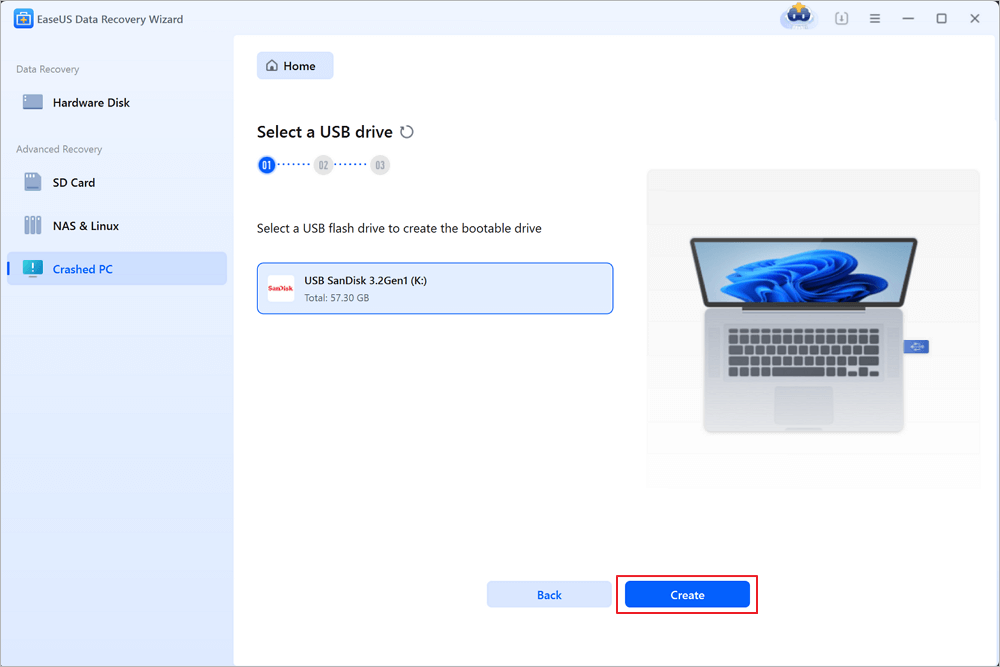
Select an empty USB to create the bootable drive and click "Create".
⚠️Warning: When you create a bootable disk, EaseUS Data Recovery Wizard will erase all data saved in the USB drive. Back up important data beforehand.
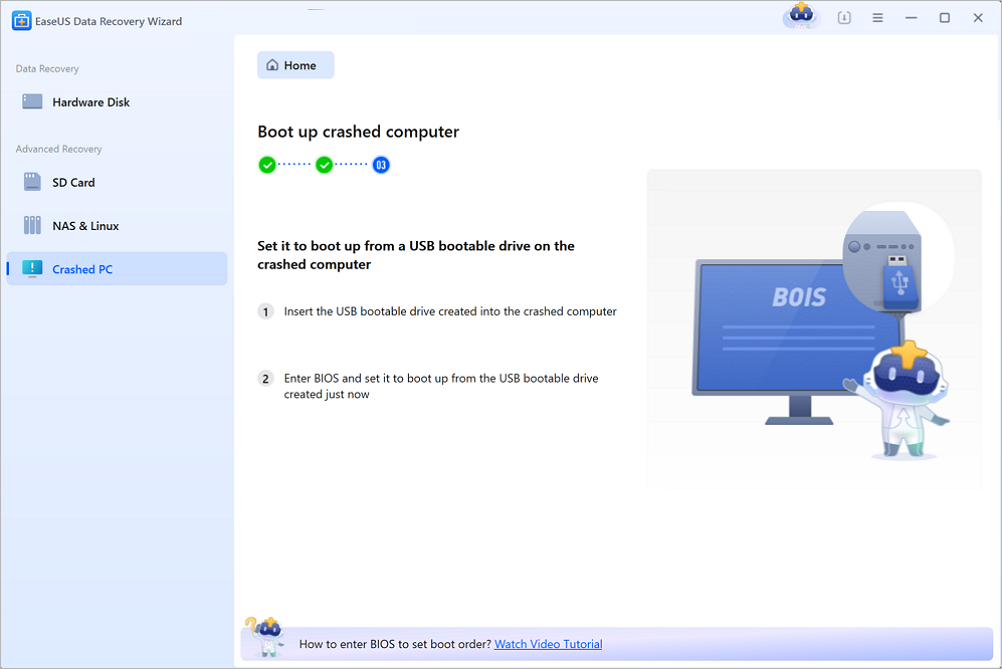
Step 2. Boot your computer from the bootable USB
Connect the bootable disk to the PC that won't boot and change your computer boot sequence in BIOS. For most users, it works well when they restart their computer and press F2 simultaneously to enter BIOS.
Set to boot the PC from "Removable Devices" (bootable USB disk) beyond Hard Drive. Press "F10" to save and exit.
Step 3. Recover data from a crashed system/PC
After booting from EaseUS Data Recovery Wizard bootable disk, select the drive you want to scan to find all your lost files. Preview and recover the files you need to a safe location.
💡Tip: You can restore data on the local disks, external hard drives, and also the cloud storage.
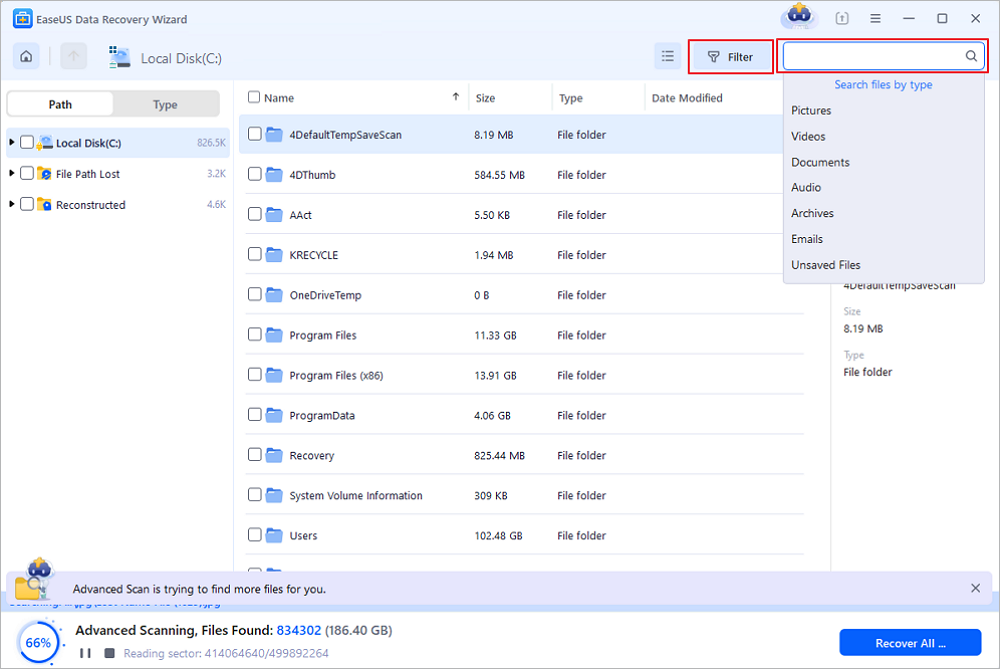
Get your data back even if your computer is frozen or unbootable, and share this helpful method with others who could benefit from it.
How to Fix Windows Stuck on Please Wait [6 Ways]
Experiencing the "Please Wait" error on your Windows PC might be irritating. But don't worry; we've covered you with various practical solutions to this issue. Before going into the remedies, it's critical to understand how to boot into Safe Mode since this is often the first step in troubleshooting.
Follow the steps below:
Step 1. Press Win+X and choose "Shut down or sign out".
Step 2. Hold Shift and click "Restart" to launch Windows Recovery Environment.
Step 3. Once you've entered WinRE, Select Troubleshoot > Advanced > Startup Settings > Restart.
Step 4. After startup, enter Safe Mode by pressing F4, F5, or F6 for corresponding settings.
We'll offer a detailed tutorial for it in the following passage:
How to Boot in Windows 11 Safe Mode [in 6 Proven Ways] - EaseUS
I was wondering how to Boot Windows 11 in safe mode. Worry no more; this article will help with multiple methods. Read more >>
After learning how to boot Windows into Safe Mode, you can move on with the following six methods:
- Fix 1. Run Windows Update Troubleshooter
- Fix 2. Disable Windows Services
- Fix 3. Run DISM, SFC, and CHKDSK
- Fix 4. Perform Windows Startup Repair
- Fix 5. System Restore Windows
- Fix 6. Reset This PC
Before we get started on the repairs, we've created a video lesson to guide you through the steps. You may view it here to understand better the processes required. Following are some essential pointers from the video.
- 00:33 Diagnosing your PC
- 01:43 Preparing Automatic Repair
- 06:05 Restart your PC

Fix 1. Run Windows Update Troubleshooter
If your system becomes stuck on the "Please Wait" prompt, it might be due to conflicts caused by Windows updates. This problem may be resolved by using the Windows Update Troubleshooter; follow the steps below:
Step 1. Select "Settings" from the Start menu.
Step 2. In Settings, choose "Update & Security".
Step 3. From the left pane, choose "Troubleshoot".
Step 4. Scroll down to "Windows Update" and click. Next, select "Run the troubleshooter".
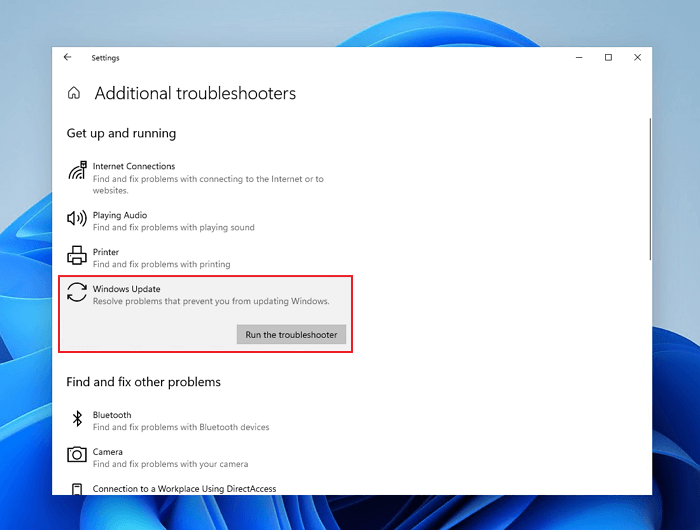
Step 5. The Windows Update Troubleshooter will find and fix problems. Comply with on-screen directions.
Step 6. After the troubleshooter finishes, restart your PC. If the Windows Update Troubleshooter is not working, check the following passage to resolve:
Windows Update Troubleshooter Not Working Windows 10/11 [FIXED]
Windows Update Troubleshooter is one of the most intriguing utilities in a Windows PC. But, when that stops working, users face extra issues. Read more >>
Fix 2. Disable Windows Services
Certain Windows services may occasionally cause the "Please Wait" error. We'll walk you through the process of deactivating these services with simple steps:
Step 1. Open Run by pressing Windows + "R" simultaneously.
Step 2. Type "services. msc" in Run and hit Enter or "OK." This opens System Configuration.
Step 3. Open System Configuration and choose "Services".
Step 4. Select "disabled" from startup type.
Step 5. Save changes by clicking "Apply" and "OK".

Step 6. For modifications to take effect, restart your PC.
Share this page on social media to let your friends and colleagues benefit from these methods.
Fix 3. Run DISM, SFC, and CHKDSK
Corrupted system files might be the source of the problem; below, we'll teach you how to fix the problem with these steps:
Step 1. Search "cmd" on Windows, right-click "Command Prompt," and choose "Run as administrator".

Step 2. Type in sfc /scannow and hit Enter on Command Prompt. Let the scan finish.

Step 3. After the SFC scan, hit Enter for DISM /Online /Cleanup-Image /RestoreHealth to run the DISM command.

Step 4. Type "chkdsk /f" and enter. Do you wish to schedule the scan for the next restart? Restart your PC after typing "Y" for yes.
Step 5. These scans may take a while. Be patient till they finish.
Step 6. After scanning, restart your PC.
Fix 4. Perform Windows Startup Repair
Windows Startup Repair automatically repairs faults that prevent Windows from booting correctly. Follow the steps below to fix the please wait screen:
Step 1. Restart your computer when inserting a Windows installation USB flash drive or DVD.
Step 2. During startup, press the boot menu key (typically F2, F12, or Del). Choose bootable media.
Step 3. Choose your language and click "Next".
Step 4. In the installation box, click "Repair your computer".
Step 5. In Advanced Options, choose "Troubleshoot".
Step 6. Click "Startup Repair" and follow the on-screen directions to fix Windows startup.
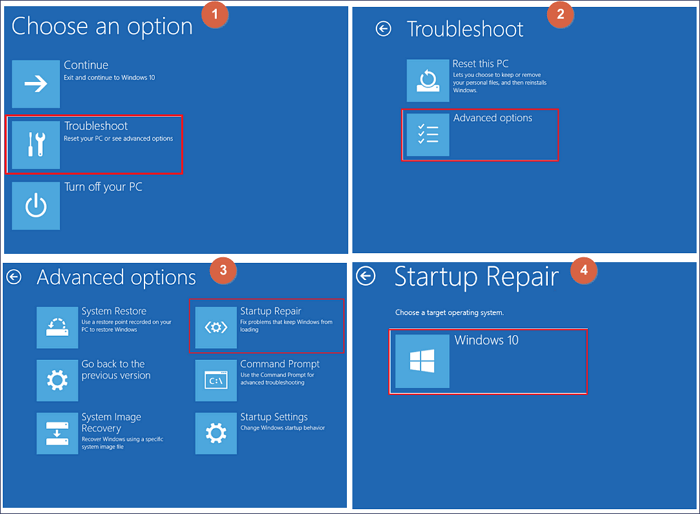
Step 7. Restart your PC after repair.
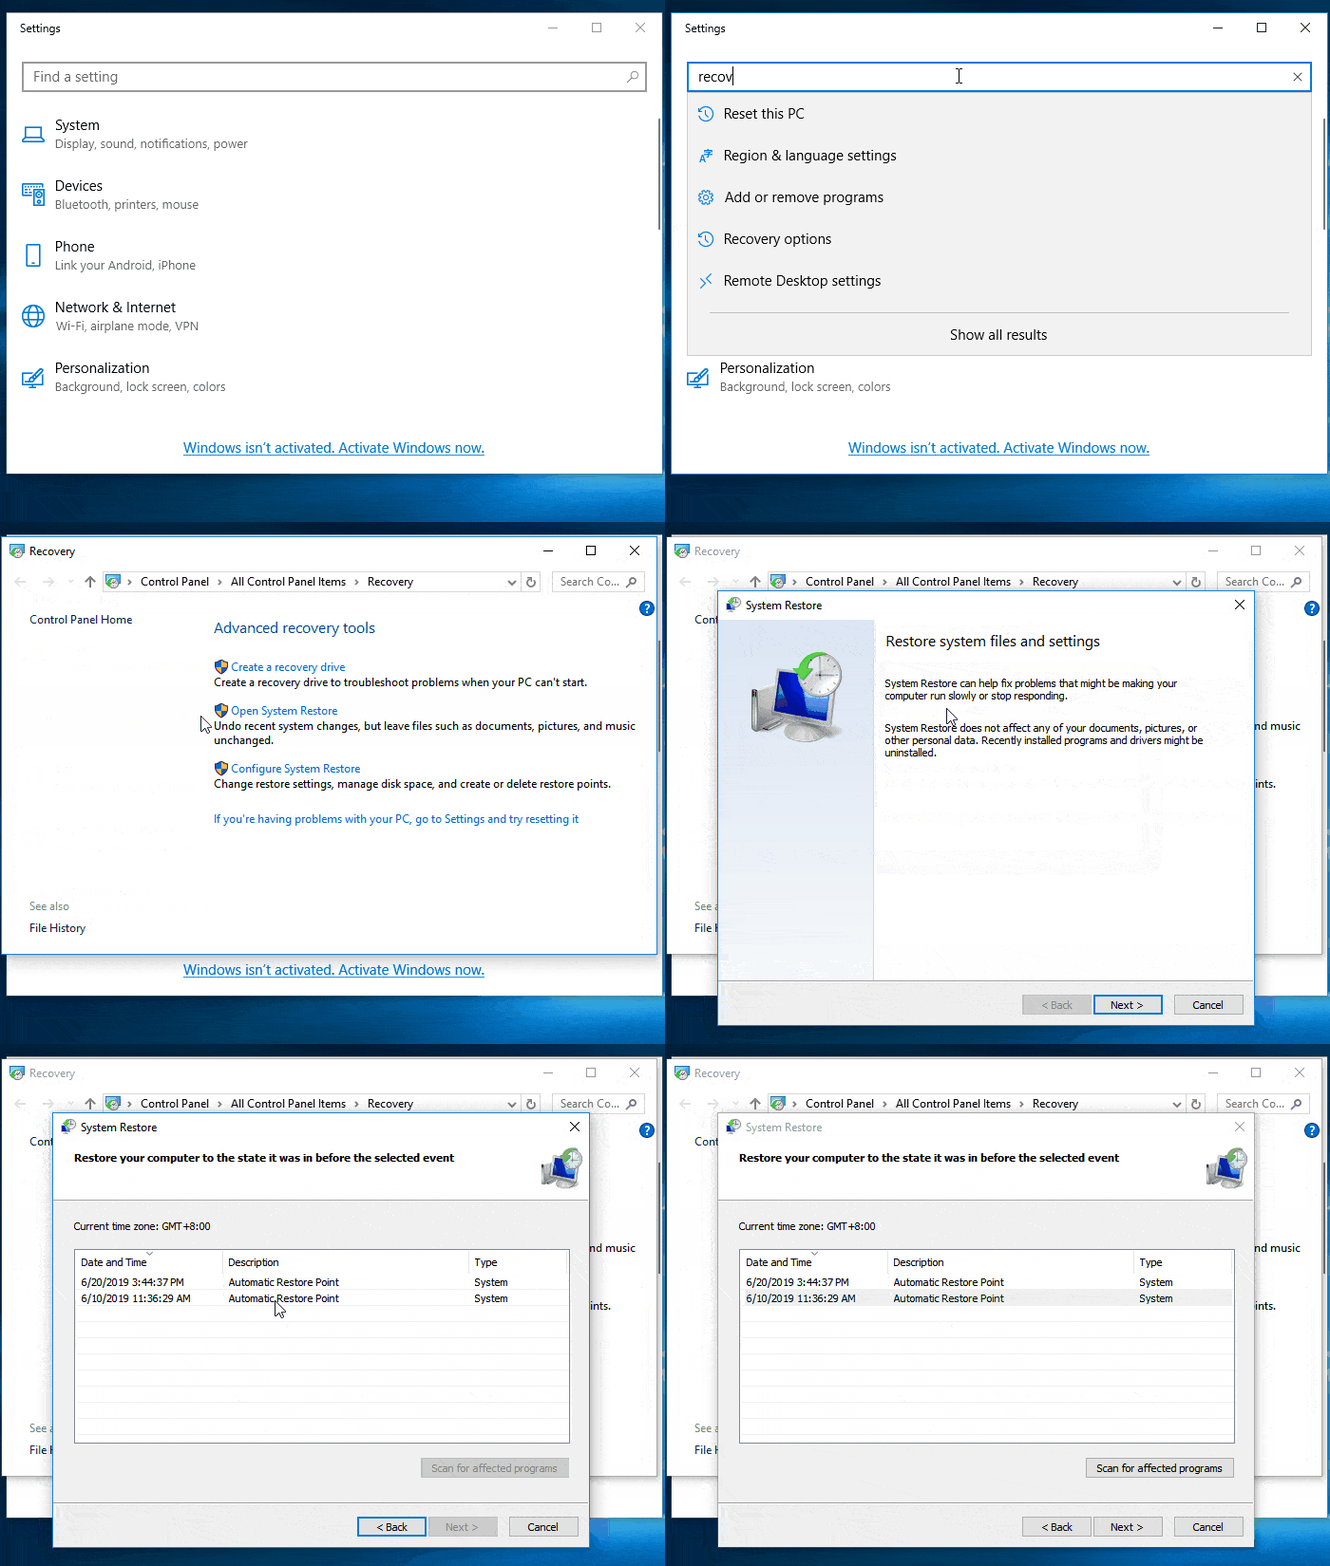
Fix 5. System Restore Windows
If recent system modifications, such as software installs, have caused the "Please Wait" error, doing a system restoration might assist. We'll help you through the procedures to get your system back up and running by system restoring Windows:
Step 1. Boot your computer in WinRE mode. Navigate to "System Restore" under Troubleshoot > Advanced Options.
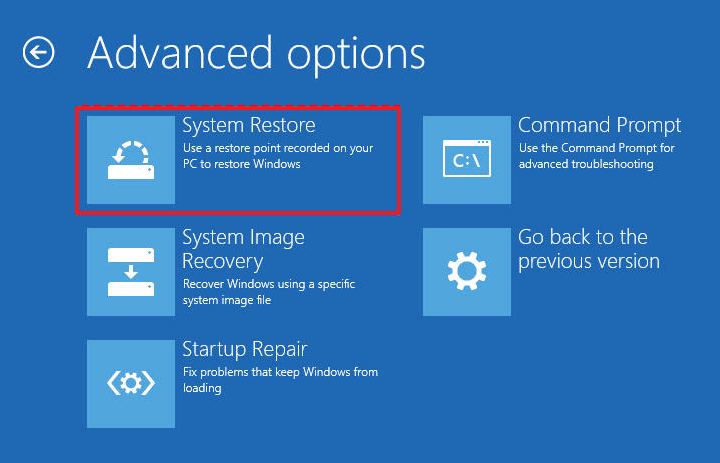
Step 2. Log in using your preferred user ID and password.
Step 3. Choose the system restore point generated previously, follow the instructions, and wait.
Fix 6. Reset This PC
If everything else fails, restoring your PC to factory settings may help to address persistent issues. Follow the steps below:
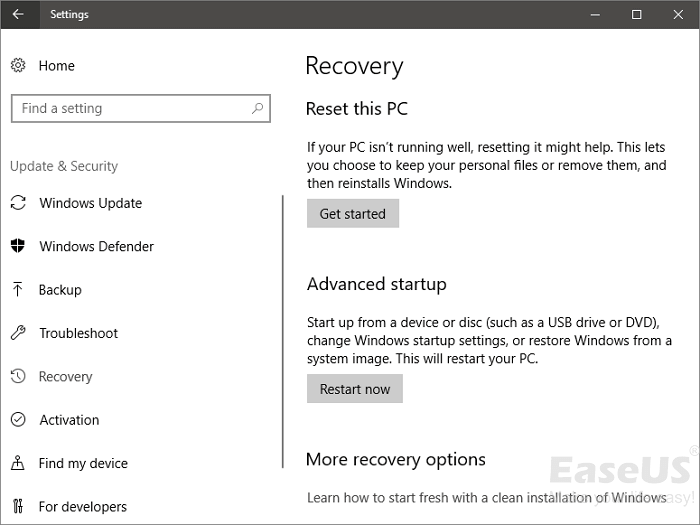
Step 1. Select the gear-shaped "Settings" icon from "Start".
Step 2. Open Settings and choose "Update & Security".
Step 3. In Update & Security, click "Recovery" from the left-hand menu.
Step 4. Select "Get started" under "Reset this PC." You will have two choices:
- Keep my files: It reinstalls Windows 10/11 without deleting your data.
- Remove everything: It deletes all data and reinstalls Windows.
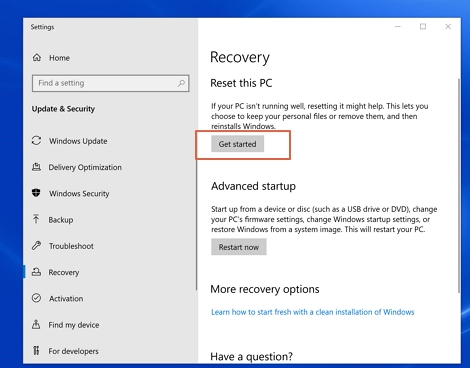
Step 5. Depending on your decision, prompts will appear. Carefully read and follow them.
Step 6. Your PC will restart when you confirm your choices. It may take time; be patient.
Step 7. After the reset, you must set up Windows again, exactly like when you bought your PC.
If you think this is helpful, share this on social media to let the audience know how to solve the window stuck on the "please wait" screen.
To Wrap Up
When Windows gets stuck on the "Please Wait" screen, it may be an unpleasant experience, but with the top 6 approaches presented in this tutorial, you have various options. These techniques cover multiple causes of stuck windows and their solutions ranging from running Windows Update Troubleshooter to a full system reset. Furthermore, if you've lost data due to this problem, EaseUS Data Recovery Wizard Pro provides a dependable solution for data recovery, even on unbootable PCs.
Windows 10/11 Stuck on Please Wait for Screen FAQs
Following are some of the most common questions that people ask regarding the please wait screen on your device:
1. How long should I wait to get Windows ready stuck?
The length of the issue depends on the severity of the problem. It is often suggested to wait 30 minutes. You may use the troubleshooting procedures described in this tutorial if progress is still being made.
2. How do I fix a stuck Windows 11 welcome screen?
To repair a stuck Windows 11 welcome screen, force restart, boot into Safe Mode, create a new user profile, update or roll back the driver, or do a System Restore. If all else fails, think about repairing your Windows installation.
3. Why does my computer get stuck on loading after Windows update?
If your computer gets stuck during a Windows update, it might be due to damaged data or program problems. You can try Force restarting, entering Safe Mode, or utilizing System Restore to correct this.
4. Will I lose data when Windows is stuck on? Please wait.
Fixing the "Please Wait" problem using proper procedures minimizes data loss. However, before trying any changes, it's always a good idea to back up your crucial data. If necessary, EaseUS Data Recovery Wizard Pro may assist in recovering lost data.
Was this page helpful?
-
Dany is an editor of EaseUS who lives and works in Chengdu, China. She focuses on writing articles about data recovery on Mac devices and PCs. She is devoted to improving her writing skills and enriching her professional knowledge. Dany also enjoys reading detective novels in her spare time. …

20+
Years of experience

160+
Countries and regions

72 Million+
Downloads

4.9 +
Trustpilot Score


Free Data
Recovery Software
Recover data up to 2GB for free!


