-
![]() BitLocker Drive Encryption, How to Unlock BitLocker Drive
BitLocker Drive Encryption, How to Unlock BitLocker Drive January 29,2026
 6 min read
 -
![]() League of Legends Replays & Highlights, Where to Find and How to Recover
League of Legends Replays & Highlights, Where to Find and How to Recover February 12,2026
 6 min read
 -
![]() How to Fix External Hard Drive Takes Long Time to Open and Read
How to Fix External Hard Drive Takes Long Time to Open and Read January 29,2026
 6 min read
 -
![]()
-
![]() How to Fix Download Error - 0x80248007 Windows 10/11
How to Fix Download Error - 0x80248007 Windows 10/11 January 29,2026
 6 min read
 -
![]() [Solved] Windows 11/10 Show Hidden Files Not Working
[Solved] Windows 11/10 Show Hidden Files Not Working January 29,2026
 6 min read
 -
![]() How to Fix Windows 10 Error Code 0xc00000e Without Data Loss
How to Fix Windows 10 Error Code 0xc00000e Without Data Loss February 12,2026
 6 min read
 -
![]() Solve 0x800f020b Windows Update Error in Windows 10/11
Solve 0x800f020b Windows Update Error in Windows 10/11 January 29,2026
 6 min read
 -
![]() How to Work on Large Excel Files Without Crashing (5-Step Guide)
How to Work on Large Excel Files Without Crashing (5-Step Guide) January 29,2026
 6 min read
 -
![]()
Page Table of Contents
Digital security is always changing, but one term, "Secure Boot", stands firm at the gateway to your computer's secure database. However, a confusing barrier sometimes stands in the way of an unbreakable defense: Secure Boot may occasionally take over while the operating system is in user mode.
Consider how unsettling it would be if you knew the security of your system might be breached at any time. Our services begin at this point. In this manual, we lace on our swords and set out on a journey to solve this mystery. Get ready for three powerful solutions, reinforced with clarity and screenshots, to restore your system's safety and sanity.
| Workable Solutions | Step-by-step Troubleshooting |
|---|---|
| Fix 1. Adjust UEFI Firmware Settings in Windows Troubleshooter | Access the system settings by pressing the Windows key and the letter "I" simultaneously...Full steps |
| Fix 2. Convert Partition Style from MBR to GPT | Press Windows+ "X" and pick "Disk Management" from the context menu...Full steps |
| Fix 3. Disable CSM and Reinstall Windows | Access UEFI settings as in Fix 1. Save and leave UEFI settings. Boot Windows from...Full steps |
What Causes Secure Boot Can Be Enabled When System in User Mode
Only digitally signed and trustworthy software can be executed during startup, safeguarding your system against viruses and unauthorized code. This is achieved via Secure Boot, a crucial security feature in current systems. Secure Boot being active in user mode is a puzzling situation that may cause serious issues that must be addressed immediately. Following are some of the issues:
- ⚠️Corrupted Boot Configuration: One typical issue is a corrupted boot configuration. This may occur when there is a discrepancy between the desired and real condition of the system as a result of things like unexpected power outages, botched software upgrades, or malware outbreaks.
- ❌Incorrect BIOS/UEFI Setting: Incorrect BIOS/UEFI settings may cause this problem. Secure Boot may be enabled in user mode if your machine's firmware is not set up correctly to support it.
- 🦠Malware/Viruses: Persistent malware/viruses may interfere with system files and settings, activating Secure Boot without the user's knowledge.
- 💽Hardware Issues: Bad sectors, like a broken processor or recording device, can interfere with the boot process and cause a problem.
Fix Secure Boot Can Be Enabled When System in User Mode
Secure Boot enables boot mode while the machine is in user mode. Let's get down to fixing this problem and getting your system back to normal. We'll show you three reliable solutions with detailed, easy-to-follow instructions and visual aids.
We've included timestamps in the following video to assist you in finding certain sections of the troubleshooting process:
- 00:00 Intro
- 01:00 Change Secure Boot Mode from Custom to Standard
- 01:19 Save Changes
Fix 1. Adjust UEFI Firmware Settings in Windows Troubleshooter
First, use Windows Troubleshooter to access your system's UEFI firmware settings to reclaim Secure Boot management.
Step 1. Access the system settings by pressing the Windows key and the letter "I" simultaneously. Click "Update & Security".

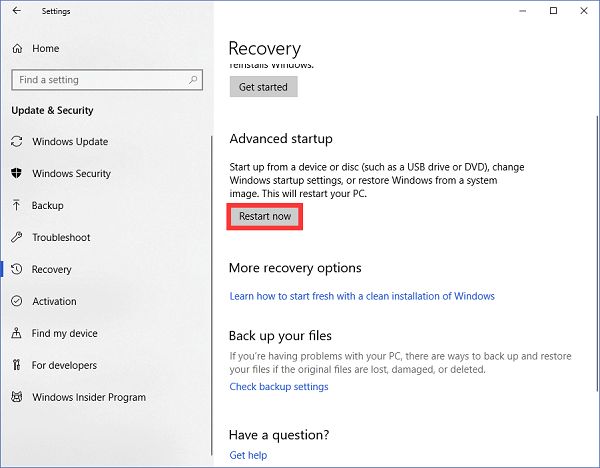
Step 2. Select "Recovery" from the left panel of Update & Security.
Step 3. Select "Restart now" under Advanced Startup. The computer reboots into Advanced starting options.
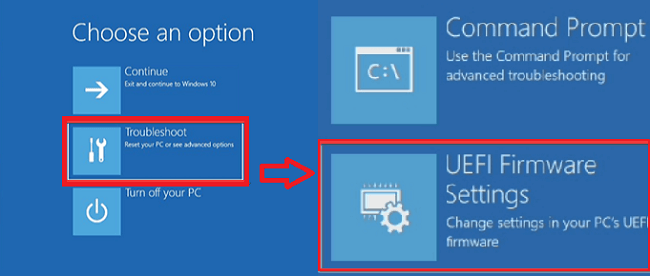
Step 4. Select "Troubleshoot" under Choose an option.
Step 5. Select "Advanced options".
Step 6. Select "UEFI Firmware Settings." from Advanced options. Restarting brings you to UEFI settings.
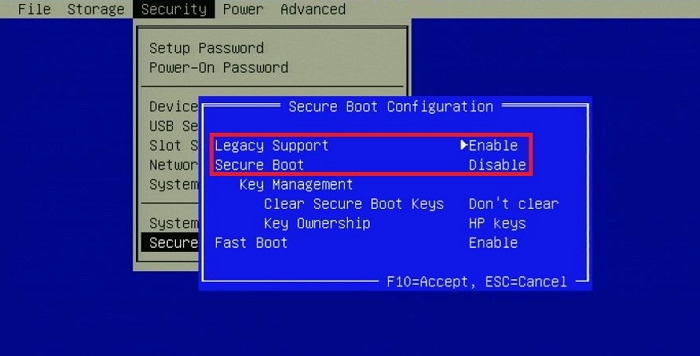
Step 7. Find Secure Boot in UEFI. It may be under "Security" or "Boot", depending on your motherboard manufacturer.
Step 8. Turn off Secure Boot. Leave UEFI settings after saving.
Fix 2. Convert Partition Style from MBR to GPT
If that doesn't work, we'll try switching your partition style from MBR to GPT, which is a different approach if fix 1 doesn't work.
Step 1. Press Windows+ "X" and pick "Disk Management" from the context menu.
Step 2. Find "Disk 0" in Disk Management. Right-click the disk and choose "Properties".
Step 3. In the Properties window's "Volumes" tab, check Partition style under Disk Information. If you see "Master Boot Record (MBR)", convert it to "GUID Partition Table (GPT)."
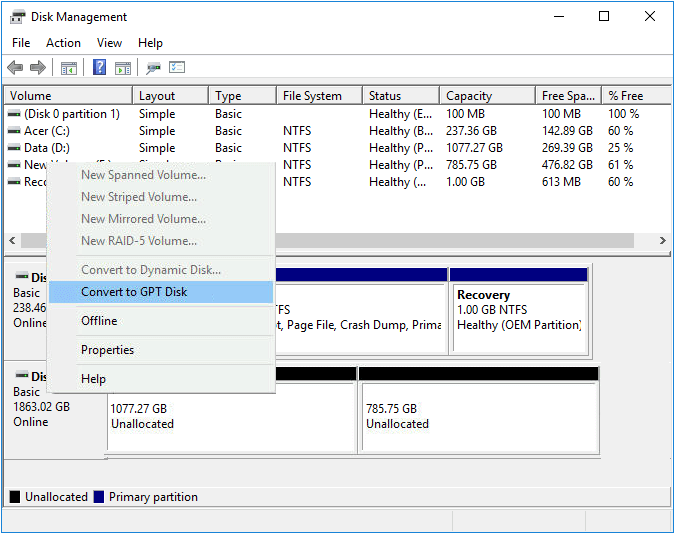
Step 4. To convert, back up your data and use MBR2GPT or the built-in "mbr2gpt" command-line program. Check the following passage to restore data if you encounter data loss after conversion.
How to Recover Lost Data after Disk MBR to GPT Conversion
When you lost data after disk MBR to GPT conversion using Disk Management, stay calm. Read more >>
Fix 3. Disable CSM and Reinstall Windows
If the first two repairs fail, try Fix 3, which disables the Compatibility Support Module (CSM) and reinstalls Windows.
Step 1. Access UEFI settings as in Fix 1.
Step 2. Find CSM or Legacy Support in UEFI settings. Make it inactive.
Step 3. Save and leave UEFI settings.
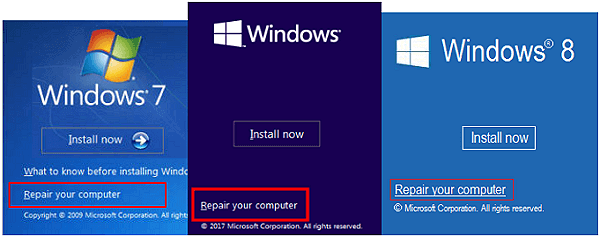
Step 4. Boot Windows from a USB or DVD and restart. Boot from installation media.
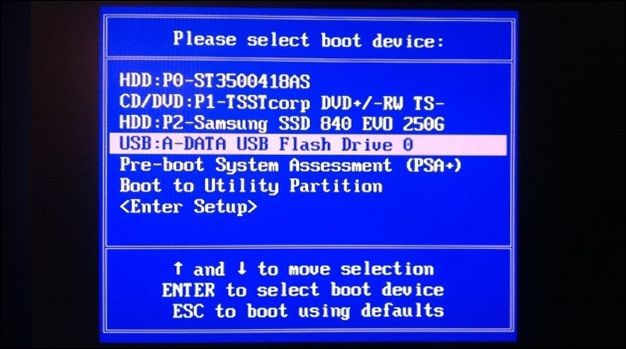
Step 5. Reinstall Windows using the on-screen instructions. Installation should use GPT partitions.
Step 6. Install Windows and set up your user account and settings.
If these solutions helped, share this page on social media. Sharing expertise may help others with similar challenges get aid.
After reinstalling Windows, you can restore data easily with EaseUS data recovery software. You can click the following passage to learn more:
How to Recover Files after Reinstalling Windows 11/10/8/7
Reinstalled Windows 10 and lost everything, you are not alone. Here, follow the three effective ways to recover files. Read more >>
Recover Lost Data After Fixing Secure Boot Issues
Assuming you have fixed the Secure Boot problems and restored system security, your next priority should be data recovery. You may have lost data during troubleshooting or backed it up before trying solutions and now need a trusted method to restore it. EaseUS Data Recovery Wizard Pro is useful for this purpose.
The EaseUS Data Recovery Wizard Pro is an effective and reliable application that can recover lost or deleted information from a wide range of storage media. This program may help you easily recover data lost due to Secure Boot problems, unintentional deletion, system failures, or formatting mistakes.
Following are some of the key features of EaseUS Data Recovery Wizard Pro:
- 🗑️Quickly and easily recover deleted files and directories using this program.
- 💽EaseUS can recover formatted hard drives, SSDs, and USB drives, and external storage devices.
- 💻If an unforeseen system crash causes you to lose data, this program may help you recover it.
You can check a detailed tutorial to recover data from your PC after fixing secure boot issues:
Step 1. Select a location and start scanning
Launch EaseUS Data Recovery Wizard and choose the partition where you lost data. Then, click "Search for Lost Data".

Step 2. Filter and preview files
Use the file format filter on the left or upper right corner to find the files you need. If you remember the file name, you can also search in the search box, which is the fastest way to find the target file. Then, you can click the "Preview" button or double-click a file to preview its content.

Step 3. Recover lost data or files
Click the checkbox next to the file and click "Recover" to restore the lost data to your local storage or Cloud drive.

Don't forget to recommend this software by sharing this passage on social media!
Conclusion
By fixing the confusing Secure Boot issue while your system is in user mode, you've protected your machine and solved the data recovery problem. In resolving these core issues, you have shown your mettle in the face of digital hardship and that you can adapt and find solutions.
Keep in mind that while obstacles may appear in the field of computers, they may be surmounted with the proper training and resources. As you continue with your protected system and restored data, help others experiencing similar difficulties by sharing what you've learned. Collectively, we strengthen our digital landscapes and equip our fellow citizens to do the same with assurance.
Secure Boot Issues FAQs
1. What is a secure boot in UEFI?
Secure Boot is an element of UEFI firmware that verifies the authenticity of starting software before allowing it to execute. It serves as a sentry against malicious and unwelcome software.
2. Why can't I enable and access Secure Boot in Windows?
Incompatible hardware, incorrect UEFI settings, or already present system circumstances are all potential causes of Secure Boot inaccessibility. Verify UEFI configuration, look for hardware incompatibilities, and resolve them.
3. How to enable Secure Boot in UEFI?
To activate Secure Boot in UEFI, enter the UEFI/BIOS settings when the machine is booting, then go to the security or boot menu and choose the option. Use only digitally signed versions of your operating system and bootloaders for maximum safety.
4. What to do if Secure Boot is enabled but Secure Boot status is disabled?
Check your system's UEFI/BIOS settings and firmware upgrades if Secure Boot is enabled in UEFI but displays as disabled. Verify that your system's firmware and operating system components have valid signatures. If problems continue, contact the manufacturer or a professional technician.
Was this page helpful?
-
Cedric Grantham is a senior editor and data recovery specialist of EaseUS. He mainly writes articles and how-to tips about data recovery on PC and Mac. He has handled 10,000+ data recovery cases and is good at data recovery of NTFS, FAT (FAT32 and ExFAT) file systems, and RAID structure reorganization. …
-
Dany is an editor of EaseUS who lives and works in Chengdu, China. She focuses on writing articles about data recovery on Mac devices and PCs. She is devoted to improving her writing skills and enriching her professional knowledge. Dany also enjoys reading detective novels in her spare time. …

20+
Years of experience

160+
Countries and regions

72 Million+
Downloads

4.9 +
Trustpilot Score


Free Data
Recovery Software
Recover data up to 2GB for free!


