-
![]() Fix The Type of the File System Is RAW Now with 3 Steps
Fix The Type of the File System Is RAW Now with 3 Steps January 29,2026
 6 min read
 -
![]() Fix GoPro Video Won't Play: Reapir Corrupted GoPro Videos
Fix GoPro Video Won't Play: Reapir Corrupted GoPro Videos January 29,2026
 6 min read
 -
![]() 8 Best Free External Hard Drive Recovery Software in 2026
8 Best Free External Hard Drive Recovery Software in 2026 February 01,2026
 6 min read
 -
![]() Fix Unable to Activate Windows After Hardware Change
Fix Unable to Activate Windows After Hardware Change February 12,2026
 6 min read
 -
![]()
-
![]()
-
![]() How to Repair PDF File Using Acrobat? 2026 Adobe PDF Repair Tool
How to Repair PDF File Using Acrobat? 2026 Adobe PDF Repair Tool January 29,2026
 6 min read
 -
![]() How to Fix Windows 11 File Explorer Crashing [8 Solutions]
How to Fix Windows 11 File Explorer Crashing [8 Solutions] February 12,2026
 6 min read
 -
![]() What Is Dynamic Disk | Everything About Windows Dynamic Disk You Should Know
What Is Dynamic Disk | Everything About Windows Dynamic Disk You Should Know January 29,2026
 6 min read
 -
![]() Word Cannot Open the Document: User Does Not Have Access Privileges
Word Cannot Open the Document: User Does Not Have Access Privileges January 29,2026
 6 min read
Page Table of Contents
What is the Aptio Setup Utility? Do you know how to access and fix the error when your computer is stuck in Aptio Setup Utility? Follow this page, you'll get an ultimate guide on how to access, make use of and fix Aptio Setup Utility problems effectively.
| Workable Solutions | Step-by-step Troubleshooting |
|---|---|
| 1. What Is Aptio Setup Utility | Aptio Setup Utility is known as a computer configuration utility created by American Megatrends...Full steps |
| 2. Access Aptio Setup Utility | Restart your computer and press the F2/F9/F12 or Del key continuously...Full steps |
| 3. How to Use Aptio Setup Utility | Restart the PC and press F2/F9/F12 or Del while booting up PC. Wait for the computer to enter Aptio...Full steps |
| 4. Access Files from Aptio | Prepare an empty USB. If you have important data on it, copy the data to another device...Full steps |
| 5. Computer Boots Into Aptio | Shut down the computer, open the computer case or laptop case...Full steps |
Note: When Aptio Setup Utility stops working or is stuck, you may not be able to access files and data on your computer. Bootable data recovery software - EaseUS Data Recovery Wizard can help.
What Is Aptio Setup Utility
Aptio Setup Utility is known as a computer configuration utility created by American Megatrends Incorporated (known as AMI). Aptio Setup Utility is also known as American Megatrends BIOS accessing utility that most comes with desktop computers and laptops.
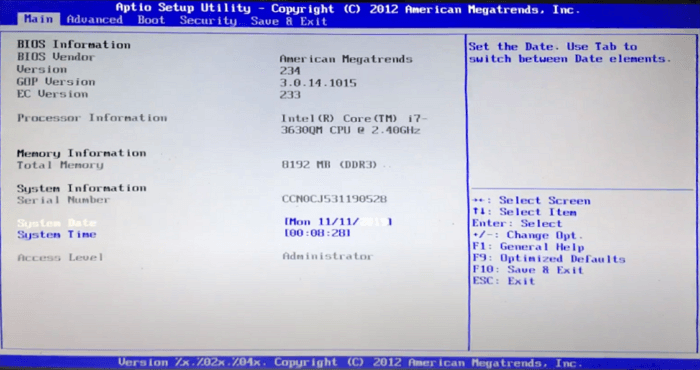
Currently, Aptio Setup Utility is widely used by the following computer manufactures:
- ASUS
- Dell
- Acer
- Samsung
- Alienware
- MSI
- Razer
- Etc.
With it, you can boot the PC into the Aptio Setup Utility and configure some boot settings on your computer instead of booting into the OS Windows 10/8.1/8/7.
How to Access Aptio Setup Utility
So how to access and enter the Aptio Setup Utility? Here is the guide:
Step 1. Restart your computer and press the F2/F9/F12 or Del key continuously.
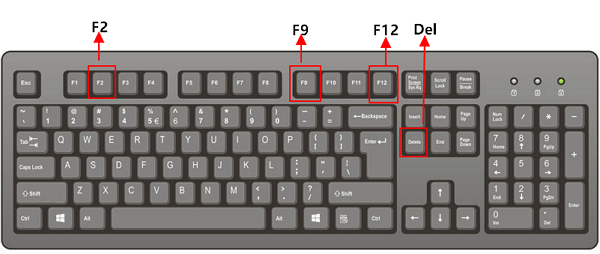
Step 2. Wait patiently, the computer will boot into Aptio Setup Utility.
In other words, your PC will enter the BIOS setup utility.
So what's in Aptio Setup Utility? Let's see:
Note that different versions of Aptio Setup Utility may be different in the boot menu. Some of them may contain the IO section.
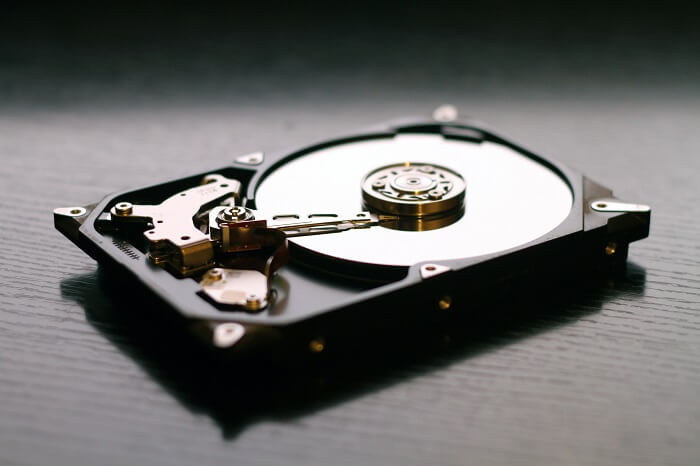
Fusion Drive vs. SSD vs. HDD. Which Is Better?
What's the difference between solid-state drive and hard drive? Which one to use for your PC? Read this post to learn more on SSD VS HDD now.
Let's check what does each option mean in the Aptio Setup Utility or Aptio BIOS boot menu:
#1 Main:
Aptio Setup Utility - BIOS Main option is an approach to load the system information, product information, CPU information, and other hardware information about your computer.
How-to Access:
Step 1. Restart PC and press F2/F9/F12 or Del while booting up PC.
Step 2. Wait for the computer to enter Aptio Boot Menu.
The system will enter the Main option by default.
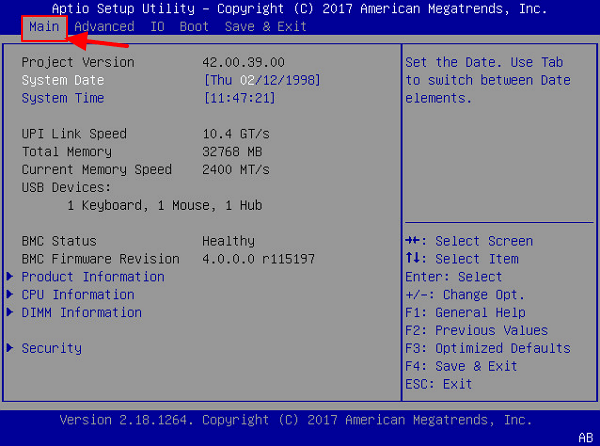
Step 3. Use the up or down arrow key to switch options, hit Enter to select and load specific items.
#2 Advanced:
The Advanced menu in Aptio Setup Utility is the main window that loads hardware settings on your computer, including Processors, USB Ports, Serial Port Console Redirection, Network Stack, etc.
How-to Access:
Step 1. Restart PC and press F2/F9/F12 or Del while booting up PC.
Step 2. Wait for the computer to enter Aptio Boot Menu.
Step 3. Use the Right arrow key to switch option and enter Advanced.
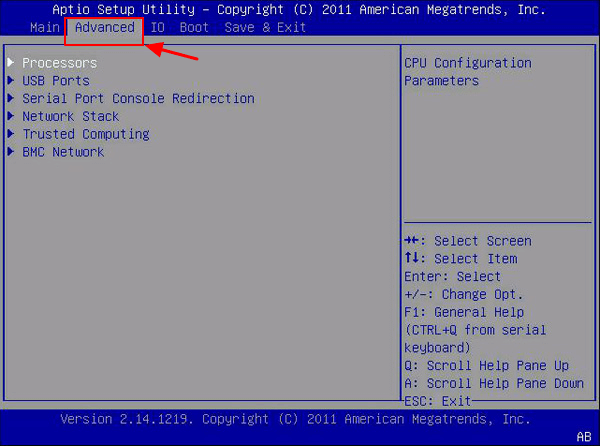
Step 4. Then you can use the Up or Down arrow key to change the settings of the hardware on your PC.
#3 IO:
Some lower editions of Aptio Setup Utility may don't contain this option. It contains PCI Subsystem Settings, IO Virtualization, IOAT Configuration, Internal Devices, Add In Cards, PCIE SLot Hardware Configuration.
How-to Access:
Step 1. Restart PC and press F2/F9/F12 or Del while booting up PC.
Step 2. Wait for the computer to enter Aptio Boot Menu.
Step 3. Use the Right arrow key to switch option and enter the IO option.
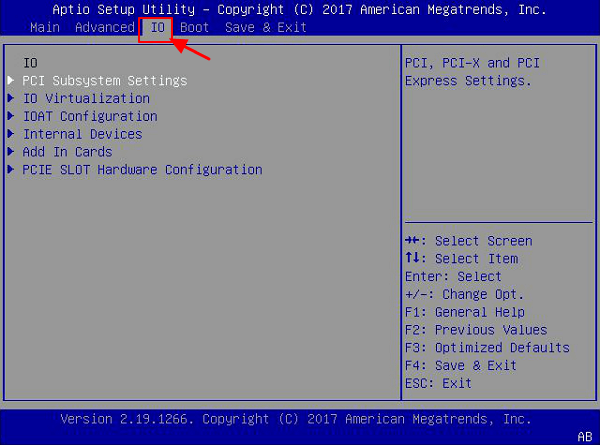
Step 4. Then use the Up or Down arrow key to select items that you want to configure.
#4 Boot:
It's the most frequently used option for configuring computer boot order or switching BIOS boot mode in Aptio Setup Utility. The Boot menu contains UEFI/BIOS Boot Mode, Retry Boot List, Network Boot Retry, OSA Configuration, Boo Priority, etc.
How-to Access:
Step 1. Restart PC and press F2/F9/F12 or Del while booting up PC.
Step 2. Wait for the computer to enter Aptio Boot Menu.
Step 3. Use the Right arrow key to switch options and enter the Boot menu.
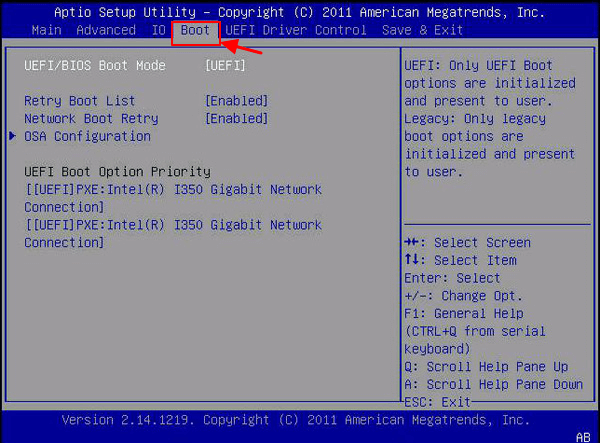
Step 4. Use the Up or Down key to select items that you want to change in the computer.
On this page, we covered the complete process of how to prepare SSD disk, migrate Windows OS to a new SSD, and make SSD as the boot drive in Windows 10/8/7, etc.

#5. Security:
The Security menu in Aptio Setup Utility contains items that are related to computer security, such as Supervisor Password, User Password, Boot Sector Virus Protection, etc. ]
How-to Access:
Step 1. Restart PC and press F2/F9/F12 or Del while booting up PC.
Step 2. Wait for the computer to enter Aptio Boot Menu.
Step 3. Use the Right arrow key to switch option and enter the Security menu.
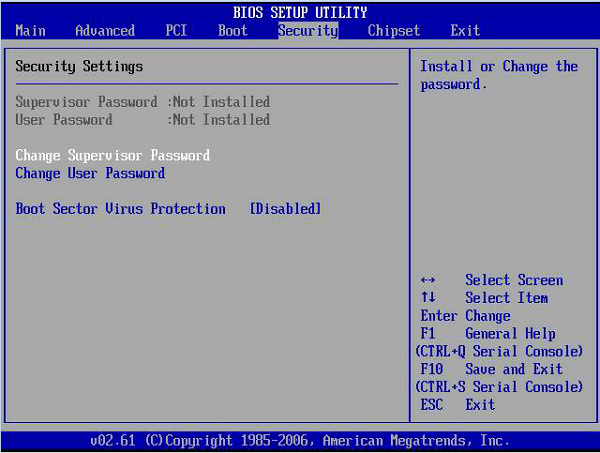
Step 4. Use the Up or Down key to load items and change its settings to better guard your computer security.
#6. Save & Exit:
In Aptio Setup Utility, when you configure changes on the computer, and you want to save the changes, you can enter the Save & Exit menu to keep all the changes. On it, you can Save Changes and Reset, Discard Changes and Exit, Discard Changes, and even Restore Defaults.
How-to Access:
Step 1. Restart PC and press F2/F9/F12 or Del while booting up PC.
Step 2. Wait for the computer to enter Aptio Boot Menu.
Step 3. Use the arrow keys and enter to configure settings to your computer.
Step 4. Use the right arrow key to enter Save and Exit menu, use the up or down arrow to select an item, and save the changes.
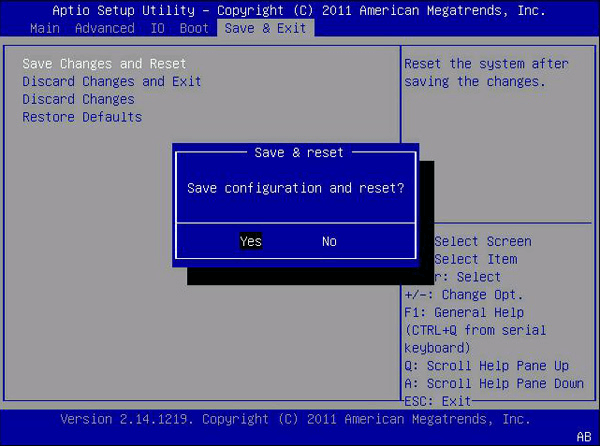
How to Use Aptio Setup Utility and Make Changes to Your PC
We collected some top and frequently configured items in Aptio Setup Utility and offered a detailed guide for you to change these settings on your computer. Let's see:
#1. Change BIOS Boot Mode & Boot Order
Applies to fix: Cloned SSD Won't Boot, Can't Install Windows on GPT Disk, Boot Windows from MBR
When your computer cannot boot up successfully on an MBR or GPT disk, it could be the Boot mode issue. You can fix this issue by configuring its Boot Mode into UEFI or BIOS: MBR - BIOS Legacy; GPT - UEFI.
Here is how to change the Boot Mode in Aptio Setup Utility:
Step 1. Restart PC and press F2/F9/F12 or Del while booting up PC.
Step 2. Wait for the computer to enter Aptio Boot Menu.
Step 3. Use the down arrow key to select UEFI/BIOS Boot Mode and hit "Enter" to bring up the Boot Mode options.
Select "UEFI" or "Legacy" and hit Enter.
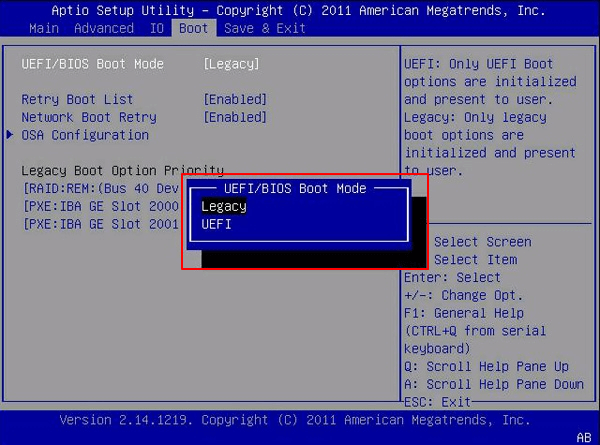
Step 4. To change the boot drive, use the down arrow key to select "Boot Configuration", hit Enter, and reselect "Set Boot Priority".
On the pop-up, select the target disk as your boot drive.
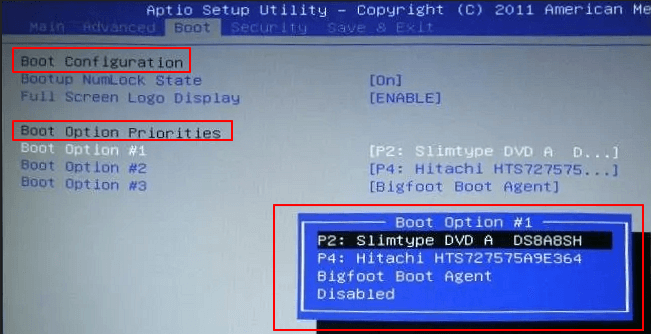
Step 5. Save the changes and exit Aptio Setup Utility. Reboot the PC and wait patiently.
#2. Factory Reset Aptio Setup Utility
Applies to fix: Aptio Setup Utility boot loop, computer boots into Aptio Setup Utility instead of the operating system error.
Note that when your computer directly boots into Aptio Setup Utility (BIOS menu), it could be configured into a false setting. You can try to factory reset Aptio Setup Utility to fix this issue.
How to start:
Step 1. Restart PC and press F2/F9/F12 or Del while booting up PC.
Step 2. Wait for the computer to enter Aptio Boot Menu.
Step 3. Got o Security, expand "I/O Interface Security" > "Secure Boot Control" and disable the Secure Boot option.
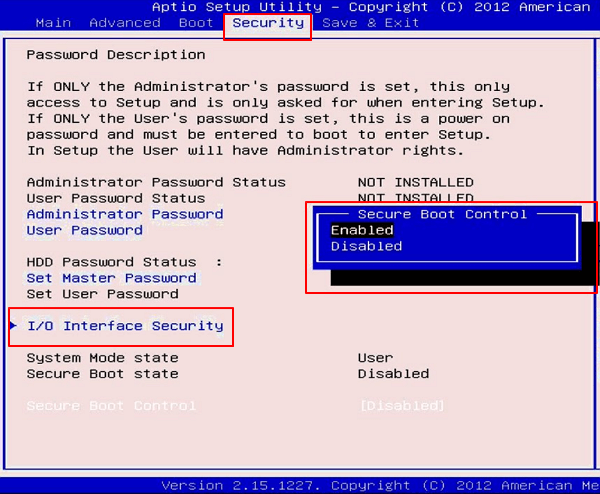
Or you can go to "Settings" and enable the "Reset Configuration Data" or " Factory Reset" option.
Step 4. Save and exit Aptio. Restart the PC.
#3. Configure Computer to Boot from USB on Aptio Setup Utility
Step 1. Connect a USB bootable Drive or USB recovery drive to the PC.
Step 2. Restart PC and press F2/F9/F12 or Del while booting up PC.
Step 3. Wait for the computer to enter Aptio Boot Menu.
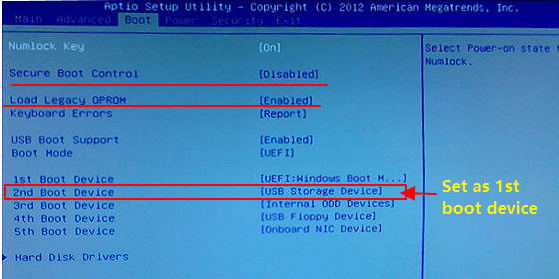
Step 4. Disable Secure Boot Control and enable Load Legacy OPROM.
Step 5. Change Boot Mode to Legacy.
Step 6. Change the first Boot Device to a USB Device.
How to Access Files from Aptio Setup Utility
Applies to fix: recover data from a dead laptop, recover data from a dead hard drive.
Sometimes, you may encounter an Aptio Setup Utility boot loop or stuck error, or even the how computer dies that you cannot enter the OS and access files on your PC.
In this case, how will you manage to get your data out of the computer? Yes, you can access files and restore them from Aptio Setup Utility with reliable bootable data recovery software.
EaseUS Data Recovery Wizard with Bootable Media can boot your PC from Aptio Setup Utility and get all data out of your computer with ease.
Here is how to access files from Aptio Setup Utility:
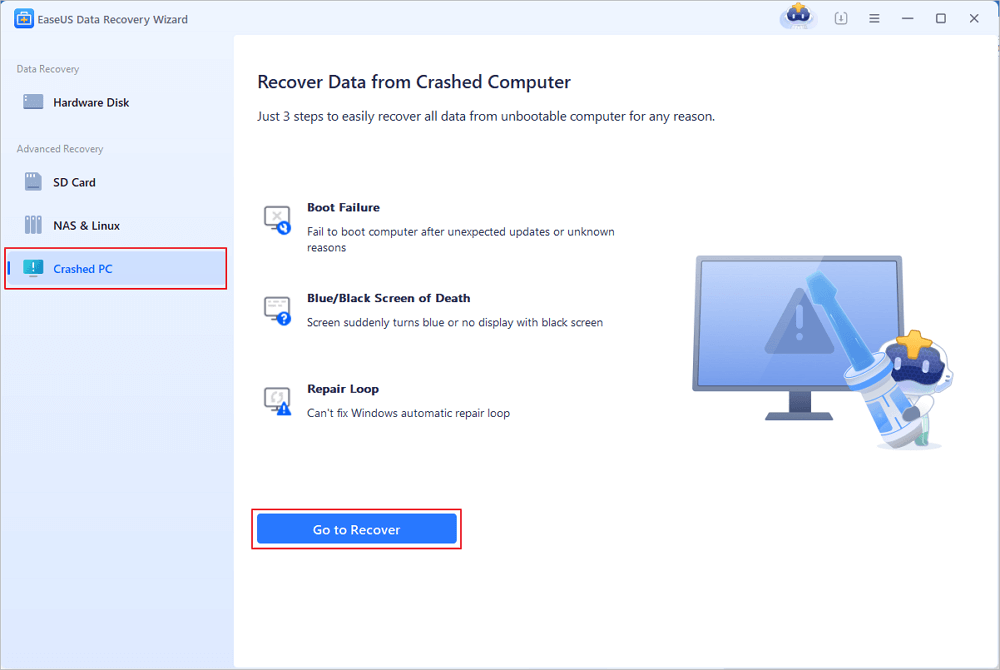
Step 1. Create a bootable disk
Launch EaseUS Data Recovery Wizard, choose "Crashed PC" and click "Go to Recover".
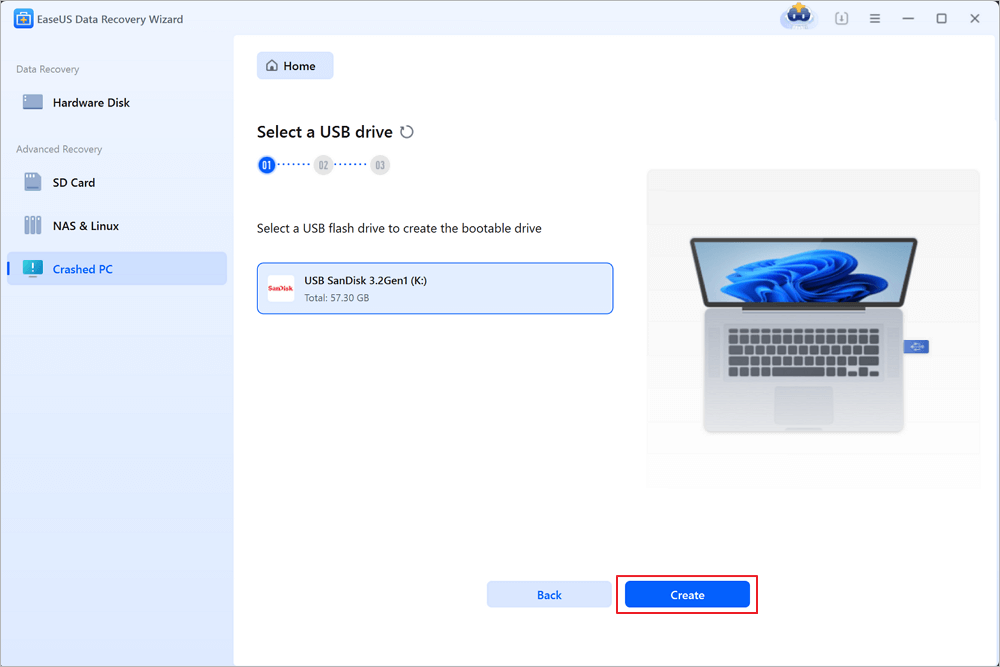
Select an empty USB to create the bootable drive and click "Create".
⚠️Warning: When you create a bootable disk, EaseUS Data Recovery Wizard will erase all data saved in the USB drive. Back up important data beforehand.
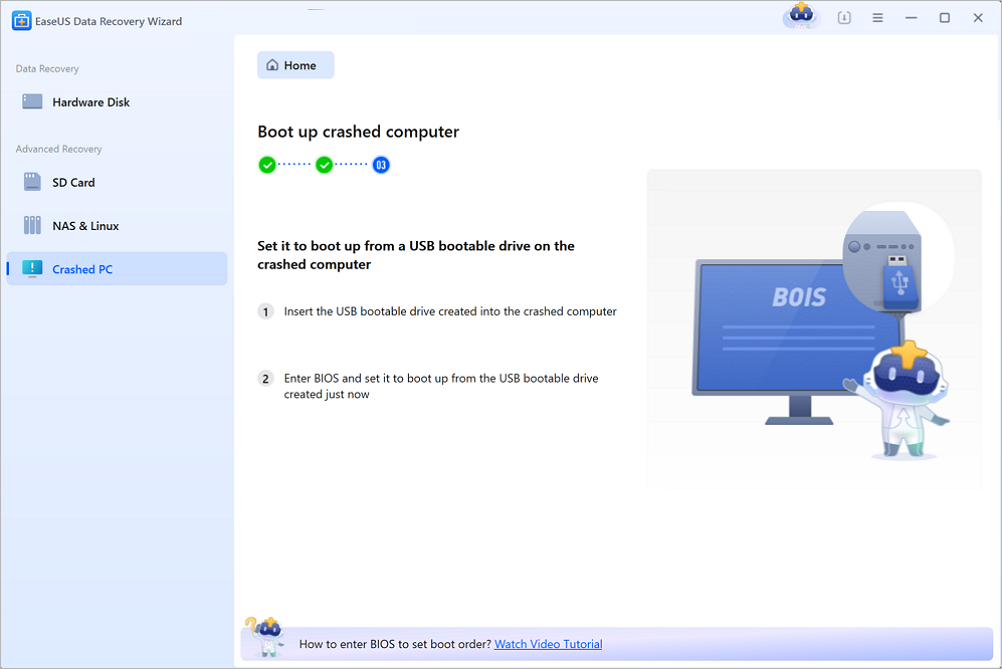
Step 2. Boot your computer from the bootable USB
Connect the bootable disk to the PC that won't boot and change your computer boot sequence in BIOS. For most users, it works well when they restart their computer and press F2 simultaneously to enter BIOS.
Set to boot the PC from "Removable Devices" (bootable USB disk) beyond Hard Drive. Press "F10" to save and exit.
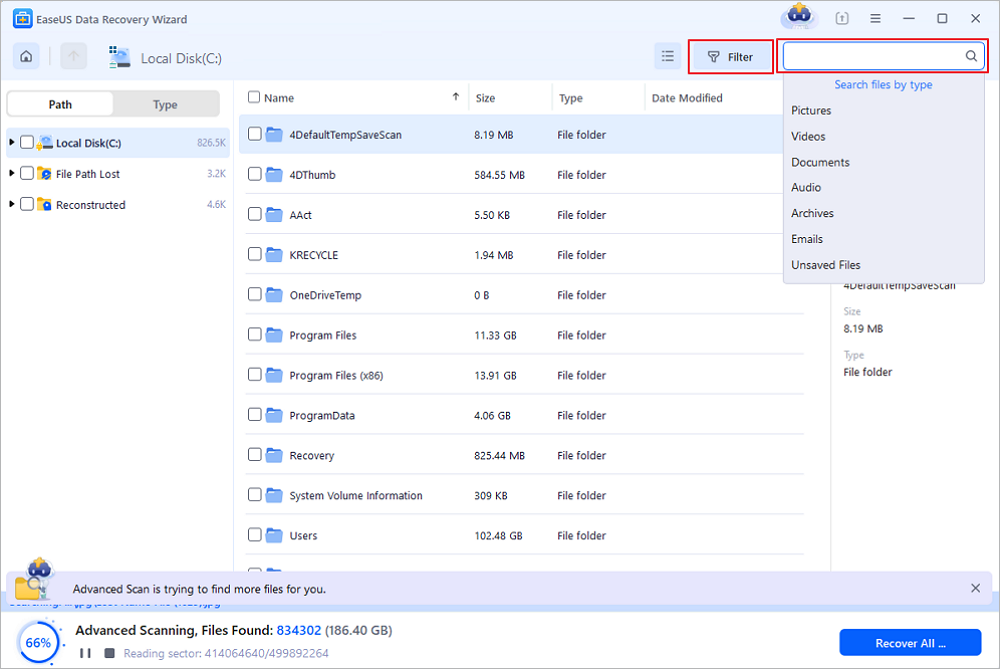
Step 3. Recover data from a crashed system/PC
After booting from EaseUS Data Recovery Wizard bootable disk, select the drive you want to scan to find all your lost files. Preview and recover the files you need to a safe location.
💡Tip: You can restore data on the local disks, external hard drives, and also the cloud storage.
Problem Fix: Computer Boots Into Aptio Setup Utility Instead of Booting Into Its OS
Some of you may have encountered this error that the computer directly boots into Aptio Setup Utility instead of booting into its OS.
It could be 3 reasons:
- 1. The OS disk is not correctly connected;
- 2. The OS disk is not set as boot drive;
- 3. Secure boot is enabled that disallows the computer to detect HDD/SSD.
So how to fix this error, setting the computer to boot into OS instead of Aptio Setup Utility? Try the following fixes.
#1. Reinstall HDD or SSD Correctly
- Shut down the computer, open the computer case or laptop case.
- Check the HDD or SSD connection cables.
- Remove the plugged cables and reconnect the cables correctly.
- If the cables are broken, change them with a new one.
#2. Set OS Disk As Boot Drive
- Restart PC and press F2/F9/F12 or Del while booting up PC.
- Wait for the computer to enter Aptio Boot Menu.
- To change the boot drive, use the down arrow key to select "Boot Configuration", hit Enter, and reselect "Set Boot Priority".
- On the pop-up, select the target OS disk as your boot drive.
- Save the changes and exit Aptio Setup Utility.
#3. Disable Secure Boot, Allow Aptio to Detect Boot Disk
- Reboot PC and press F2/F9/Del to enter Aptio Boot Menu.
- Go to Security, expand "Secure Boot Menu", and disable it.
- Save the changes and exit Aptio, then restart the computer.
- If the problem continues, re-enter Aptio, go to Boot, and disable "Secure Boot and Fast Boot".
- Enable CSM and save the changes.
- Exit Aptio and restart the computer.
#4. Use Windows Repair Services to Fix Computer Booting Into
If the above methods failed to fix your computer booting issue, don't fret. You still have a greater chance to troubleshoot by using manual Windows data recovery services. EaseUS's professional technical team can help you solve any system startup errors, including system failure, BSOD, unbootable devices, and so on.
Consult with EaseUS data recovery experts for one-on-one manual recovery service. We could offer the following services after FREE diagnosis:
- Fix Windows boot issues, including BSOD
- Fix Windows error and configure Windows environment
- Restore the system when it fails to boot
- Optimize Windows computer to make it run quickly
In The End
On this page, we explained what is Aptio Setup Utility, and what does each menu contains. Besides, you can learn how to use each option, and configure computers with some normal settings.
We also offered guidelines to help you access computer files when the machine is unbootable with EaseUS bootable data recovery software.
Last, we provided 3 tips to help you fix the Aptio Setup Utility boot loop error. When your computer only boots into the Aptio menu, not entering the OS, you are good to follow the tips and have a try.
Last, Aptio Setup Utility is important and any false operation may cause serious problems. Be sure that you'll the guidelines to set up computer carefully.
Was this page helpful?
-
Brithny is a technology enthusiast, aiming to make readers' tech lives easy and enjoyable. She loves exploring new technologies and writing technical how-to tips. In her spare time, she loves sharing things about her game experience on Facebook or Twitter.…
-
Evan Galasso is a digital forensics and data recovery engineer with over 10 years of experience in the field. He presents opinions on the current state of storage media, reverse engineering of storage systems and firmware, and electro-mechanical systems of SSDs and HDDs.…

20+
Years of experience

160+
Countries and regions

72 Million+
Downloads

4.9 +
Trustpilot Score


Free Data
Recovery Software
Recover data up to 2GB for free!

