Page Table of Contents
Reviews and Awards
Windows 11/10 is a complete changeover from Windows 7. Not only the user interface is new, but the OS also offers more stability and security. On top of all of this, Windows 11/10 is a free upgrade for many if they have a valid key. Windows 11/10 also has built-in security software, which makes sure you do not need any Antivirus. It also includes Ransomware protection, OneDrive Personal Vault, Microsoft Store, and a brand new browser, Microsoft Edge.
One of the major fears that make users shy to upgrade Windows is the loss of data. However, things have changed, and there are ways to make sure data can be backed up and can be restored in case of accidental failure.
When upgrading to Windows 11/10, the installer offers an option where the user can backup the files. These files are available even after the upgrade is complete. The second method is to use professional software such as EaseUS Todo PCTrans that can backup only data or data and apps so you can restore them later quickly.
So, all in all, you can easily trust this software and upgrade to Windows 11/10 and get a better experience. Post upgrade, you can also get back the files and program if left behind by the upgrade process.
PAGE CONTENT:
Using EaseUS Todo PCTrans to Backup Windows 7 PC
How to Install Windows 11/10
Restore Programs and Files to Windows 11/10 PC
#1. Backup Windows 7 PC Data and Apps in Advance
When upgrading Windows, it is essential that to backup everything to a USB or external device. It makes sure there is no accidental deletion of files and programs from the backup drive. At times users delete the backup drive and even install Windows on it. So, make sure to disconnect the drive before you upgrade.
EaseUS Todo PCTrans offers the Backup and Restore feature that can take backup of files, programs, and user accounts and restore after you upgrade to Windows 11/10. Here is how to take backup:
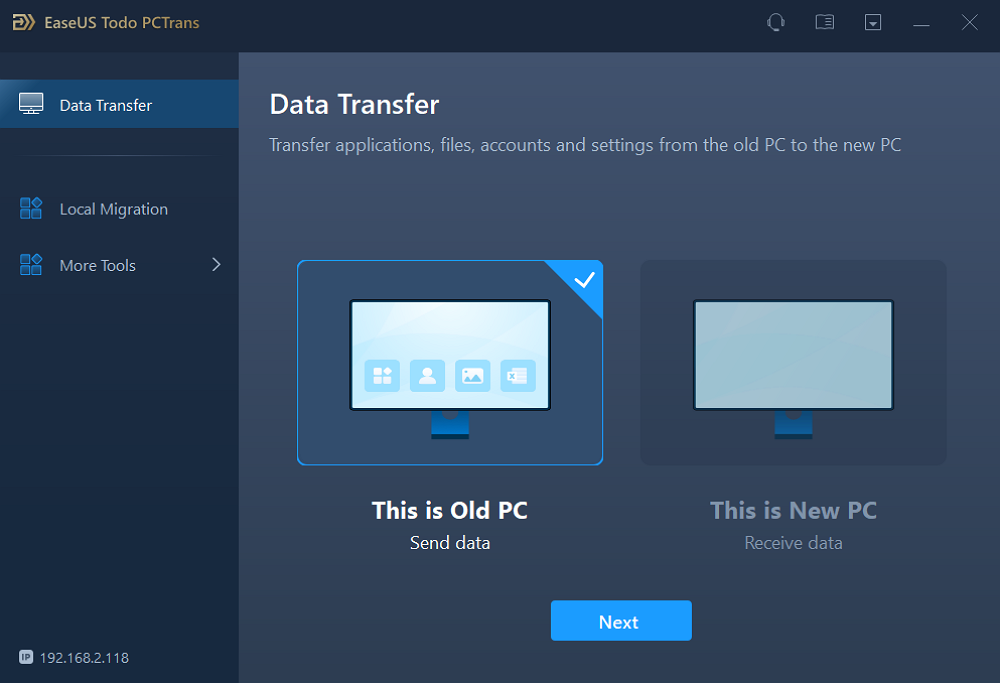
Step 1. Launch EaseUS Todo PCTrans on your computer. Click "Data Transfer" on the main screen, select "This is Old PC" and click "Next."
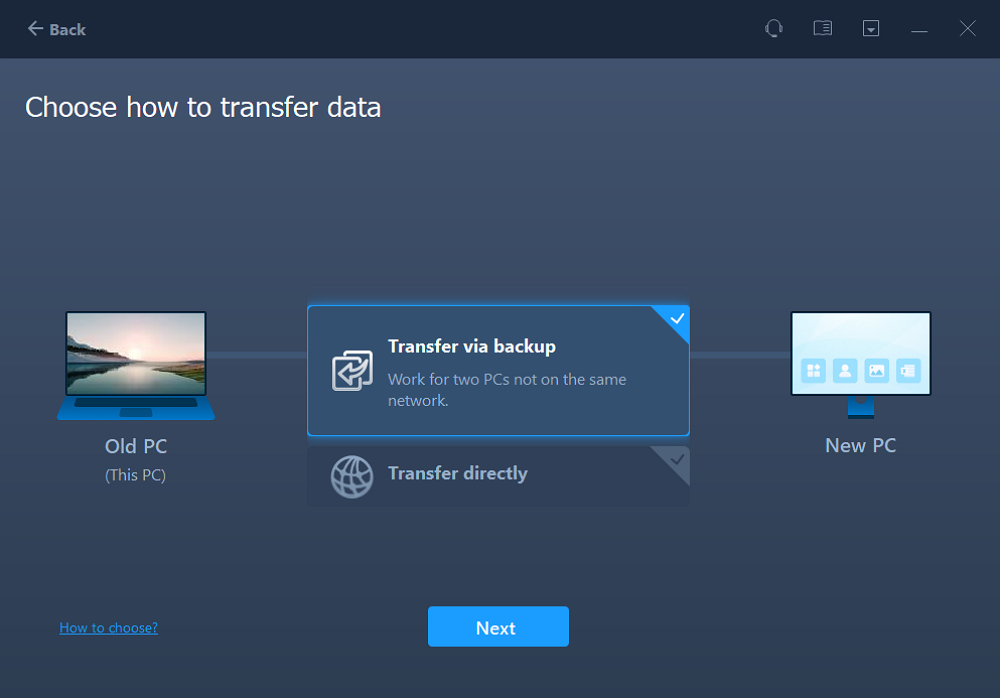
Step 2. Choose the "Transfer via backup" method and click the "Next."
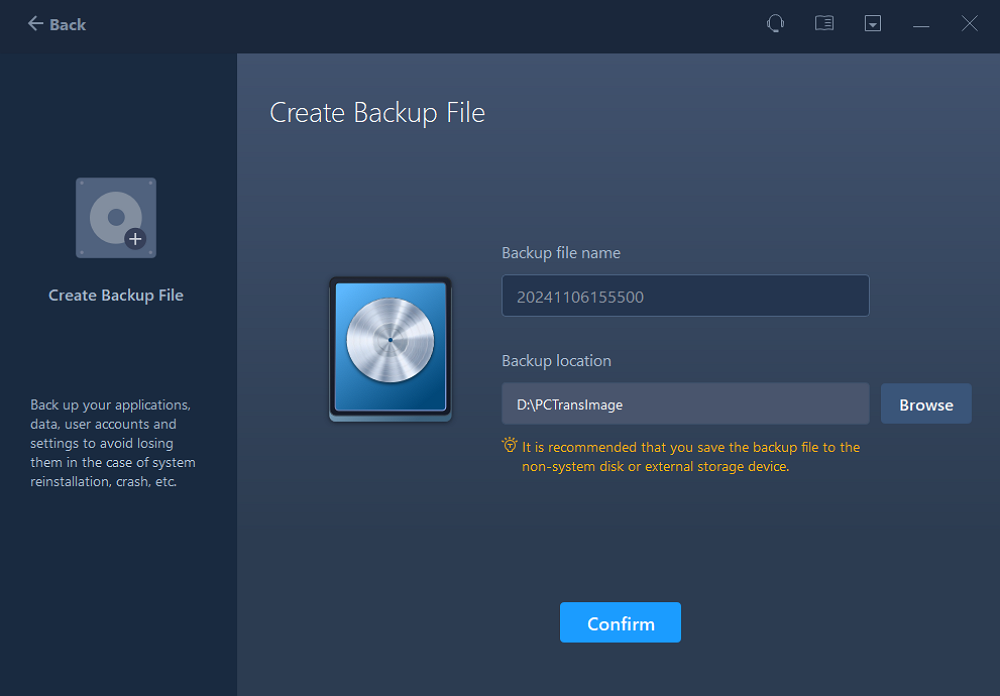
Step 3. Confirm the backup file name and backup location (Please save your files to a location where the new PC can access, like an external hard disk or shared network location.)
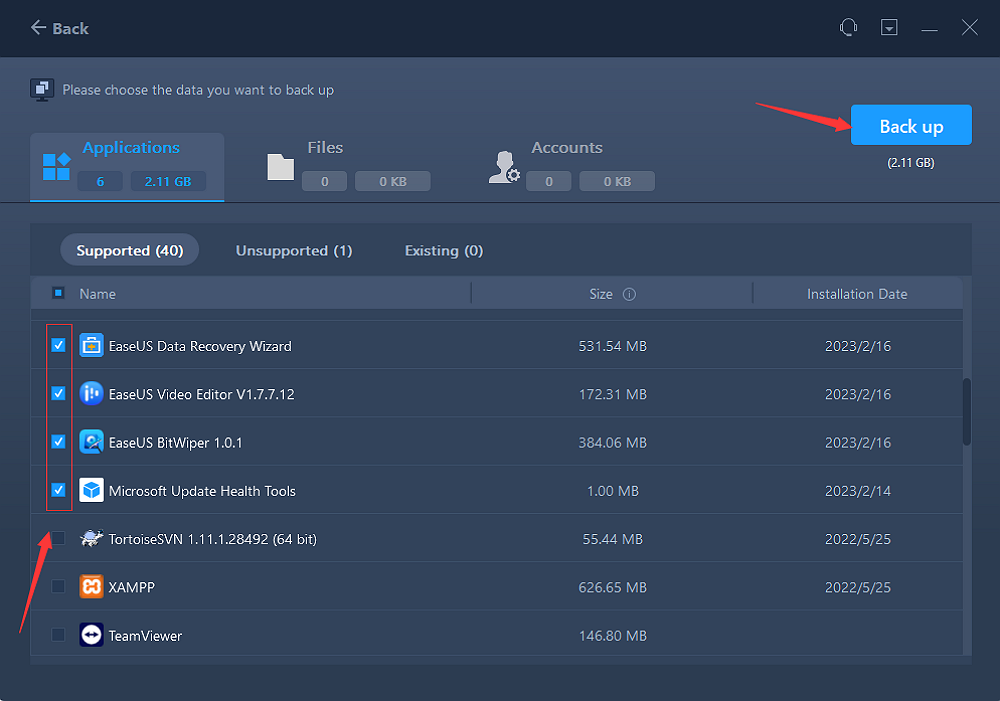
Step 4. Tick the Applications, Files, and Accounts that you wnat to backup. Click the "Backup" option to execute the process.
Step 5. Wait patiently till the backup procedure is done.

#2. How to Install Windows 11/10 on Windows 7
Now that all file is backed up, its time to upgrade to Windows 11/10. You will need enough storage space on your primary or system drive.
Step 1: Download Windows Upgrade Assistant from the official Microsoft site, and run it.
The installer will first check if the device is compatible and then move to the next screen. If there some apps which may not work, you can either update or uninstall them. Since you have already taken the backup, the app can be installed at a later point.
Step 2: When upgrading, you will have two options—Upgrade or Clean install—make sure to choose former.
You will also have the option to backup personal files. You can do that as well for a second backup. In case you are looking for a clean install, the second option comes in handy, but make sure you have Windows 7 Key with you so you can get it activated later by contacting Microsoft support.
Step 3: Finally, start the installation process.
During this, the computer may start multiple times. Once it is complete, you will be able to log in using the same account as before.
For more details, you may refer to these two links: Upgrade Windows 7 to Windows 10 and Upgrade Windows 7 to Windows 11.
Post-installation, you may have to connect to a Microsoft account at a later point. Be aware that there are many changes from Windows 7 to Windows 11/10, and you should make yourself aware of it.
#3. Restore Programs and Files to Windows 11/10 PC
Now that your Windows 7 PC is upgraded to Windows 11/10, it's time to restore the programs and files to the exact location as it was before the upgrade. While the EaseUS Todo PCTrans software should be their post-upgrade, if not, then download, and install the software again.
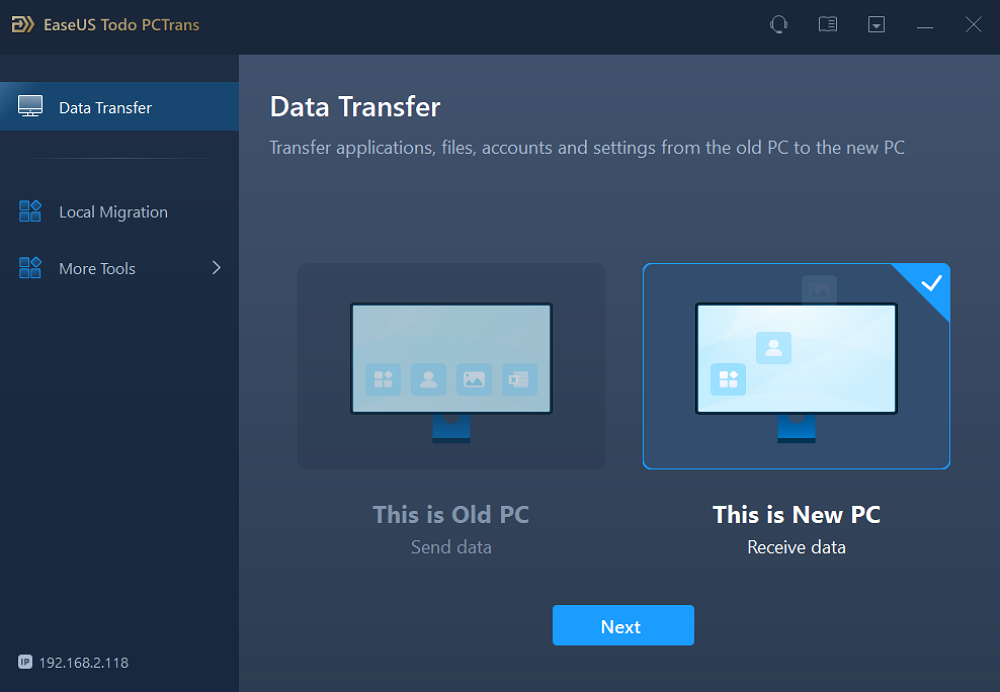
Step 1. Lauch EaseUS Todo PCTrans on the target PC you want to restore the backup image, and choose "This is New PC" in the Data Transfer section. Click "Next".
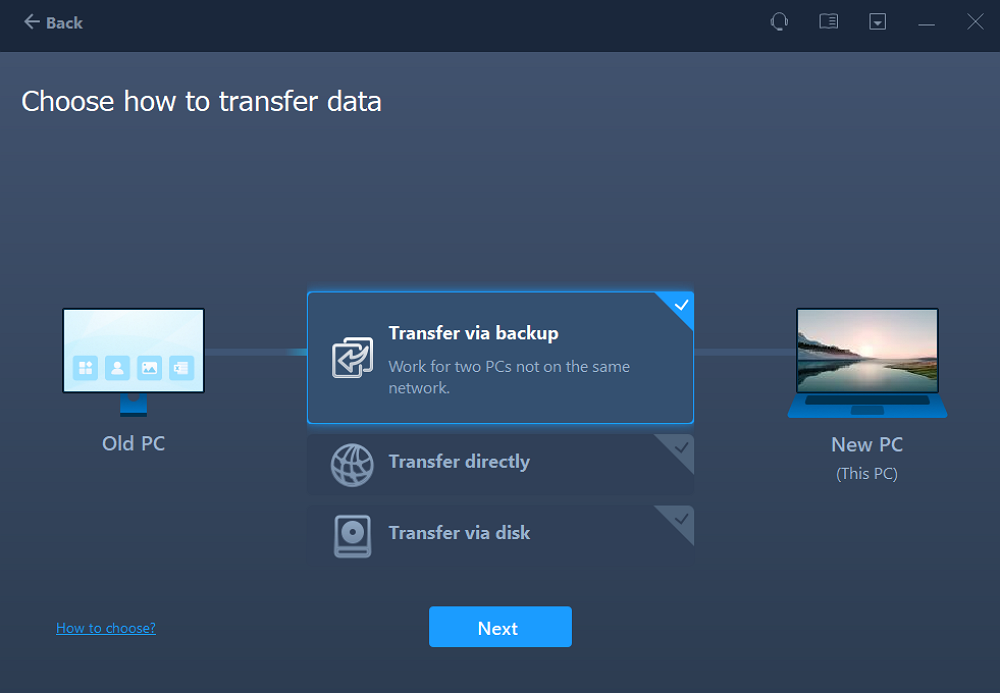
Step 2. Selcet "Transfer via backup" and click "Next."
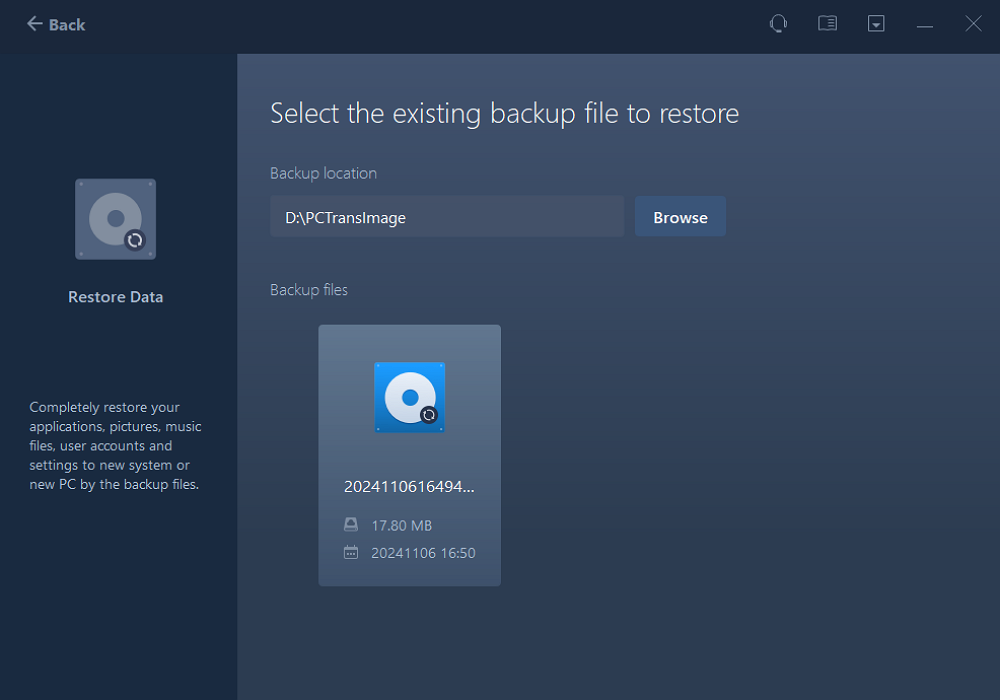
Step 3. Click "Browse" to navigate the Backup location where you stored your backup of files, apps, or settings.
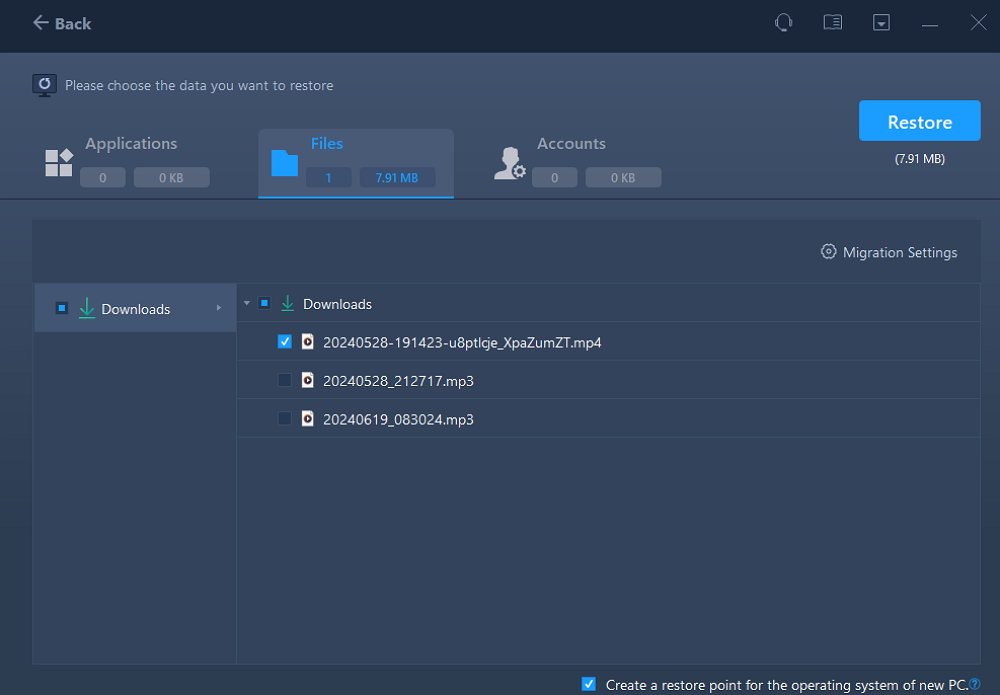
Step 4. Then, go to the Applications, Files, or Accounts sections to select the exact data, apps, or accounts settings you want to restore to the new device, and click "Restore."
In the end, make sure to verify you have all the software installed and files backup to the place where you expected it. You will also some new programs installed which are offered as part of the Windows 11/10 upgrade.
Conclusion
Upgrading to Windows 11/10 from Windows 7 is easy. Not only Windows upgrade process takes care of backup, but it is also better that you use professional software like EaseUS Todo PCTrans software to backup apps, files, and accounts. Once the upgrade is complete, you can use the same backup file to restore them to the exact location.
If you have any questions about the software or the process of upgrade, you can contact EaseUS Support at [email protected].
About the Author
Updated by Tracy King
Tracy became a member of the EaseUS content team in 2013. Being a technical writer for over 10 years, she is enthusiastic about sharing tips to assist readers in resolving complex issues in disk management, file transfer, PC & Mac performance optimization, etc., like an expert.
Reviews and Awards
-
EaseUS Todo PCTrans Free is a useful and and reliable software solution created to serve in computer migration operations, be it from one machine to another or from an earlier version of your OS to a newer one.
Read More -
EaseUS Todo PCTrans is by the folks at EaseUS who make incredible tools that let you manage your backups and recover your dead hard disks. While it is not an official tool, EaseUS has a reputation for being very good with their software and code.
Read More
-
It offers the ability to move your entire user account from your old computer, meaning everything is quickly migrated. You still get to keep your Windows installation (and the relevant drivers for your new PC), but you also get all your apps, settings, preferences, images, documents and other important data.
Read More
Related Articles
-
How to Uninstall a Program Using CMD
![author icon]() Roxanne/2024/11/29
Roxanne/2024/11/29 -
Windows Cannot Find Uninstall.exe File - 6 Solutions🔥
![author icon]() Sherly/2024/11/29
Sherly/2024/11/29 -
How to Fix Appdata Too Big Error With No Data Loss 🔽
![author icon]() Sherly/2024/11/14
Sherly/2024/11/14 -
How to Move Lightroom to Another Drive [Step-by-Step Guide]
![author icon]() Sherly/2024/12/04
Sherly/2024/12/04