Page Table of Contents
Reviews and Awards
Take a view of what necessities you will need to execute this task:
| ⏱️ Duration: | 5 - 15 munites (depending on the file size) |
| ✂️ Preparations: |
|
| 📖 Supported File Types: | Folders, files, videos, audio, images, installed programs, games, apps, etc. |
| ✍️Applies to: | Network and file sharing between Windows OSes, like Windows 11/10/8.1/8/7/XP/Vista and Windows Severs. |
Can I Share Files Between Windows 7 and Windows 10/11
File sharing is not a difficult issue but also sticks unclear in someone's mind. Do you have a clue to share files between Windows 7 and Windows 10 computers? You will get all the useful methods to transfer files from Windows 7 to Windows 10 over network or without network on this page.
- Notice:
- Windows 10 support ends on October 14, 2025. After this date, the system will no longer receive security updates, bug fixes, or technical support. To understand what this means for users, check our Windows 10 End of Support, Stay or Upgrade.
Here, we'll list the applicable methods from easy to difficult so as to save your time and energy. See the key part below:
| Workable Solutions | Step-by-step Troubleshooting |
|---|---|
| Fix 1. Use PC Transfer Software (Easiest) |
Download and install EaseUS Todo PCTrans on both PCs...Full steps |
| Fix 2. Use Network Share |
#1. Create Network Shared Link to Share Files...Full steps |
| Fix 3. Use OneDrive Shared Link | Go to Open the OneDrive on the source PC with Windows 7 or Windows 10...Full steps |
| Fix 4. Use Email | Step 1. Sign in with your email accounts on two PCs...Full steps |
| Bonus Tip. File Share without Network | If both Windows 7 and Windows 10 have no network connection, try fixes here...Full steps |
If you want a straightforward method to network connection two computers between Windows 7 and Windows 10/11 for file sharing, you can pick EaseUS Todo PCTrans. It features fast data transfer without data loss.
Method 1. Network and File Sharing Between Windows 7 and Windows 10/11 via Free Transfer Software
Applies to: Share and transfer files, applications, programs, and games on all Windows OS.
The earlier the solutions appear, the easier they would be for you to apply and transfer files between Windows 7 and Windows 10/11.
Third-party free PC file transfer software - EaseUS Todo PCTrans Free provides the best solution for network connecting and sharing between Windows computers. This software supports sharing and transferring files, applications, programs, and games between two Windows computers like, Windows 7 and Windows 10/11.
EaseUS Todo PCTrans enables you to transfer multiple files from PC to PC for free in only 4 steps. See how to transfer your files from Windows 7 to Windows 10/11 with the steps here:
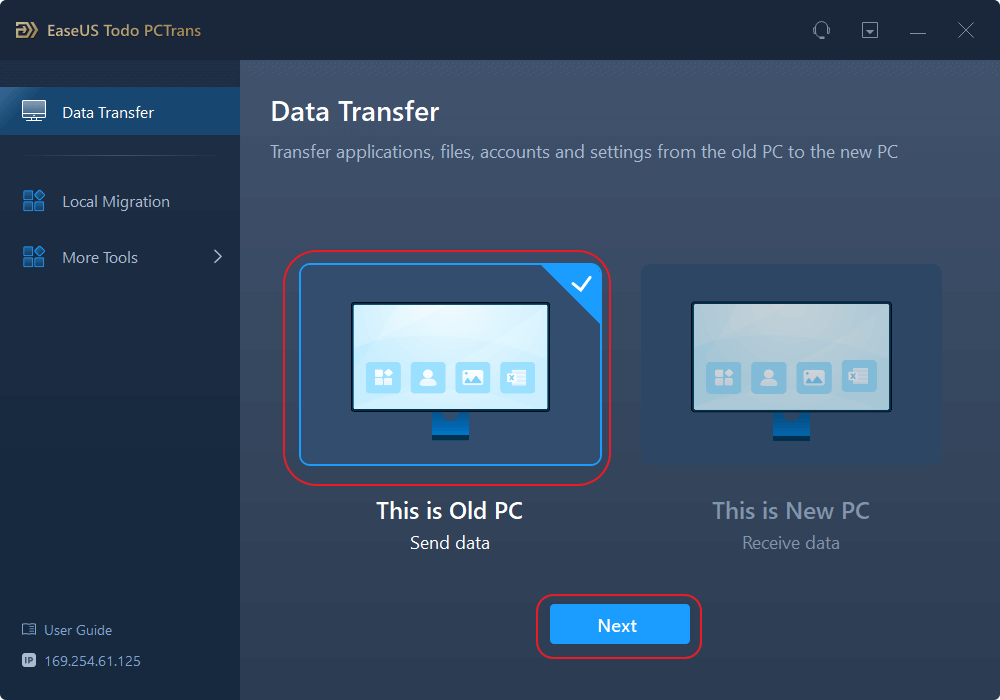
Step 1. Set Up the Source PC.
- Download and install EaseUS Todo PCTrans on source and target PCs(make sure they are on the same LAN).
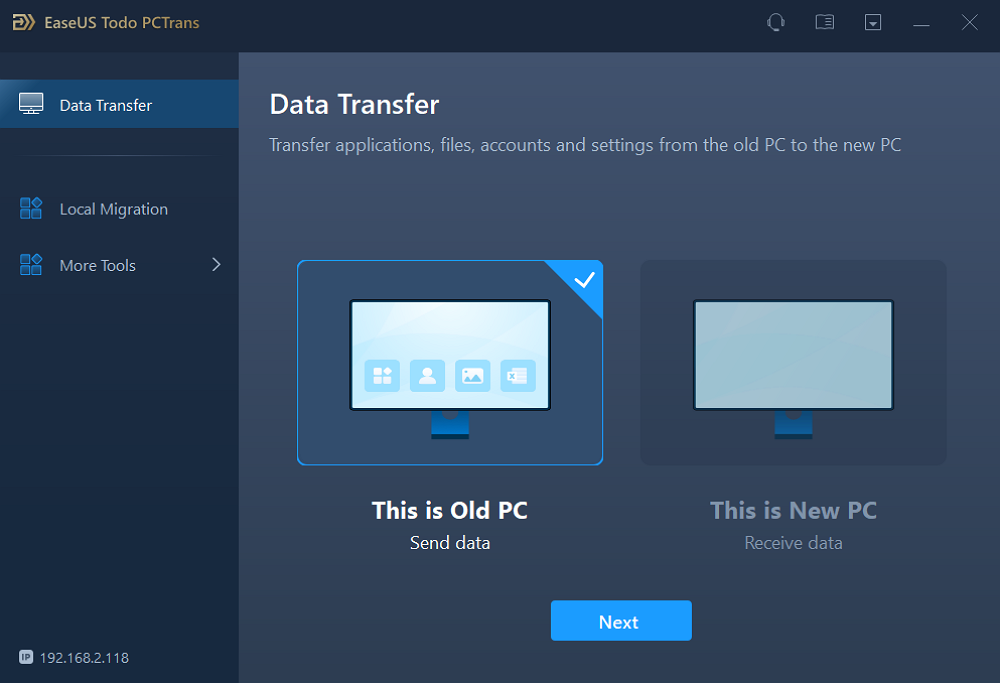
- Run EaseUS Todo PCTrans on the source PC. Verify "This is old PC" and click "Next" in the "Data Transfer" tab.
Step 2. Set Up the New PC
- Run EaseUS Todo PCTrans and open "Data Transfer." Select "This is New PC." Then, choose "Transfer directly."
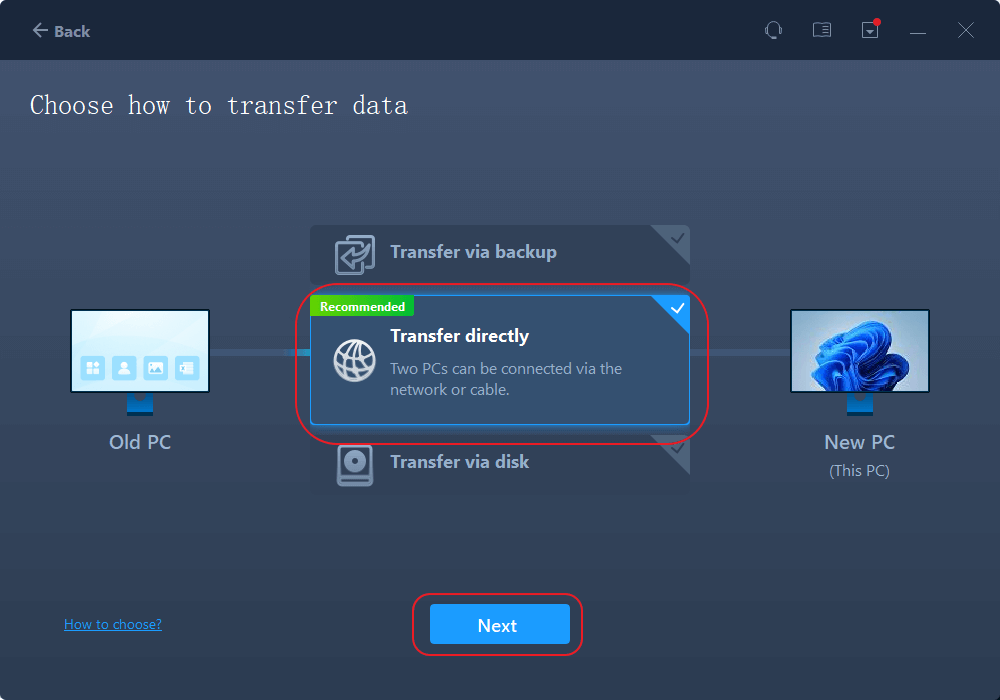
- Tick "Network" and click Next to continue.
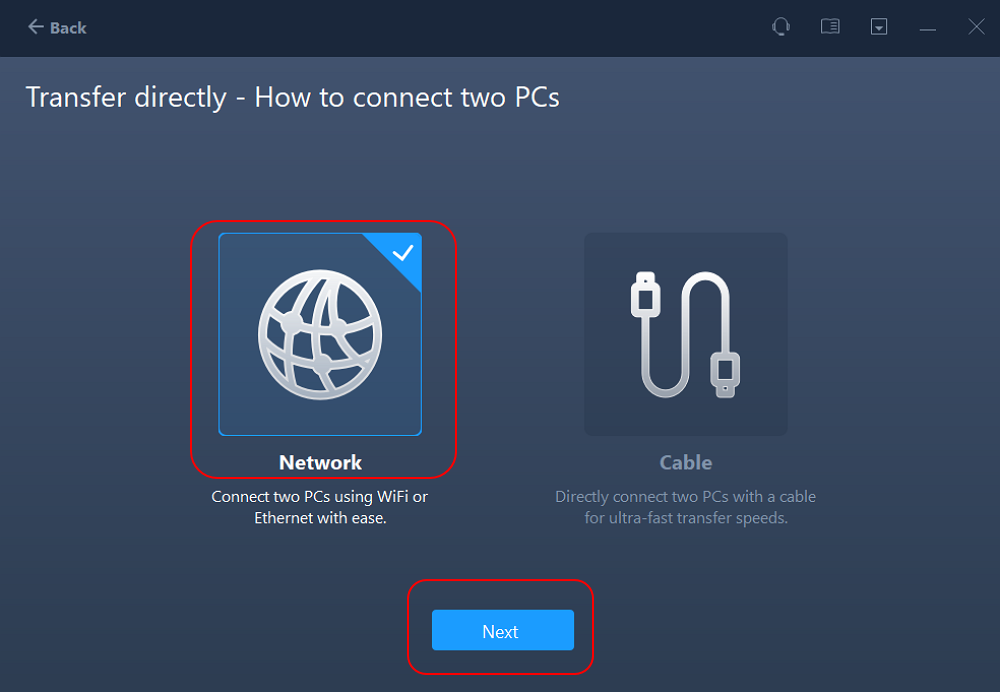
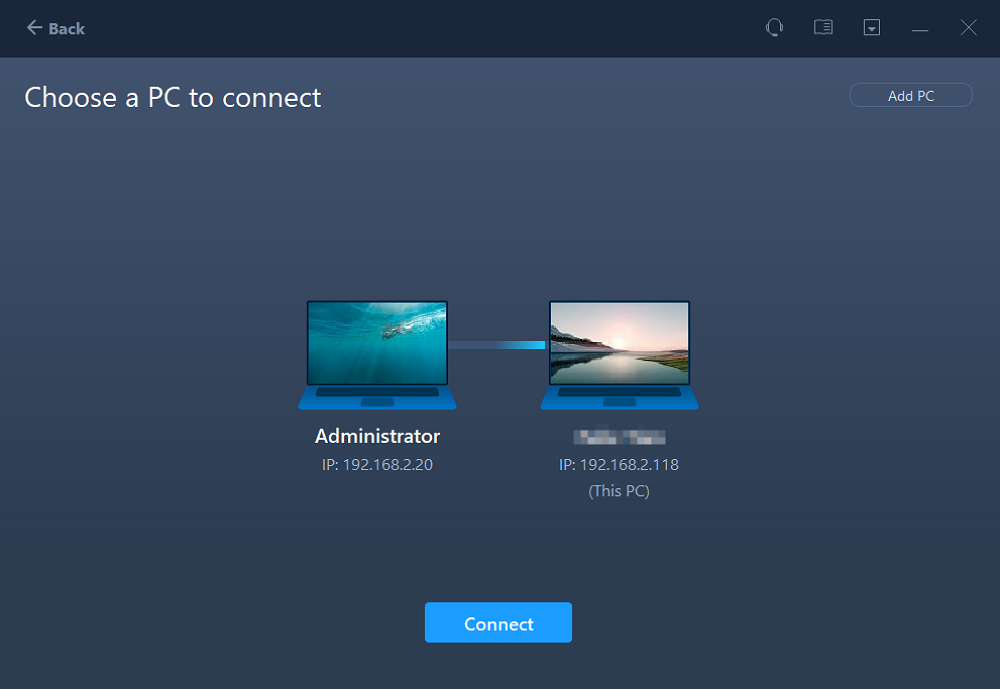
- Hit "Connect" in the next window to automatically scan the source PC.
Step 3. Select the content you want to transfer.
- Hover on the category (Applications, Files, or Accounts) and click "Edit".
- Choose the specific items you want to transfer and click "Transfer".

Step 4. Transfer selected items from Windows 7 to Windows 10.
- Click "Transfer" to start transferring applications, files, or accounts from Windows 7 to Windows 10.
- Wait for the transfer process to finish and then click "OK".

If you feel like the provided method for file sharing between Windows 7 and new Windows 10 computers, share this amazing tip for helping your friends to seamlessly migrate and upgrade files from old PC to new computers now:
Besides file sharing, you can also use EaseUS Todo PCTrans to migrate applications and user account from one computer to another in Windows 11/10/8.1/8/7/Vista/XP, such as "Move Dropbox to Another Computer". Read also:
How to Transfer Microsoft Office from One Laptop to Another
This page shows you how to transfer Microsoft Office 2010/2013/2016 application with its product key from one laptop to another with the help of EaseUS PC Transfer software and Microsoft manual method.

Method 2. Share Files Between Windows 7 and Windows 10/11 Via Network Share
Applies to: Share files between Windows PCs via Nearby Shre, HomeGroup/Network Shared Drives
Microsoft Windows also has offered some built-in tools that allow users to share files between Windows computers. Here are three major tools that you can apply to transfer files between Windows 7 and Windows 10/11:
- Tool 1 - Create Network Shared Link via Share/Share With
- Tool 2 - Use Windows HomeGroup
- Tool 3 - Map and Use Network Shared Drive
#1. Create Network Shared Link to Share Files Between Windows 7 & Windows 10/11 via Share/Share With
First, Turn on Network Discovery for File Sharing
Step 1. Open Network & Sharing Center and Change advanced sharing settings on the source PC
- 1. Right-click the Windows icon, click Search and type: network and sharing center, click to open it.
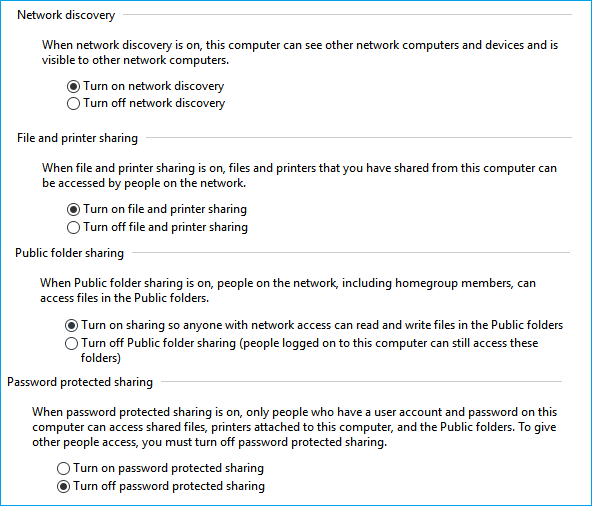
- 2. Click "Change advanced sharing settings", check the boxes below and save changes:
- Turn on network discovery
- Turn on file and printer sharing
- Turn on sharing so anyone with network access can read and write files in the public folders
- Turn off password protected sharing
Step 2. Create a shared link for the files that you want to share
Next. Create a Network Shared Link on Source PC
From Windows 10 to Windows 7:
Step 1. Open drives in Windows 10 File Explorer and select files that you want to share with Windows 7.
Step 2. On the Windows File Explorer window, go to the Share tab at the top pane, click "Share" and select "Specific people...".
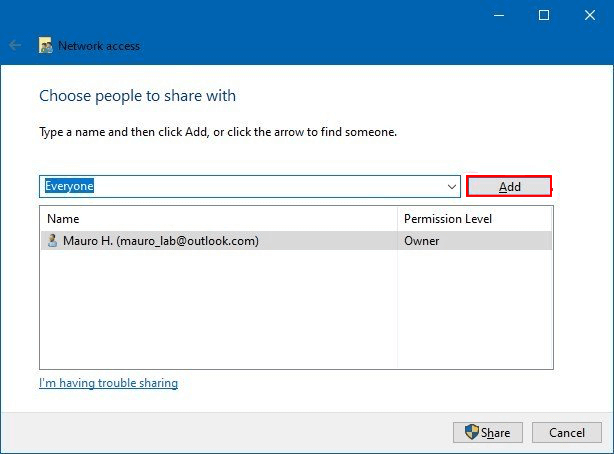
Step 3. Click the expand button and choose "Everyone" as the share mode, click "Add" to confirm.
Step 4. Click "Everyone", and specify the access privilege as "Read/Write" under the Permission Level. And click "Share" to confirm.

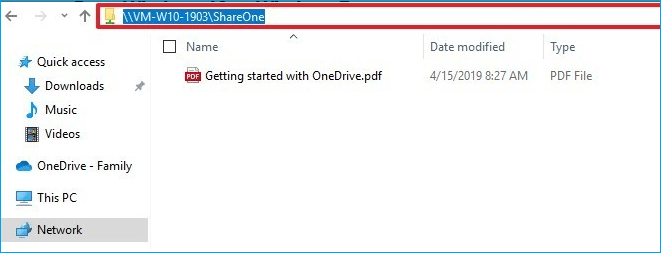
Step 5. Right-click the shared folder path and select "Copy Link" as shown below:
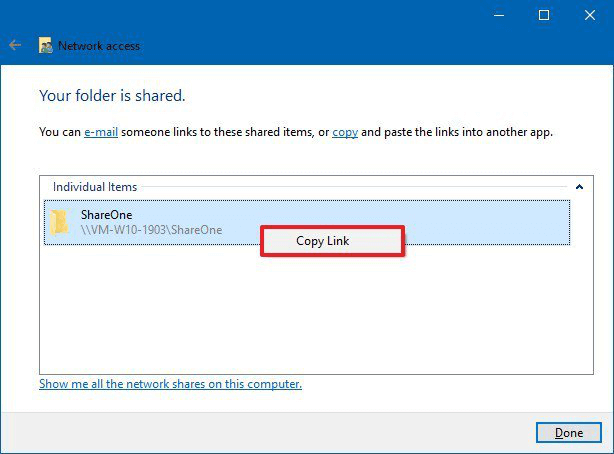
Step 6. Send the shared link to the target PC via Email or other ways.
From Windows 7 to Windows 10:
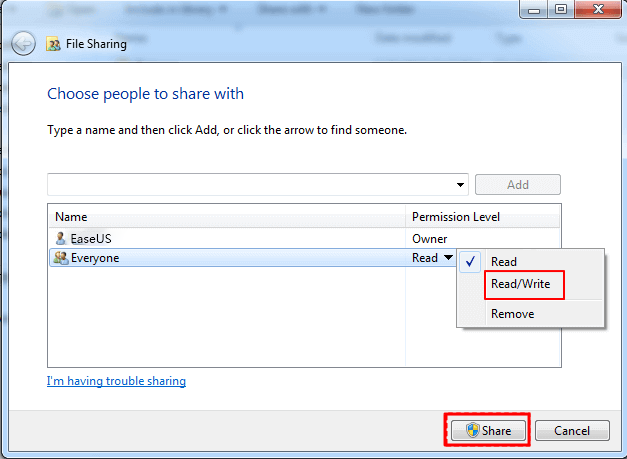
Step 1. Open drive or partition in Windows 7 Explorer, right-click on the folder or files that you want to share, and select "Share with" > Choose "Specific people...".
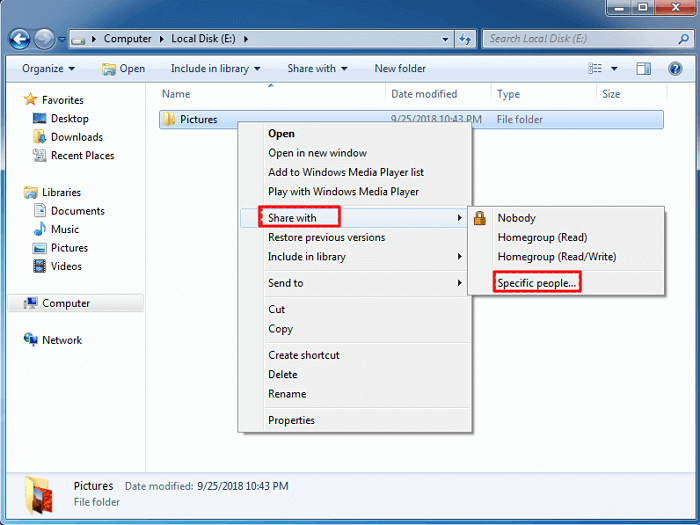
Step 2. Choose "Everyone" in the drop-down menu on File Sharing, click "Add" to confirm.

Step 3. Click "Everone" and set permissions to "Read/Write" and click "Share" to confirm.
Step 4. Access shared files on target PC
Last. Restore Shared Files via Network Shared Link on Target PC
From Windows 10 to Windows 7:
Step 1. Open Windows 7 File Explorer, click "Network".
Step 2. Paste the shared link and hit enter to access the shared content.
From Windows 7 to Windows 10:
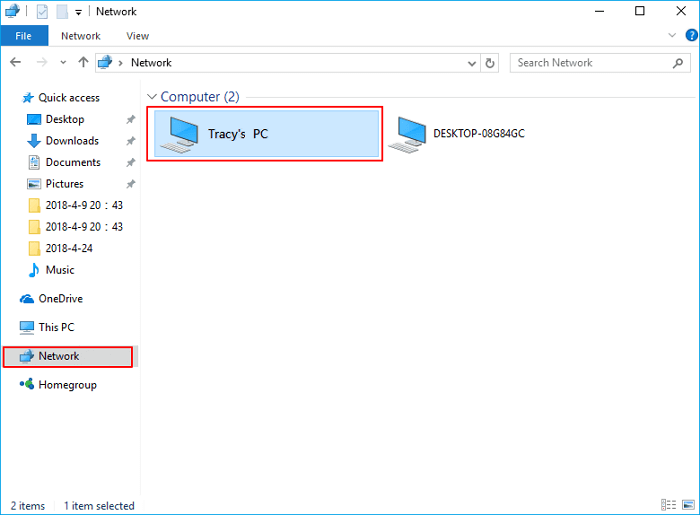
Step 1. Open Windows 10 File Explorer and click "Network".
Step 2. Find the Windows 7 computer's name and double-click to open it, access the shared files.
P.S. Suppose you face Windows 7 to Windows 10 network sharing not working issue, you can see a how-to article of Windows 10 file sharing not working.
Tool 2 - Use Windows HomeGroup to Share Files Between Windows 7 and Windows 10/11
HomeGroup is used to share files or folders between two Windows computers connected to the same network.
If your Windows OS stays in versions before 1803, you can use HomeGroup to share files between Windows 7 and Windows 10 with the below steps:
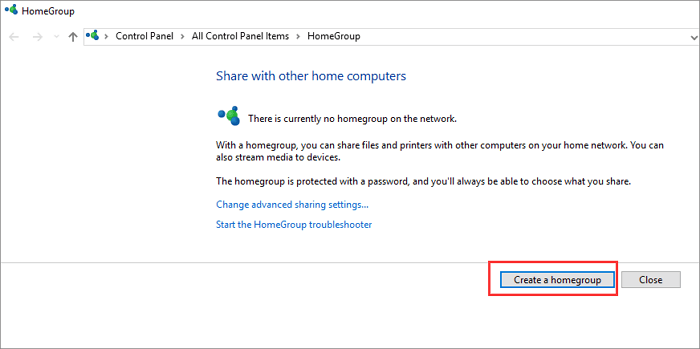
Step 1. On the Windows computer, type and search for a homegroup in the Search box. Click to open it.
Step 2. Choose "Create a homegroup" > "Next", and follow the instructions.
Step 3. Select files and folders that you want to share and switch the Permissions buttons to "Shared", and click "Next".
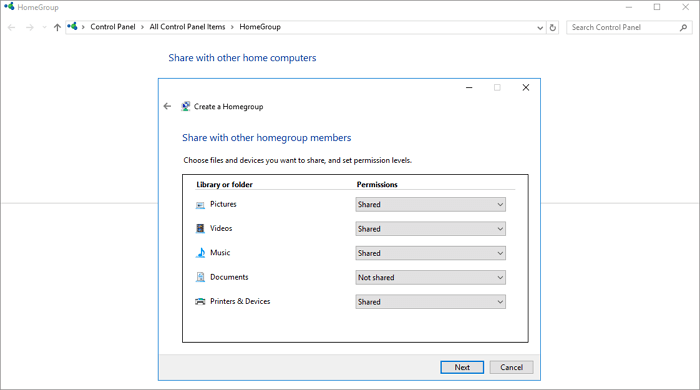
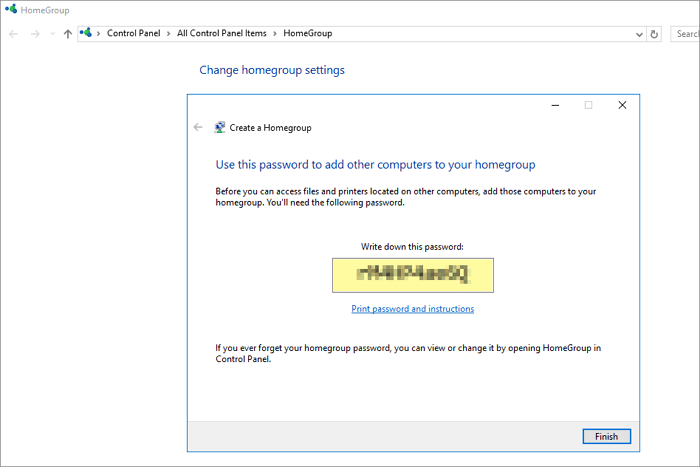
Note: Remember the password shown on-screen.
Step 4. Go to Windows 10 computer and open HomeGroup: Control Panel > All Control Panel Items > HomeGroup.
Step 5. Join the existing Homegroup and enter the password you got earlier and click "Finish".
Step 6. Access the shared files on the new PC.
If you Windows 10 has been updated to the new versions after April 2018 Update (version 1803), use the Share option to accomplish file sharing between Windows 7 and Windows 10:
Step 1. Open File Explorer on Windows 7, select the folder or files that you want to share.
Step 2. Click the "Share" tab at the top panel, and click the "Share" button.

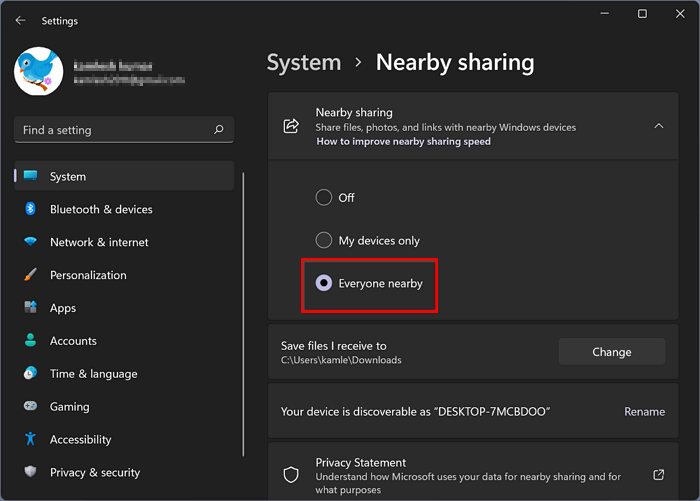
Step 3. Select a contact, nearby sharing device, or one of the Microsoft Store apps (such as Mail).
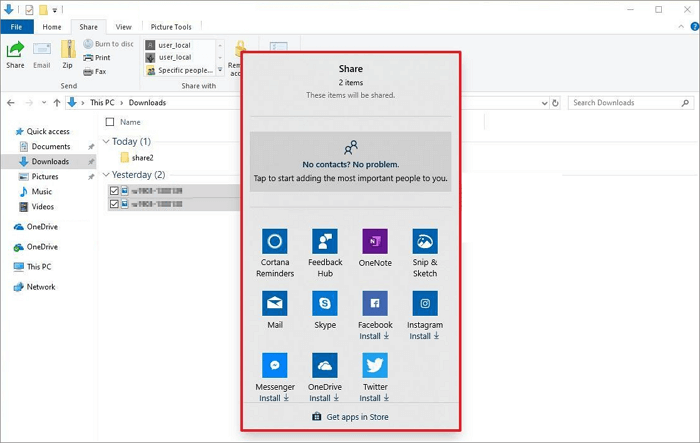
Step 4. Finish the process by following the on-screen directions to transfer files from Windows 7 to Windows 10.
Tool 3 - Map and Use Network Shared Drive on Both Two Computers for File Sharing
Tip: Both Windows 7 and Windows 10 must connect to the same network or LAN for sharing files via the network shared drive.
Step 1. Map a network drive on the source computer.
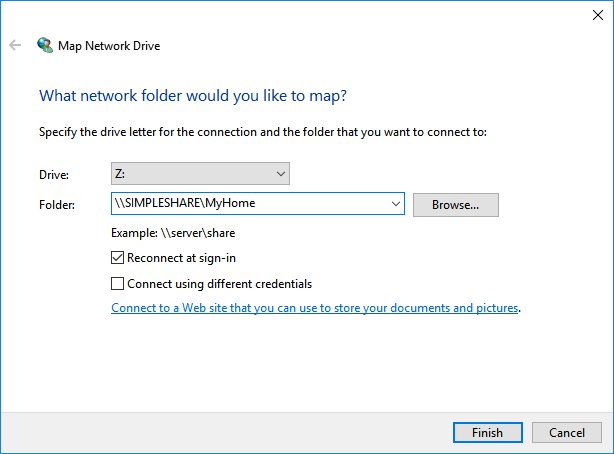
- 1. Right-click on This PC/Computer and select "Map network drive".
- 2. In the Drive box, click the drive letter you want to use.
Note: The drive should be big enough for saving the files and folders that you want to share.
- 3. In the Folder box, type \\server\share, where you can type the IP address of the drive to be mapped.
- For example, if the IP address is 192.168.6.xxx, you can type \\192.168.6.xxx.
- 4. Click "Finish".
Step 2. Save files and folders to the mapped drive.
Step 3. One the target PC, open File Explorer and type the IP address of the mapped network drive, e.g: 192.168.6.xxx
Step 4. Hit Enter and access the shared files. You can copy and save the files to your local PC.
If nearby sharing not working, click the link to find solutions:
Nearby Sharing Not Working Windows 11? Fix It Now!
Is the Nearby Sharing feature on your Windows 11 not working as it should? Find out how to fix Nearby Sharing not working in Windows 11 in this article.
Method 3. Use OneDrive Link to Share Files Between Windows 7 and Windows 10/11
Applies to: File backup, File sharing on all Windows PCs
Cloud drive services also provide people with great convenience for file backup and file sharing in all Windows and Mac computers. There are many cloud services available online that you can choose to backup and share files, such as OneDrive, Dropbox, Google Drive, iCloud, etc.
Here we'll take OneDrive as an example to show you how to share files between Windows 7 and Windows 10/11:
Step 1. Go to Open the OneDrive on the source PC with Windows 7 or Windows 10/11.
Step 2. Right-click the file or folder that you want to share and select "Share a OneDrive link".
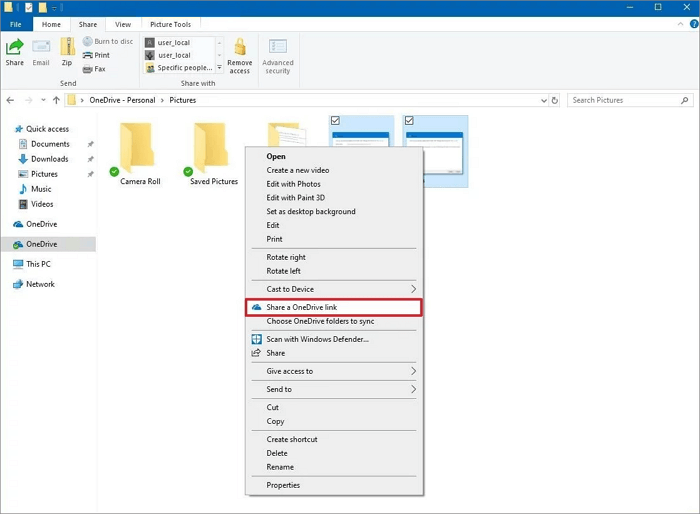
Step 3. Paste the link to share it on any email, social media post, or any other type of messaging system.
Step 4. Once you received the sent link on the target PC, you can access the shared files.
Method 4. Use Email to Share Files between Windows 7 and Windows 10/11 Computers
Applies to: Everyone who has an email account in all Windows OS.
The other applicable and practical way for file sharing is email. The reason is that almost everyone has an email account in their daily file and jobs. It's a common way to share files via emails is in ordinary people's life.
Required: Two email accounts offered by Outlook, Windows Email/Mail, Gmail, Mozilla Thunderbird or Hotmail, etc.
You can follow the steps below to share files between your two PCs:
Step 1. Sign in with your email accounts on two PCs.
Step 2. On the source computer, go to Index, input the email addresses
From: your email address on the source PC, To: email address on the target PC.
Step 3. Click the Attachment icon, select the files that you want to share on your current PC.
Step 4. Click "Send" to start sending files to the target PC.
Step 5. On the target PC, go to Inbox, check, and download the received attachment files.
If you feel like the provided automatic and manual methods for file sharing between old Windows 7 computers and new Windows 10 computers, share them to help more friends around you to master this issue like an expert now:
Bonus Tips. Share Files Between Windows 7 and 10/11 without Network
Applies to: Share confidential files offline between Windows 7 and 10 without a network connection.
If you prefer an offline file sharing option between Windows 7 and Windows 10, you can use three provided methods here without using the network:
- #1. Manually Copy Files via External Storage Device
- #2. Use EaseUS PCTransfer with Its Data Backup & Restore Feature
Method 1. Manually Copy Files via External Storage Device
Note: Be careful while copying and pasting files. Improper operation may result in unexpected file loss.
Step 1. Prepare a big enough empty external hard drive or USB drive.
Step 2. Connect the external storage drive to the source PC, copy, and save files and folders to the drive.

Step 3. Unplug the external device and connect it to the target PC, copy and save shared files to a local drive.
Method 2. Transfer Files via Image with EaseUS PC Transfer Tool
The "Backup and Restore" Transfer feature in EaseUS Todo PCTrans allows you to create compressed backup files and folders and transfer them to the target PC at one time:
Step 1. Create a backup file to transfer
- Launch EaseUS Todo PCTrans on the source and target PCs. Click "Data Transfer" and select "This is Old PC". Then, click "Next" to continue.
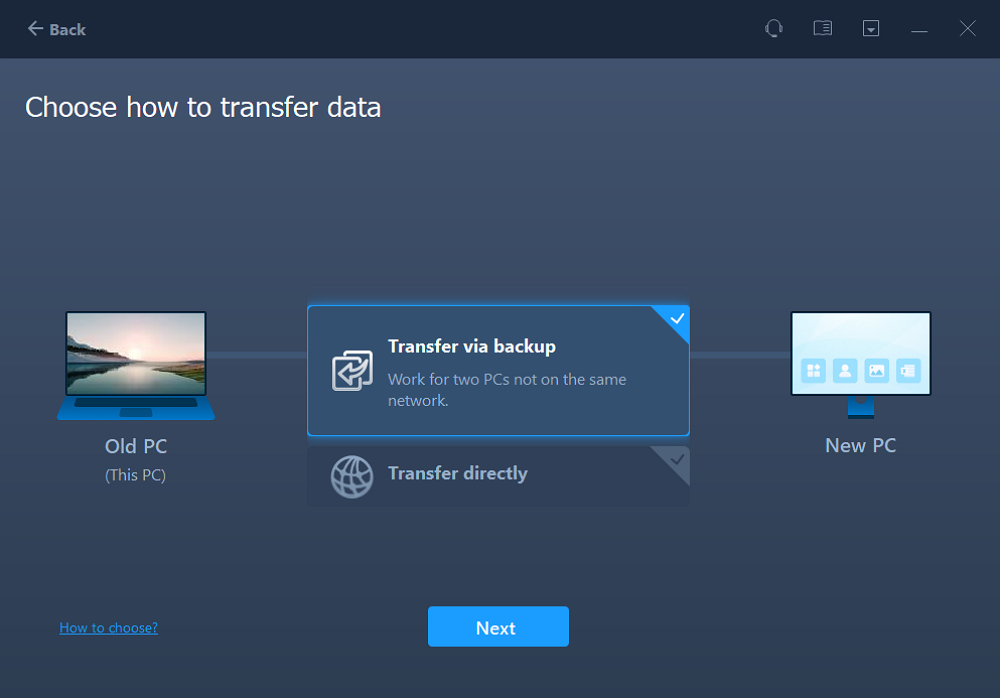
- Click "Transfer via backup" and select "Next" to continue.
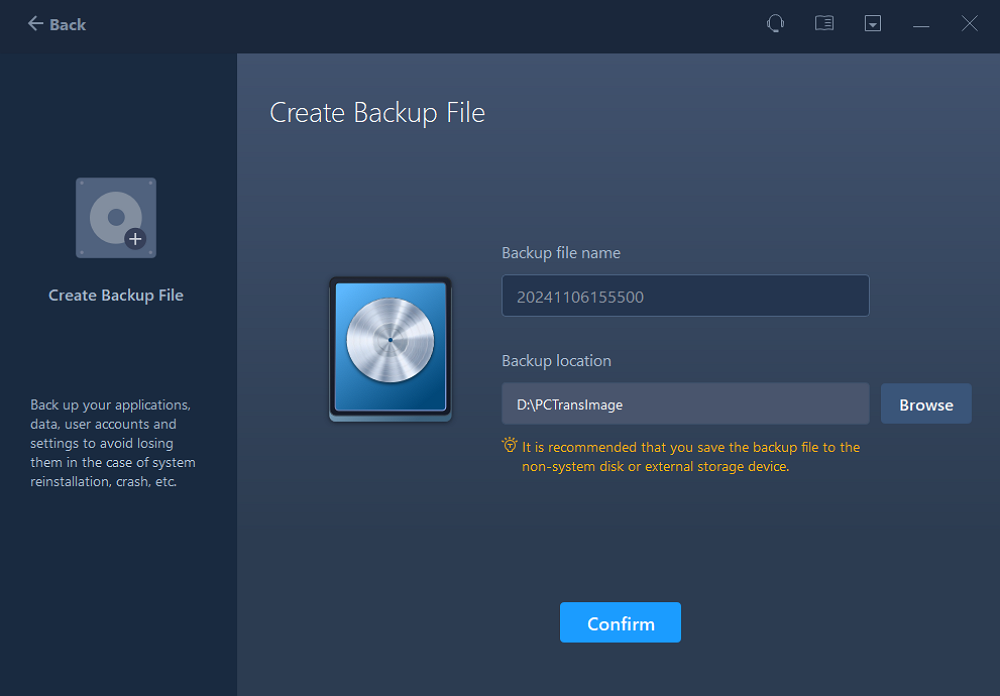
- Create a name for the backup of the files you wish to transfer without network. And click "Browse" to select the destination (a USB, external hard drive, or SD card) to save the backup of your target files. Then, click "Confirm".
- Then, go to the Files tab, select the respective files you want to transfer to a new PC without network, and click "Back up".
After this, unplug the removable device with your file backup to the new computer.
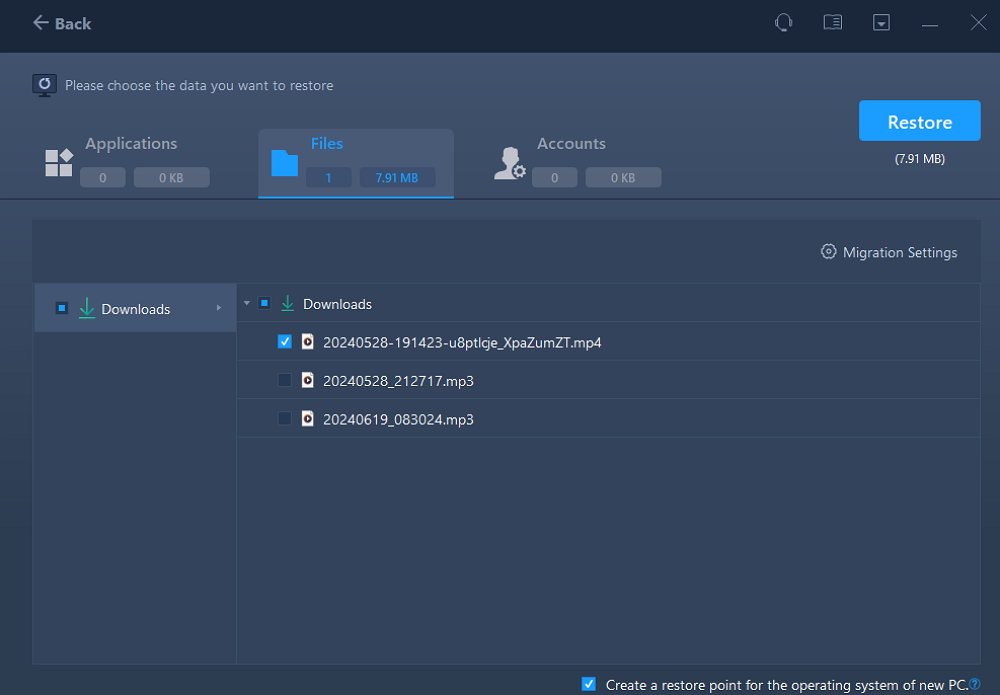
Step 2. Restore and transfer backup files to the new PC without network
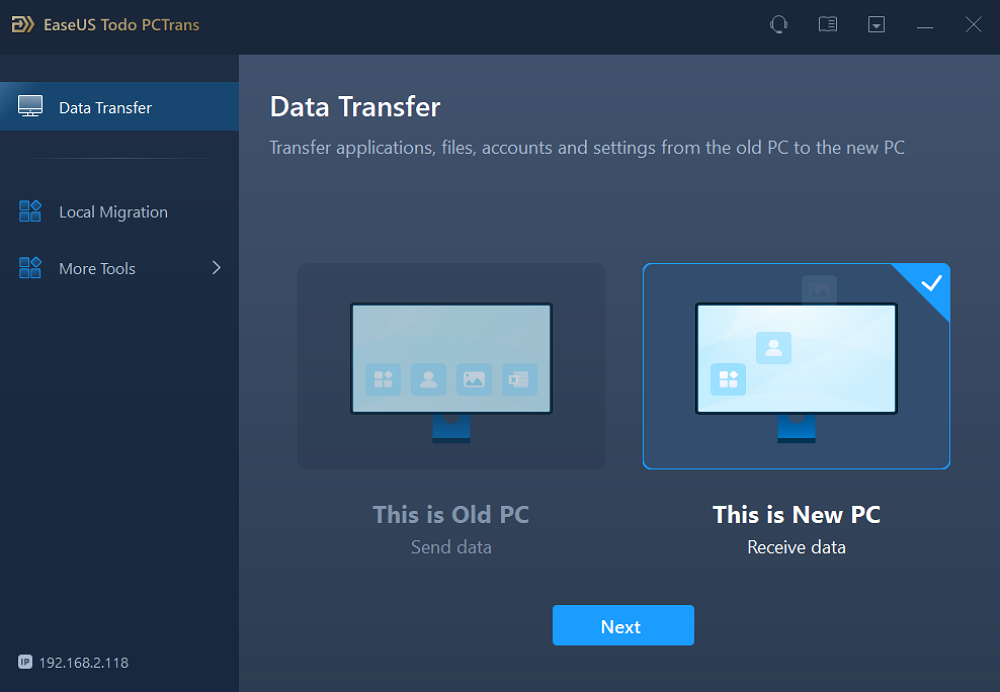
- Launch EaseUS Todo PCTrans on the new computer, click "This is New PC" and click "Next".
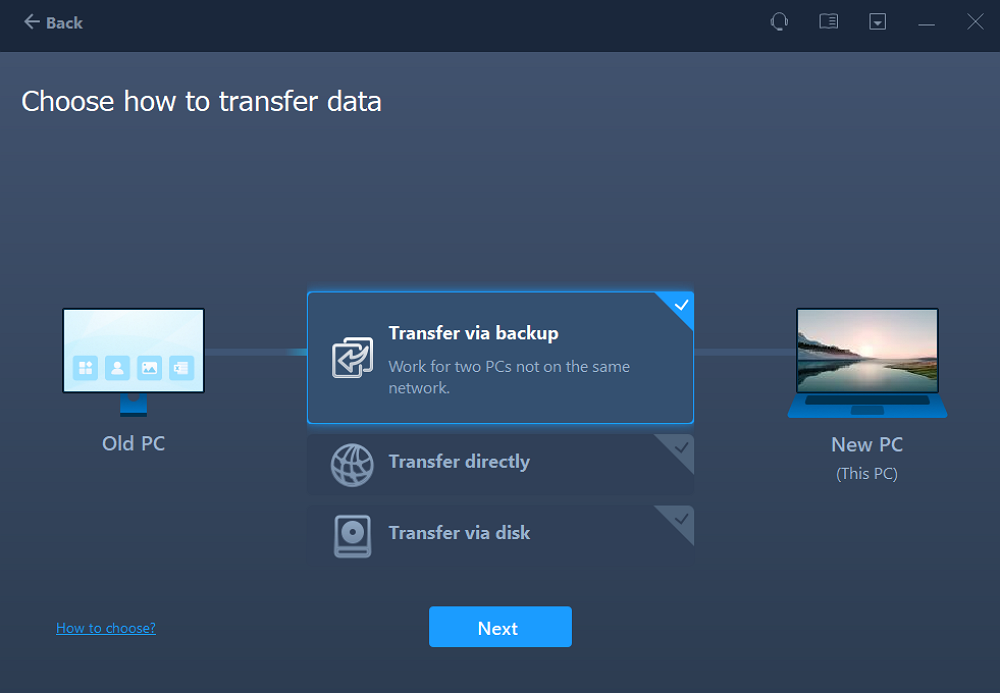
- Select "Transfer via backup" and click "Next".
- Click "Browse" to select the file backup in your removable device.
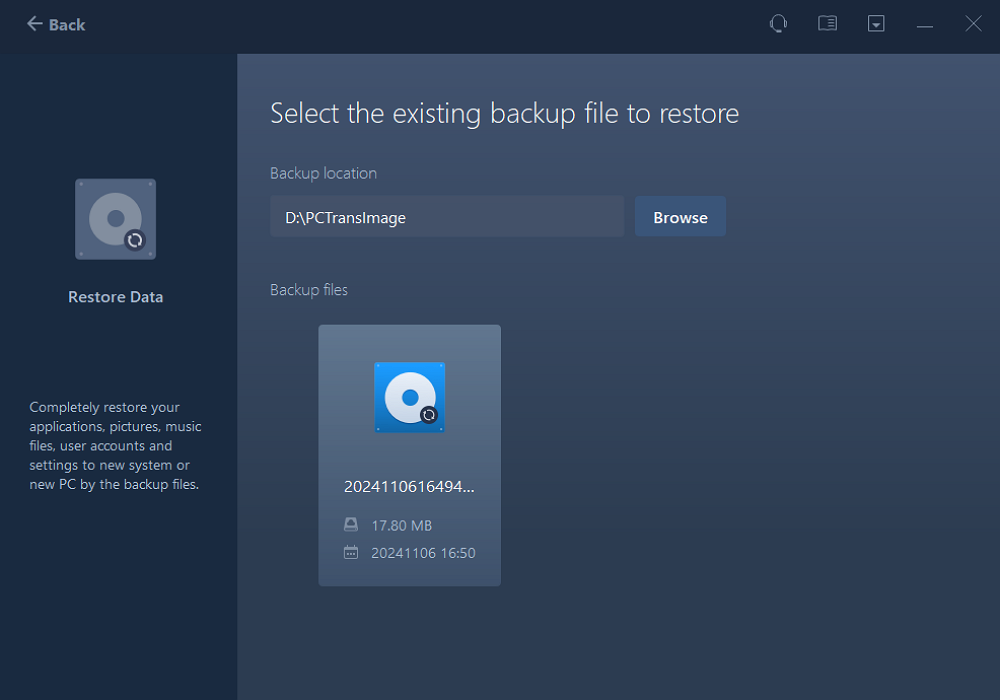
- Click "Files" and select the backed up files you want to transfer from the old PC to your current new PC, and click "Restore".
Easy, Quick, and Safe Fixes for File Sharing
This page shows you six methods in which to transfer files between Windows 7 and Windows 10/11.
For the easiest solution, EaseUS Todo PCTrans in Method 1 is the best one for all users. Email, cloud drive, and network sharing are also practical ways for manual guidelines. Your advice is important to us. Looking forward to your consultation!
FAQs About Network File Sharing from Windows 7 to Windows 10
Here we listed some hot topics that are related to file sharing via network or email between Windows 7 and Windows 10, if you are interested in, follow and find answers here:
1. Can Windows 7 and Windows 10 share files via HomeGroup?
Yes, sure. You can share files between Windows 7 and Windows 10 computers via HomeGroup. All you need is to set up a file sharing homegroup and set both Windows 7 and Windows 10 computers to join the group. Then, you can start transferring files on two computers via the HomeGroup.
2. How can I share files between computers on the same network in Windows 7?
Yes, sure and you can share files between computers on the same network in Windows 7. To do so, you have at least three ways for sharing files between Windows 7 computers as listed here:
- #1. File Transfer Software - EaseUS Todo PCTrans
- #2. Network Share - HomeGroup
- #3. Email or Cloud Share - Gmail/Hotmail, OneDrive, Dropbox, etc.
For Windows 7 beginners, we suggest you turn to Method 1 for help, as recommended on the above page. It's efficient, fast, and easy for all levels of Windows 7 users to apply and execute the file-transferring operation.
3. How to enable file sharing in Windows 7?
- Open Control Panel and click "Network and Internet".
- Click "Change Advanced Sharing Settings" and click "Turn on network discovery" and "Turn on file and printer sharing".
- Save changes.
About the Author
Updated by Joey Albert
Joey is an enthusiast of science and technology. With a passion for uncovering the latest tech innovations, she creates clear, engaging how-to guides that make technology accessible and enjoyable for all.
Brithny is a technology enthusiast, aiming to make readers' tech lives easy and enjoyable. She loves exploring new technologies and writing technical how-to tips. In her spare time, she loves sharing things about her game experience on Facebook or Twitter.
Reviews and Awards
-
EaseUS Todo PCTrans Free is a useful and and reliable software solution created to serve in computer migration operations, be it from one machine to another or from an earlier version of your OS to a newer one.
Read More -
EaseUS Todo PCTrans is by the folks at EaseUS who make incredible tools that let you manage your backups and recover your dead hard disks. While it is not an official tool, EaseUS has a reputation for being very good with their software and code.
![]() Read More
Read More
-
It offers the ability to move your entire user account from your old computer, meaning everything is quickly migrated. You still get to keep your Windows installation (and the relevant drivers for your new PC), but you also get all your apps, settings, preferences, images, documents and other important data.
Read More
Related Articles
-
How to Transfer Files from Broken Laptop to New Laptop - Easy!
![author icon]() Oliver/2026/01/29
Oliver/2026/01/29 -
How to Transfer Files to Flash Drive Windows 11 (Full Tutorial)
![author icon]() Oliver/2026/06/22
Oliver/2026/06/22 -
How to Move Windows Apps to Another Drive - 2 Way
![author icon]() Tracy King/2026/01/29
Tracy King/2026/01/29 -
How to Transfer Files from iCloud to Google Drive Step by Step
![author icon]() Tracy King/2026/01/29
Tracy King/2026/01/29