
Content
Page Table of Contents
About the Author
Hot Topics
Upgrading the storage capacity of your Xbox One console can greatly enhance your gaming experience by letting you store more games, apps, and media. If you find yourself running out of space on your current Xbox One hard drive, it may be time to consider upgrading to a larger storage option.
In this passage, EaseUS will guide you through the process of upgrading the hard drive on your Xbox One. You will learn about the necessary preparations, the steps involved in the upgrade process, and the tools you will need along the way:
| 🚩Stages | 🔦Tools | 🔎Duration | 🔨Complex |
|---|---|---|---|
|
4-6 Minutes | Moderate | |
| Stage 2. Clone Xbox One Hard Drive to New HDD/SSD | EaseUS Partition Master | 3-5 Minutes | Easy |
| Stage 3. Install New HDD or SSD to Xbox One | Blank USB flash drive 6GB | 5-8 Minutes | Complex |
Preparations for Xbox One Hard Drive Update
Before you begin the process of upgrading your Xbox One hard drive, there are a few important preparations to make:
💡Buy a certificated SSD or larger HDD: It is crucial to choose a certified solid-state drive (SSD) or a larger hard disk drive (HDD) that meets the requirements for compatibility with your Xbox One. Factors such as performance, speed, price, capacity, and quality should be taken into account when making your selection.
💡Download a reliable cloning tool - EaseUS Partition Master: To transfer the data from your current Xbox One hard drive to a new SSD or HDD, you will need a reliable cloning tool. EaseUS Partition Master is a recommended software that offers a clone feature specifically designed for this purpose, making it easy and safe and helping you upgrade Xbox One hard drives without losing any data or custom settings.
💡Initialize the target hard drive or SSD for use: Before installing the new hard drive or SSD, you need to initialize it so that it can be recognized by your Xbox One. This ensures that the console can properly utilize the new storage device.
💡Prepare the tools to install the new hard drive or SSD: To perform the physical installation of the new hard drive or SSD in your Xbox One, you will need a few tools such as plastic opening tools, spudger, T9 TORX screwdriver, and T10 TORX screwdriver to open the console, and a USB flash drive with at least 6GB of space during installation.
By following these preparations and gathering the necessary tools, you will be ready to upgrade your Xbox One hard drive, which we will cover in the subsequent sections. You should download the EaseUS Partition Master in advance to clone the original Xbox One hard drive. Don't forget to share this complete guide online to help more Xbox One owners upgrade their hard disk drives successfully:
Stage 1: Remove the Original Hard Drive From Xbox One
In this stage, we'll learn how to remove the original hard drive from Xbox One to add a new, larger one and upgrade. It's good to know that if your Xbox One is still under warranty, upgrading your internal hard drive will abolish its warranty, so please decide wisely to upgrade your Xbox One internal hard drive.
Once again, I want to remind you of the necessary tools you should arrange in advance:
- Plastic Opening Tools
- Spudger
- T9 TORX Screwdriver
- T10 TORX Screwdriver
Follow the steps to remove the original hard drive from Xbox One:
Step 1. Carefully peel up the tamper-evident tape to open your Xbox. Detach the plastic vent encircling the side USB port and remove the plastic tab providing reinforcement to the front corner.
Step 2. Use a spudger to open the case, starting from the rear side vent. Pry open the clips along the rear and remaining sides to remove the top case.
Step 3. Safely disconnect the front panel button cable using tweezers; remove the Wi-Fi board and the upper metal case.
Step 4. Detach the SATA power and data cables from the hard drive and remove the hard drive assembly from the tray.
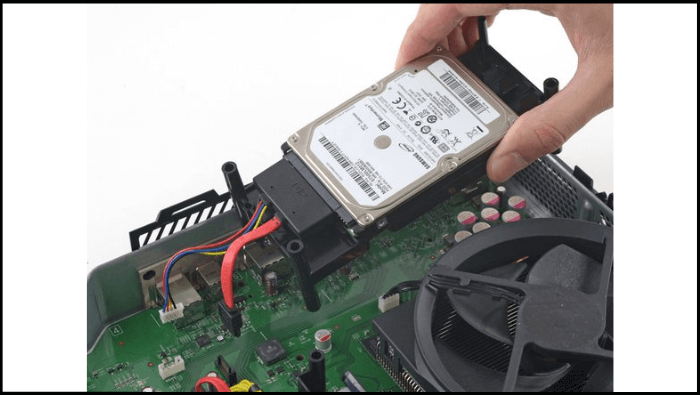
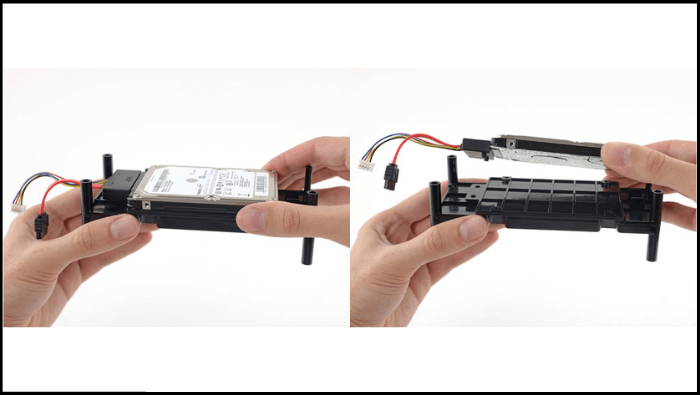
Step 5. Extract the four 8.5 mm T10 Torx screws that secure the hard drive assembly to the tray. Disconnect the SATA connector block from the hard drive.
To reverse the disassembly process and reassemble your device, please follow these instructions in the opposite order.
Stage 2. Clone the Original Xbox One Hard Drive
To preserve the data of the original Xbox One hard drive, you'll need reliable disk cloning software such as EaseUS Partition Master with its clone feature for help. EaseUS Partition Master offers various disk management features, including disk cloning.
With it, you can create an exact replica of your Xbox One hard drive, ensuring that all your games, data, and settings are transferred seamlessly to the new drive.
Now, let's delve into the step-by-step instructions on how to clone the Xbox One hard drive using EaseUS Partition Master:
Step 1. Select the source disk.
- Click the "Clone" from the left menu. Select the "Clone OS Disk" or "Clone Data Disk" and click "Next".
- Choose the source disk and click "Next".
Step 2. Select the target disk.
- Choose the wanted HDD/SSD as your destination and click "Next" to continue.
- Read Warning message and confirm "Yes" button.
Step 3. View the disk layout and edit the target disk partition size.
Then click "Continue" when the program warns it will wipe out all data on the target disk. (If you have valuable data on the target disk, back up it in advance.)
You can select "Autofit the disk", "Clone as the source" or "Edit disk layout" to customize your disk layout. (Select the last one if you want to leave more space for C drive.)
Step 4. Click "Start" to start the disk cloning process.
Alongside cloning Xbox One hard drive, you can apply EaseUS Partition Master to:
- Format and wipe old Xbox One hard drive
- Format SSD for Xbox One
- Convert external SSD to FAT32 or NTFS for Xbox One
- Format external hard drive for Xbox One
Stage 3. Install the New Hard Drive or SSD to Xbox One
Once you have removed the original internal hard drive, carefully insert the new internal hard drive into your Xbox One. You can follow the steps from Stage 1. Now, it's time to install the new larger hard drive or SSD on Xbox One to upgrade.
Follow these steps:
Step 1. Download the offline system update files. Here is a link: http://www.xbox.com/xboxone/osu1
Step 2. Arrange a blank USB flash drive with a minimum of 6GB storage capacity or more than this and format it to NTFS.
Step 3. Extract the downloaded files on your PC/Laptop. Carefully eject and remove the USB flash drive from your system.
Step 4. Open your Xbox One and use your controller to choose Troubleshoot.
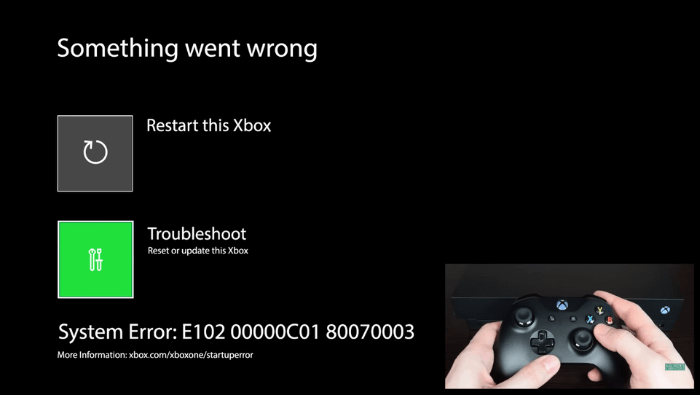
Step 5. Connect the USB flash drive to the console's B port. When the Offline system update option becomes active, choose it.
Step 6. Wait for approximately ten minutes until the on-screen ends. Finally, follow the prompts shown on the screen to finalize the console setup.
That's all you achieved to upgrade Xbox One hard drive to a new larger one and expand it. If you find this article helpful, please don't forget to share this with your friends and colleagues on social media to help them if they also need to upgrade the Xbox One drive.
Finally, we'll discuss the reasons why you should upgrade your Xbox One hard drive and then conclude the entire article. So, please don't forget to read it and know the benefits.
Why Do We Need to Upgrade Xbox One Hard Drive
The original internal hard drive of the Xbox One may have several disadvantages. These may include limited disk space, slow loading times, excessive noise, or other performance-related issues. These limitations can significantly impact your gaming experience and storage capacity.
Nowadays, It's a trend for users to upgrade their old Xbox One hard drives and overcome these limitations to enjoy a better gaming experience. By upgrading to a larger capacity and faster hard drive, you can acquire more space for games, faster loading times, and an overall improved performance. With the understanding of why you need to upgrade your Xbox One hard drive and its importance, let's start with this tutorial and follow our step-by-step guide to achieve this goal, as we mentioned all steps clearly so you can understand easily.
Read Also:
Conclusion
The essence and need to upgrade the Xbox One hard drive goes with the user's preferences. Some may want up to 1 TB, and some need 2 TB. If you need to upgrade the Xbox One due to low disk space and slow performance, this how-to article is helpful for you. You should read this entire article to understand the process step-by-step, from buying a new larger SSD or hard drive to removing the original hard drive, inserting the new one, cloning the existing hard drive, and then completing the setup.
So, download EaseUS Partition Master now to easily clone your original Xbox One hard drive and preserve all your valuable games, data, and settings.
Upgrade Xbox One Hard Drive FAQs
When it comes to upgrading your Xbox One hard drive, you may have some questions in mind. Let's explore a few frequently asked questions below:
1. Can I upgrade my Xbox One HDD to SSD?
Yes, it is possible to upgrade your Xbox One HDD to an SSD (Solid State Drive).
Follow these steps:
Step 1. Open your Xbox One console and remove the existing hard drive.
Step 2. Replace it with the SSD by connecting it to the appropriate port.
Step 3. Reassemble the console and proceed with the necessary system setup.
2. Can you add more GB to Xbox One?
Yes, you can add more storage capacity to your Xbox One. One way to purchase an external hard drive. Simply connect a compatible external hard drive to your Xbox One via a USB port, and expand your storage space.
3. Will an SSD make my Xbox One faster?
Upgrading to an SSD can definitely make your Xbox One faster. SSDs offer faster data access times, reducing loading times for games and applications. However, it's recommended to research and find specific user experiences and benchmarks to gauge the performance gains accurately.
How Can We Help You
About the Author
Updated by Tracy King
Tracy became a member of the EaseUS content team in 2013. Being a technical writer for over 10 years, she is enthusiastic about sharing tips to assist readers in resolving complex issues in disk management, file transfer, PC & Mac performance optimization, etc., like an expert.
Sherly joined EaseUS in 2022 and she has always loved writing articles and enjoys the fun they bring. She receives professional training here, focusing on product performance and other relative knowledge. She has written over 200 articles to help people overcome computing issues.
Product Reviews
-
I love that the changes you make with EaseUS Partition Master Free aren't immediately applied to the disks. It makes it way easier to play out what will happen after you've made all the changes. I also think the overall look and feel of EaseUS Partition Master Free makes whatever you're doing with your computer's partitions easy.
Read More -
Partition Master Free can Resize, Move, Merge, Migrate, and Copy disks or partitions; convert to local, change label, defragment, check and explore partition; and much more. A premium upgrade adds free tech support and the ability to resize dynamic volumes.
Read More -
It won't hot image your drives or align them, but since it's coupled with a partition manager, it allows you do perform many tasks at once, instead of just cloning drives. You can move partitions around, resize them, defragment, and more, along with the other tools you'd expect from a cloning tool.
Read More
Related Articles
-
Partition Manager Windows 11 Free Download in 2026 🏆
![author icon]() Tracy King/2026/06/17
Tracy King/2026/06/17 -
How to Check SSD Health on Mac | 3 Free Ways
![author icon]() Sherly/2026/06/17
Sherly/2026/06/17 -
How to Create A Bootable Installer for macOS - Full Steps
![author icon]() Oliver/2026/06/17
Oliver/2026/06/17 -
How to Remove Bloatware From Windows 11/10
![author icon]() Sherly/2026/06/17
Sherly/2026/06/17


