
Content
Page Table of Contents
About the Author
Hot Topics
Running out of space on your C drive is one of the most common Windows 11 frustrations, especially when you clearly see unallocated space but still can't extend C drive. Errors like "Extend volume greyed out" or "can't extend C drive with unallocated space Windows 11" often come down to partition layout, not storage capacity. This guide breaks down why it happens and how to safely increase C drive space in Windows 11 without formatting or data loss.
Why Can't Extend C Drive in Windows 11
Before jumping into fixes, it's critical to understand why this issue occurs. Below are the most common causes behind "extend volume is not enabled in Windows 11."
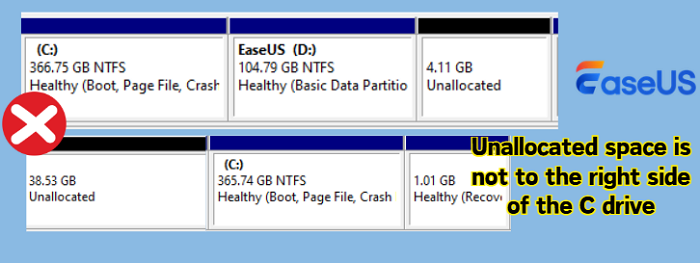
1️⃣Unallocated Space Not to the Right Side of C Drive
Windows Disk Management only allows extending a partition when the unallocated space is directly to the right of the C drive. If the space is separated by another partition or to the left of the C drive, the "Extend Volume" option will be greyed out, even if there is plenty of free space available.
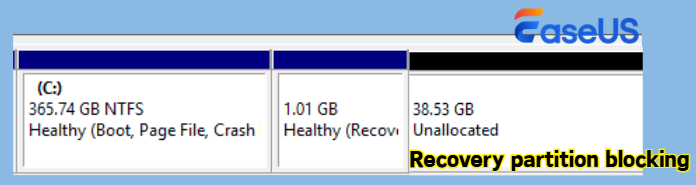
2️⃣Recovery Partition Blocking
Many Windows 11 systems include a Recovery partition placed right after the C drive. It prevents C from accessing unallocated space behind it. This is one of the most overlooked reasons behind "can't extend C even though I have unallocated space next to it."
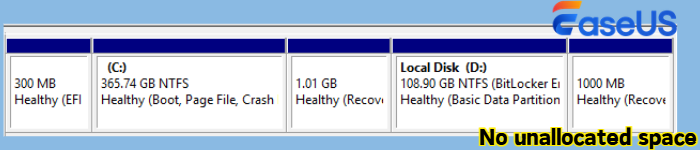
3️⃣No Unallocated Space
If your disk is fully partitioned (e.g., C and D drives take up all space), there is simply no unallocated space to extend into.
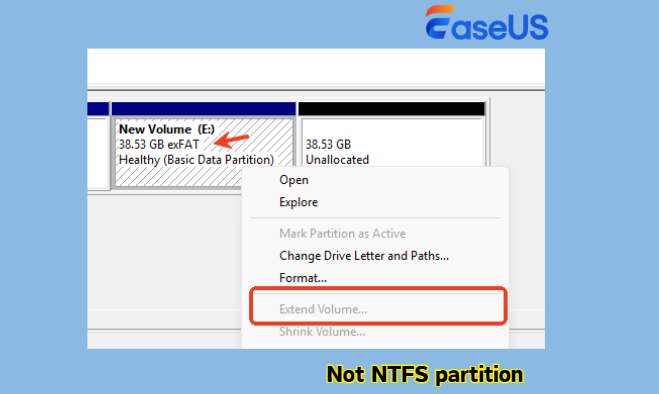
4️⃣File System Limitation
Disk Management only supports extending NTFS partitions. If your system drive is using FAT32 or exFAT, extending is not supported.
How to Fix "Unable to Extend C Drive Windows 11" Error
Before applying any fix, you should know this key rule:
|
Disk Management can only extend C drive when unallocated space is immediately adjacent on the right side. |
If your situation doesn't meet this requirement, you'll need alternative approaches. Below are two practical solutions, each suited for different scenarios.
💡Quick Comparison: Choose the Right Fix
#1: Use EaseUS Partition Master (Recommended for Most Users)
Advantages:
- Move unallocated space next to C drive without restrictions
- Directly extend C drive with nonadjacent unallocated space
- Merge partitions directly to increase C drive space
- Complete all operations without data loss
Best for:
- Extend volume greyed out even with unallocated space
- Unallocated space is not next to C drive
- There is a Recovery or EFI partition blocking extension
- Users who want a safer, more flexible way to extend C drive
#2: Delete the Partition Behind C Drive (Built-in Method)
Advantages:
- Uses Windows built-in Disk Management (no extra software)
- Simple and quick if conditions are ideal
Limitations/Risks:
- Causes permanent data loss on the deleted partition
- Not recommended if the partition is a Recovery partition
- May lead to boot or system repair issues
Best for:
- The partition next to C drive is expendable (e.g., empty D drive)
- You have already backed up important data
- You want a quick fix and accept the risks
Fix 1. Use EaseUS Partition Master
The most efficient way to fix "can't extend C drive even with unallocated space" is by using a professional partition tool like EaseUS Partition Master. It bypasses Windows limitations and allows flexible partition management without data loss.
Unlike Disk Management, it can:
- Move unallocated space next to C drive
- Extend C drive with adjacent or nonadjacent unallocated space
- Merge partitions to increase C drive space in Windows 11 without formatting
This makes it ideal for users who want a safe and direct solution without deleting partitions.
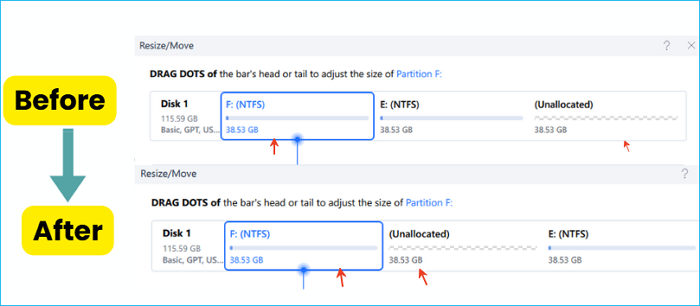
Option 1. Move Unallocated Space to the Right Side of the C Drive
Step 1. Launch EaseUS Partition Master, right-click the C drive, and click "Resize/Move".
Step 2. Drag the C drive to the left or right to make the unallocated space to the right side of C drive.
Step 3. Click "Execute the Task" and "Apply" to confirm.
Then, you can see the unallocated space is exactly to the right side of the C drive.
Option 2. Extend C Drive with Adjacent/Nonadjacent Unallocated Space
Extend System C drive with unallocated space
- 1. Right-click on the System C: drive and select "Resize/Move".
- 2. Drag the system partition end into the unallocated space so to add it to the C: drive. And click "OK".
- 3. Click "Execute Task" and "Apply" to execute the operations and extend the C drive.
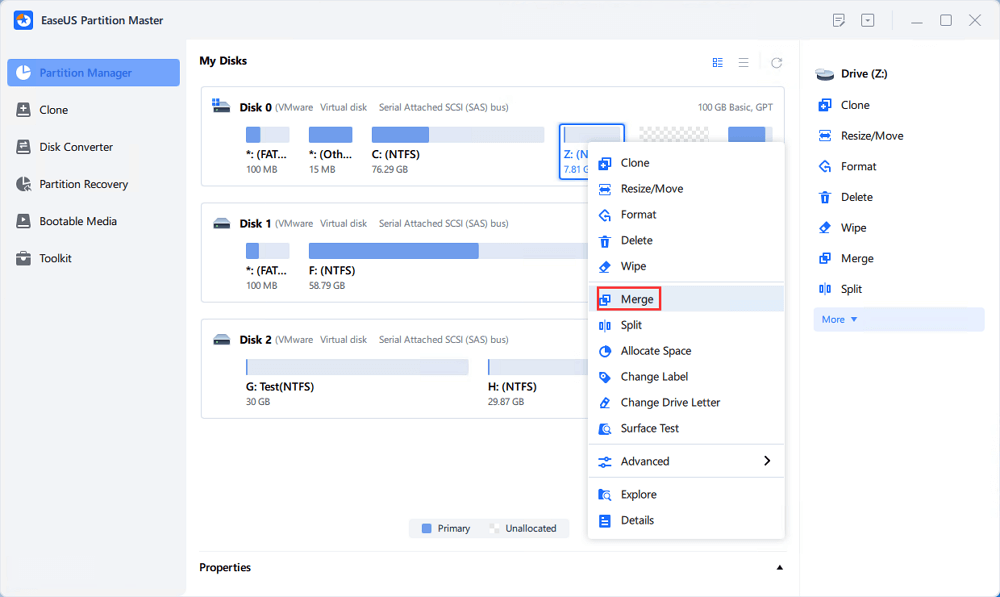
Option 3. Merge C Drive with Another Partition
Step 1. Go to Partition Manager, right-click one partition that you need to merge and select "Merge".
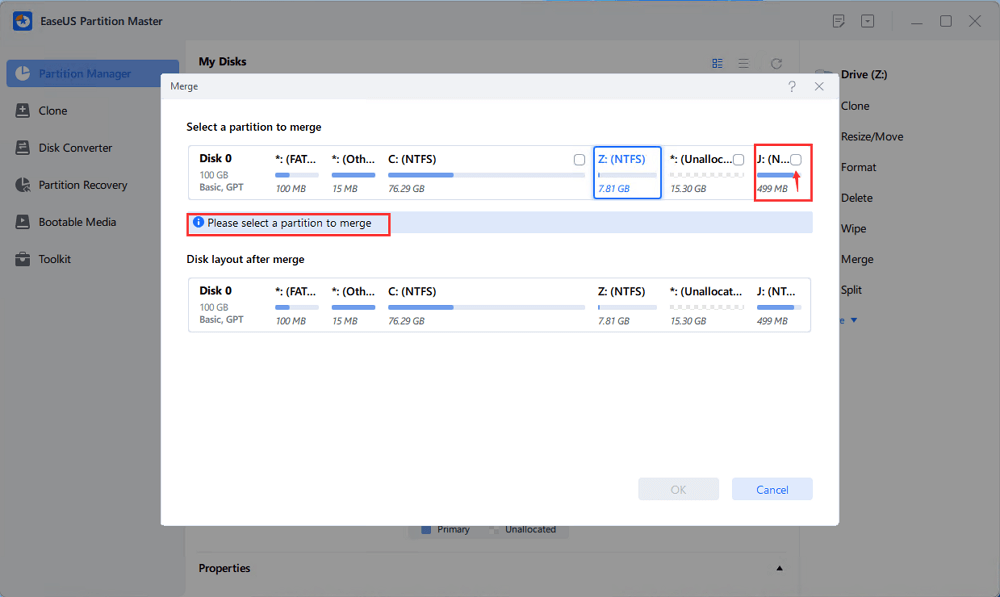
Step 2. Select a non-adjacent partition to merge, click "OK".
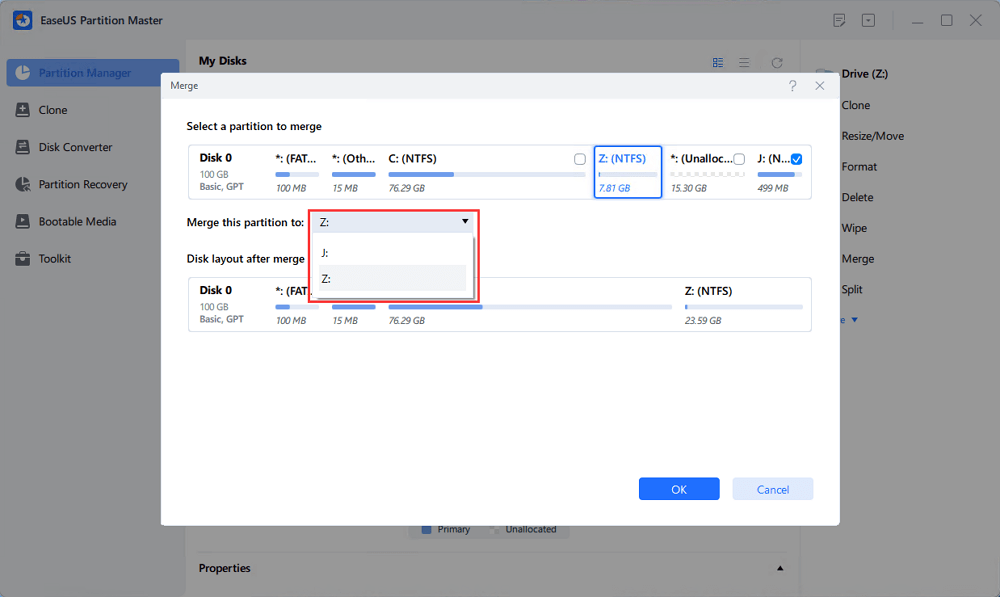
Step 3. Select the target partition you want to keep, and click "OK" to merge the non-adjacent partition into it.
Step 4. Click the "Execute Task" button and click "Apply" to start merging partitions.

Fix 2. Delete the Partition Behind C Drive
This method works only if there is a partition directly to the right of C drive (e.g., D drive). By deleting it, you create adjacent unallocated space that Disk Management can use.
|
⚠️ Warning: This will permanently erase all data on the deleted partition, so always back up important data before proceeding. If the partition is a Recovery partition, removing it may affect system repair or boot functionality. |
Steps to Extend C Drive Using Disk Management:
- Press Win + X and select Disk Management.
- Locate the partition immediately to the right of C drive.
- Right-click it and select Delete Volume.
- Confirm deletion (this will create unallocated space).
- Right-click the C drive and select Extend Volume and follow the wizard to complete the extension.
Feel free to share this post if it helps you extend C drive on Windows 11 safely.

Conclusion
When you can't extend the C drive in Windows 11, the issue is usually caused by partition layout—not a lack of space. While Disk Management works in simple cases, it quickly falls short when partitions are not ideally arranged. For most users, using a reliable partition manager is the safest way to extend the C drive without formatting or losing data. Choose the method that matches your situation, and always proceed carefully when modifying disk partitions. Check the following related articles if you need further help.
FAQs About Unable to Extend C Drive Windows 11
1. How to extend C drive in Windows 11 using CMD?
Here is extend C drive in Windows 11 with command lines:
Open Command Prompt as Admin: Press Win + R, type "cmd", right-click "Command Prompt", and select Run as administrator.
- Launch Diskpart: Type diskpart and press Enter.
- List Volumes: Type list volume and press Enter to see all volumes.
- Select C: Drive: Type select volume X (replace X with your C: drive's volume number) and press Enter.
- Extend Drive:
- To use all available adjacent space: Type extend and press Enter.
- To extend by a specific size: Type extend size=10240 (to extend by 10GB, size is in MB) and press Enter.
However, this only works if unallocated space is adjacent to the right side of the C drive.
2. Why is "Extend Volume" greyed out in Windows 11?
The Extend Volume option is usually greyed out because of:
- Unallocated space is not next to the C drive
- A recovery or other partition is blocking it
- There is no unallocated space available
3. How to extend C drive from D drive in Windows 11?
There are two main options to extend the C drive from D drive:
- Shrink the D drive to create unallocated space, then move it next to C
- Use partition software to merge or directly extend the C drive
This is the most practical way to increase C drive space in Windows 11 without formatting, especially when managing multiple partitions.
How Can We Help You
About the Author
"I hope my articles can help solve your technical problems. If you are interested in other articles, you can check the articles at the bottom of this page. Similarly, you can also check my Twitter to get additional help."
Sherly joined EaseUS in 2022 and she has always loved writing articles and enjoys the fun they bring. She receives professional training here, focusing on product performance and other relative knowledge. She has written over 200 articles to help people overcome computing issues.
Product Reviews
-
I love that the changes you make with EaseUS Partition Master Free aren't immediately applied to the disks. It makes it way easier to play out what will happen after you've made all the changes. I also think the overall look and feel of EaseUS Partition Master Free makes whatever you're doing with your computer's partitions easy.
Read More -
Partition Master Free can Resize, Move, Merge, Migrate, and Copy disks or partitions; convert to local, change label, defragment, check and explore partition; and much more. A premium upgrade adds free tech support and the ability to resize dynamic volumes.
Read More -
It won't hot image your drives or align them, but since it's coupled with a partition manager, it allows you do perform many tasks at once, instead of just cloning drives. You can move partitions around, resize them, defragment, and more, along with the other tools you'd expect from a cloning tool.
Read More
Related Articles
-
Solved: C Drive Full and Out of Space in Windows 11/10/8/7
![author icon]() Jean/2026/05/27
Jean/2026/05/27 -
![author icon]() Daisy/2026/04/30
Daisy/2026/04/30 -
Windows 11 C Drive Access Denied on Samsung Laptops: Causes and 4 Proven Fixes
![author icon]() Sherly/2026/05/10
Sherly/2026/05/10 -
How to Clean C drive in Windows 10/11 - 12 Methods
![author icon]() Sherly/2026/05/27
Sherly/2026/05/27
Hot Topics


EaseUS Partition Master

Version 20.0 is here - full exFAT support, easier disk partitioning, and PC performance optimization.