
Content
Page Table of Contents
About the Author
Hot Topics
PAGE CONTENT:
Enabling Secure Boot helps protect your PC from malware and unauthorized software, but it can sometimes cause the system to get stuck in BIOS after enabling Secure Boot. This often happens due to incompatible disk formats (MBR vs GPT), disabled CSM (Legacy Boot), or misconfigured BIOS settings.
If you're wondering about the reasons and effective fixes, this guide from EaseUS Software will help you quickly restore normal booting.
Why Am I Stuck in BIOS after Enabling Secure Boot
Getting stuck in BIOS after enabling Secure Boot is a frequent problem for many users. Here are the most common causes you need to check to resolve this issue.
Secure Boot Compatibility Requirements not Met: Secure Boot requires a GPT partition style, UEFI boot mode, a compatible Windows version (such as Windows 10/11), and properly configured boot files. If the required conditions are not met, the system may fail to boot normally.
Partition Style Mismatch: This issue often occurs when Windows is installed on an MBR disk instead of the required GPT format. Since Secure Boot only works with UEFI and GPT, an MBR-based system becomes unbootable if Secure Boot is enabled.
CSM Disabled: Disabling CSM can prevent the system from booting if it was previously configured in Legacy BIOS mode. Without CSM, the system cannot support MBR-based boot configurations, leading to BIOS boot loops or failure to detect the OS. Please read the instructions on how to change the BIOS Mode from Legacy to UEFI, if needed.
What to do if the BIOS is stuck after Enabling Secure Boot
Enabling Secure Boot in Windows is a security feature designed to protect your PC from malware and unauthorized operating systems. However, it can sometimes prevent your system from booting, leaving it stuck in BIOS.
Fix 1. Disable Secure Boot
Secure Boot only allows operating systems signed with trusted certificates to boot. If your current setup is an MBR disk instead of a GPT disk, your PC can get stuck in the BIOS. Disabling Secure Boot temporarily allows the system to boot so you can make further corrections.
Step 1. Restart your PC > press F2, F10, Esc, or DEL as the startup screen appears.
Step 2. Figure out the manufacturer of your PC > keep pressing the following corresponding hotkey to enter BIOS.
- HP: F10 or Esc
- Dell: F2 or F12
- Acer: F2 or Del
- Lenovo: F2 or Fn + F2
- Asus: F2 or Esc
- Samsung: F2
- Sony: F1, F2, or F3
Step 3. In your BIOS menu, under Security/Boot > locate Secure Boot > set it to Disabled.

Fix 2. Use EaseUS Partition Master🔥
Secure Boot requires a GPT partition style for the system disk. If your Windows installation is on an MBR disk, enabling Secure Boot will prevent booting, leaving the BIOS stuck. With EaseUS Partition Master, converting the disk to GPT aligns it with Secure Boot requirements.
Step 1. Install and launch EaseUS Partition Master on your computer.
Step 2. Open the Disk Converter tab, select "MBR => GPT" and click "Next" to continue.
Step 3. Choose the target MBR disk, and click "Convert" to start the conversion.
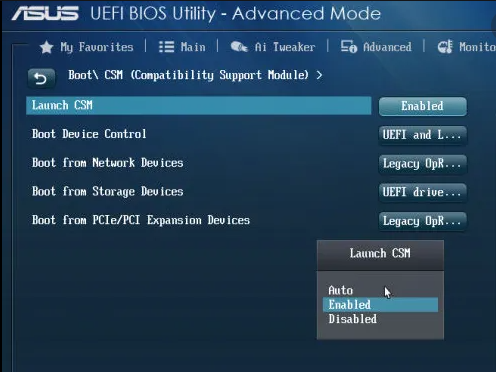
Fix 3. Enable CSM
CSM (Legacy Boot) allows the BIOS to boot from MBR disks and legacy operating systems. If CSM is disabled, systems with MBR or legacy configurations cannot boot under Secure Boot, resulting in a BIOS loop. Enabling CSM provides backward compatibility. Let's show how it works.
Step 1. Restart your PC > press F2, F10, Esc, or DEL as the startup screen appears.
Step 2. Press the appropriate hotkey to enter the BIOS, depending on your computer's brand.
Step 3. Locate CSM or Legacy Boot under Boot or Advanced settings > choose Enabled.
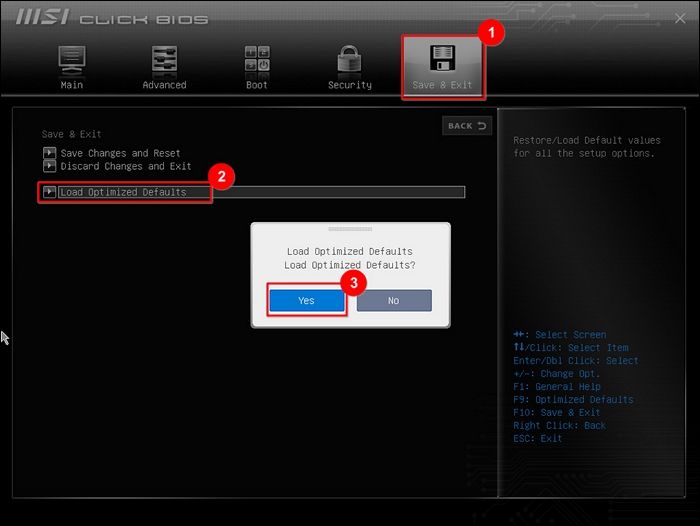
Fix 4. Reset BIOS to Default Settings
Misconfigured BIOS settings, such as incorrect boot order, disabled drives, or other custom changes, can block the system from recognizing the operating system after enabling Secure Boot. Factory resetting the BIOS restores default settings compatible with Secure Boot. Let's take MSI PC as an example.
Step 1. Restart your MSI computer > press the Del key immediately to access the BIOS settings.
Step 2. Move to the Save & Exit tab > select Load Optimized Defaults.
Step 3. Select Yes to confirm your choice > select Save changes and Reset > click Yes.
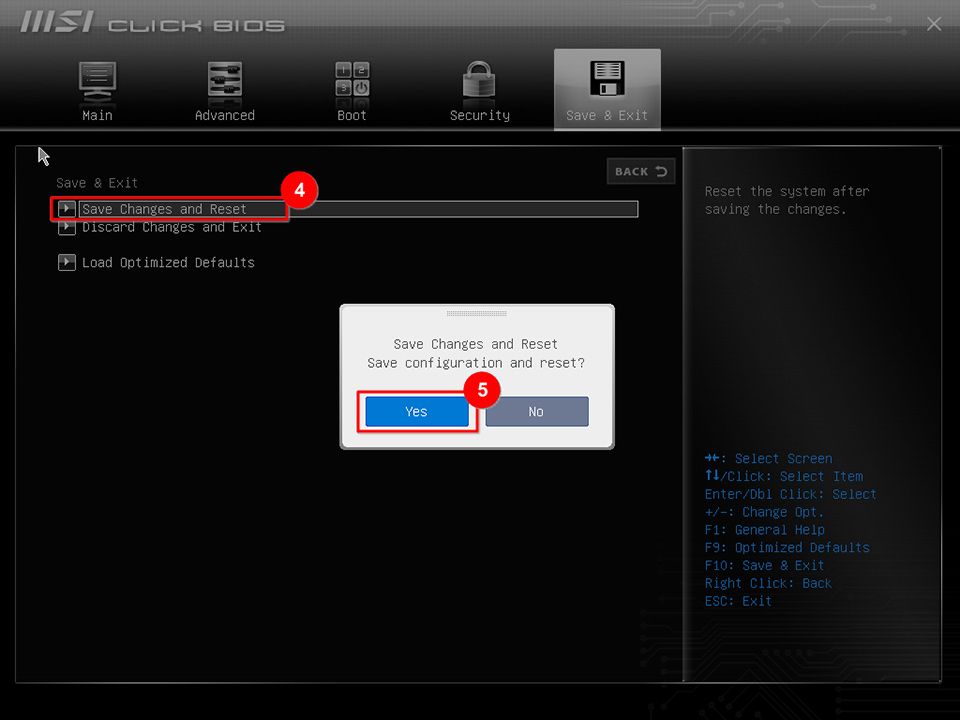
Step 4. Reboot your computer for changes to take effect.
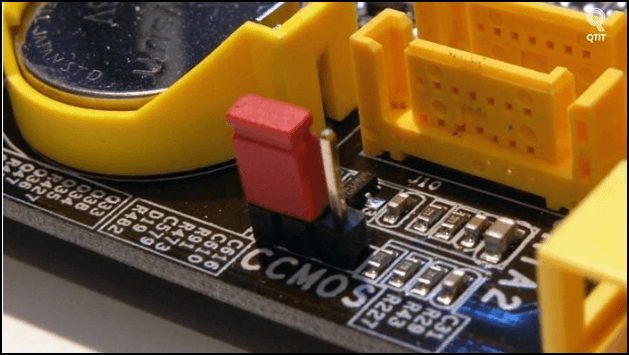
Fix 5. Clear CMOS
Clearing the CMOS resets all BIOS settings, including Secure Boot keys, boot order, and other firmware configurations. This method is useful if the BIOS becomes corrupted or misconfigured, causing the PC to remain stuck in BIOS after enabling Secure Boot on PCs.
Step 1. Turn off your PC and disconnect it from any power source. For laptops, remove the battery.
Step 2. Touch a metal surface before opening your PC to prevent static damage.
Step 3. Open your case or laptop to find the silver coin-shaped battery on the motherboard. Carefully remove it.
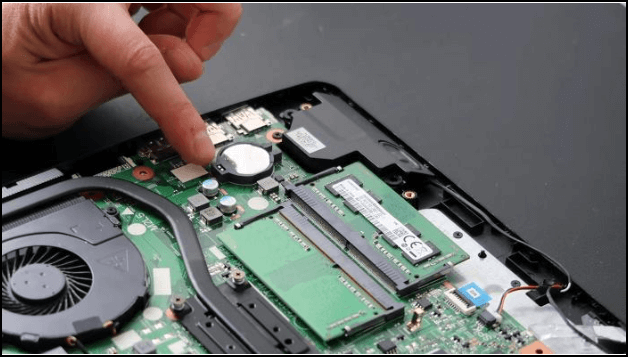
Step 4. Press and hold the power button for 10–15 seconds to reset the CMOS memory.
Step 5. Place the battery back, reconnect power (and battery for laptops), and turn on the PC.
- Tip
- Alternative Method: Use the CMOS jumper, often labeled CLEAR, CLEAR CMOS, CLR, or PSSWRD, if your motherboard doesn't have a removable battery. Check the manual or manufacturer's website for precise instructions.
Why Would I Want to Enable Secure Boot
Secure Boot is a security feature in modern PCs that ensures only trusted software can run when your computer starts. It helps protect your system from malware and unauthorized changes before Windows even loads.
Key Benefits:
1️⃣Protects Against Boot-Level Malware
- Secure Boot blocks malware, such as rootkits, that try to load before your operating system, keeping your PC safe from hidden threats.
2️⃣Maintains System Integrity
- Every boot component is verified against trusted digital signatures, preventing unauthorized software from tampering with your system.
3️⃣Supports Modern Windows Security Features
- Secure Boot works with TPM (Trusted Platform Module) and other Windows security features, both of which are essential to Windows 10 and 11.
4️⃣Recommended for Sensitive or Business PCs
- In corporate or high-security environments, Secure Boot adds an extra layer of protection for valuable data and critical systems. While Secure Boot improves security, it can block unsigned or custom software. You may need to temporarily disable it when installing certain drivers or operating systems.
Conclusion
Getting stuck in the BIOS after enabling Secure Boot can be alarming, but it's usually caused by disk formatting issues, a disabled CSM, or misconfigured BIOS settings, not by a permanent hardware problem. The good news is that these issues can be resolved quickly and safely with the right steps.
Among all the solutions, using EaseUS Partition Master to convert an MBR disk to GPT is convenient and efficient. With just a few clicks, you can prepare your system disk for Secure Boot without complex commands or risk of data loss. Naturally, you can also try disabling Secure Boot, enabling CSM, resetting the BIOS, or clearing the CMOS to fix this issue.
How Can We Help You
About the Author
"I hope my articles can help solve your technical problems. If you are interested in other articles, you can check the articles at the bottom of this page. Similarly, you can also check my Twitter to get additional help."
Product Reviews
-
I love that the changes you make with EaseUS Partition Master Free aren't immediately applied to the disks. It makes it way easier to play out what will happen after you've made all the changes. I also think the overall look and feel of EaseUS Partition Master Free makes whatever you're doing with your computer's partitions easy.
Read More -
Partition Master Free can Resize, Move, Merge, Migrate, and Copy disks or partitions; convert to local, change label, defragment, check and explore partition; and much more. A premium upgrade adds free tech support and the ability to resize dynamic volumes.
Read More -
It won't hot image your drives or align them, but since it's coupled with a partition manager, it allows you do perform many tasks at once, instead of just cloning drives. You can move partitions around, resize them, defragment, and more, along with the other tools you'd expect from a cloning tool.
Read More
Related Articles
-
How Do I Perform Windows Password Reset with USB? 2026 Guide
![author icon]() Tracy King/2026/06/17
Tracy King/2026/06/17 -
6 Ways to Reset Forgotten Windows 10 Password 🥇
![author icon]() Sherly/2026/06/17
Sherly/2026/06/17 -
How to Create UEFI Bootable USB Drive on Windows 10 🔥
![author icon]() Cedric/2026/06/17
Cedric/2026/06/17 -
How to Unlock Bitlocker in CMD Without Recovery Key
![author icon]() Cici/2026/06/17
Cici/2026/06/17


