
Content
Page Table of Contents
About the Author
Hot Topics
Updated on Jun 30, 2026
- 1. How to Check You Are Using Legacy or UEFI
- 2. How to Change BIOS Mode from Legacy to UEFI
- 3. Why Do We Change BIOS Mode from Legacy to UEFI
In this tutorial, you'll discover a 2-phrase guide for converting system from Legacy BIOS mode to UEFI mode without reinstalling the OS. EaseUS software is about to show you how to convert Legacy to UEFI successfully with practical solutions, as shown below.
Phase1. Check If Your PC Is Using Legacy or UEFI Mode
Before we start to converting the BIOS legacy mode to UEFI, it's necessary to check what boot mode the PC is using: BIOS or UEFI. There are several ways to check whether you are using Legacy or UEFI mode on your computer. One way is to check the System Information.
Here is the detailed step guide you can follow:
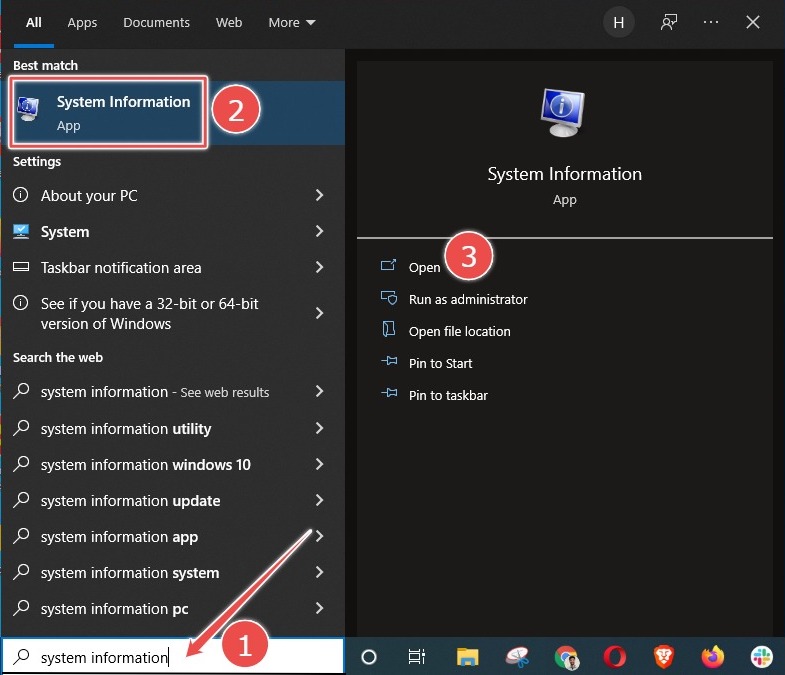
Step 1: Search "System Information" in the search bar and open it.
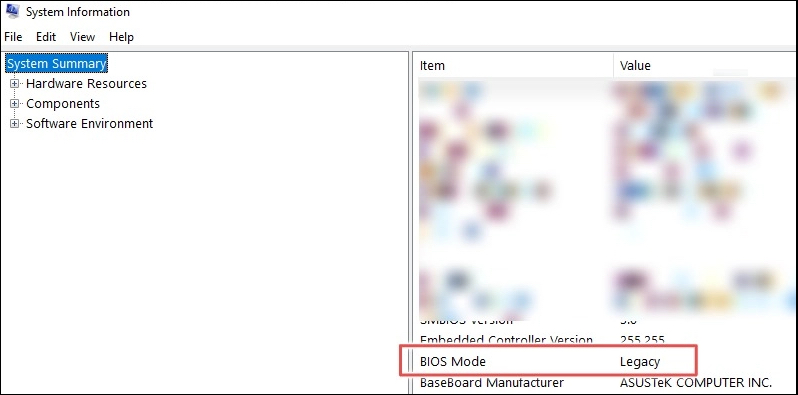
Step 2: Check your BIOS Mode.
There is more than one way to check whether you are using Legacy or UEFI. Follow this link if you are interested in other methods to check Windows using UEFI or Legacy.
Phase 2: How to Change BIOS Mode from Legacy to UEFI
Users may need to change the BIOS mode from Legacy to UEFI for various reasons. For example, they may be upgrading to a new operating system that requires UEFI, or they may want to take advantage of features that are only available in UEFI mode. In any case, changing the BIOS mode is not as difficult as users think.
Prerequisites
In order to change the BIOS mode from legacy to UEFI, there are a few prerequisites that must be met.
- Windows version must be at least Windows 10 v1703.
- The MBR disk should not contain more than three partitions. If there are more than three partitions, you can merge or delete them.
- Turn off BitLocker before converting BIOS mode since it doesn't allow Windows to convert the drive from Legacy BIOS to UEFI.
- The operating system must be 64-bit.
- No dual boot.
Although you will not lose your data during conversion, we still recommend you back up your data first.
Part 1. Convert MBR to GPT
Converting a hard drive from MBR to GPT is necessary when changing BIOS mode from Legacy to UEFI. EaseUS Partition Master makes it easy to change convert drives from MBR to GPT with just a few clicks.
Step 1. Download and launch EaseUS Partition Master on your computer.
Step 2. Go to Disk Converter, select "MBR => GPT" and click "Next" to continue.

Step 3. Select the target MBR disk that you tend to convert to GPT, and click "Convert" to start the conversion.

In addition, EaseUS Partition Master offers a number of other benefits.
- Migrate Windows 11 to a new SSD in one click.
- Resize/extend/shrink/create dynamic volume easily.
- Convert file system from FAT32 to NTFS.
As a result, it's the perfect tool for anyone who needs to change their BIOS mode or convert their hard drive.
You can also learn how to convert MBR to GPT by command prompt in our related article, which is more time-consuming.
Part 2. Convert Legacy BIOS to UEFI
Open the BIOS setting to choose UEFI as the boot mode. The general procedure is as follows, although some details may vary by the computer manufacturer.
Step 1: Turn on or restart your computer.
Step 2: When the computer manufacturer logo interface appears, long-press F2 to open the BIOS Setup. Generally speaking, most computers can enter the BIOS Setup by long-pressing F2, and some computers may enter through other keys, such as ESC, DEL, F12, etc.
Note: If you do not open the BIOS Setup in time at this time, Windows will load successfully, and you need to restart the computer to convert to BIOS mode.
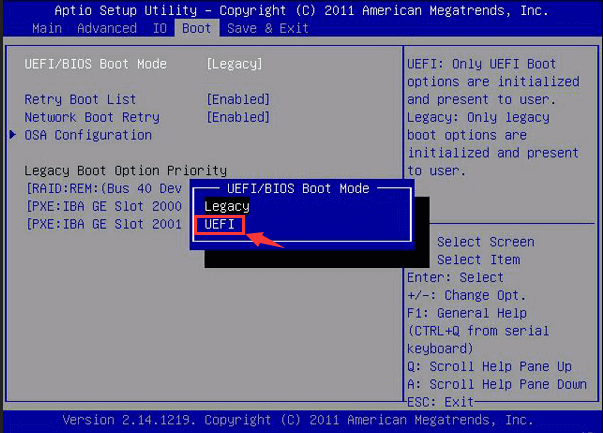
Step 3: Use arrow keys to select the "Boot" tab.
Step 4: Select "UEFI" in the "UEFI/BIOS Boot Mode". Press Enter.
Step 5: Move to the "Save & Exit" tab and press Enter.
That's the complete process of switching Legacy mode to UEFI. If you've switched the OS boot mode from Legacy to UEFI successfully, don't forget to share this online to help more of your friends master their computers for a better digital experience with ease:
Why Do We Change BIOS Mode from Legacy to UEFI
BIOS is the basic input/output system that controls communication between computer hardware and operating systems. BIOS is stored on a ROM chip located on the motherboard. The BIOS contains a set of instructions that the computer uses to perform basic operations, such as booting up.
UEFI (Unified Extensible Firmware Interface) is a newer type of BIOS that offers several advantages over Legacy BIOS. One key advantage of UEFI is that it provides a more user-friendly interface. BIOS screens are often text-based and difficult to navigate, whereas UEFI screens are typically graphical and easier to use. In addition, UEFI offers better support for large hard drives and long filenames. It can also boot faster than BIOS due to its smarter handling of driver loading. Finally, UEFI provides better security features, such as encrypting the boot process and requiring a password for BIOS settings changes. With so many advantages, it's no wonder that users want to change BIOS mode from Legacy to UEFI.
However, some computers still use Legacy BIOS, so it's still important to know the difference between the two types of BIOS. Follow this link to know more information about BIOS and UEFI.
Conclusion
The article discusses how to change the BIOS mode from legacy to UEFI in Windows 10/11. It recommends using EaseUS Partition Master to convert MBR to GPT before changing the BIOS mode. This is because EaseUS Partition Master will ensure that the data on the hard drive is not lost during the MBR-to-GPT convention. Then convert Legacy BIOS to UEFI from the firmware settings screen for your motherboard.
How Can We Help You
About the Author
Updated by Tracy King
Tracy became a member of the EaseUS content team in 2013. Being a technical writer for over 10 years, she is enthusiastic about sharing tips to assist readers in resolving complex issues in disk management, file transfer, PC & Mac performance optimization, etc., like an expert.
Product Reviews
-
I love that the changes you make with EaseUS Partition Master Free aren't immediately applied to the disks. It makes it way easier to play out what will happen after you've made all the changes. I also think the overall look and feel of EaseUS Partition Master Free makes whatever you're doing with your computer's partitions easy.
Read More -
Partition Master Free can Resize, Move, Merge, Migrate, and Copy disks or partitions; convert to local, change label, defragment, check and explore partition; and much more. A premium upgrade adds free tech support and the ability to resize dynamic volumes.
Read More -
It won't hot image your drives or align them, but since it's coupled with a partition manager, it allows you do perform many tasks at once, instead of just cloning drives. You can move partitions around, resize them, defragment, and more, along with the other tools you'd expect from a cloning tool.
Read More
Related Articles
-
How to Resize exFAT Partition (Extend/Shrink exFAT Volume)
![author icon]() Oliver/2026/06/29
Oliver/2026/06/29 -
How to Remove Partition on External Hard Drive [2026 Updated]
![author icon]() Jean/2026/06/17
Jean/2026/06/17 -
Resize/Move Partitions to Solve Low Disk Space Issue
![author icon]() Daisy/2026/06/17
Daisy/2026/06/17 -
Seagate Hard Drive Repair Tool Free [Fix Seagate Errors Quick & Easy]
![author icon]() Cici/2026/06/17
Cici/2026/06/17


