Page Table of Contents
About the Author
Hot Topics
Updated on Jan 29, 2026
BitLocker is a powerful data encryption feature built into your computer's OS for data safety. It offers comprehensive protection for the entire drive, ensuring that sensitive files remain inaccessible to unauthorized users. However, there may be instances where you need to disable this feature temporarily. A few examples include resolving technical issues, preparing to sell your device, or upgrading system components.
EaseUS will show you how to disable BitLocker in Windows 11/10 within no time. By the end, you can quickly deactivate this feature on Lenovo, Dell, or Asus devices. Learn how to decrypt your hard drive and understand the critical aspects of handling encrypted data to avoid potential security risks.
How to Turn Off BitLocker in Windows 11/10 - 4 Ways
Depending on your preference and familiarity with the system, there are many reliable ways to turn off this feature. These range from using third-party software to built-in utilities to help you decide the best solution. Outlined below are four straightforward methods to turn off/disable BitLocker in Windows 11/10 within no time:
Way 1. Disable Bitlocker Encryption via EaseUS Partition Master
You should utilize professional software to deactivate this feature to avoid any adverse effects. The safest way to turn off/disable BitLocker in Windows 11/10 is EaseUS Partition Master Free. This software streamlines all your disk management needs from partitioning and formatting to resizing your drives. When it comes to turning off BitLocker, it offers the most uncomplicated process that is suited for all users.
Advantages of EaseUS Partition Master
- 1. Unlike other methods, it provides a graphical interface that makes it easy to navigate for users unfamiliar with advanced system tools.
- 2. Mistyping a command when using manual methods can lead to unintended issues, but this tool automates the process to minimize the risk of mistakes.
- 3. Besides disabling BitLocker, this robust software offers a comprehensive suite of disk management features, including partition resizing, cloning, and formatting.
- 4. It simplifies steps that would otherwise require multiple manual commands or navigating through several system settings to disable BitLocker.
Step-by-Step Tutorial To Turn Off/Disable BitLocker in Windows 11/10
You can follow the detailed instructions given below to safely deactivate this data encryption feature on your PC:
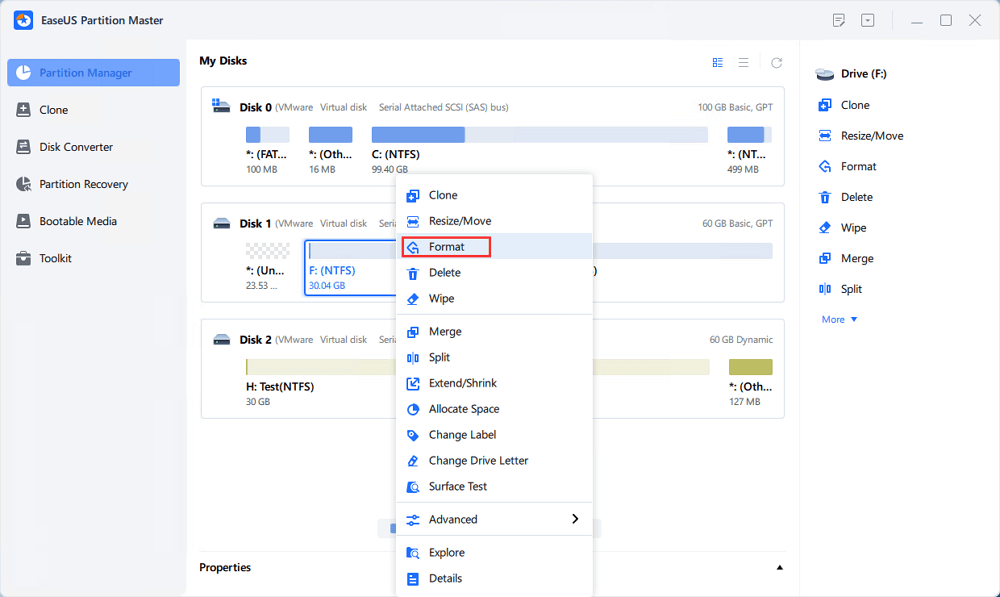
Step 1. Run EaseUS Partition Master, right-click the hard drive partition you intend to format and choose "Format".
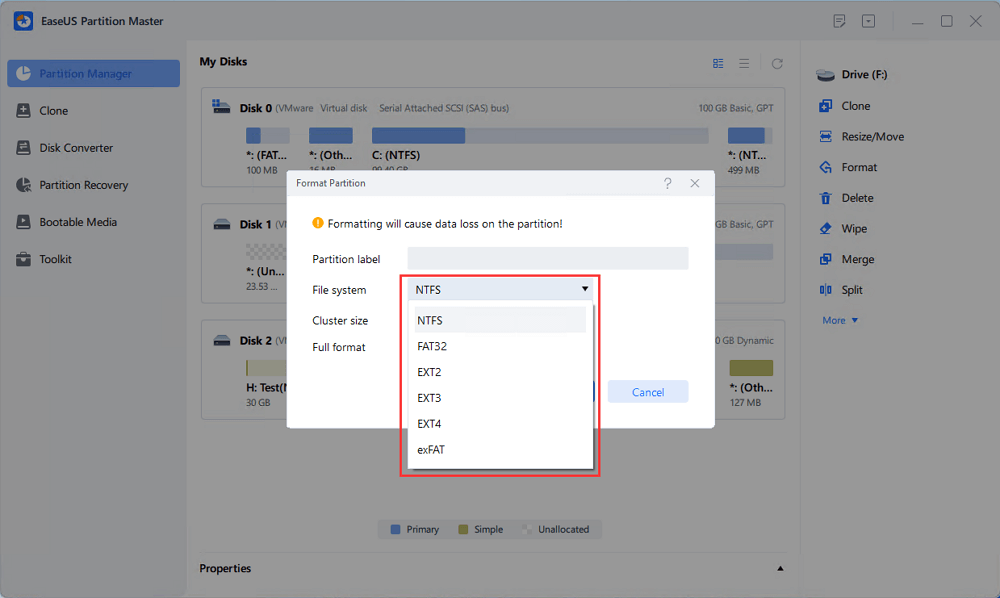
Step 2. In the new window, set the Partition label, File system (NTFS/FAT32/EXT2/EXT3/EXT4/exFAT), and Cluster size for the partition to be formatted, then click "OK".
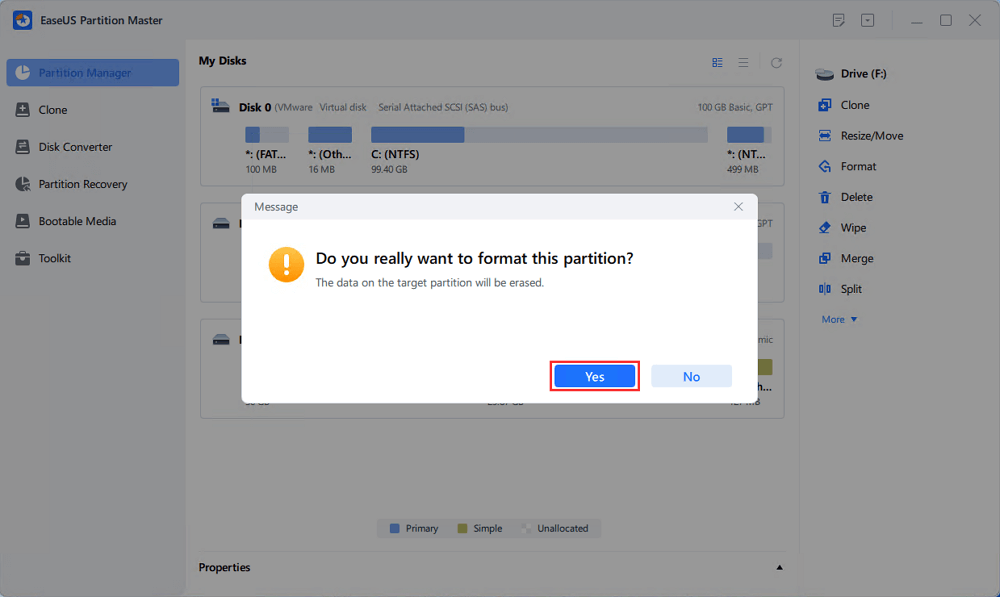
Step 3. Then you will see a warning window, click "Yes" in it to continue.
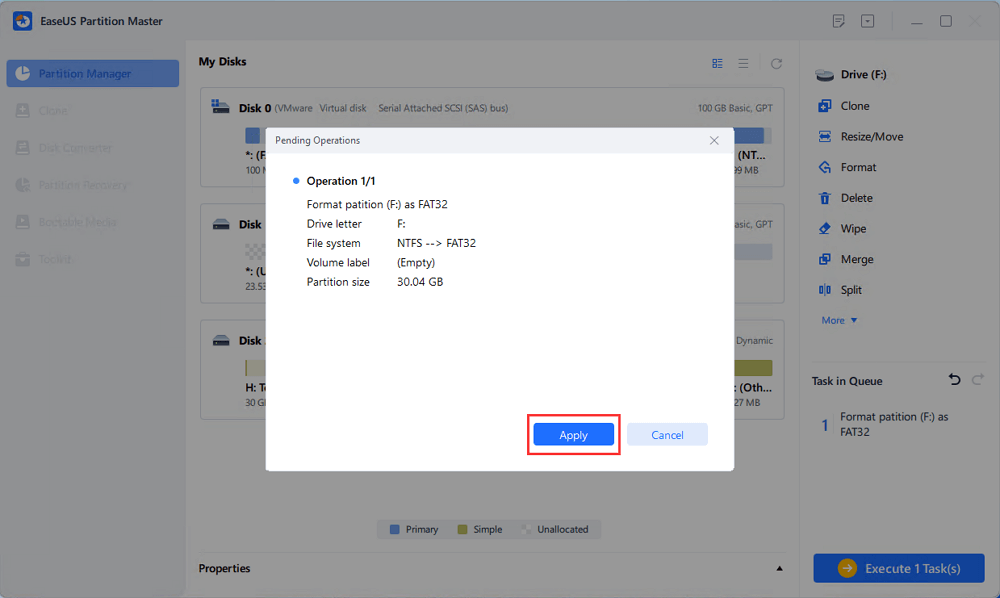
Step 4. Click the "Execute 1 Task(s)" button to review the changes, then click "Apply" to start formatting the partition on your hard drive.
Related Features
- Partition or format encrypted drives after disabling BitLocker to optimize storage: Partition A BitLocker Drive, Format Bitlocker encrypted drive
- Easily decrypt and remove encryption from BitLocker-protected drives without needing to access complex system settings:
- Fix The Drive Protected by BitLocker Is Already Unlocked Error
There is no doubt that EaseUS Partition Master is the optimal solution for turning off/disabling BitLocker in Windows 11/10. With additional benefits like disk cloning and partition management, this tool goes beyond just disabling BitLocker, offering comprehensive solutions for managing your storage.
|
Want to learn more about BitLocker in one place—start with our BitLocker troubleshooting guide. |
Way 2. Remove BitLocker via Command Prompt (manage-bde command line)
Another effective method to disable BitLocker encryption using CMD. This method provides direct control over the process, allowing you to disable it quickly through a few simple commands. While this approach is more technical, it's a reliable option for users who are comfortable working with Command Prompt. Detailed below how to turn off/disable BitLocker in Windows 11/10 via CMD:
Step 1. Get started by opening Command Prompt with admin permissions by typing "cmd" in the Start menu. Now, you can right-click on the result to select "Run as administrator" to launch it. Within the CMD, run the "manage-bde -status" instruction to view the status of BitLocker on your drives.

Step 2. Once the command result is displayed, ensure that "Conversion Status" is set to "Fully Decrypted" and "Percentage Encrypted" is "0.0%" to proceed. When you come across the "Percentage Encrypted: 100.0%" display, execute the following instruction:
"manage-bde -off C:" (substitute "C:" with the encrypted drive letter)

Step 3. After this instruction is processed, BitLocker on the targeted drive will be disabled. You can again run the "manage-bde-status" command to confirm this before moving forward.

You can also run manage commands to unlock Bitlocker when you forget the password:
Forgot BitLocker Password: How to Recover?
Follow this guide to learn how to recover the forgotten Bitlocker password in four solid ways.
Way 3. Turn Off BitLocker in Windows GUI Mode
You can turn off this feature using the familiar Windows interface for users who prefer a more straightforward and visual method. This method is ideal for those who may not be comfortable with command-line tools and prefer to navigate through the visual interface. It can be done via the Control Panel using these steps to turn off/disable BitLocker in Windows 11/10 without the need for technical knowledge:
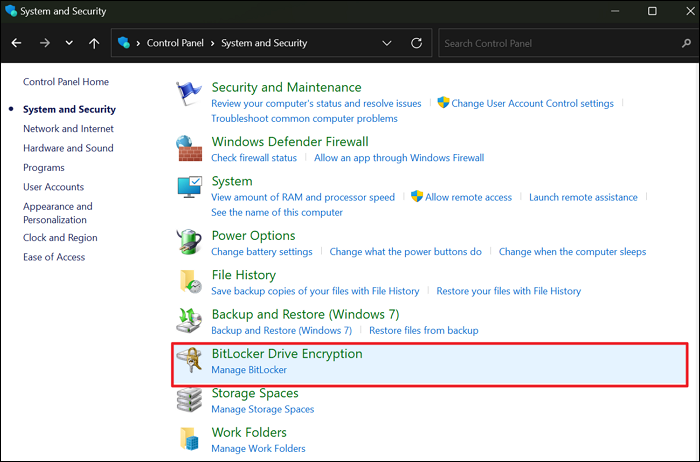
Step 1. Commence the operation by accessing the Windows Search bar to look for and launch the Control Panel. Here, click the "System and Security" option to tap "BitLocker Drive Encryption" on the subsequent screen.
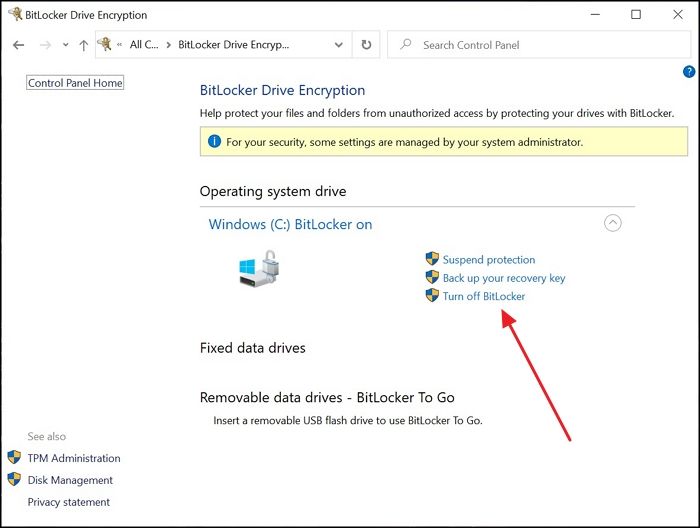
Step 2. Now, locate the drive whose BitLocker you want to disable to utilize the "Turn Off BitLocker" choice. You'll be prompted to confirm by clicking "Turn off BitLocker/Decrypt the drive" to continue.
Before diving into the last fix, you can share these workable ways with more users online:
Way 4. Unlock BitLocker via Windows PowerShell
Users who prefer to use PowerShell on their computers over Command Prompt can also turn off this feature through commands. This powerful scripting tool offers a flexible and efficient way to manage system settings, including BitLocker. It provides a variety of commands mentioned in the following steps to streamline the decryption process to turn off/disable BitLocker in Windows 11/10:
Step 1. On your PC, utilize the "Win + X" keys to access the Power Menu and click "Windows PowerShell (Admin)" to launch this command line tool with admin powers. In Windows 11, choose "Terminal (Admin)" from the list, and once it opens, run the "Get-BitLockerVolume" command to view the BitLocker status of drives.
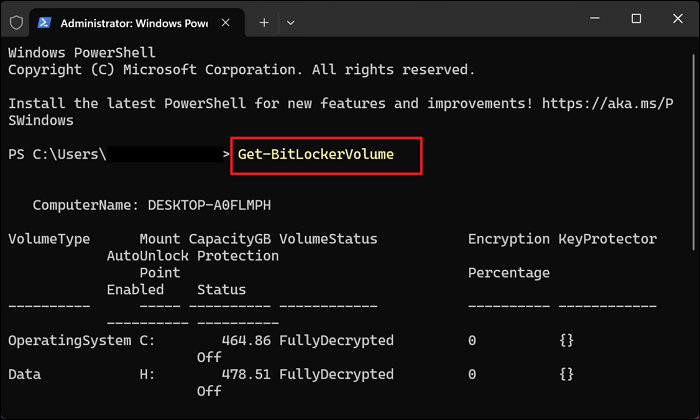
Step 2. From the given results, utilize the "Volume Status" and "Encryption KeyProtector Percentage" to determine each drive's BitLocker status. If any is not "FullyDecrypted," employ the "Disable-BitLocker -MountPoint "C: "command to decrypt the drive.
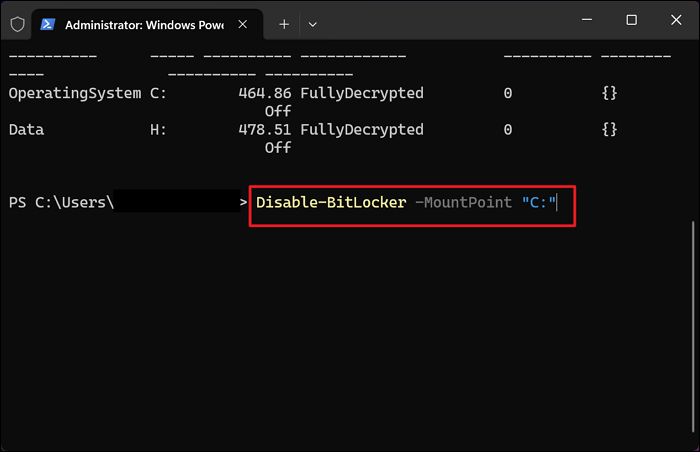
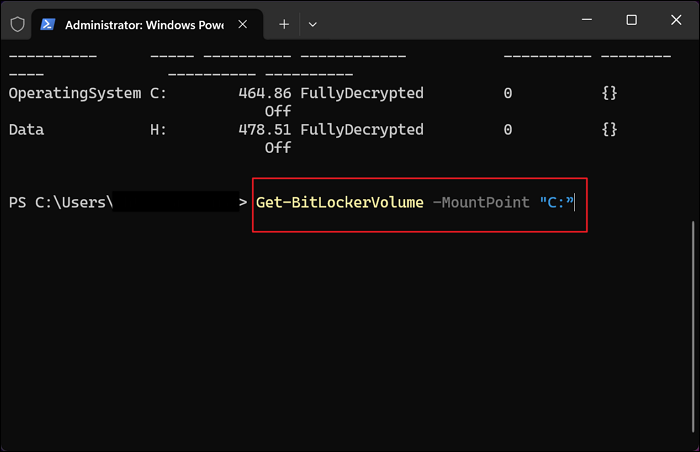
Step 3. Before executing the command, remember to replace "C:" with the drive letter you want to decrypt. Later, you can monitor the status of the decryption process by using the "Get-BitLockerVolume -MountPoint "C:" "command.
Conclusion
In summary, we've explored four effective methods to turn off/disable BitLocker in Windows 11/10. Each technique offers a unique approach tailored to different user preferences and technical skills. Among these methods, we highly recommend trying EaseUS Partition Master. Its comprehensive disk management features make it a standout choice for users looking to easily disable BitLocker.
Beyond just turning off BitLocker, this software offers additional functionalities such as partition resizing and disk cloning. This makes it an invaluable tool for anyone looking to manage their storage efficiently. Give this advanced program a try to simplify your BitLocker decryption process and enhance your overall disk management experience.
FAQs About How to Disable BitLocker in Windows 11/10
As this matter concerns your sensitive data on your computer, it is given that you have more queries. Explained below are a few common questions regarding how to turn off/disable BitLocker in Windows 11/10.
1. Why can't I turn off Windows BitLocker?
There can be several reasons behind it, including system corruption and the lack of administrative powers for the operation. Other reasons include TPM error, group policy, or corporate environment for BitLocker management. You can resolve it by gaining the required permissions and running a system check.
2. How do I turn off BitLocker in Windows safe mode?
Utilize the instructions given below to deactivate this encryption feature in Safe Mode:
Step 1. First, click "Restart" on your PC while holding the Shift key to enter into Safe Mode and select "Troubleshoot." Next, choose "Advanced options" and move to click "Restart" in "Startup Settings."
Step 2. Press the F4 key to boot your computer into Safe Mode and access the Command Prompt with admin powers to execute the "manage-bde -status" command. It will list the encrypted drives that you decrypt via the "manage-bde -off C:" instruction.
3. How do I disable BitLocker in BIOS?
Doing this is not possible as BitLocker operates at the operating system level rather than the BIOS level. You will need to boot into Windows and access the BitLocker management console to deactivate encryption.
How Can We Help You
About the Author
"I hope my articles can help solve your technical problems. If you are interested in other articles, you can check the articles at the bottom of this page. Similarly, you can also check my Twitter to get additional help."
Cici is the junior editor of the writing team of EaseUS. She accepted the systematic training on computers at EaseUS for over one year. Now, she wrote a lot of professional articles to help people resolve the issues of hard drive corruption, computer boot errors, and disk partition problems.
Product Reviews
-
I love that the changes you make with EaseUS Partition Master Free aren't immediately applied to the disks. It makes it way easier to play out what will happen after you've made all the changes. I also think the overall look and feel of EaseUS Partition Master Free makes whatever you're doing with your computer's partitions easy.
Read More -
Partition Master Free can Resize, Move, Merge, Migrate, and Copy disks or partitions; convert to local, change label, defragment, check and explore partition; and much more. A premium upgrade adds free tech support and the ability to resize dynamic volumes.
Read More -
It won't hot image your drives or align them, but since it's coupled with a partition manager, it allows you do perform many tasks at once, instead of just cloning drives. You can move partitions around, resize them, defragment, and more, along with the other tools you'd expect from a cloning tool.
Read More
Related Articles
-
How to Fix HP Laptop Stuck on HP Screen | 10 Efficient Ways
![author icon]() Cici/2026/01/29
Cici/2026/01/29 -
How to Fix RAW External Hard Drive Without Formatting ✔️
![author icon]() Sherly/2026/01/29
Sherly/2026/01/29 -
Can't Delete Partition on USB? Time to Fix it!
![author icon]() Tracy King/2026/01/29
Tracy King/2026/01/29 -
How Do I Fix Windows 10 BSOD: Blue Screen of Death Error? Here Is The Guide
![author icon]() Tracy King/2026/01/29
Tracy King/2026/01/29
Hot Topics
EaseUS Partition Master

Version 20.0 is here - full exFAT support, easier disk partitioning, and PC performance optimization.


