
Content
Page Table of Contents
About the Author
Hot Topics
Secure Boot has become an essential requirement for modern Windows PCs. Whether you are upgrading to Windows 11, trying to run a new game that requires Secure Boot, or improving system security against boot-level malware, enabling Secure Boot is often unavoidable. - PR Newswire
This guide explains how to enable Secure Boot on a PC in a clear, practical way. You will learn what Secure Boot is, how to check if it is already enabled, what prerequisites must be met, and how to enable it safely in BIOS or UEFI without breaking your system.
- What Is Secure Boot and Why Does It Matter?
- Check If Secure Boot Is Enabled on Your PC
- Requirements Before Enabling Secure Boot
- How to Enter BIOS or UEFI Settings
- How to Enable Secure Boot in BIOS (General Steps)
- Enable Secure Boot on Popular PC Brands
- Common Secure Boot Problems and Fixes
- FAQs About Enabling Secure Boot on PC
What Is Secure Boot and Why Does It Matter?
Secure Boot is a UEFI firmware security feature designed to ensure that your PC boots only with trusted software. During startup, Secure Boot verifies digital signatures for bootloaders, firmware drivers, and the operating system, blocking unauthorized or malicious code.
Secure Boot is important because it:
- Prevents bootkits and rootkits from loading before Windows starts
- Is required or strongly recommended for Windows 11 (from Microsoft)
- Is increasingly required by modern games and anti-cheat systems
- Works alongside TPM 2.0 to form a baseline security standard for new PCs
If Secure Boot is disabled, Windows may still run, but certain features, updates, or applications may refuse to work. Learn more about Secure Boot in this Reddit post below:
What is secure boot and should I have it on or off?
byu/____Maximus____ intechsupport
Check If Secure Boot Is Enabled on Your PC
Before changing anything, you should confirm the current Secure Boot status. Here are two methods for you to check if Secure Boot is enabled.
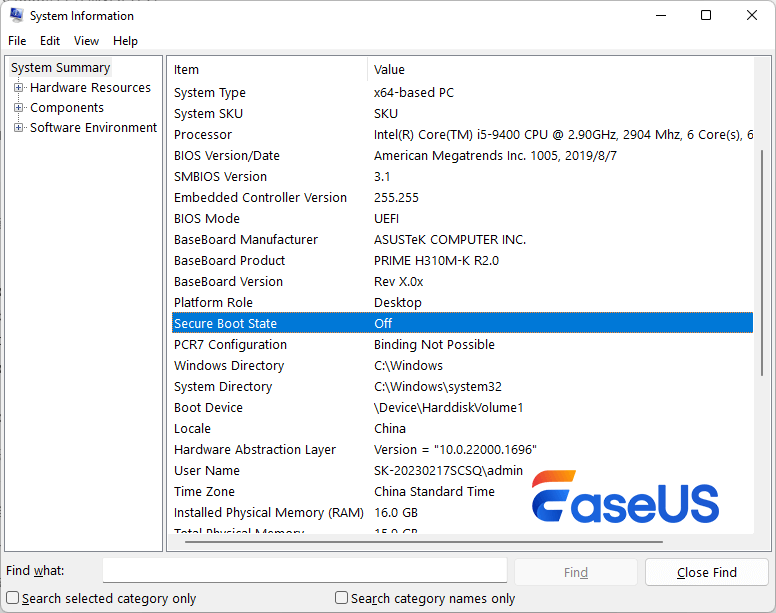
Method 1: Use System Information
Press Win + R, type msinfo32, and press Enter
Look for Secure Boot State
- On → Secure Boot is enabled
- Off → Secure Boot is supported but disabled
- Unsupported → Your system does not support Secure Boot (Check this Reddit post to learn more about Secure Boot is not supported error)
Method 2: Use PowerShell
Right-click Start and select Windows PowerShell (Admin)
Run: Confirm-SecureBootUEFI
- True = enabled
- False = disabled
If Secure Boot is off, continue with the steps below to turn on Secure Boot. Do not forget to share this post to help more users.

Requirements Before Enabling Secure Boot
This is the most common point where users get stuck. Secure Boot cannot be enabled unless all prerequisites are met.
#1. Your PC Must Use UEFI (Not Legacy BIOS)
Secure Boot only works in UEFI mode. If your system uses Legacy BIOS or CSM (Compatibility Support Module), Secure Boot will be unavailable or greyed out.
#2. Your System Disk Must Be GPT (Not MBR)
Secure Boot requires a GPT partition style. If your disk is MBR: Secure Boot will not enable; Windows may boot only in Legacy mode
Steps to check if the system disk is GPT:
- Press Win + R, type diskmgmt.msc, and press Enter.
- In the bottom panel, right-click on "Disk 0" (usually your system disk) and select "Properties".
- Go to the "Volumes" tab. Look at "Partition style". It will show either "GUID Partition Table (GPT)" or "Master Boot Record (MBR)".
If the system disk is using MBR, you need to convert MBR to GPT. EaseUS Partition Master allows you to convert the system disk from MBR to GPT without losing data or reinstalling Windows:
Step 1. Install and launch EaseUS Partition Master on your computer.
Step 2. Open the Disk Converter tab, select "MBR => GPT" and click "Next" to continue.
Step 3. Choose the target MBR disk, and click "Convert" to start the conversion.
Windows' built-in tools can also convert MBR to GPT, but some of them don't support converting the system disk or are difficult to use for beginners. However, if you have enough computing experience, you can use MBR2GPT to achieve this.
#3. TPM 2.0 Should Be Enabled
While Secure Boot and TPM are separate features, Windows 11 expects both to be active. Enabling TPM first can prevent installation or compatibility issues later.
How to Enter BIOS or UEFI Settings
You can access BIOS/UEFI using either method below.
Option 1: During Startup
Restart your PC and press the appropriate key repeatedly:
- Del or F2 (most desktops and laptops)
- F10, Esc, or F12 (varies by manufacturer)
Option 2: From Windows Settings
- Go to Settings → System → Recovery
- Click Restart now under Advanced startup
- Navigate to: Troubleshoot → Advanced options → UEFI Firmware Settings
Your PC will reboot directly into BIOS/UEFI.
How to Enable Secure Boot in BIOS (General Steps)
Although BIOS layouts differ by brand, the logic is consistent across systems.
Step 1: Switch Boot Mode to UEFI
- Locate Boot Mode, Boot List Option, or CSM
- Set boot mode to UEFI
- Disable Legacy Boot or CSM
This step is mandatory. Secure Boot will not appear otherwise.
Step 2: Locate Secure Boot Settings
Secure Boot is usually found under:
- Boot
- Security
- Windows OS Configuration
Set Secure Boot to Enabled.
Step 3: Install Default Secure Boot Keys (If Required)
If Secure Boot cannot be enabled:
- Look for Install Default Secure Boot Keys
- Or Restore Factory Keys
- Apply the change, then re-enable Secure Boot
Step 4: Save and Exit
Press F10, confirm changes, and reboot.
Enable Secure Boot on Popular PC Brands
#1. Dell PCs (Refer to the Dell Official Website)
- Boot your computer.
- Tap the F2 key when the Dell logo appears to enter the BIOS.
- Once you enter the BIOS, look for the Secure Boot option.
- Change Secure Boot to Enabled.
- Select Apply or Save and Exit, depending on your computer.
#2. ASUS (Refer to the ASUS Official Website)
- Restart and enter the BIOS (press Delete or F2), switch to Advanced Mode, and go to the Boot tab.
- Select Secure Boot, set OS Type to Windows UEFI mode, and then ensure Secure Boot Control is Enabled, saving and exiting to apply changes.
#3. HP (Refer to HP Official Website)
- To enable Secure Boot on an HP, restart your PC, repeatedly press Esc, then F10 to enter BIOS.
- Navigate to Security or Boot > Secure Boot Configuration, load factory keys if needed, and disable Legacy Support/CSM.
- Set Secure Boot to Enabled, then Save and Exit (F10) to restart.
#4. Lenovo (Refer to Lenovo Official Website)
- To enable Secure Boot on a Lenovo, restart your PC and repeatedly press the BIOS key (usually F1 or F2) at the Lenovo logo to enter setup.
- Navigate to the Security or Boot tab, find the Secure Boot setting, enable it, and then Save & Exit (often F10) to apply changes.
#5. MSI (Refer to MSI Official Website)
- Enter the BIOS (press Delete repeatedly during startup), switch to Advanced Mode, and set CSM to UEFI.
- Find Secure Boot under Settings > Security (or Windows OS Configuration) and set it to Enabled, ensuring the mode is Standard, and finally Save & Exit (F10).
You might need a reboot after changing to UEFI before Secure Boot becomes active.
#6. Gigabyte (Refer to Gigabyte Official Website)
Restart your PC, press Delete to enter the BIOS/UEFI, go to the Boot tab (or Security), disable CSM Support, enable Secure Boot, and if it remains inactive, switch to Custom mode and Restore Factory Keys, then save and exit to activate it.
Share this post and help more users enable Secure Boot smoothly.
Common Secure Boot Problems and Fixes
-
Secure Boot Option Is Missing
| Possible causes: | Fix: |
|---|---|
|
|
Learn more details from this Reddit Post:
No Secure Boot Option
byu/iTzBoltHD inMSI_Gaming
- Secure Boot Enabled but Windows Says "Off"
| This usually means: | Solution: |
|---|---|
|
|
Learn more details about this error from this Reddit post:
Secure boot enabled but not active for windows 11
byu/O0UFF ingigabyte
Advanced Scenarios and Notes
- Dual Boot Systems: Secure Boot may block unsigned Linux bootloaders unless properly configured.
- Temporary Disable: Some firmware updates or hardware tools require Secure Boot to be turned off briefly.
- After BIOS Update: Secure Boot settings may reset - always recheck after updating firmware.
Final Checklist Before You Finish
Before leaving BIOS, confirm:
- Boot mode is UEFI
- Disk uses GPT
- Secure Boot is Enabled
- Default keys are installed
- Windows reports Secure Boot State = On
Conclusion
Enabling Secure Boot on a PC is no longer optional for many users. It is a core requirement for Windows 11, modern security standards, and an increasing number of applications and games.
By ensuring UEFI mode, GPT disk structure, and proper BIOS configuration, you can enable Secure Boot safely and without reinstalling Windows. If Secure Boot appears unavailable, the issue is almost always related to legacy boot settings or disk format, not hardware limitations.
If you follow the steps in this guide carefully, you should be able to enable Secure Boot on most modern PCs with confidence.
FAQs About Enabling Secure Boot on PC
1. Is Secure Boot required for Windows 11?
Yes. Secure Boot is one of the official system requirements for Windows 11. While some installations may bypass the check, Microsoft strongly recommends enabling Secure Boot to ensure system integrity, firmware security, and compatibility with future updates.
2. Why can't I enable Secure Boot in BIOS?
The most common reasons are:
- Your system is using Legacy BIOS or CSM instead of UEFI
- Your system disk is formatted as MBR instead of GPT
- Secure Boot keys are not installed
- BIOS firmware is outdated
Secure Boot will only appear when all requirements are met.
3. Does enabling Secure Boot erase data?
No. Enabling Secure Boot itself does not delete data. However, if your disk needs to be converted from MBR to GPT, you should confirm the method used supports data preservation before proceeding.
4. Can Secure Boot be enabled without reinstalling Windows?
Yes, in most cases. If your hardware supports UEFI and your disk can be converted to GPT, Secure Boot can be enabled without reinstalling Windows. Tools like mbr2gpt are designed for this scenario.
5. What happens if I disable Secure Boot?
Disabling Secure Boot may:
- Prevent Windows 11 from installing or updating properly
- Cause certain games or anti-cheat systems to stop working
- Reduce protection against boot-level malware
Secure Boot can be temporarily disabled if needed, but it is not recommended for daily use.
6. Is Secure Boot the same as TPM 2.0?
No. Secure Boot and TPM 2.0 are separate technologies:
- Secure Boot verifies trusted boot components during startup
- TPM 2.0 stores cryptographic keys and supports device-level security
Both are required for Windows 11, but they serve different purposes.
7. Why does Secure Boot show "Off" even after enabling it?
This usually happens when:
- Default Secure Boot keys were not installed
- CSM is still partially enabled
- The OS was installed in Legacy mode
Re-enter BIOS, install default keys, confirm UEFI boot mode, and restart the system.
8. Does Secure Boot affect gaming performance?
No. Secure Boot does not reduce gaming performance. In fact, some modern games require Secure Boot to be enabled to support advanced anti-cheat systems.
9. How do I know if my motherboard supports Secure Boot?
Most PCs manufactured after 2016 support Secure Boot. You can confirm support by:
- Checking msinfo32 for Secure Boot capability
- Reviewing your motherboard or laptop manufacturer's specifications
- Looking for UEFI options in BIOS settings
10. Should I enable Secure Boot on an older PC?
If your hardware supports UEFI and GPT, enabling Secure Boot can improve security. However, very old systems or legacy software may not be compatible. Always verify compatibility before making changes.
How Can We Help You
About the Author
Sherly joined EaseUS in 2022 and she has always loved writing articles and enjoys the fun they bring. She receives professional training here, focusing on product performance and other relative knowledge. She has written over 200 articles to help people overcome computing issues.
Product Reviews
-
I love that the changes you make with EaseUS Partition Master Free aren't immediately applied to the disks. It makes it way easier to play out what will happen after you've made all the changes. I also think the overall look and feel of EaseUS Partition Master Free makes whatever you're doing with your computer's partitions easy.
Read More -
Partition Master Free can Resize, Move, Merge, Migrate, and Copy disks or partitions; convert to local, change label, defragment, check and explore partition; and much more. A premium upgrade adds free tech support and the ability to resize dynamic volumes.
Read More -
It won't hot image your drives or align them, but since it's coupled with a partition manager, it allows you do perform many tasks at once, instead of just cloning drives. You can move partitions around, resize them, defragment, and more, along with the other tools you'd expect from a cloning tool.
Read More
Related Articles
-
Windows 11 Low Disk Space: Causes, Solutions & Long-Term Fixes
![author icon]() Sherly/2026/03/11
Sherly/2026/03/11 -
How to Change Dynamic Disk to Basic Disk Safely
![author icon]() Tracy King/2026/01/29
Tracy King/2026/01/29 -
How to Fix SSD Shows Up in BIOS But Not Windows Issue 💡
![author icon]() Sherly/2026/01/29
Sherly/2026/01/29 -
Partition Magic Free Download for Windows Disk Management
![author icon]() Tracy King/2026/02/17
Tracy King/2026/02/17
Hot Topics


EaseUS Partition Master

Version 20.0 is here - full exFAT support, easier disk partitioning, and PC performance optimization.