
Content
Page Table of Contents
About the Author
Hot Topics
Encountering the error message "Selected File Is Not a Proper BIOS" is common when attempting to update or install a BIOS (Basic Input/Output System). This problem is usually caused by incompatible or damaged BIOS files while installing or updating. The BIOS is essential for communication between a computer's hardware and software.
In this guide, EaseUS will explore four efficient approaches to resolve the problem of encountering the selected file that is not a proper BIOS issue. Each method offers a distinct approach, guiding users through troubleshooting steps to resolve this frustrating error.
How to Fix Selected File Is Not a Proper BIOS - 4 Ways
- Preparations
- Way 1. Format the External Hard Drive
- Way 2. Update BIOS with the Correct File
- Way 3. Update the Outdated Drivers
- Way 4. Run CHKDSK to Check Your External Hard Drive
As mentioned before, BIOS is a fundamental element of any computer system. It facilitates communication between hardware and software. Before we move on to the solutions, it is necessary that you prepare properly for this process.
Preparations for Fixing Selected File Is Not a Proper BIOS
1. System Information Check
Start by accessing your system information to collect details like the system model, BIOS version/date, BIOS mode, and specific motherboard name and model number. This data will be crucial in identifying the appropriate BIOS update for your system.
2. Verify BIOS File Integrity
Should any signs of a corrupted BIOS file surface, obtaining a valid BIOS file anew from a reputable source is crucial. Additionally, consider temporarily deactivating anti-malware programs to avoid them mistakenly flagging the BIOS file as a threat and removing it unintentionally.
3. Creating a System Image Backup
Protect your data by creating a backup of your system image. This step is vital in mitigating the risk of any potential corruption or failures that may occur during the BIOS update process.
By undertaking these preparatory measures, you can lay the groundwork for effectively addressing the selected file, which is not a proper BIOS error. It will allow you to proceed confidently with the subsequent troubleshooting solutions.
Way 1. Format the External Hard Drive
One of the primary reasons the selected file is not a proper BIOS error is the incompatible format of the external hard drive. To facilitate compatibility between your external hard drive and computer, formatting the drive to FAT32 becomes imperative.
One efficient tool for this task is the EaseUS Partition Master Professional. Enabling a user-friendly and simplified method for formatting your external drive to FAT32. This tool also offers additional functionalities.
Formatting your hard drives becomes a swift and simple task with EaseUS Partition Master. Follow these steps to format your external hard drive to FAT32 easily:
Step 1. Launch EaseUS Partition Master, right-click the partition on your external hard drive/USB/SD card which you want to format and choose the "Format" option.
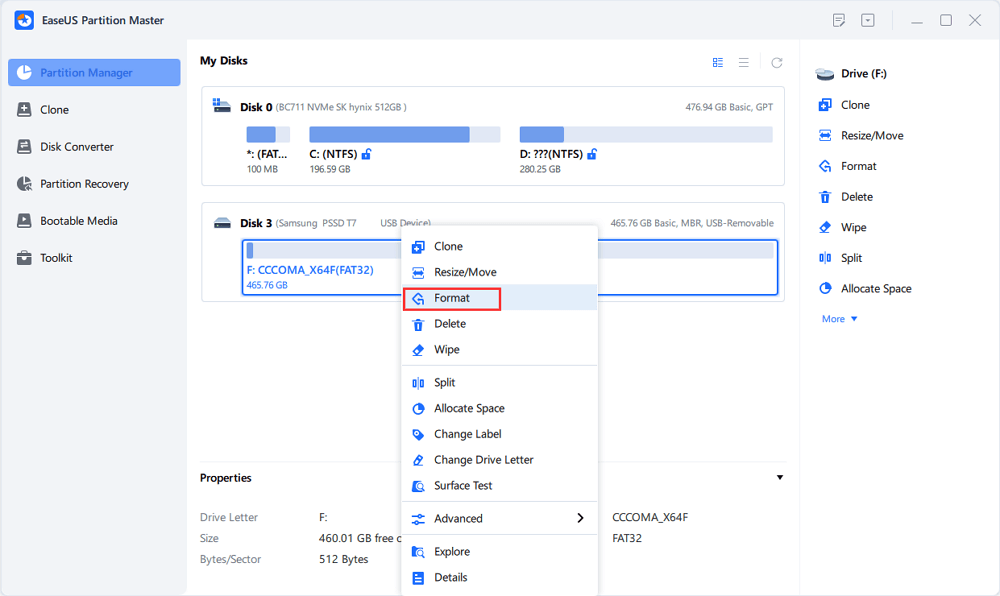
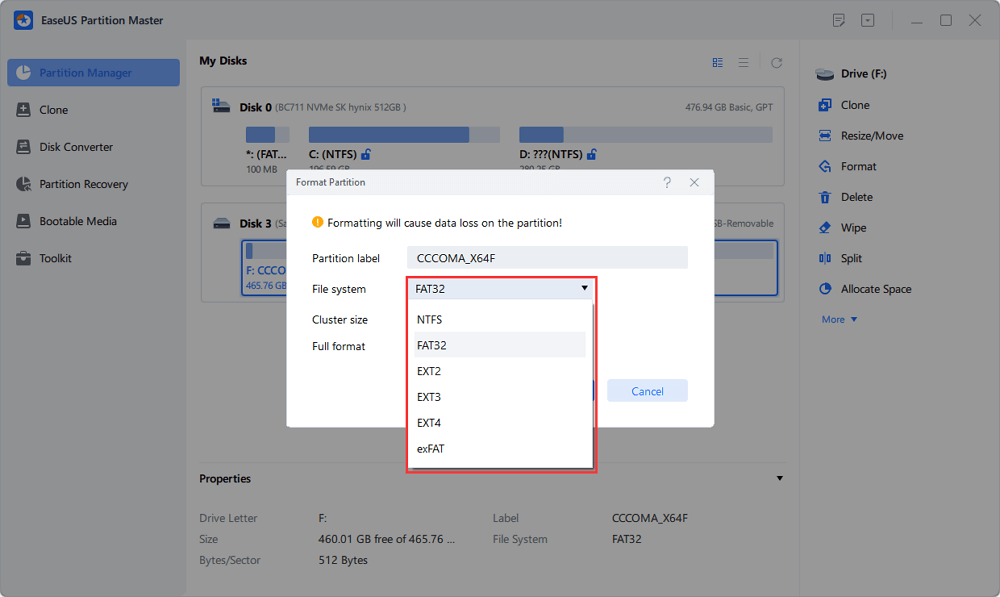
Step 2. Assign a new partition label, file system (NTFS/FAT32/EXT2/EXT3/EXT4/exFAT), and cluster size to the selected partition, then click "OK".
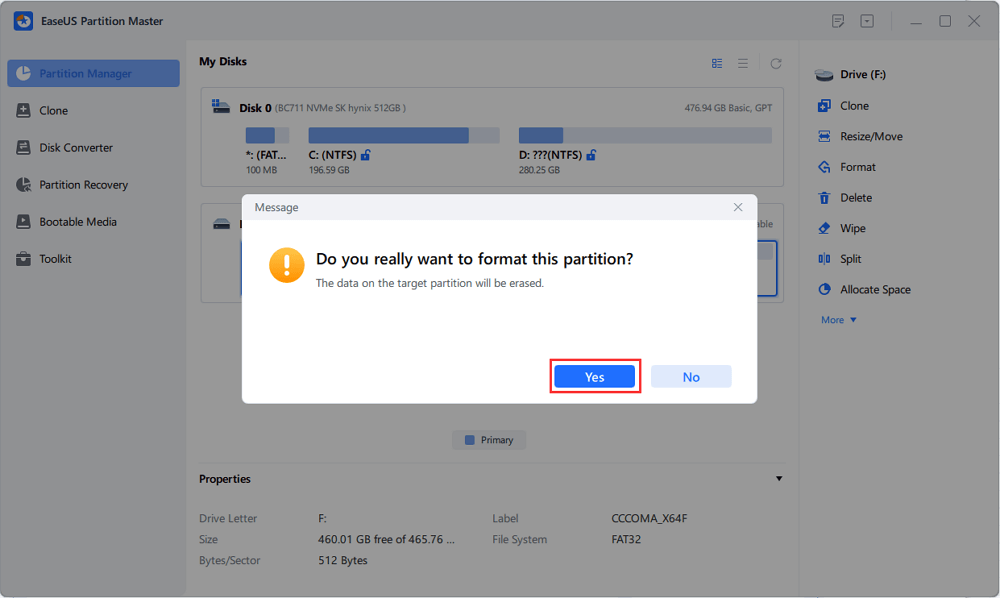
Step 3. In the Warning window, click "Yes" to continue.
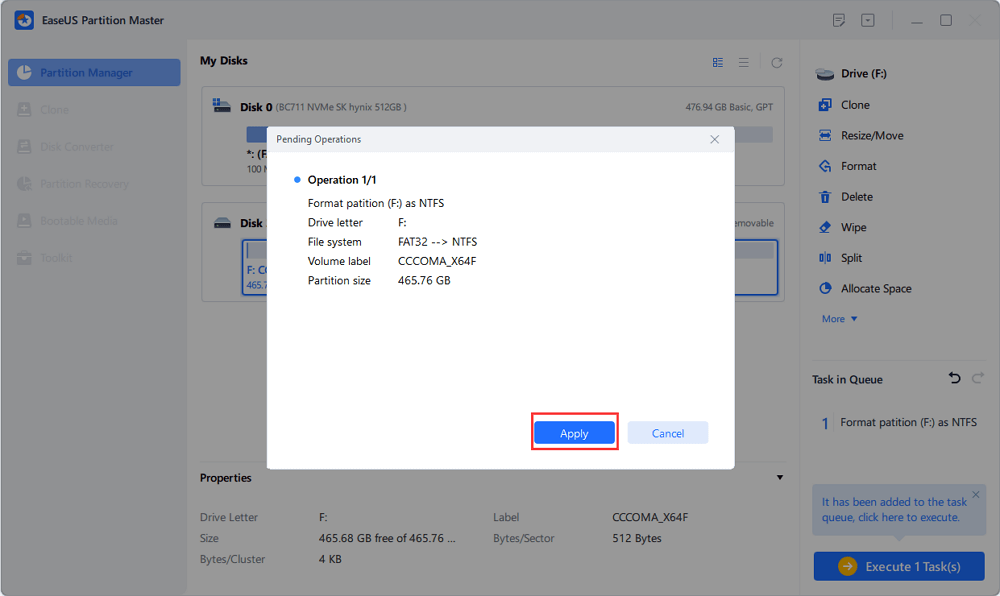
Step 4. Click the "Execute 1 Task(s)" button in the top-left corner to review the changes, then click "Apply" to start formatting your external hard drive/USB/SD card.
Other Features of EaseUS Partition Master
- It can fix the "Boot Drive Not Showing Up in BIOS" issue.
- Format Hard Drive from BIOS Windows 10
- Fix Default Boot Device Missing or Boot Failed on Windows 10/11
Considering its user-friendliness and versatility in disk management tasks, we highly recommend users explore EaseUS Partition Master. It is a reliable solution for formatting their external hard drives and potentially resolving the BIOS compatibility issue.
Way 2. Update BIOS with the Correct File
Using an incompatible or corrupt file to update the BIOS can also lead to the selected file not being a proper BIOS issue. This method involves obtaining the accurate BIOS update file that is compatible with your specific hardware configuration. Following the correct update procedure can often resolve compatibility issues and ensure a proper BIOS installation.
Phase 1. Format a USB to FAT32
Use EaseUS Partition Master to effortlessly format a USB drive to the required FAT32 format. Refer to the instructions in Way 1.
Phase 2. Download the Correct BIOS File Online
After formatting the USB to FAT32, the subsequent task is to acquire the appropriate BIOS file(WiFi version). Ensuring the accurate BIOS file that matches your motherboard model is critical when updating. Refer to your computer's documentation to locate and make your motherboard's precise model number. Then, visit the official website of the motherboard manufacturer and locate the support or downloads section.
Phase 3. Update BIOS
After obtaining the appropriate BIOS update file, the final procedure involves updating your computer's BIOS. Now you are ready to update the BIOS:
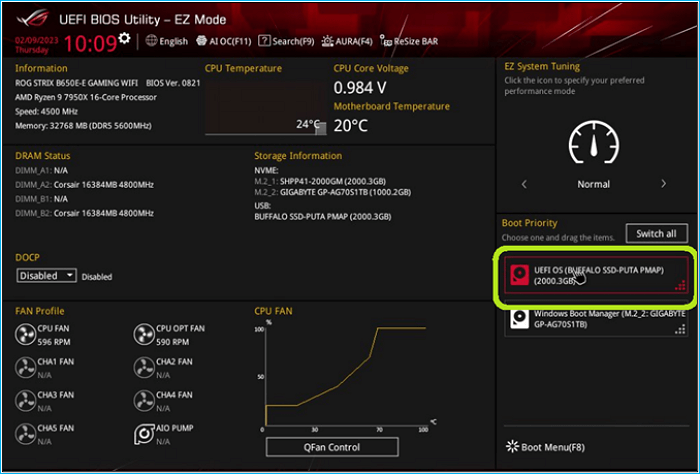
Step 1. Insert the USB that stores the proper BIOS file and boot your PC.
Step 2. Press the F10/F12/F2 key to launch the BIOS.
Step 3. Set the target USB as the boot device and boot from it.
Step 4. Then, select the correct BIOS file and confirm the action.
This BIOS update process will take 2-3 minutes. Once done, restart your PC. For more details, you can view the comprehensive guide here:
[Quickly & Easily] How to Update BIOS with USB in 2024
This article contains two workable methods to update BIOS with USB, including using BIOS Flashback and UEFI setup.
Way 3. Update the Outdated Drivers
Updating outdated drivers can often resolve compatibility issues related to the "selected file is not a proper BIOS" error. Follow these steps to update the outdated drivers on your Windows computer:
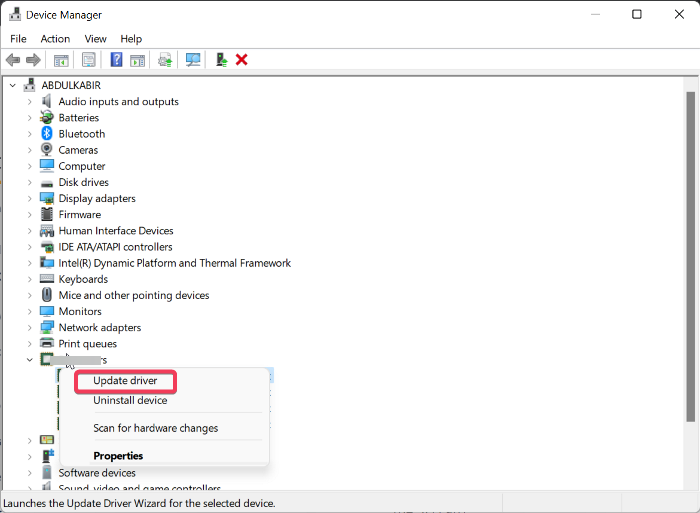
Step 1. Use the "Win + X" keys to access the power menu on your Windows computer and click "Device Manager." Move to the "Display Adapters" tab and right-click on the driver to choose "Update Driver."
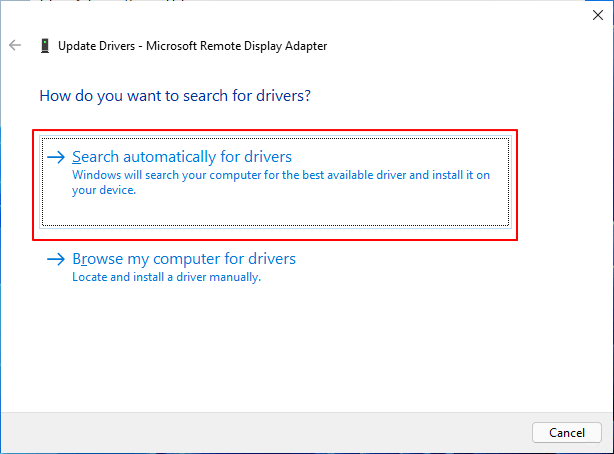
Step 2. Afterward, click "Search automatically for drivers." once an update appears, follow the on-screen prompts to update the driver and check if the problem is resolved.
Way 4. Run CHKDSK to Check Your External Hard Drive
Sometimes, a damaged or error-ridden USB drive can be the root cause. Running the CHKDSK utility can help detect and fix errors on your external hard drive that might be contributing to the selected file not being a proper BIOS error. You can refer to these instructions to check the USB drive using the CHKDSK utility:
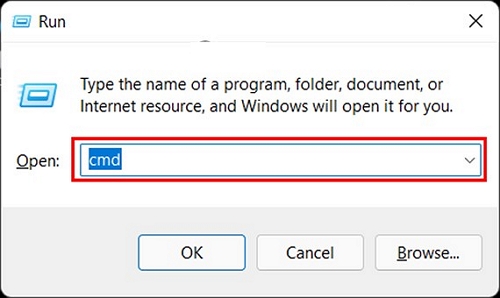
Step 1. To begin, you need to launch Command Prompt with admin privileges. For that, open the Task Manager and tap "Run New Task." On the pop-up window, type "cmd," check the "create this task with admin privileges," and click "OK" to run it.
Step 2. Within the Command Prompt interface, input the following command: "chkdsk [drive letter]: /f." Substituting [drive letter] with the designated letter allocated to your external hard drive. Proceed by hitting "Enter" to execute the command and allow CHKDSK an interval to rectify any issues with the drive. Afterward, check if the BIOS issue has been resolved.
Now, you may successfully resolve this daunting issue, share this tutorial to help others:
Why Selected File Is Not a Proper BIOS
Wondering about the causes behind the frustrating message "selected file is not a proper BIOS?" There are several factors contributing to this error, prompting us to go deeper into its potential roots. The following are some of the possible causes behind this error:
- Incorrect or Corrupted BIOS File: Using an inaccurate or damaged BIOS file while updating or installing could result in the occurrence of this error. This prevents the system from correctly identifying or effectively utilizing the file.
- Outdated Drivers: The presence of outdated drivers in the system might clash with the BIOS update. It can lead to conflicts that result in the selected file not being a proper BIOS error message.
- Damaged or Corrupted External Hard Drive: If the external hard drive employed for the BIOS update becomes damaged or corrupted, it may result in complications. Such impairment or corruption of the hard drive obstructs the accurate reading or execution of the BIOS file, thereby leading to an error.
- Wrong Format for External Hard Drive: Incompatibility due to an incorrect format of the external hard drive can prompt this error message. If it isn't aligned with the system's requirements (such as using a file system that the BIOS cannot read), it may also lead to an error.
Below are some posts that related to the boot issues:
Conclusion
In summary, the exploration into troubleshooting the error message "selected file is not a proper BIOS" has unveiled several potential causes behind this perplexing issue. The error often arises due to factors such as utilizing an incorrect or corrupted BIOS file, outdated drivers, damage to the external hard drive, and many more. Addressing these aspects can significantly contribute to resolving this error and ensuring a successful BIOS update or installation.
Amidst various solutions, a standout recommendation emerges as EaseUS Partition Master. This versatile tool facilitates formatting drives to ensure compatibility with the BIOS update process and provides a range of disk management functions.
FAQs About Selected File Is Not a Proper BIOS
Finding comprehensive answers to common queries can be immensely beneficial for those seeking further clarification or specific guidance regarding the selected file is not a proper BIOS issue. Below are concise answers to frequently asked questions about BIOS-related concerns:
1. How do I restore my ASUS BIOS?
To restore the ASUS BIOS, follow these steps:
Step 1. Access the BIOS utility by restarting your ASUS computer and pressing the designated key (often DEL or F2) to enter the BIOS setup.
Step 2. Now press "F9" or select the "Default" option, and when prompted to "Load Optimized Defaults," press "OK."
Step 3. Next, click "Save & Exit" or press "F10" to exit the BIOS settings.
2. How do I fix the incorrect BIOS Settings?
To rectify incorrect BIOS settings, you can reset the BIOS settings for which the steps are given below:
Step 1. Reboot your computer and repeatedly press the F2 key to enter BIOS settings. Here, click "General" from the left side and click "Restore Settings."
Step 2. Now, select "OK" to confirm your decision and proceed by following the prompts on the screen to finalize the procedure.
3. How do I factory reset my BIOS?
Perform a BIOS factory reset with these steps:
Step 1. Access Windows Recovery Environment and navigate to Troubleshoot>Advanced Options>UEFI Firmware Settings. Here, click "Restart" to boot the computer in BIOS setup.
Step 2. Now, find and click "Load Setup Defaults" and confirm the action by tapping "Yes." Wait for the process to complete, and your BIOS will be restored to the default settings.
How Can We Help You
About the Author
"I hope my articles can help solve your technical problems. If you are interested in other articles, you can check the articles at the bottom of this page. Similarly, you can also check my Twitter to get additional help."
Cici is the junior editor of the writing team of EaseUS. She accepted the systematic training on computers at EaseUS for over one year. Now, she wrote a lot of professional articles to help people resolve the issues of hard drive corruption, computer boot errors, and disk partition problems.
Product Reviews
-
I love that the changes you make with EaseUS Partition Master Free aren't immediately applied to the disks. It makes it way easier to play out what will happen after you've made all the changes. I also think the overall look and feel of EaseUS Partition Master Free makes whatever you're doing with your computer's partitions easy.
Read More -
Partition Master Free can Resize, Move, Merge, Migrate, and Copy disks or partitions; convert to local, change label, defragment, check and explore partition; and much more. A premium upgrade adds free tech support and the ability to resize dynamic volumes.
Read More -
It won't hot image your drives or align them, but since it's coupled with a partition manager, it allows you do perform many tasks at once, instead of just cloning drives. You can move partitions around, resize them, defragment, and more, along with the other tools you'd expect from a cloning tool.
Read More
Related Articles
-
Windows 10 Booting From Wrong Drive - Fix Easily
![author icon]() Sherly/2026/06/17
Sherly/2026/06/17 -
How to Reset Lenovo Laptop Password on Windows 10/11
![author icon]() Cici/2026/06/30
Cici/2026/06/30 -
(Fixed) HAL INITIALIZATION FAILED BSOD Error
![author icon]() Oliver/2026/06/17
Oliver/2026/06/17 -
Windows Vista Password Reset Without Disk | How to Guide
![author icon]() Sherly/2026/06/17
Sherly/2026/06/17


