
Content
Page Table of Contents
About the Author
Hot Topics
MSI (Micro-Star International) laptops can deliver an unrivaled gaming experience. You can try booting your MSI from USB when MSI laptop black screen or doesn't work as expected. Booting from USB on an MSI motherboard will prevent crashes and failure to boot.
In the tutorial, EaseUS Software will guide you on how to make your MSI boot from USB on Windows 11/10. We also provide some additional troubleshooting to help you solve the problem of being unable to boot MSI from bootable USB.
| ⏱️Duration | 3-6 minutes of reading |
| 💻Applies to | Get the MSI boot from USB on Windows 11/10/8/7 |
| ⛏️ Tools |
✔️USB ✔️Professional tool - EaseUS Partition Master ✔️MSI laptop or desktop |
| 🖌️ Stages |
1️⃣Stage 1. Access the Boot Device Menu 2️⃣Stage 2. Select Boot from the USB 3️⃣Stage 3. Set Up MSI to Boot from USB |
Preparations for MSI Boot From USB
If you want to boot your computer from USB and install Windows on your MSI laptop, you need to do the following preparations to ensure that the boot process goes smoothly:
Stage 1. Prepare the USB
Please prepare at least 16GB of free space on the USB and format USB to FAT32:
- Right-click on the Windows icon and find Disk Management.
- Locate the USB drive, right-click, select "Format," and set it to FAT32 format.
Stage 2. Make a Windows Bootable USB
There are two scenarios for making a Windows bootable USB:
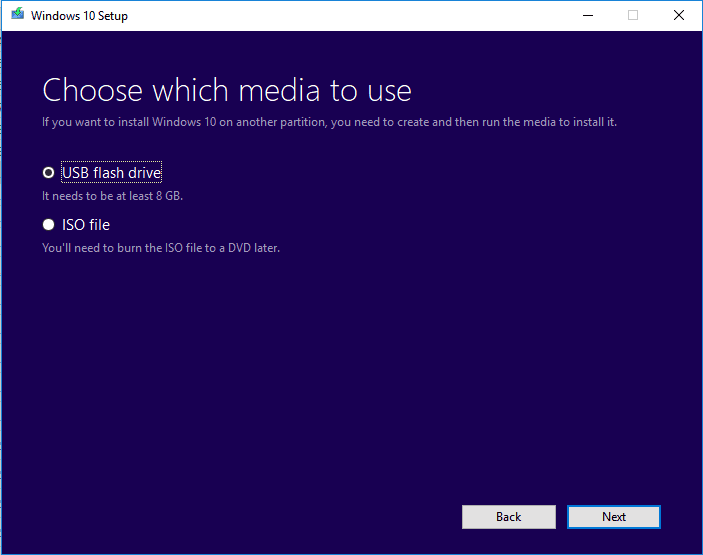
- Create Bootable Installation USB: If you want to install Windows from USB to solve the problem of system crash or boot error, download the Windows ISO file and burn it to USB.
- Create Bootable USB: If you only want to run a boot computer on MSI without installing Windows - you can create a bootable USB drive by cloning your Windows system to USB. Or use a Windows installation tool or third-party tool to create a bootable USB.
Whatever your reason for wanting to create a bootable USB, we'll give you a detailed guide:
Guide 1. Creating a Bootable Installation USB
Often, we need bootable media to get into the system when it crashes, so we prefer to use EaseUS Partition Master Professioanl to create bootable installation media and then reinstall Windows OS on MSI.
Download the Windows ISO file: https://www.microsoft.com/en-us/software-download/windows11
Download the ISO burning tool:
The tool provides easy-to-use methods, even if you are a novice, you can finish mastering the operation skills:
Steps to create a bootable installation USB:
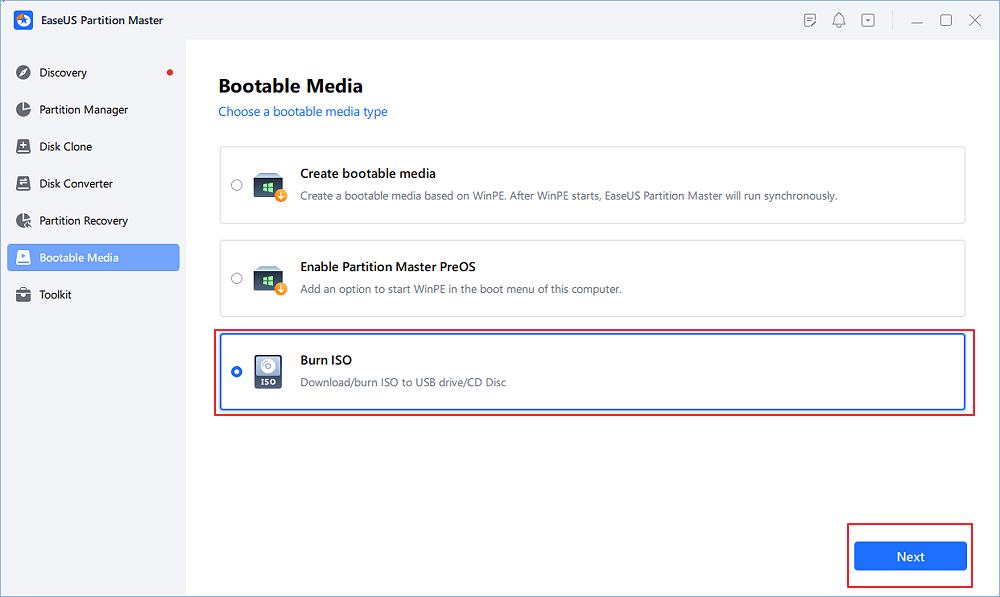
Step 1. Launch EaseUS Partition Master and go to the Bootable Media section. Click "Burn ISO" and click "Next".
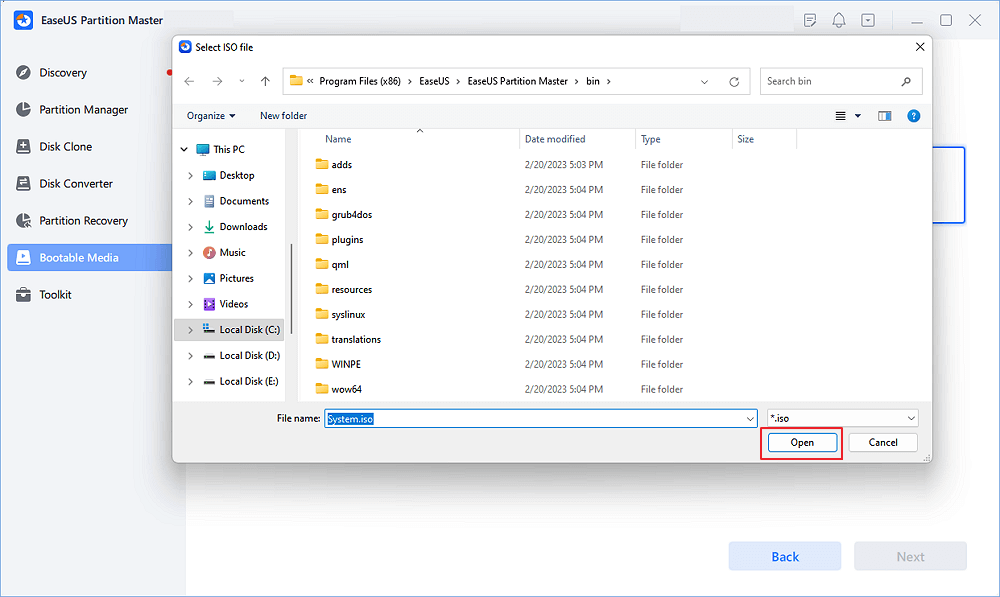
Step 2. Select the ISO image that you have downloaded on your PC, and click "Open".
Step 3. Click "Next" and select the target USB as destination and click "Burn" to execute the operation.
Now, you can also use EaseUS Partition Master to skip Windows 11's strict installation requirements on old PCs.
Guide 2. Creating a Bootable USB
To create a bootable drive, you can use EaseUS Partition Master to migrate Windows OS to USB.
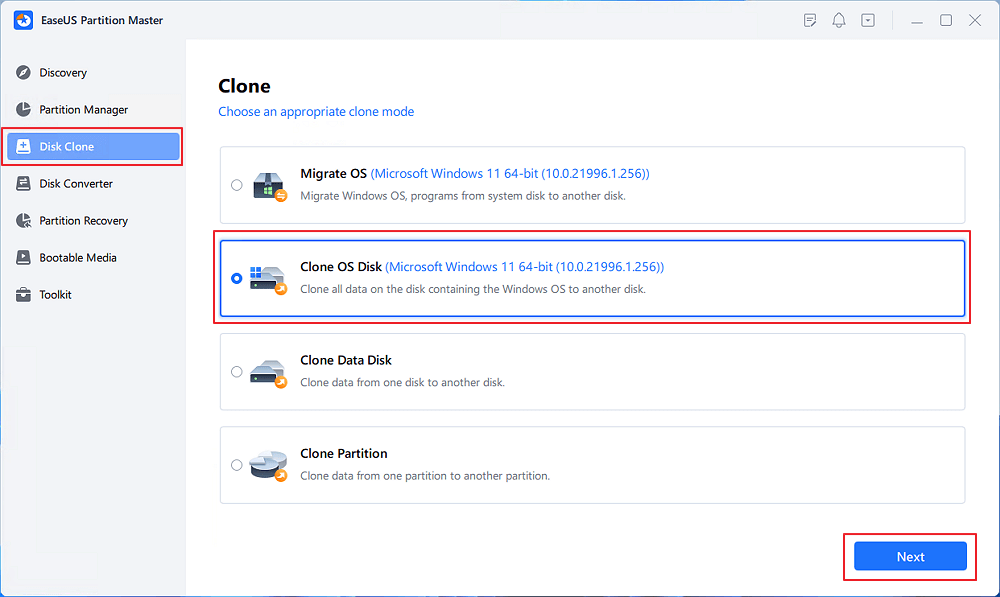
Step 1. Launch EaseUS Partition Master, go to the Disk Clone tab, select "Clone OS Disk" and click "Next".
Step 2. Select the target new drive where you want to clone the OS to, and click "Next".
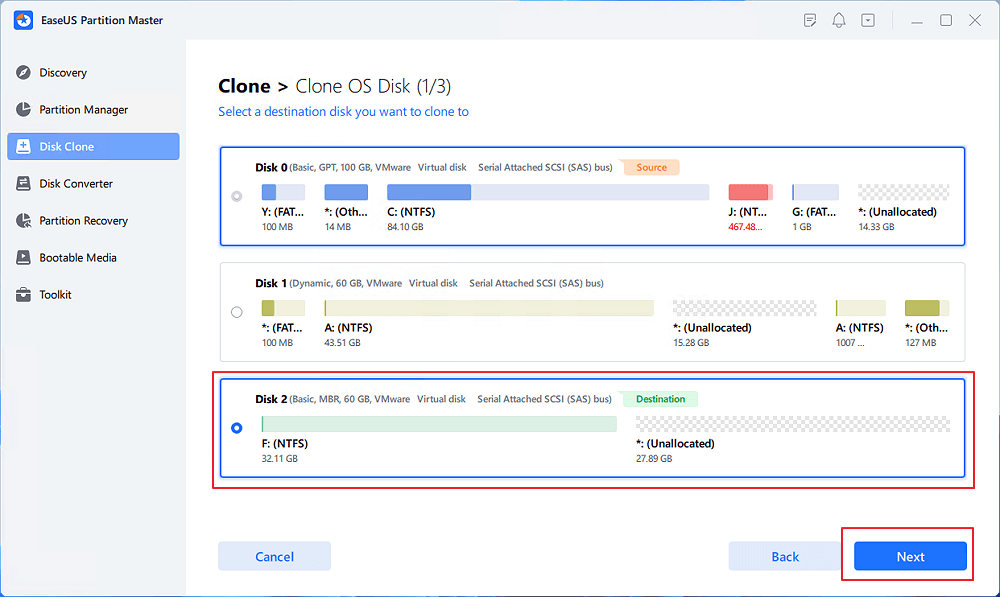
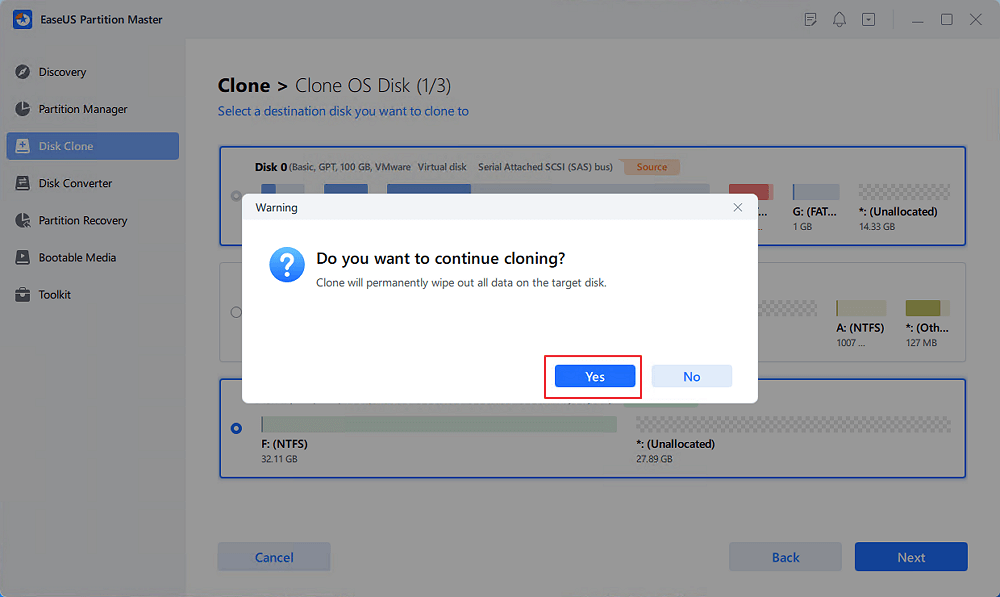
Click "Yes" to confirm that you want to continue the OS disk cloning process.
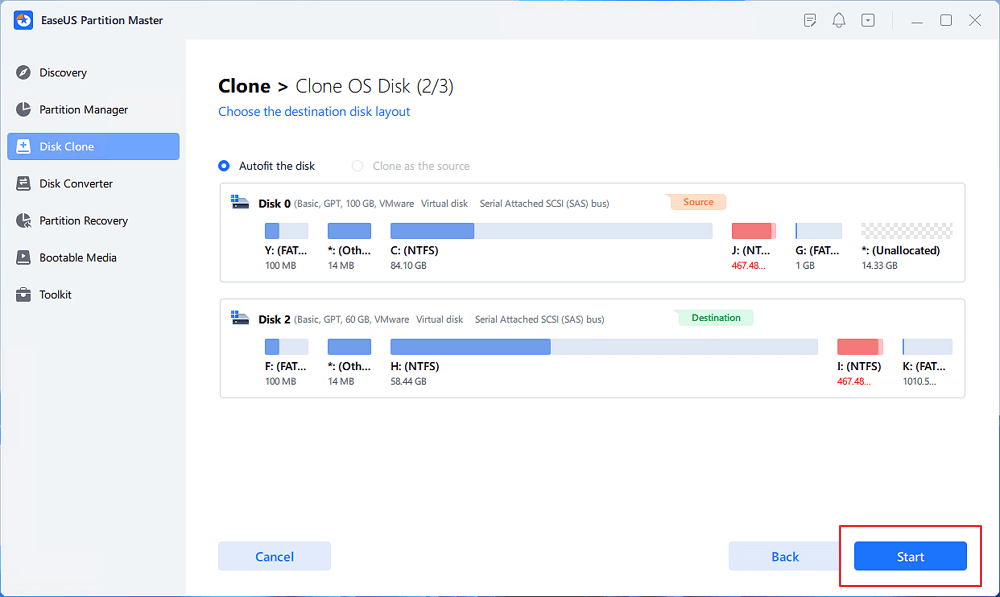
Step 3. View the disk layout, and click "Start" to begin the OS cloning process.
Step 4. When the process completes, you'll see a confirming message, asking "if you want to start up computer from the clone target disk".
- Reboot Now means to reboot your PC and configure the computer to boot OS from the new disk immediately.
- Done means you want to make the changes later.

Furthermore, you can also use EaseUS OS2Go - a program specifically designed for Windows bootable purposes.
Read more: How to create a bootable USB
When you are ready with the above, read on, and we will use the bootable USB to boot your MSI laptop now. And if you think this guide is useful, share it with others in need.
How to Boot from USB on MSI Motherboard
In this section, we provide a detailed guide to boot your MSI laptop from USB in 5 stages as follows:
Stage 1. Access the Boot Device Menu
1️⃣. Open the laptop, and when the MSI logo appears, press F11 repeatedly.
![]()
2️⃣. Open the boot menu and select bootable USB flash drive.
Stage 2. Select Boot from the USB
1️⃣. Find the bootable USB drive in the boot menu and select it.
2️⃣. Press Enter to start making the USB boot the MSI laptop.
Stage 3. Set Up MSI to Boot from USB
1️⃣. Reboot the MSI laptop.
2️⃣. After the MSI logo appears, press F11 repeatedly to open the Boot menu.
3️⃣. In the Boot menu, select Boot from USB under the Set Boot option.
4️⃣. Press Enter to begin booting the MSI laptop from the USB drive.
Stage 4. Enable MSI to Boot from USB
Once you have successfully set USB as a bootable drive, you can use it to boot your computer:
1️⃣. Shut down the MSI computer.
2️⃣. Press and hold the Esc key and the Power button to boot the MSI.
3️⃣. Keep holding the Esc key until BIOS SETUP UTILITY appears.
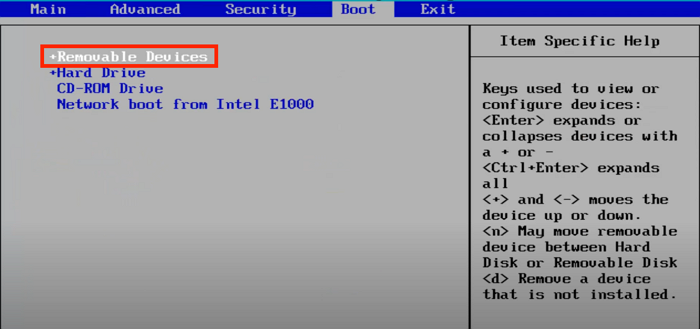
4️⃣. Under the Boot option, select the USB drive and Press and hold Enter to boot the MSI system from USB.
Stage 5. Adjust Boot Priority in MSI BIOS
Now that you have booted your MSI laptop from the USB drive, the next step is to adjust the boot priority. Once you've set the boot order in BIOS, you can permanently set the USB drive to the highest priority and build your system: in the presence of a USB, the system will boot from that USB first. Otherwise, the system will boot from the second boot item.
1️⃣. Turn on your MSI notebook and press Del/F2 repeatedly.
2️⃣. Go to the MSI BIOS setup menu.
3️⃣. Set the boot order of the USB:
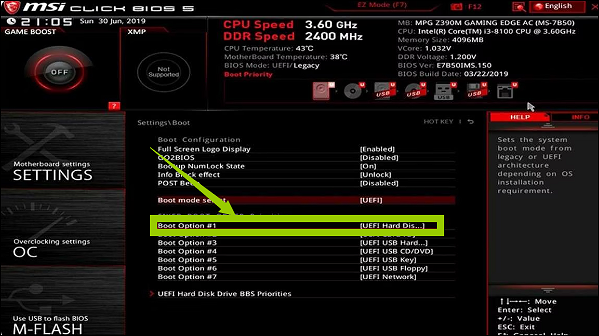
- MSI BIOS loads to EZ mode by default. Please drag and drop the USB drive to the first position of "Boot Priority."
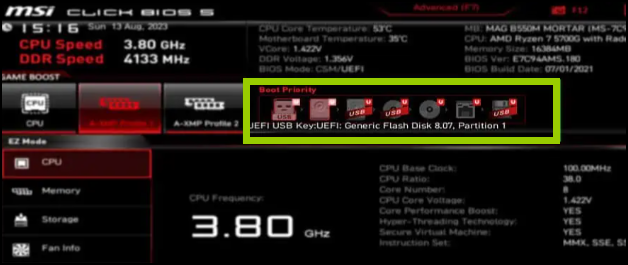
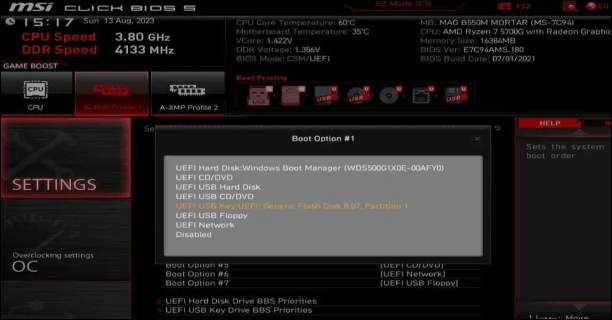
- Please press F7 to switch to the advanced mode interface: select Settings>Boot and set USB as the boot option 1.
4️⃣. After setting the boot priority for your MSI laptop, press F10 to save the changes and exit the BIOS.
If you want to reinstall Windows via the created bootable USB, please follow the above steps to set USB as a boot order and refer to the following article to reinstall Windows.
How to Install Windows 10 from USB Drive
This tutorial will concentrate on installing Windows 10 from USB. When your computer does not use the OS installation CD, you can install Windows 10 via EaseUS Partition Master or Windows Media Creation Tool.
Bonus Tip: Fix Unable to Boot MSI from Bootable USB
It is not difficult to burn Windows ISO to USB using EaseUS Partition Master, then set the USB boot sequence on an MSI laptop so that MSI can boot from USB. But sometimes, the BIOS fails to detect the MSI bootable USB. Why? This section gives some quick troubleshooting:
1. First, please check the cables and power supply board and solve any other hardware problems, such as USB port corruption or USB drive corruption.
2. Disable Fast Boot and Safe Boot: These will prevent USB from being detected or prevent you from booting with an unauthenticated device.
3. Different system configurations: The USB's target system (Legacy/CSM/UEFI) and partition style (MBR/GPT) must match your current system configuration. If the partition style does not match, please convert MBR to GPT and vice versa.
4. Outdated BIOS: You can fix the unbootable USB by updating the BIOS.
5. In addition, resetting the CMOS battery can clear all non-default BIOS settings and may allow your MSI to boot.
6. Bootable USB creation failure: Please use a professional tool when creating a bootable USB.
Hope these tips can solve your problem! Besides, don't hesitate to share this tutorial with others if you think it's useful:
Conclusion
If your MSI laptop system crashes and your computer won't boot, try booting from a USB flash drive and reinstalling Windows OS.EaseUS Partition Master provides two methods for creating bootable installation media and a USB. Additionally, this tutorial provides quick fixes if the bootable USB you created does not appear in the BIOS.
FAQs About MSI Boot from USB
This section will provide more information about booting MSI from a USB drive. Please read on to solve more of your doubts.
1. How to boot into MSI BIOS?
The MSI motherboard BIOS controls the boot process. If you are familiar with the MSI boot menu key, you can easily enter the BIOS:
Reboot your computer and Press and hold Delete/F2 for BIOS while the system is booting.
After changing the BIOS settings, press Esc to save the changes and exit.
2. How to boot Windows 10 from USB in MSI?
Before booting from USB, please set USB as bootable media and connect it to your MSI computer:
Step 1. Reboot your computer and hit Delete repeatedly to enter the BIOS setup.
Step 2. Navigate to the Boot tab in BIOS setup and select UEFI.
Step 3. After saving the settings, reboot and press "F11" repeatedly to enter the boot menu.
3. How to install Windows from USB in MSI?
Please use EaseUS Partition Master to create bootable installation media first and then boot from the installation CD:
Step 1. Reboot your computer, enter the boot menu when the MSI logo appears, and select Boot from USB.
Step 2. Set the language, date, etc., and click Next.
Step 3. Select Install Now and follow the on-screen instructions to continue the installation.
How Can We Help You
About the Author
Updated by Joey Albert
Joey is an enthusiast of science and technology. With a passion for uncovering the latest tech innovations, she creates clear, engaging how-to guides that make technology accessible and enjoyable for all.
Cici is the junior editor of the writing team of EaseUS. She accepted the systematic training on computers at EaseUS for over one year. Now, she wrote a lot of professional articles to help people resolve the issues of hard drive corruption, computer boot errors, and disk partition problems.
Product Reviews
-
I love that the changes you make with EaseUS Partition Master Free aren't immediately applied to the disks. It makes it way easier to play out what will happen after you've made all the changes. I also think the overall look and feel of EaseUS Partition Master Free makes whatever you're doing with your computer's partitions easy.
Read More -
Partition Master Free can Resize, Move, Merge, Migrate, and Copy disks or partitions; convert to local, change label, defragment, check and explore partition; and much more. A premium upgrade adds free tech support and the ability to resize dynamic volumes.
Read More -
It won't hot image your drives or align them, but since it's coupled with a partition manager, it allows you do perform many tasks at once, instead of just cloning drives. You can move partitions around, resize them, defragment, and more, along with the other tools you'd expect from a cloning tool.
Read More
Related Articles
-
Windows 11 Upgrade Guide for Unsupported PCs | Bypass Windows 11 Upgrade Requirements
![author icon]() Sherly/2026/06/30
Sherly/2026/06/30 -
Solved: Diskpart List Volume There Are No Volumes
![author icon]() Sherly/2026/06/17
Sherly/2026/06/17 -
How to Bypass BitLocker Recovery Key on Dell Laptop Windows 11
![author icon]() Shelly/2026/06/17
Shelly/2026/06/17 -
Guide on Seagate External Hard Drive Transfer Speed
![author icon]() Tracy King/2026/06/30
Tracy King/2026/06/30


