Page Table of Contents
About the Author
Hot Topics
Updated on Jan 29, 2026
| Workable Solutions | Step-by-step Troubleshooting |
|---|---|
| #1. Remove Disk Write Protection by CMD and Registry Editor | Step 1. Open the start menu. Then type "CMD". Press Enter to continue; Step 2. Now, you have to Type...Full steps |
| #2. Change Read-only Permission on Windows 11 | Step 1: Open File Explorer and locate the USB drive you want to make writable; Step 2: Right-click on the USB...Full steps |
| #3. Format Read-only Disk to Desired File System | Step 1. Run EaseUS Partition Master, right-click the hard drive partition you intend to format, and choose "Format"...Full steps |
Disk Shows Read-Only. This is a fairly common error that can occur on Windows systems. The disk shows as being in read-only mode, and you are unable to make changes to the files or folders on the disk.
There are a few possible causes for this problem. One possibility can be a problem with the file system on the disk. The cause can be errors in the file system or corruption of the file system.
Another possibility can be a problem with one of the drivers associated with the disk. This can be caused by a corrupted driver or by a driver that has been installed incorrectly.
If you are experiencing this problem, there are a few things that you can do to try to resolve it. In this article, we will take a deep look at how to format a read-only disk to normal Windows 11. So, let us get started.
Scenario - Disk Shows Read-Only?

- File permissions:
One of the most common reasons for a disk appearing as read-only is due to file permissions. If a file or folder is set to read-only, then you will not be able to make any changes to it. To fix this, you will need to change the file permissions accordingly.
- Disk corruption:
If the disk itself is corrupted, then it will often appear as read-only. In this case, you will need to format the disk and reinstall any necessary software.
- Incorrect file system:
If the file system on the disk is not set up correctly, then it can also cause the disk to show as read-only. Therefore, you will need to fix the file system to make changes to the disk.
- Virus infection:
A virus infection can also cause a disk to appear as a read-only medium. In most cases, you will need to scan the disk for viruses and remove them to make changes.
- Hardware failure:
If there is a hardware failure with the disk, then it will often appear as read-only. In this case, you will need to replace the disk to make changes.
How to Change Read-only USB on Windows 11?
We know that "Read Only Disk" can be frustrating for you. But do not worry, here is how you can solve it. Check out these 3 best methods to format a read-only Disk to a standard Windows 11 Disk.
#1. Remove Disk Write Protection by CMD and Registry Editor
Step 1. Open the start menu. Then type "CMD". Press Enter to continue.
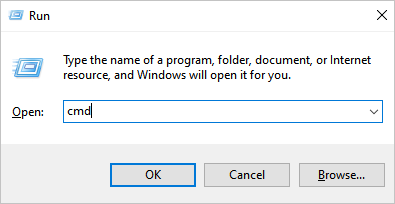
Step 2. Now, you have to Type "command Diskpart" and hit Enter. You will see a new command window.
Step 3. Here you have to type "list disk". Press enter button. Here make sure your storage device is listed.
Step 4. Now, type the command "select disk x" and hit Enter.
Step 5. Next, press Enter at the "attributes disk clear read-only". Again, press the Enter button.
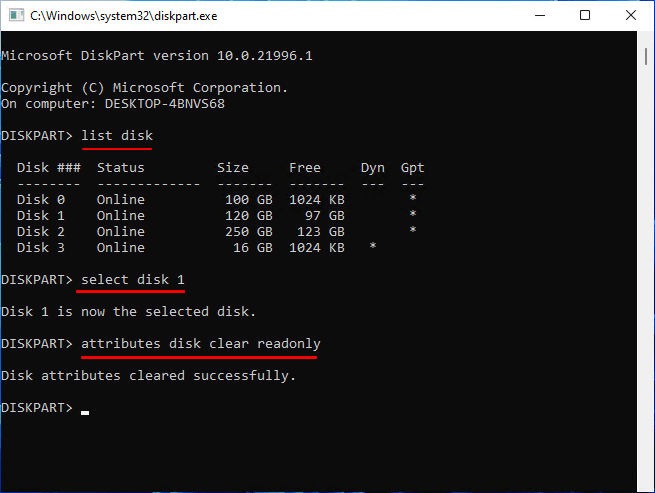
Congrats. You have successfully removed the read-only attribute. You can now simply exit the DiskPart utility.
#2. Change Read-only Permission on Windows 11
There are times when you come across a USB drive that is labeled as read-only. And you wonder how to change read-only USB on Windows 11. Here is how it is done. To change a read-only USB drive to writable in Windows 11, follow these simple steps:
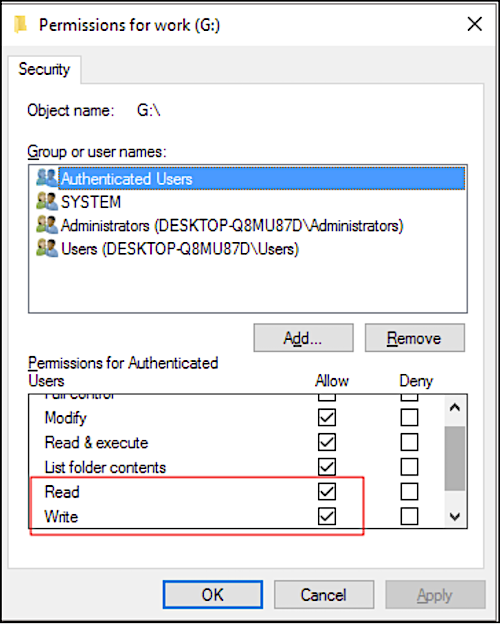
Step 1: Open File Explorer and locate the USB drive you want to make writable.
Step 2: Right-click on the USB drive and select "Properties: from the menu.
Step 3: Click on the "Security" tab and then click on the "Edit" button.
Step 4: Find your username under the Group or user names section and check the Allow box next to Full Control.
Step 5: Click on "Apply" and then "OK". The USB drive should now be writable. Close File Explorer and safely remove your USB drive from your computer.
#3. Format Read-only Disk to Desired File System
Many storage devices such as USBs, SD cards, and Hard Disk Drive are preformatted. So, even if you try to format them, it gets tricky for you. Therefore, you cannot write anything on them. The only option you are left with is to buy a new one.
This is also one of the biggest reasons you get the read-only error. But now, you don't have to buy a new storage device. Instead, you can take advantage of the excellent tool available for this purpose, the EaseUS Partition Master.
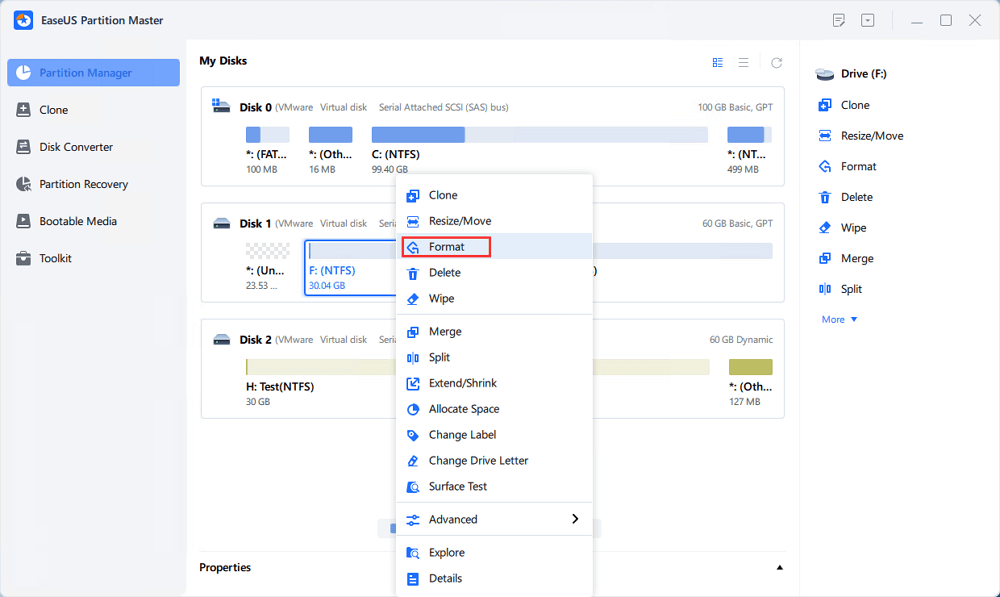
Step 1. Run EaseUS Partition Master, right-click the hard drive partition you intend to format and choose "Format".
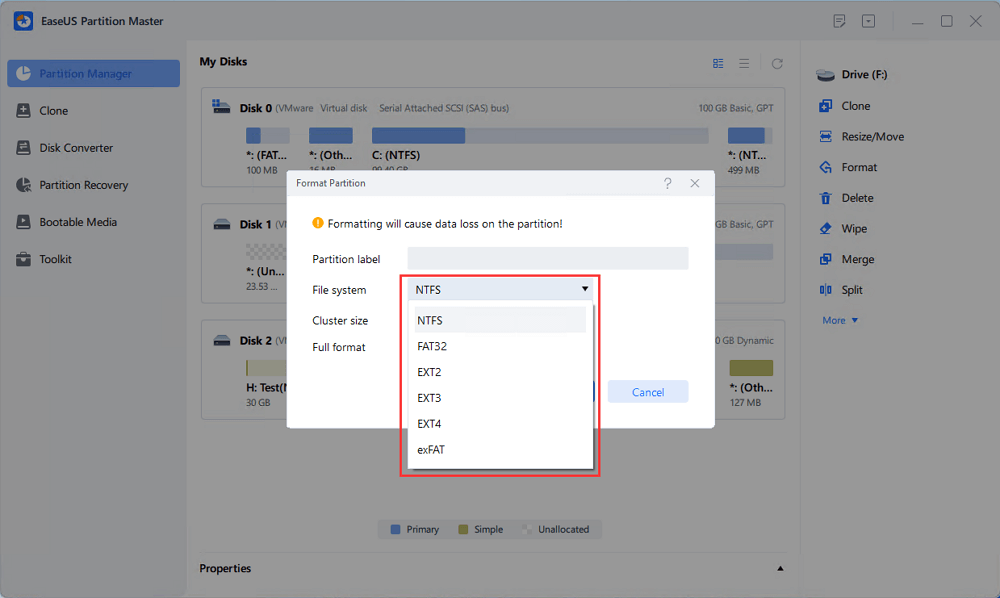
Step 2. In the new window, set the Partition label, File system (NTFS/FAT32/EXT2/EXT3/EXT4/exFAT), and Cluster size for the partition to be formatted, then click "OK".
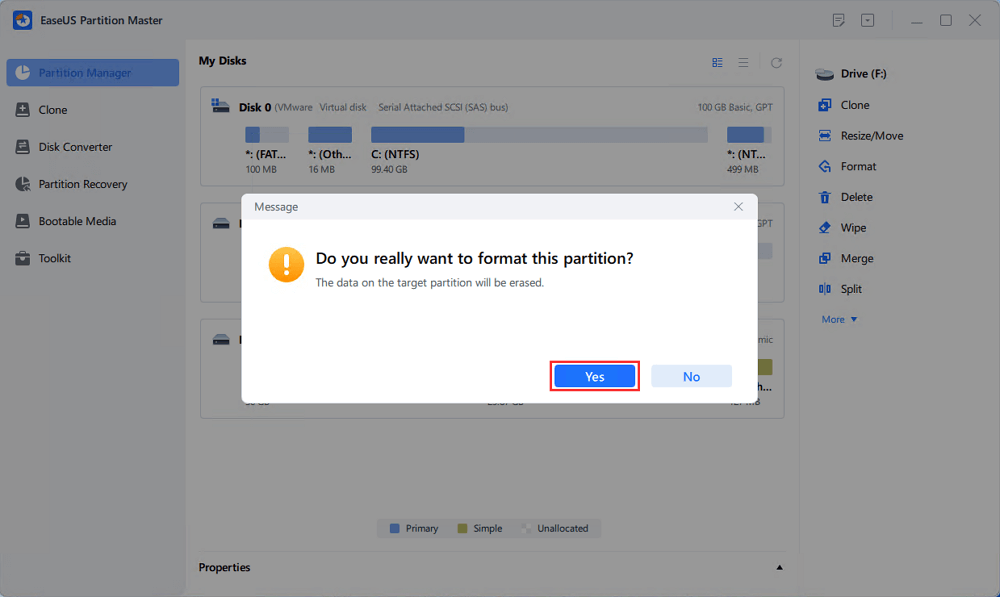
Step 3. Then you will see a warning window, click "Yes" in it to continue.
Step 4. Click the "Execute 1 Task(s)" button to review the changes, then click "Apply" to start formatting the partition on your hard drive.
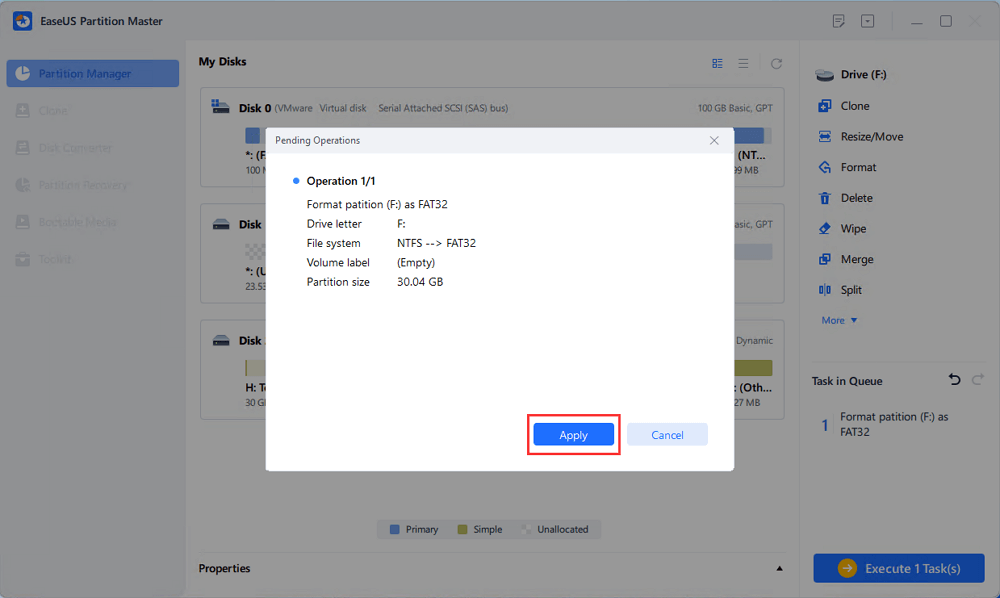
As the name says, it lets you reformat your disk to any format. It can be FAT16/32, NTFS EXT2/3/4. So, download this fantastic software today to format a read-only disk to the Windows 11 standard.
Related article: NTFS or exFAT for External Hard Drive: Which Format is Better for External Hard Drive?
Here is a snippet of what this software can do:
- Format SD card
- Resize partition
- Reformat Windows 11
- Wipe hard disk data
Conclusion
So, now you know how to format a read-only disk to a standard Windows 11 disk. See, it is not that tough. But, the real icing on the cake here is the EaseUS Partition Manager software. It is one easy-to-use, and practical that lets you deal with "Disk read-only" error. So, download it today and say goodbye to such errors.
How Can We Help You
About the Author
Updated by Tracy King
Tracy became a member of the EaseUS content team in 2013. Being a technical writer for over 10 years, she is enthusiastic about sharing tips to assist readers in resolving complex issues in disk management, file transfer, PC & Mac performance optimization, etc., like an expert.
Product Reviews
-
I love that the changes you make with EaseUS Partition Master Free aren't immediately applied to the disks. It makes it way easier to play out what will happen after you've made all the changes. I also think the overall look and feel of EaseUS Partition Master Free makes whatever you're doing with your computer's partitions easy.
Read More -
Partition Master Free can Resize, Move, Merge, Migrate, and Copy disks or partitions; convert to local, change label, defragment, check and explore partition; and much more. A premium upgrade adds free tech support and the ability to resize dynamic volumes.
Read More -
It won't hot image your drives or align them, but since it's coupled with a partition manager, it allows you do perform many tasks at once, instead of just cloning drives. You can move partitions around, resize them, defragment, and more, along with the other tools you'd expect from a cloning tool.
Read More
Related Articles
-
Windows 11 Download Without TPM 2.0 & Run Windows 11 Without TPM
![author icon]() Jean/2026/01/29
Jean/2026/01/29 -
How to Run Disk I/O Test on Windows | Your Solutions Here!
![author icon]() Cici/2026/01/29
Cici/2026/01/29 -
How to Downgrade and Rollback Windows 11 24H2 | Safe & Fast
![author icon]() Cici/2026/01/29
Cici/2026/01/29 -
How to Format USB/External Hard Drive to ExFAT [Windows & Mac]
![author icon]() Tracy King/2026/01/29
Tracy King/2026/01/29
Hot Topics
EaseUS Partition Master

Version 20.0 is here - full exFAT support, easier disk partitioning, and PC performance optimization.


