Page Table of Contents
About the Author
Hot Topics
Updated on Jan 29, 2026
"Can I change MBR to UEFI?" Yes, you can. In computing, MBR supports BIOS, while GPT supports UEFI.
Thus, if you want to convert MBR to UEFI or change the firmware type from the Basic Input/Output System (BIOS) to the Unified Extensible Firmware Interface (UEFI) without modifying the current installation, then upgrade from Windows 10 to Windows 11 without losing data, you need to convert MBR to GPT.

Transitioning from MBR to UEFI may seem complex at first, but it ultimately improves system performance and compatibility. To help users of all skill levels navigate this process, a detailed, step-by-step guide has been created. Now, let's learn about the procedure that will help you transition from MBR to UEFI.
Don't forget to share this MBR to UEFI conversion tool online to help more of your friends who need help of switching their MBR disk drive with OS to UEFI mode:
Phase 1. Check if a Motherboard Supports UEFI
The first crucial step is verifying that your system's motherboard supports UEFI, which lays the foundation for a smooth and successful conversion. Let's show how to know if Windows is using UEFI or Legacy.
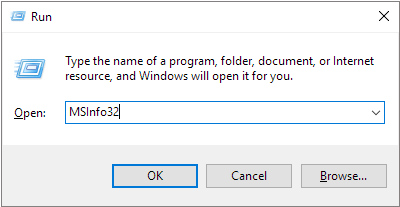
Step 1. Press Win + R to open the Run box > type MSInfo32 in the search bar > click OK or press Enter to enter the System Information window.
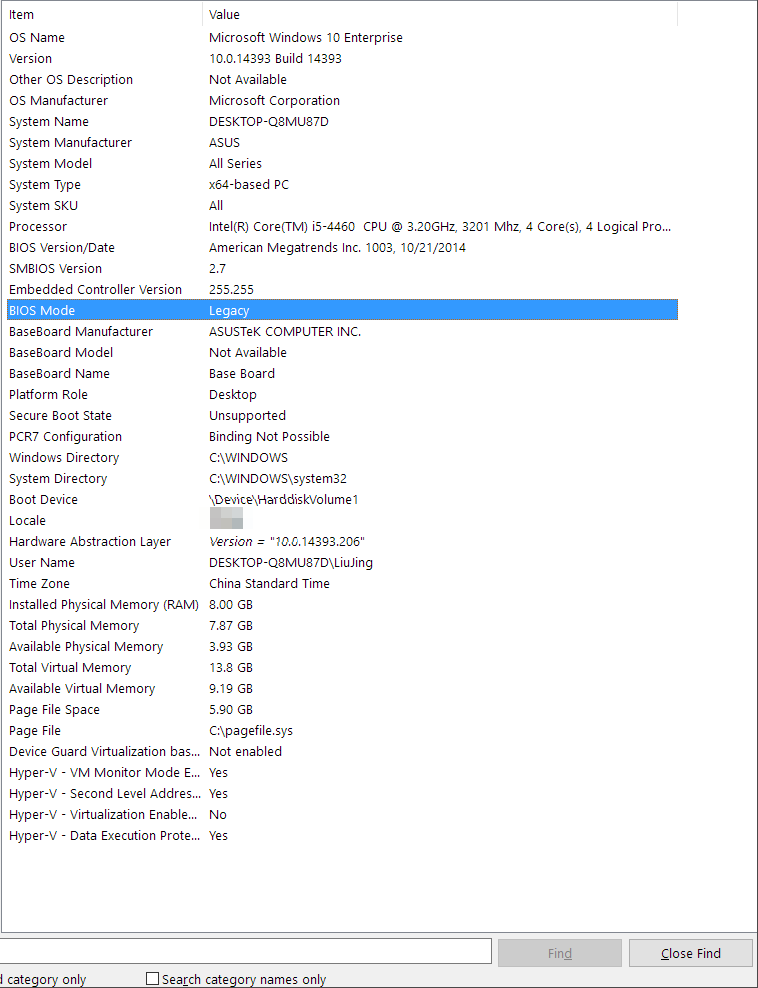
Step 2. Under the Item tab, find BIOS Mode > verify that it is set to Legacy or UEFI.
- As the following pic. shows, the BIOS Mode of this Windows is Legacy. Thus, you may need to convert MBR to UEFI if necessary.
- If its BIOS mode is UEFI, you don't have to change the firmware type from Legacy to UEFI.
Phase 2. Download MBR Disk Converter Software
Having the right tools in your hand plays a major role in this transition process. For Windows users, EaseUS Partition Master Professional is the way to go as it is the most reliable tool, and its easy-to-use interface makes it the tool of choice. Its powerful features make it your best companion when it comes to converting MBR to UEFI.
EaseUS Partition Master's stellar Disk Converter is specifically designed to make this transition seamless. Its interactive design makes sure that non-tech-savvy users can easily navigate through this process effortlessly.
Don't forget to share this MBR to UEFI conversion tool online to help more of your friends who need help of switching their MBR disk drive with OS to UEFI mode:
Phase 3. Convert MBR to Support UEFI
Now that we've laid the foundation for understanding the language of your computer - MBR for Legacy boot mode and GPT for UEFI - let's delve into the pivotal step of converting your MBR disk to support UEFI.
- In the intricacy of computer systems, the MBR disk speaks the language of Legacy boot mode, a method rooted in tradition. However, for those seeking to embrace the contemporary UEFI mode, a translation is in order.
- The GPT disk, fluent in the modern UEFI dialect, becomes the key to unlocking advanced functionalities and staying in sync with the latest technological advancements.
To bridge this linguistic gap and enable your system to converse effortlessly in UEFI, converting your MBR disk drive to the GPT partition style is imperative. EaseUS Partition Master enables you switching MBR disk to GPT without losing any data with the step guide here:
Step 1. Download and launch EaseUS Partition Master on your computer.
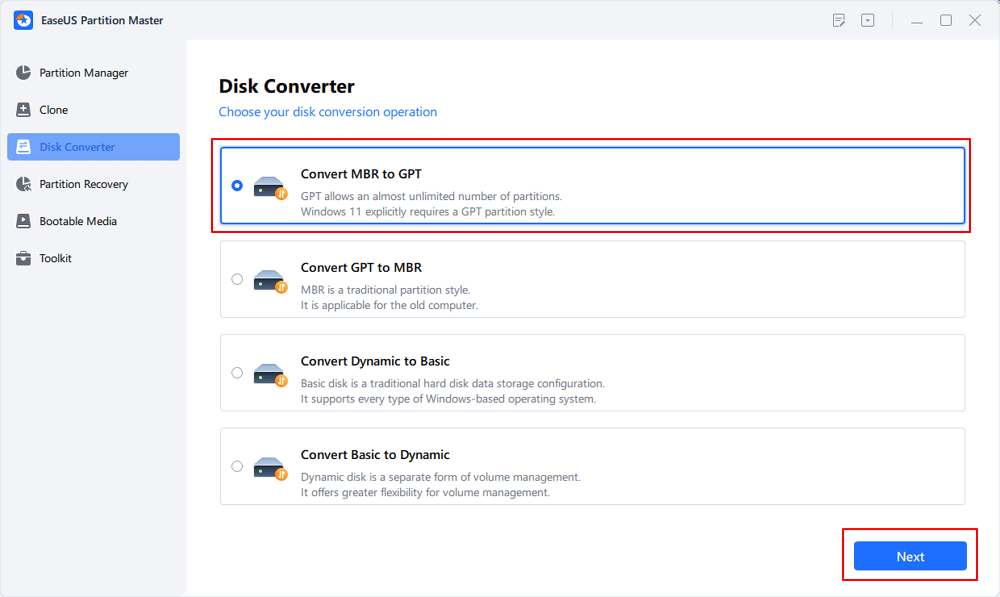
Step 2. Go to Disk Converter, select "MBR => GPT" and click "Next" to continue.
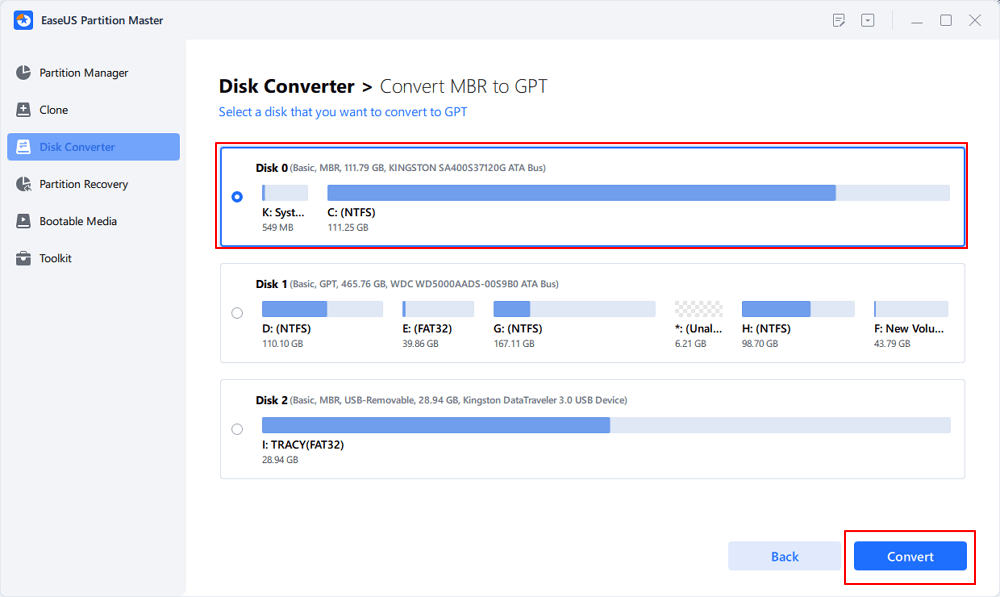
Step 3. Select the target MBR disk that you tend to convert to GPT, and click "Convert" to start the conversion.
This transformation serves as the passport to the UEFI realm, ensuring compatibility and unlocking your system's full potential. So, let's embark on this conversion journey, where your MBR disk evolves into a GPT powerhouse, ready to support UEFI mode seamlessly.
For an OS drive, you still have one last step go move, which is to enable the UEFI mode on the source OS disk that was converted to GPT with the above guide. Move to the next part, and check for the details.
Phase 4. Enable UEFI Mode
Now that you've successfully converted your MBR disk to the UEFI-friendly GPT partition style, the next pivotal step is to enable UEFI mode in your system. This step ensures your system fully capitalizes on the benefits of the modern UEFI environment.
Step 1. Power on or restart your computer.
Step 2. Access the BIOS setup by pressing the designated key during the initial boot process (common keys include F2, F10, F12, or DEL).
Step 3. Navigate to the "Boot" or "Boot Options" section within the BIOS menu using the arrow keys.
Step 4. Select UEFI as the preferred boot mode.
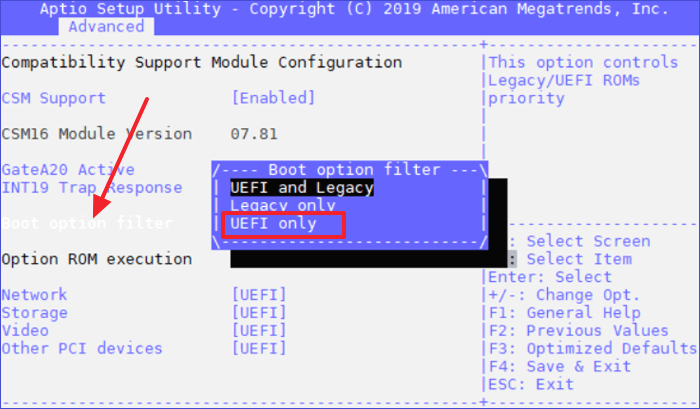
Step 5. Save your changes and exit the BIOS by navigating to the "Save & Exit" menu, usually found in the last tab of the BIOS interface.
A significant step in the conversion process, enabling UEFI mode optimizes your system for better performance and compatibility with contemporary technologies. You've made sure that your computer is now prepared to utilize UEFI to the fullest extent possible by following these easy steps. The journey continues with your system poised for a more advanced and efficient computing experience.
This is the complete procedure of converting MBR to UEFI, and you love it, don't hesitate to share this tutorial page to help more of your friends online:
Conclusion
In conclusion, this guide has navigated you through the intricate process of converting your MBR disk to support UEFI, transforming your system into a more advanced and efficient computing powerhouse. EaseUS Partition Master, as a user-friendly solution for Windows beginners, is equipped with the Disk Converter feature and has become your go-to companion for the seamless transition from MBR to UEFI mode.
Converting an MBR disk to GPT is only the beginning of switching the MBR disk to UEFI mode. The key procedure is to enable the UEFI boot mode for the GPT from the BIOS as the provided guide shown above.
FAQs Of Converting MBR to UEFI
If you still have further questions about configuring the MBR disk to UEFI boot mode on your PC, check and find answers here blow:
1. Can MBR run UEFI?
No, MBR and UEFI are distinct boot modes that are incompatible with one another. MBR is associated with Legacy boot mode, whereas GPT (GUID Partition Table) is required for UEFI. Converting from MBR to UEFI is necessary to harness the benefits of UEFI.
2. Can I convert MBR to UEFI without losing data?
Yes, converting MBR to UEFI without losing data is possible, but caution is essential. Utilizing reliable partition management software, such as EaseUS Partition Master, allows for a seamless conversion while preserving your data. Always ensure a backup before initiating any major disk conversion to mitigate potential risks.
3. Can I convert a VM to UEFI?
Yes, converting a virtual machine (VM) to UEFI involves adjusting settings in your virtualization software. Power off the VM, access settings, change the boot mode to UEFI, and ensure the disk uses the GPT partition style. Save changes and start the VM. Specific steps may vary by virtualization platform, so consult your software's documentation. Always back up your VM before making significant changes to prevent potential data loss.
How Can We Help You
About the Author
"I hope my articles can help solve your technical problems. If you are interested in other articles, you can check the articles at the bottom of this page. Similarly, you can also check my Twitter to get additional help."
Written by Tracy King
Tracy became a member of the EaseUS content team in 2013. Being a technical writer for over 10 years, she is enthusiastic about sharing tips to assist readers in resolving complex issues in disk management, file transfer, PC & Mac performance optimization, etc., like an expert.
Product Reviews
-
I love that the changes you make with EaseUS Partition Master Free aren't immediately applied to the disks. It makes it way easier to play out what will happen after you've made all the changes. I also think the overall look and feel of EaseUS Partition Master Free makes whatever you're doing with your computer's partitions easy.
Read More -
Partition Master Free can Resize, Move, Merge, Migrate, and Copy disks or partitions; convert to local, change label, defragment, check and explore partition; and much more. A premium upgrade adds free tech support and the ability to resize dynamic volumes.
Read More -
It won't hot image your drives or align them, but since it's coupled with a partition manager, it allows you do perform many tasks at once, instead of just cloning drives. You can move partitions around, resize them, defragment, and more, along with the other tools you'd expect from a cloning tool.
Read More
Related Articles
-
Guide to Fix Ndis.sys Failed BSOD Error on Windows
![author icon]() Oliver/2026/01/29
Oliver/2026/01/29 -
SSD System Reserved: How to Remove System Reserved Partition
![author icon]() Daisy/2026/01/29
Daisy/2026/01/29 -
How to Format Bitlocker Encrypted Drive Using CMD
![author icon]() Cici/2026/01/29
Cici/2026/01/29 -
How to Fix Black Screen After Cloning Disk - 3 Proven Methods
![author icon]() Sherly/2026/01/29
Sherly/2026/01/29
Hot Topics
EaseUS Partition Master

Version 20.0 is here - full exFAT support, easier disk partitioning, and PC performance optimization.


