Page Table of Contents
About the Author
Hot Topics
Updated on Jan 29, 2026
Always remember to back up valuable USB files before formatting them to NTFS. Follow the guide mentioned below and learn why you can't format USB to NTFS and how you can successfully find fixes to format USB to NTFS.
Error: Can't Format USB to NTFS
Why can't we format our USB to NTFS? Stay calm if you can't format USB to NTFS on Windows computers. Following is the list of causes and reasons why you can't format USB to NTFS:
- Physical damage to USB.
- Virus or malware infection.
- Presence of Bad sector on USB.
- USB is locked or write-protected.
- The current operating system does not support NTFS.
- USB contains faults file system errors, corrupted, or becomes raw.
- The USB file format is unsupported or incompatible with Windows.
Fix "Can't Format USB to NTFS" on Windows with Step-by-Step Guidelines
First, back up your data. The following list of methods mentioned below that will be helpful in formatting USB to NTFS:
- Method #1. Format USB to NTFS with EaseUS USB Formatter Software
- Method #2. Clean Viruses/Malwares and Format USB to NTFS in Disk Management
- Method #3. Run CHKDSK and Format USB to NTFS in CMD
- Method #4. Format USB Write-Protected USB to NTFS
Method #1. Format USB to NTFS with EaseUS USB Formatter Software
Easeus Partition Master Free is recommended to format USB to NTFS. It is a free and easy-to-use disk and partition management tool for Windows.
EaseUS Partition Master can recognize and format unsupported, inaccessible, and RAW USB to NTFS. Follow the detailed steps:
Step 1. Select the USB drive to format.
Connect the USB drive or pen drive to your computer. Launch EaseUS partition software, right-click the USB drive you intend to format and choose "Format".
Step 2. Set the drive letter and file system on USB.
Assign a new partition label if you want to change the drive letter of your USB, set the desired file system -NTFS/FAT32/EXT2/EXT3/EXT4/exFAT to your USB, then click "OK".
Step 3. Check "Yes" to confirm formatting USB.
Click "Yes" if you see the Warning window. If you have important data on it, back up the data in advance.
Step 4. Apply the changes.
Click the "Execute 1 Task(s)" button first, and then click "Apply" to format the USB drive.
Method #2. Clean Viruses/Malwares and Format USB to NTFS in Disk Management
It can be made simple using small USB flash drives to back up or transfer the data to the computer. They are often shared and used on many computers, making it easy for viruses to infect. A trusted antivirus program can eliminate malware or virus.
#1: Cleaning of Viruses / Malware
To clean Viruses/Malware, the following steps can be followed:
Step 1. First, Type Window Security into the search box on the right of the Windows logo on your computer screen.
Step 2. Click "Virus & Threat protection". You can now find "Scan Options" under "Current Threats". There will be four different scanning options.
Step 3. If you are doing this for the first time and want to check everything, choose the "Full Scan Option". Select the radio button next to "Full Scan" and click the "Scan Now" button.
Step 4. Pressing this button will run a full system scan, and window security will display a progress bar with findings. If everything is fine, you will see the message "No Current Threats".
Step 5. If Microsoft Defender founds any threats, you will receive a notification with the text "Threats found" along with a list of infected files. To remove threats from your computer, you have to click the "Start Actions" button then Microsoft Defender will remove the threats.
Now check if Windows has a cure for the "can't format USB" problem.
#2: Format USB to NTFS in Disk Management
Disk Management on Windows computers is another tool for managing disks and partitions. Disk management can easily create a new volume on the removable disc that the window can't format. The steps are mentioned below:
Step 1. Right-click on "This PC", then select Manage, and click on Disk Management to proceed.
Step 2. Choose your external hard drive or USB and right-click on it.
Step 3. Select the "Format" option and choose the "Perform a quick format" option.
Step 4. Select the correct file format. Then click "OK."
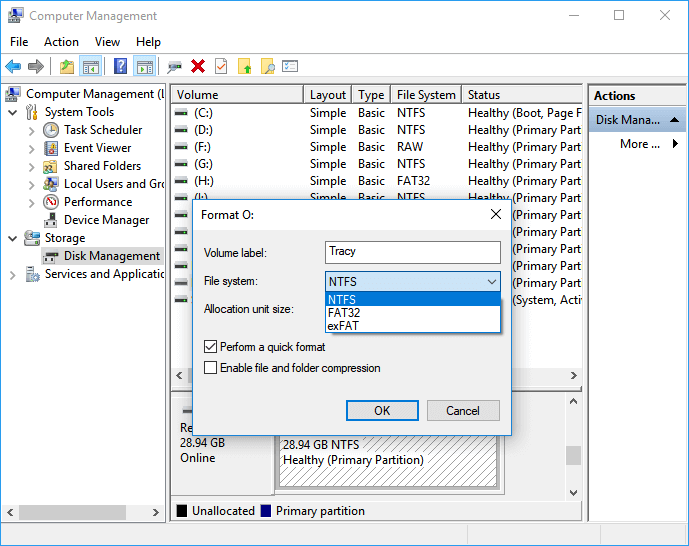
Now the issue has been resolved.
Method #3. Run CHKDSK and Format USB to NTFS in CMD
"CHKDSK" or Check Disk is a system tool or utility present in Windows operating systems that can scan the hard drive for any file system errors. Running the CHKDSK utility helps check and repair Hard Drive errors and keeps the system data organized.
#1: Run CHKDSK with Command Prompt
The Command Prompt can run CHKDSK. The steps mentioned below will tell you how to run CHKDSK from Command Prompt on Windows:
Step 1. Type cmd in the Start menu search bar, right-click on Command Prompt then click Run as administrator.
Step 2. Type "chkdsk" and hit Enter. CHKDSK will scan for drive errors and let you know if it found any you should repair, but it won't try to fix them without a command.
#2: Format USB Using CMD (Command Prompt)
Sometimes, due to RAW or an invalid file system, bad sector, or other errors, USB may corrupt or become inaccessible. Formatting a USB using CMD is a quick way to resolve these problems.
The following are two optional guidelines that help format a USB flash drive from Command Prompt.
Option 1: Format USB in Windows 11/10
Step 1. Connect the USB to your PC and press Windows + R keys.
Step 2. First, type cmd in the Search box and click Enter to raise Command Prompt.
Step 3. Now type the below-mentioned command lines and press Enter after adding each one.
- Diskpart
- list disk
- select the disk number (put the number of your USB drive.)
- list volume
- select the volume number (put your USB flash drive volume number.)
- format fs=ntfs quick (NTFS can also be replaced by FAT32 or exFAT.)
- Exit
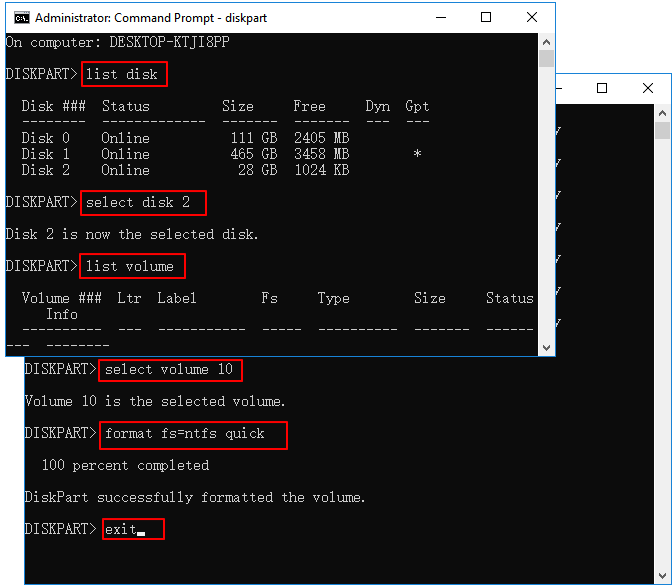
CMD also works to fix Windows was unable to complete the format error in your computer hard drive, USB, or other storage devices.
Option 2: Format USB flash drive in Windows 8/7
If your computer running with the Windows 8/7 system, you can follow to format USB using the command prompt with the help of the steps mentioned here:
Step 1. Connect your USB drive to the computer.
Step 2. Open File Explorer and remember the drive letter of your USB drive.
Step 3. Go to search bar from the taskbar and type cmd, when it appears right-click on Command Prompt, and select "Run as Administrator".
Step 4. Type the following mentioned command lines one by one, and press Enter each time:
- Format /FS:NTFS J (You replace J with the drive letter of your USB.)
- exit
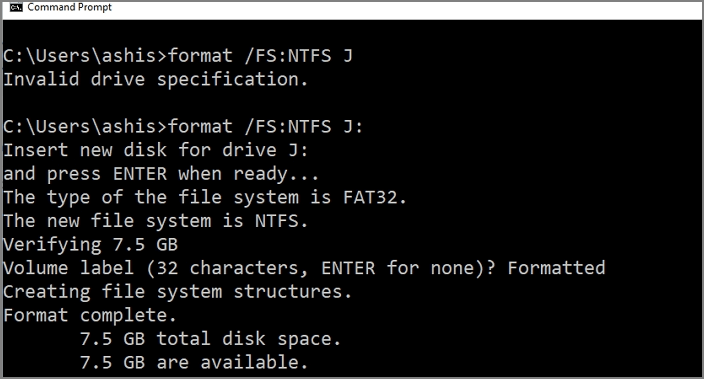
If you want to know more detailed information about the format USB using CMD, please click on the following link to check out:
Method #4. Format USB Write-Protected USB to NTFS
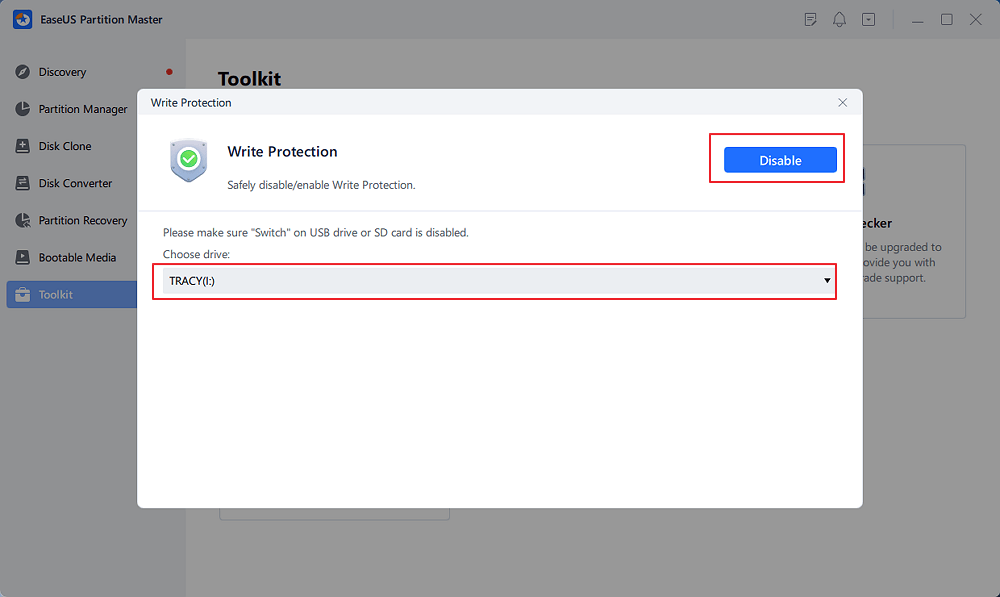
EaseUS Partition Master has a write protection removal feature, which helps people format write-protected USBs easily. Follow the detailed steps:
Step 1. Download and install EaseUS Partition Master, go to the Toolkit section, and click "Write Protection".
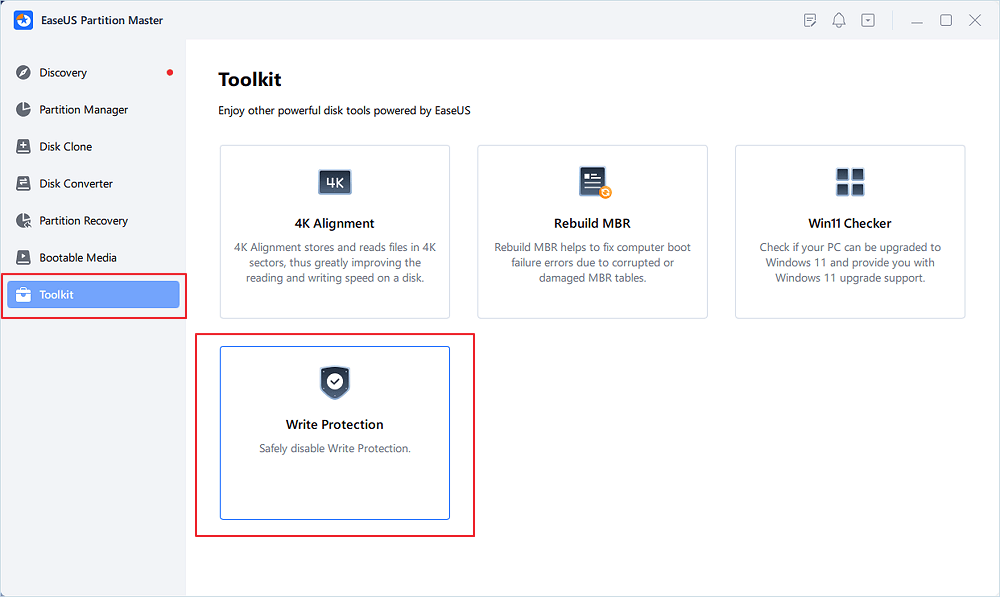
Step 2. Select your write protected USB, USB external disk or SD card, and click "Disable".
You May Also Like: Aside from replacing CMD to format the USB drive, EaseUS Partition Master is also a great hard drive format tool that you can apply to format and set up any type of storage device for different purposes as shown below here.
Bonus Tip: How to Format USB to NTFS Windows 7
In Windows 7, sometimes people can't format USB to NTFS because Windows provides an option to format USB to FAT or FAT32, but not with NTFS.
Following are the steps mentioned on how to format USB to NTFS on Windows 7:
Windows can format a USB flash drive with FAT or FAT32 file systems only, but not with NTFS (New TechnologyFile System.) It is because there are some disadvantages of NTFS usage in this case. First, the speed of saving on the flash drive decreases (but the speed of reading data from the drive is the same), and you have to be more careful to remove the USB flash drive safely permanently.
However, you can still format the Flash Drive in the NTFS format. Follow these steps for the same.
Step 1. You can insert the USB flash drive into the USB port.
Step 2. Click Start, and type devmgmt. msc in the Search box and press Enter.
Step 3. Find Disk Drives and expand them.
Step 4. Find the USB flash drive you want to format, and double-click it. It opens the Properties dialog box.
Step 5. Click the Policies tab.
Step 6. By default, the Optimize for quick removal option is selected, switch it to Optimize for performance and then press OK.
Step 7. Now open the Computer—Right-click on the USB Flash Drive and select format. The Format dialog box now appears.
Step 8. Select NTFS in the File System field then press Start and wait until the process is completed.
Now, your USB Flash Drive is formatted with NTFS format.
Final Verdict
Before taking any action to fix the "Can't format USB to NTFS" error, remember to back up your data. There may be some causes if you can't format USB to NTFS on Windows computers, like any physical damage to your USB Drive, Virus or malware action, etc. Use EaseUS Partition Master as a reliable USB formatting tool to format the USB drive to NTFS with simple clicks.
FAQs about the "Can't Format USB to NTFS" Error in Windows
1. How to change the flash drive format from FAT32 to NTFS?
First press "Windows+R" and type "diskmgmt.msc" and click Enter to display Disk management. Then right-click the partition you want to change and select "Format". Now specify the volume label and select "NTFS" file system, then "default" the allocation unit size, and check to Perform a quick format. Then click "OK".
2. Can I format my USB stick to NTFS?
First, "Right-click" the USB drive. From the pop-up menu, click on "Format". In the File system dropdown menu, choose "NTFS". Then click the "Start" button and wait until you finish.
3. Should USB be FAT32 or NTFS for bootable?
If a recovery drive is to be created, the USB drive should be formatted as FAT32, and if you want to use USB as storage media, you can create NTFS bootable USB Keys.
4. Why am I unable to format my USB?
There may be the following reasons:
Viruses or malware, bad sectors on the USB drive, physical damage to the USB drive, and the USB drive being write-protected.
How Can We Help You
About the Author
Updated by Tracy King
Tracy became a member of the EaseUS content team in 2013. Being a technical writer for over 10 years, she is enthusiastic about sharing tips to assist readers in resolving complex issues in disk management, file transfer, PC & Mac performance optimization, etc., like an expert.
Product Reviews
-
I love that the changes you make with EaseUS Partition Master Free aren't immediately applied to the disks. It makes it way easier to play out what will happen after you've made all the changes. I also think the overall look and feel of EaseUS Partition Master Free makes whatever you're doing with your computer's partitions easy.
Read More -
Partition Master Free can Resize, Move, Merge, Migrate, and Copy disks or partitions; convert to local, change label, defragment, check and explore partition; and much more. A premium upgrade adds free tech support and the ability to resize dynamic volumes.
Read More -
It won't hot image your drives or align them, but since it's coupled with a partition manager, it allows you do perform many tasks at once, instead of just cloning drives. You can move partitions around, resize them, defragment, and more, along with the other tools you'd expect from a cloning tool.
Read More
Related Articles
-
Battlefield 6 Crashing on PC? 4 Proven Fixes to Stop It Instantly
![author icon]() Sherly/2026/01/29
Sherly/2026/01/29 -
ASUS Laptop Won't Turn On: 9 Easy Fixes with Guide🔥
![author icon]() Sherly/2026/01/29
Sherly/2026/01/29 -
How to Create and Use Windows 11 Repair USB
![author icon]() Cici/2026/01/29
Cici/2026/01/29 -
How to Delete Partitions on SSD in Windows 11/10 [Step-by-Step Guide]
![author icon]() Cici/2026/01/29
Cici/2026/01/29
Hot Topics
EaseUS Partition Master

Version 20.0 is here - full exFAT support, easier disk partitioning, and PC performance optimization.


