
Content
Page Table of Contents
About the Author
Hot Topics
Most of you are aware of using Disk Management in Windows for managing partitions. From creating new partitions to resizing or extending partitions, Disk Management has many purposes. However, what if you are facing the problem of grayed-out options in Disk Management?
Corruption in system files or improper formatting of disk drives can be among the primary reasons. Along with that, faulty drives and malware can also cause such a basic issue in Disk Management. If all drive options are greyed out in Disk Management, then it may indicate that some important system files get corrupted or damaged. While this issue sounds despicably huge, EaseUS Provides several solutions you can try to resolve.
Turn To Its Alternative When All Options Grayed Out in Disk Management
To evade such conditions, there is an alternative that can help you manage disk drives in your Windows computer - EaseUS Partition Master Free. Its Disk Management feature is your go-to option when all options are grayed out in Disk Management.
It is a free disk manager that helps operate all forms of partition management tasks and optimization operations within the disks across a Windows device. Withholding support from Windows Vista to Windows 11. Check the basic features using the table below:
| Manage Partitions | Manage Disk | Data Migration |
|---|---|---|
|
|
|
Along with these basic partition operations, you can quickly move, resize, extend, and shrink your required partitions within your Windows device. You should consider downloading this effective tool to extend or format your volume across your Windows device.
A Comprehensive Guide To Extending Volume With EaseUS Partition Master:
If you wish to extend your disks' volume across the Windows device, try these steps with EaseUS Partition Master.
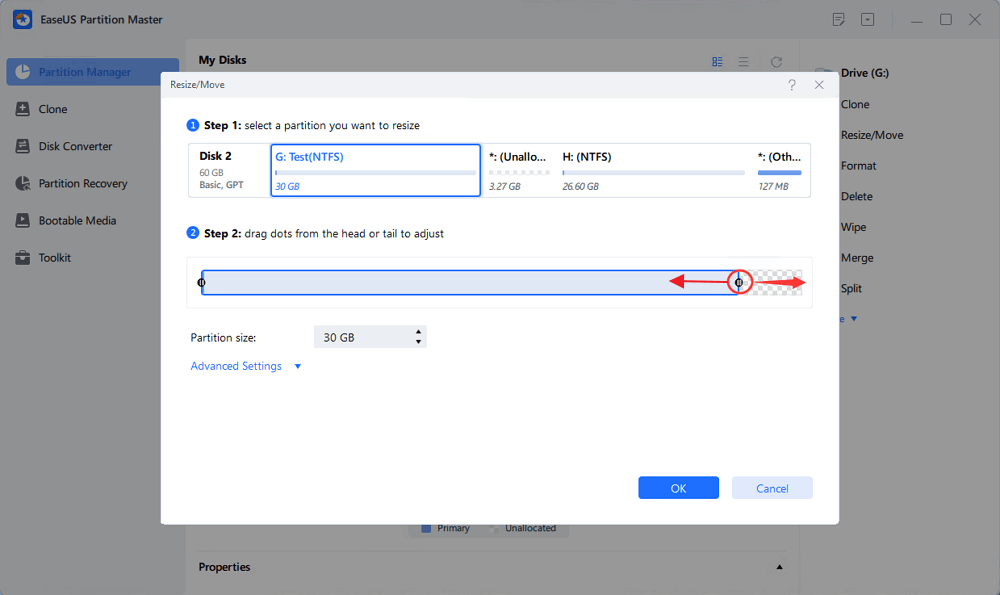
Step 1. Shrink a neighbor partition to extend partition.
If the hard drive has enough unallocated space to extend the target partition, jump to Step 2, and continue. If not, free up space first:
- Go to the Partition Manager section, right-click on a partition next to the target partition and select "Resize/Move".
- Drag the partition ends to free up space, leaving enough unallocated space behind the target partition, click "OK".
Step 2. Extend the target partition with unallocated space.
Right-click on the target partition you want to extend and select "Resize/Move".

Drag the target partition handle into the unallocated space to extend partition.
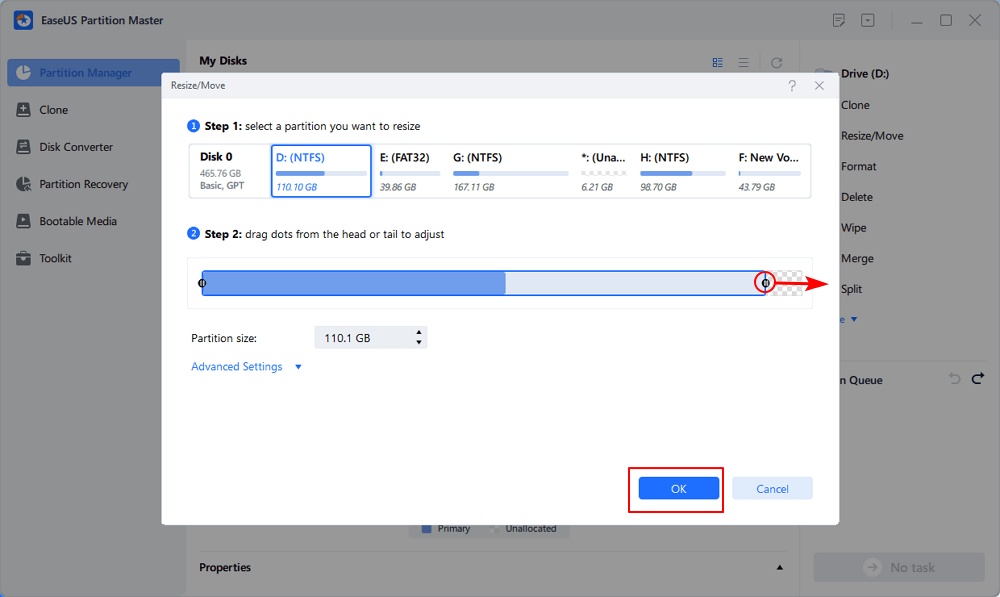
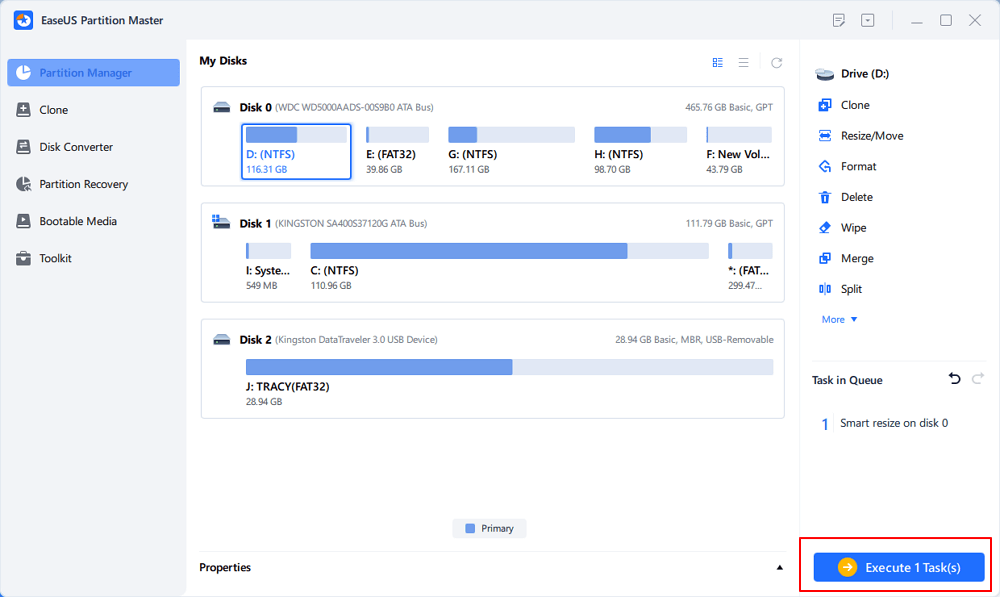
Step 3. Keep all changes.
Click the "Execute Task" button and click "Apply" to keep all changes.
If you want to do other operations on your Disk, check the following links to get more instructions.
See also:
Furthermore, EaseUS Partition Master supports formatting, splitting, and merging partitions, which shows that it is the perfect replacement for Disk Management.
How to Fix All Options Are Greyed Out in Disk Management
You can also try to fix the error by using the following manual fixes; they may be a little difficult for beginners. Suggest you turn to the free alternative first. Then, let's start.
Fix 1. Use DiskPart
When all options are grayed out in Disk Management, the first solution you can consider is using a multi-functional command-line utility under the name DiskPart. This can execute several partition functions and will help you manage your drives. Provided below is an overview of some renowned commands that can be performed across DiskPart commands:
Step 1. First, access the Windows search feature and type "Command Prompt" in the provided box. Afterward, execute the "diskpart" command and press the "Yes" button to confirm the process.
Step 2. Once the DiskPart is launched on your system, you can use some of the following commands to perform the required operations on your disk:
| Purpose | Command |
|---|---|
| Create Partition | create partition primary size=Value |
| Delete Volume | delete volume |
| Format Partition | format fs=ntfs quick |
| Assign Drive Letter | assign letter=X |
| Extend Partition | extend size=Value |
| Shrink Partition | shrink desired=Value |
If your friend or office colleague also faces this Disk Management problem, don't forget to share this guide with them.
Fix 2. Perform an SFC or DISM Scan
If all drive options are grayed out in Disk Management, then it may indicate that some important system files are corrupted or damaged. In this case, you'd better run an SFC or DISM scan to repair them. Here is how:
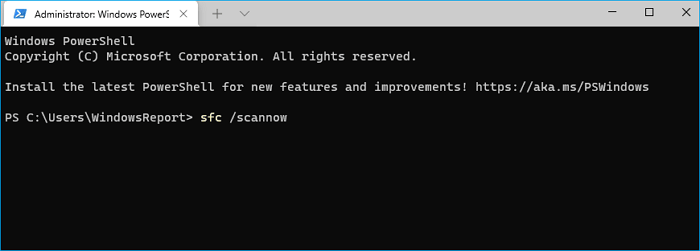
Step 1. Use the "Windows + R" shortcut keys to launch the Run dialog box on your screen, and type "cmd" in the command box. After that, press the "Control + Shift + Enter" keys to launch Command Prompt as admin by clicking the "Yes" button on confirmation.
Step 2. Next, you must execute the "sfc /scannow" command to locate and repair all the corrupted and damaged system files from your Windows PC.
Step 3. If the SFC tool fails to repair the corrupted system files to fix the Disk Management issues, you can run the following DISM commands for this purpose:
DISM.exe /Online /Cleanup-image /Scanhealth
DISM.exe /Online /Cleanup-image /Restorehealth
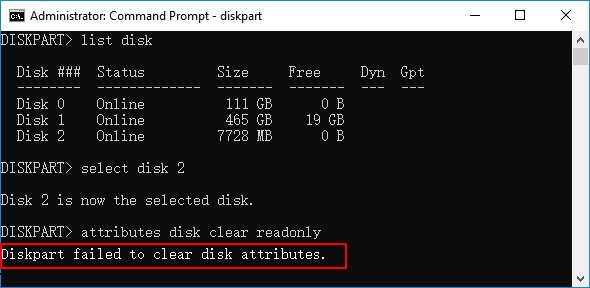
Fix 3. Remove Write Protection
When your drive is in write protection, writing or performing any other operations on it is impossible. In such a case, you need to remove this protection from your drive to ensure you can perform disk management functions. To know how it is done, follow the format defined next to remove write protection:
Instructions. To remove the write protection from your drive, access DiskPart like we have guided you in Fix 1. Afterward, perform the following commands in sequence to remove the write protection:
- list disk
- select disk n
- attributes disk clear readonly
Remember to share this comprehensive step-by-step guide with your friends and colleagues to help them eliminate this problem and manage their system drives.
Fix 4. Run CHKDSK
The CHKDSK utility is another quick remedy to resolve the concern of "all options are grayed out in Disk Management." To resolve all disk management issues in your Windows device, follow the simple set of instructions offered below:
Step 1. To utilize the CHKDSK Utility, open the Command Prompt as admin, which you can do by searching for it and choosing the "Run as administrator" option.
Step 2. Then, type and run the following command to resolve all the Disk Management problems:
chkdsk /f /r
Fix 5. Scan PC for Virus
As discussed, viruses can cause issues in your disk drives. In such a scenario, you need to scan your computer for viruses and have it resolved. To know how it is executed, look below for a better understanding:
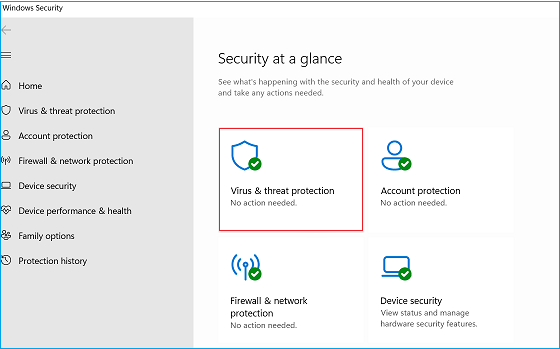
Step 1. Tap on the "Windows" icon from the screen's bottom left corner and choose the "Update & Security" option. Following this, you will have to proceed with the "Windows Security" settings from the left panel of the window.
Step 2. To execute the virus scan on your PC, choose the "Virus & Threat Protection" feature and press the "Quick Scan" button to fix all the Disk Management problems efficiently.
Fix 6. Reset and Repair Windows
If none of the remedies are turning out to be effective, you might have to reset and repair your Windows. This effectively replenishes all problems and glitches in your Windows and makes it completely new. To know how you can reset and fix your Windows issues, follow the simple guide as follows:
Step 1. Open the Windows Settings on your device and choose the Update & Security" settings among the other settings. Afterward, click on the "Recovery" option from the left side and press the "Get Started" button under the "Reset this PC" section.
Step 2. To just reset and repair Windows without data loss, proceed with the "Keep my files" option and decide whether you want to perform "Cloud Download" or "Local Reinstall" for Windows. Your Windows device will be reset and repaired depending on the selected option.
Why All Options Grayed Out in Disk Management
If you are still not aware of how the issue of "all options grayed out in Disk Management" is occurring, look again into the prominent reasons highlighting this scenario better:
- System Files are Damaged: If the system files are damaged for any particular reason, these issues can directly affect operations across Disk Management. You cannot make changes to the disk drives without resolving the problems with the system files.
- Temporary Glitches: There is a high chance that the issue of all options grayed out in Disk Management has occurred due to a temporary glitch. A simple system restart can resolve the issue with ease.
- Infected With Virus: If a virus has directly influenced your system file, it can cause disruptive changes in your Windows. This can include issues with Disk Management, which prevents you from making disk changes in your device.
- Damaged Drive: Malware can be a direct influence on the drive, which may cause it to malfunction. Due to such issues, you cannot make any changes across the drive in Disk Management.
Conclusion
As you have gone through all the details, you are now aware of why all options are grayed out in Disk Management. While you've learned what this issue represents, you have also gone through some interesting solutions that can solve the problem with Disk Management across your Windows device.
Along with these resolutions, you have also come across an innovative alternative: EaseUS Partition Master. With the aid of this tool, you can easily manage all critical operations of the disk drives that cannot be handled in Disk Management due to such issues.
Disk Management Inaccessible FAQs
If you are still facing concerns about managing the grayed-out options in Disk Management, read the following frequently asked questions to learn more about this basic problem:
1. Why are all drive options grayed out in Disk Management?
If all drive options are greyed out in Disk Management, it may indicate some important system files get corrupted or damaged. In this case, you'd better run an SFC or DISM scan to repair them.
2. Why is the format option grayed out?
When the "Format" option is not working on Disk Management in your Windows device, your device might have been struck with some virus. In other cases, you might face problems of malware infection, which may damage the drive and its assorted operations.
3. Why is the "Initialize" disk grayed out?
In situations where the "Initialize" disk option is grayed out in your Window's Disk Management feature, the issue can directly lead to corruption in the system files or drives. Since your device is compromised, you cannot do such actions on your disk drives.
How Can We Help You
About the Author
Sherly joined EaseUS in 2022 and she has always loved writing articles and enjoys the fun they bring. She receives professional training here, focusing on product performance and other relative knowledge. She has written over 200 articles to help people overcome computing issues.
Product Reviews
-
I love that the changes you make with EaseUS Partition Master Free aren't immediately applied to the disks. It makes it way easier to play out what will happen after you've made all the changes. I also think the overall look and feel of EaseUS Partition Master Free makes whatever you're doing with your computer's partitions easy.
Read More -
Partition Master Free can Resize, Move, Merge, Migrate, and Copy disks or partitions; convert to local, change label, defragment, check and explore partition; and much more. A premium upgrade adds free tech support and the ability to resize dynamic volumes.
Read More -
It won't hot image your drives or align them, but since it's coupled with a partition manager, it allows you do perform many tasks at once, instead of just cloning drives. You can move partitions around, resize them, defragment, and more, along with the other tools you'd expect from a cloning tool.
Read More
Related Articles
-
Acer Laptop Won't Turn On Blue Light On: How to Fix?
![author icon]() Cici/2026/06/17
Cici/2026/06/17 -
How to Format 2TB Hard Drive to FAT32? Here Is A Quick Guide - EaseUS
![author icon]() Tracy King/2026/06/18
Tracy King/2026/06/18 -
6 Best Hard Drive Disk Format Tool | Disk Format Tools
![author icon]() Tracy King/2026/07/01
Tracy King/2026/07/01 -
0xc000000e After Cloning to SSD (Fixed)
![author icon]() Oliver/2026/06/30
Oliver/2026/06/30


