
Content
Page Table of Contents
About the Author
Hot Topics
External hard drive showing less space than it should? Do not worry. It's very common to be faced with similar disk problems, such as SD card reporting the wrong size, and USB drives getting the incorrect size. If you are one of the victims of the hard drive showing the wrong capacity, you can deal with them with these effective solutions. Just read on; the content below will clear all your doubts.
| Workable Solutions | Step-by-step Troubleshooting |
|---|---|
| 1. Back up all data. 2. Format drive via EaseUS Partition Master or CMD (diskpart, clean, create partition primary, format fs=ntfs/exfat). 3. Assign drive letter. | |
| 1. Convert MBR to GPT using Disk Management (needs partition deletion) or EaseUS tool (keeps data). 2. Extend partition if needed. | |
| 1. Open Disk Management >"Initialize Disk". 2. Choose partition style (MBR/GPT). 3. Recreate partitions. | |
|
1. Open Device Manager. 2. Locate drive and select "Update driver". 3. Search automatically or manually install. |
|
| 1. Open CMD as admin. 2. Run chkdsk X: /f /r. 3. Wait for CHKDSK to finish. |
What is demonstrated below is a real story of a user telling his 0.18TB hard drive, showing only 90GB of free space.
A newly bought 500 GB HDD might display only 465 GB even with no data on it. Some external hard disks and USB flash drives may show another incorrect capacity issue, which is that the free space size hugely decreases. Is your hard drive corrupted when it shows the wrong capacity? Not really. There are quite a few reasons that lead to a hard drive showing less space than it should.
Why Does My Hard Drive Show Less Space Available
Why does my hard drive report less capacity than indicated? Excluding that you have bought a fake hard drive from an unscrupulous merchant, there are several reasons Windows could display the wrong amount of available space(such as a 4TB hard drive shows 2TB), like hidden files, formatting overhead, virus attacks, recovery partition occupancy, a hard drive issue, etc. In addition to what just mentioned, we list other common causes to help you understand why your (external) hard drive is showing the wrong capacity or free space.
- The hard drive driver is out of date. In this case, the hard drive might show the wrong capacity in the Windows computer.
- Format the hard drive using an inappropriate tool, or the formatting process is incomplete.
- The hard drive has been initialized to the wrong partition table. If it is larger than 2TB but initialized to be MBR, the space over 2TB will be shown as "Unallocated" in Disk Management, and you can't see it in File Explorer. That's because the MBR partition table cannot address the space that exceeds 2TB.
- Master Boot Record or EFI information area (GPT header) corrupts due to accidental insertion and removal.
- Errors caused by bad sectors.
As you can tell, not all the events require fixes. Many hard drives have an OEM partition or recovery partition for factory restore purposes, and it's usually invisible in My Computer. So, when you find a new hard drive showing less disk space than it advertised, go to "My Computer" (in Windows 7 and 8) or "This PC" (in Windows 8.1 and 10) > "Manage" > "Disk Management" and check the real space taken by the recovery partition. There's also been mention of Disk Management utility issues in this Reddit thread.
I bought me a new hard drive with 1 TB capacity. But as soon as I plug the hd into my pc and look at the properties, only 90 GB are free. - From Reddit.
For other simple causes, you can troubleshoot quickly. For instance, show hidden files and perform an anti-virus scan to check whether the hard drive shows full capacity or not. If the problem is not solved, continue applying the corresponding solutions below.
External Hard Drive Showing Wrong Capacity - 5 Fixes (Updated)
Check this part and learn how to fix the external hard drive not showing full capacity error. Before getting started, read the pros, cons, and precautions.
Solution 1. Reformat the External or Internal Hard Drive
| Pros | Cons | Precautions |
|---|---|---|
|
|
|
The following two methods teach you how to format the hard drive with the command prompt and a partition management tool. The former requires particular computer technology. So if you are not familiar with CMD, to ensure safety, you'd better use the easy-to-use formatting tool in Method 1.
- Warning
- Disk Formatting will erase hard drive data, so make sure that you have backed up all critical data before the operations.
Method 1. Format Hard Drive with an Easy Formatting Tool
If you are not familiar with Command Prompt, you can turn to a professional and easy-to-use hard drive formatting tool. My recommendation is EaseUS Partition Master. Download it and format your HDD, SSD, SD card, or USB drive easily.
Step 1. Right-click the hard drive partition and choose the "Format" option.
Step 2. In the new window, you can set a new name for your selected hard drive partition. Then click the "OK" button.
Step 3. Click the "Execute 1 Task(s)" button, then click "Apply" to start formatting the hard drive partition.
Method 2. Format Hard Drive via Command Prompt
Compared to EaseUS Partition Master, CMD is a bit more complex for beginners to format a hard drive. It also helps solve the 'hard drive shows wrong capacity' issue. Thus, you need to be very careful with the steps listed here:
Step 1. Click "Start", type cmd in the search box. Right-click on the Command Prompt and choose "Run as administrator".
Step 2. Type diskpart and press "Enter". Then, input and execute the following commands in order.
Step 3. Type list disk and press "Enter". All the disk drives will be listed, including your external drives that are connected to the computer.
Step 4. Check the number of the hard drive showing the wrong capacity in Windows. Type select disk + disk number, and press Enter. For example, select disk 1. You're telling diskpart to format disk 1.
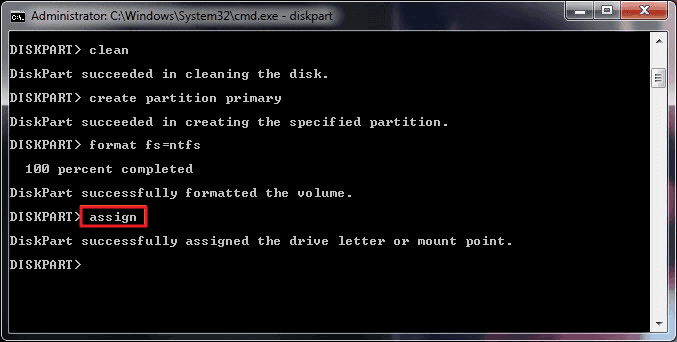
Step 5. Go on to type clean. This step starts to clean up all files and folders on the selected hard disk.
Step 6. Type create partition primary and press "Enter". This way, there is a newly created partition on the disk.
Step 7. Type format fs=ntfs (or format fs=exfat) and press "Enter". You're telling diskpart to format the drive with a file system, let it be NTFS, exFAT, etc.
Step 8. Type assign to set a drive letter to the newly created partition.
That's a complete guide to partition primary and formatting hard disk via diskpart format commands. Is this method complicated for you? If so, turn to EaseUS Partition Master with one click.
Solution 2. Convert Hard Drive from MBR to GPT
| Pros | Cons | Precautions |
|---|---|---|
|
|
|
If the (external) hard drive shows less space than it should because of the MBR style, you can fix this problem by converting MBR to GPT and then extending the partition by adding the unallocated space.
The following video shows you to convert MBR to GPT with Windows Disk Management and EaseUS Partition Master. Disk Management demands that you delete all existing partitions first. If you persist in this way, remember to back up your hard drive at the beginning. Or you can download the partition manager to convert disk between GPT and MBR directly and keep partitions as well as data intact.
After you have succeeded in converting MBR to GPT, continue to expand your disk as follows.
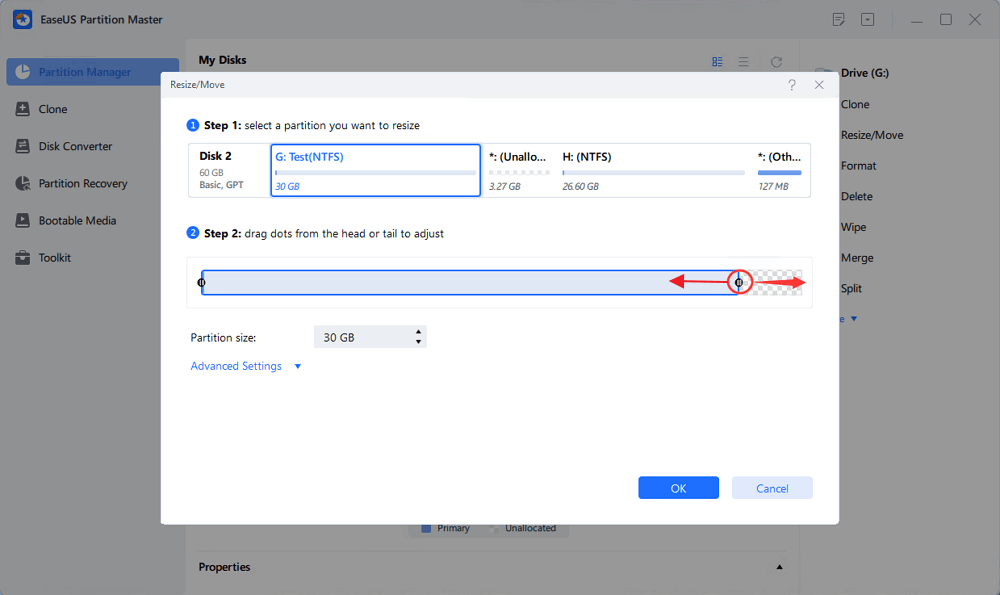
Step 1. Shrink a neighbor partition to extend partition.
If the hard drive has enough unallocated space to extend the target partition, jump to Step 2, and continue. If not, free up space first:
- Go to the Partition Manager section, right-click on a partition next to the target partition and select "Resize/Move".
- Drag the partition ends to free up space, leaving enough unallocated space behind the target partition, click "OK".
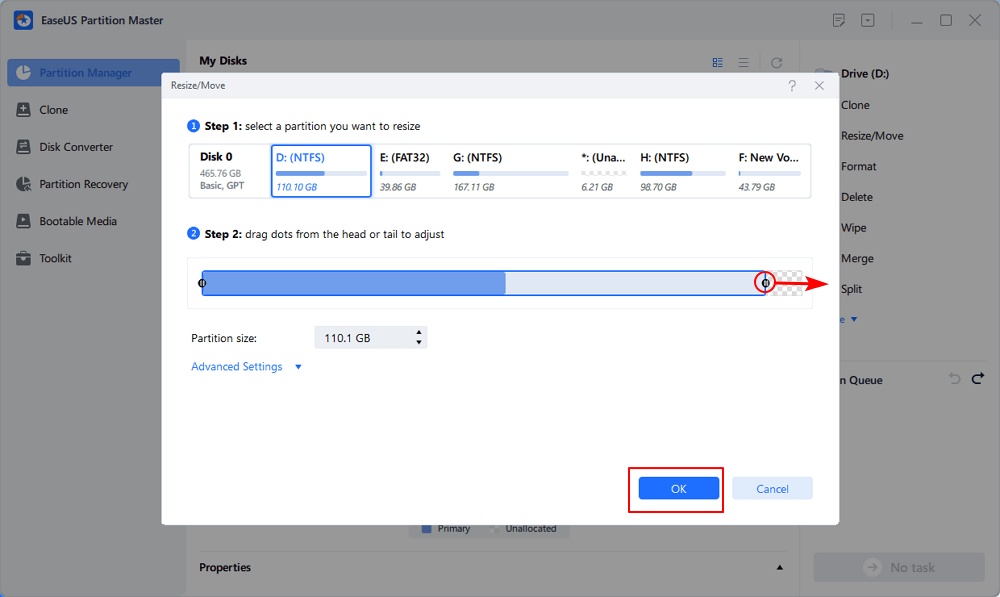
Step 2. Extend the target partition with unallocated space.
Right-click on the target partition you want to extend and select "Resize/Move".

Drag the target partition handle into the unallocated space to extend partition.
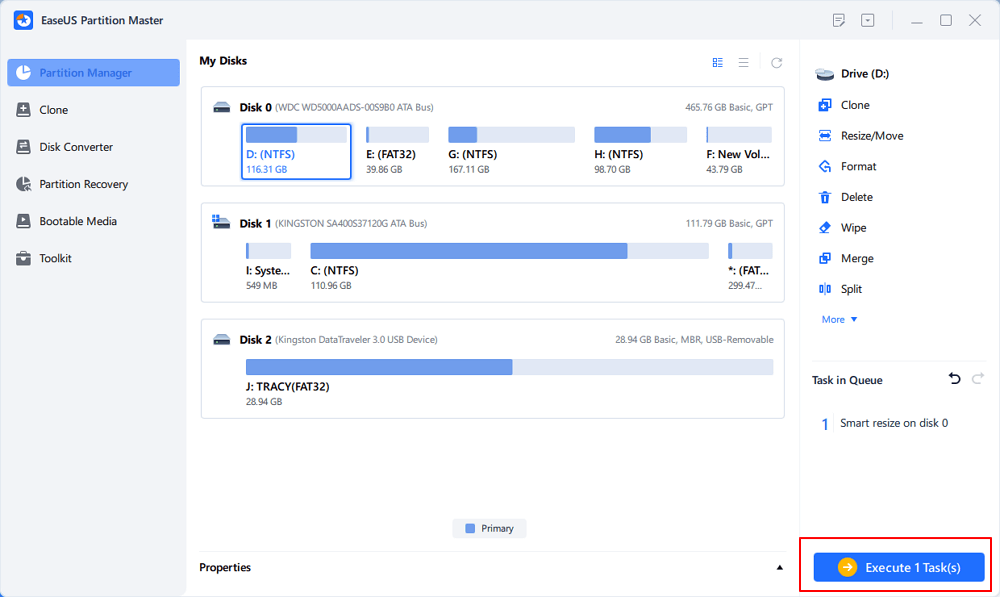
Step 3. Keep all changes.
Click the "Execute Task" button and click "Apply" to keep all changes.
Solution 3. Back-Up Data and Initialize the Hard Drive
| Pros | Cons | Precautions |
|---|---|---|
|
|
|
GPT header or MBR partition table errors cause most disk size errors. Then, the hard drive may show the wrong capacity. Under these circumstances, initialization can resolve drive showing wrong capacity issue.
- Important
-
- Disk initialization will wipe all the data. Export essential files first.
- If your hard drive is a new one, you can initialize it directly in two ways given below. If it's in use, you need to delete all the partitions before initializing it.
Method 1. Using Disk Management
Step 1. In Windows 10/8, press the "Windows + R" key, type diskmgmt.msc, and click OK to launch Disk Management. In Windows 7, right-click Computer and then select the Manage option to run Disk Management.
Step 2. Find and right-click the hard drive or SSD you want to initialize, and then click "Initialize Disk". If the disk is listed as Offline, first right-click it and select Online.
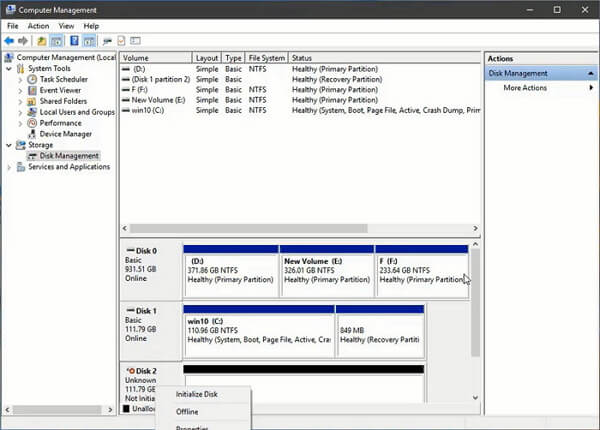
Step 3. In the Initialize Disk dialog box, select the correct disk to initialize. Then click OK to accept the default partition style, or you can change the partition style (GPT or MBR) as you want.
Method 2. Using EaseUS Partition Manager
Step 1. Open EaseUS Partition Master and got to Partition Manager.
Step 2. Right-click the target disk - HDD or SSD and select "Initialize to MBR" or "Initialize to GPT". Click "Execute Task" and "Apply" to save the changes.
0:00-0:18 Initialize to MBR; 0:19-0:44 Initialize to GPT;
Solution 4. Update Hard Drive Driver
| Pros | Cons | Precautions |
|---|---|---|
|
|
|
If your external hard drive still shows the wrong capacity, the problem might lie in an outdated or corrupted driver. Updating the hard drive driver is a simple yet effective way.
Step 1. Click "Start", type Device Manager, and press "Enter."
Step 2. Click and expand "Disk drives". Right-click on the hard drive showing the wrong capacity and select "Update driver."
Step 3. Select "Search automatically for updated driver software." If this fails, you can manually search for and install the updated driver software on the official website.

If the hard drive driver is the latest one, but things still go wrong, you can try to uninstall and reinstall the driver. If the process of updating hard drive driver is too complex for you, you may turn to reliable driver updater software like EaseUS DriverHandy for help.
Solution 5. Check for Physical Bad Sectors or Replace the Disk
| Pros | Cons | Precautions |
|---|---|---|
|
|
|
Too many bad sectors can make the disk unable to read and write correctly and show the wrong capacity in Windows. Thus, you should check and repair partition errors to rectify the problem. If the situation is terrible, and your hard disk has too many physical bad sectors, you have to consider replacing the new file after backing up the data.
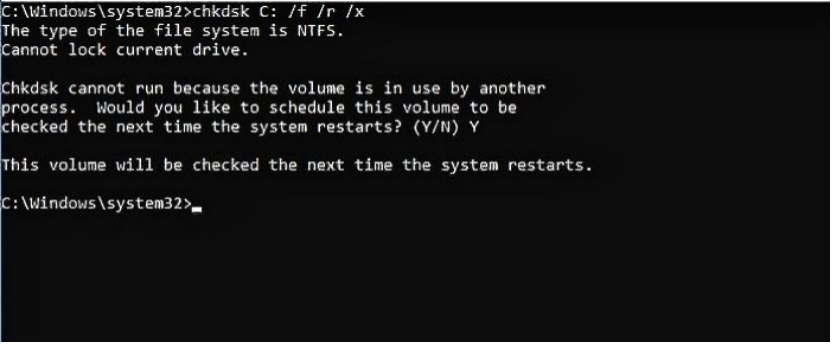
Here is how to check for bad sectors with CHKDSK.
Step 1. Open Command Prompt as Administrator.
Step 2. Type the command "chkdsk C: /f /r" and press the Enter key. (Replace the drive letter "C" with your actual hard drive letter.)
Step 3. Wait for CHKDSK to finish all stages. When it finishes, restart your system.
Final words
These methods are available for you to address internal or external hard drives showing a wrong capacity issue in Windows 10/8/7. EaseUS Partition Manager is very helpful when formatting, initializing, converting, and resizing hard drives. Besides, it's also good at merging/creating/deleting partitions, recovering lost partitions, migrating OS to SSD, and so on. Try it anyway.
📖Click the following buttons to share this post and let more users learn what to do if the external hard drive shows less capacity than it should.

External Hard Drive Showing Wrong Capacity FAQs
With these useful tips, you can solve your wrong capacity problem easily and quickly. If you have other related questions about hard drives only showing half capacity in Windows or other wrong capacities, you can read the following questions and answers.
1. Why do hard drives show the wrong capacity in Windows?
There are several reasons Windows could display the wrong amount of available space. They are:
- Invisible shadow files
- Formatting overhead
- Hidden recovery partitions
- Misleading storage capacities advertised by hard drive manufacturers and more.
2. How do I restore my hard drive to full capacity?
There are five effective ways to restore the hard drive to full capacity:
- Update Hard Drive Driver
- Reformat the Hard Drive
- Convert MBR to GPT
- Initialize the Hard Drive
- Check Physical Errors
3. How do I fix USB's incorrect size?
The best way to restore a USB drive to its full capacity is to format it. There is more than one way to do this job: you can format a USB flash drive using File Explorer, Command Prompt, Disk Management, or a third-party partition manager - EaseUS Partition Master.
4. How do I check the capacity of my external hard drive?
To check the capacity of the external hard drive:
Step 1. Open File Explorer. Right-click on your external hard drive.
Step 2. Select Properties.
Step 3. You can see the capacity of your flash drive, including the capacity, used space, and free space.
How Can We Help You
About the Author
Updated by Joey Albert
Joey is an enthusiast of science and technology. With a passion for uncovering the latest tech innovations, she creates clear, engaging how-to guides that make technology accessible and enjoyable for all.
Jean is recognized as one of the most professional writers in EaseUS. She has kept improving her writing skills over the past 10 years and helped millions of her readers solve their tech problems on PC, Mac, and iOS devices.
Product Reviews
-
I love that the changes you make with EaseUS Partition Master Free aren't immediately applied to the disks. It makes it way easier to play out what will happen after you've made all the changes. I also think the overall look and feel of EaseUS Partition Master Free makes whatever you're doing with your computer's partitions easy.
Read More -
Partition Master Free can Resize, Move, Merge, Migrate, and Copy disks or partitions; convert to local, change label, defragment, check and explore partition; and much more. A premium upgrade adds free tech support and the ability to resize dynamic volumes.
Read More -
It won't hot image your drives or align them, but since it's coupled with a partition manager, it allows you do perform many tasks at once, instead of just cloning drives. You can move partitions around, resize them, defragment, and more, along with the other tools you'd expect from a cloning tool.
Read More
Related Articles
-
Free Download Kingston DT 101 G2 Repair/Format Tool
![author icon]() Tracy King/2026/06/17
Tracy King/2026/06/17 -
The Pros and Cons of Partitioning Hard Drive | Why Partition A Hard Drive
![author icon]() Tracy King/2026/06/29
Tracy King/2026/06/29 -
7 Best FAT32 to NTFS Converters Recommend for Windows 2026
![author icon]() Tracy King/2026/06/17
Tracy King/2026/06/17 -
5 Methods to Improve and Speed up Dell Laptop/PC on Windows 10/8/7
![author icon]() Tracy King/2026/06/17
Tracy King/2026/06/17


