Page Table of Contents
About the Author
Hot Topics
Updated on Jan 29, 2026
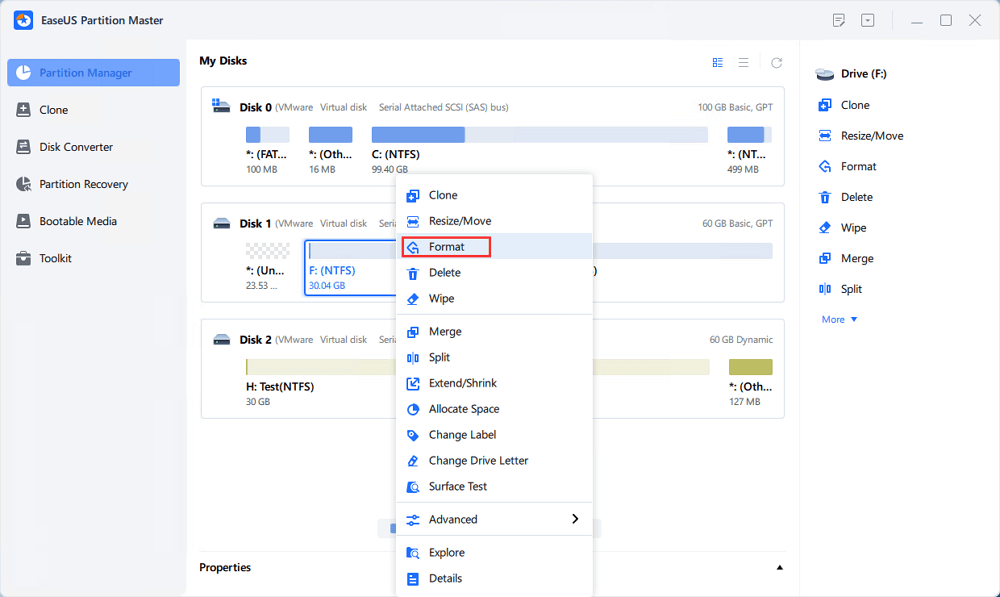
To format SanDisk iXpand flash drive, follow these steps:
Step 1. Connect the USB drive or pen drive to your computer.
Step 2. Launch EaseUS Partition Master and select the USB drive to format.
Step 3. Set the drive letter and file system, click "OK"
Step 4. Apply the changes...Read More>>
Reliable EaseUS USB formatter - Parition Master allows you to fix SanDisk iXpand flash drive when issues like unsupported format error, RAW drive error, expand flash drive not recognized or detected error happens and prevents you from accessing or using the device. Follow and learn how to format iXpand flash drive on your own.
How Do I Format My iXpand Flash Drive to FAT32?
Here is a real case on how to format iXpand flash drive:
"Hi, I am using a Mac and when I try to move a 7GB file onto the drive to put it on the iPhone it gives the unsupported message. Will reformatting solve this issue? Will I be able to transfer bigger files into it? Thanks."

SanDisk iXpand flash drive is a device that can be used to backup files or transfer data between iPhone/iPad and Windows & Mac computer. But sometimes, when you connect the iXpand flash drive to one of those devices, it reports some errors because the file system is corrupted, become RAW, or just incompatible with the device.
When you run into such a situation, you won't have access to open or use the device. And to fix the error and make the SanDisk iXpand flash drive work normally, you need to format SanDisk iXpand flash drive to fix the file system.
Here are four ways to convert the file system to FAT32/NTFS/exFAT:
- 1. Format iXpand Flash Drive with EaseUS USB Format Tool
- 2. Format iXpand Flash Drive Using Disk Management
- 3. Format iXpand USB Flash Drive via File Explorer
- 4. Use Command Prompt to Format iXpand Flash Drive
Fix 1. Format iXpand Flash Drive with Professional USB Format Tool
The cause of SanDisk iXpand unsupported format error is that the file system on the SanDisk iXpand drives is not formatted to FAT32, NTFS, exFAT, or RAW format. Thus, your Mac or iPhone cannot recognize it. Here, you can turn to EaseUS Partition Master - a powerful partition magic tool with formatting & disk management features for help.
Its intuitive interface guides you through formatting your SanDisk iXpand flash drive to FAT32 to make it compatible with iPhone, iPad, Windows, and Mac computers in simple steps without using any technical skills.
To format SanDisk iXpand flash drive, follow these steps:
Step 1. Select the USB drive to format.
Connect the USB drive or pen drive to your computer. Launch EaseUS partition software, right-click the USB drive you intend to format and choose "Format".
Step 2. Set the drive letter and file system on USB.
Assign a new partition label if you want to change the drive letter of your USB, set the desired file system -NTFS/FAT32/EXT2/EXT3/EXT4/exFAT to your USB, then click "OK".
Step 3. Check "Yes" to confirm formatting USB.
Click "Yes" if you see the Warning window. If you have important data on it, back up the data in advance.
Step 4. Apply the changes.
Click the "Execute 1 Task(s)" button first, and then click "Apply" to format the USB drive.
What Else Can EaseUS Partition Master Do for You:
- Transfer free disk space from one drive to another directly.
- Resize/move, merge, clone partitions, and check file system error.
- Clone disk, convert to MBR/GPT, convert to dynamic/basic, and even wipe data.
- Migrate OS to SSD to speed up Windows without reinstalling.
Fix 2. Format iXpand Flash Drive Using Disk Management
Requirements: USB flash drive must less than 32GB in order to format to FAT32.
As you know, there is a limitation of Disk Management, which does not support formatting a hard drive or flash drive more than 32GB to FAT32.
Steps to format iXpand to FAT32:
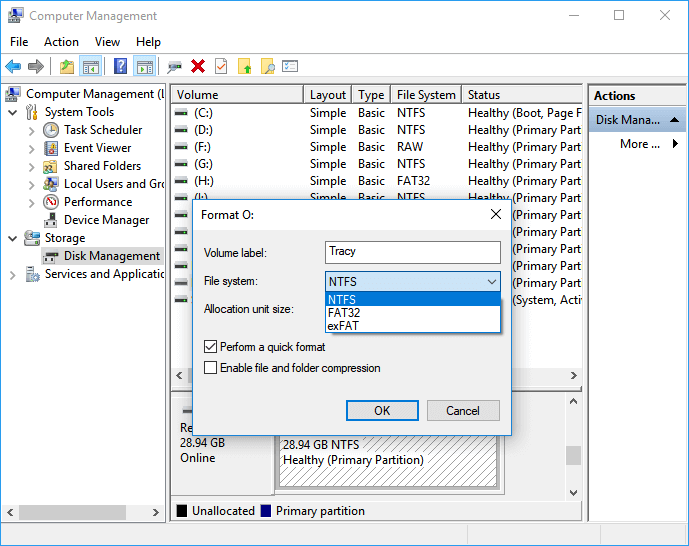
Step 1. In Windows 10, go to "This PC > Manage > Disk Management".
Step 2. Locate and right-click on your SanDisk USB flash drive, select "Format".
Step 3. Set the USB file system to FAT32, tick "Perform a quick format" and click "OK" to confirm.
Fix 3. Format iXpand USB Flash Drive via File Explorer
Requirements: USB flash drive must less than 32GB. Just like Windows Disk Management, you cannot format a USB drive to FAT32 if it is over 32GB.
To format iXpand USB flash drive under 32GB to FAT32 File System:
Step 1. Connect iXpand USB flash drive to a Windows 10 PC.
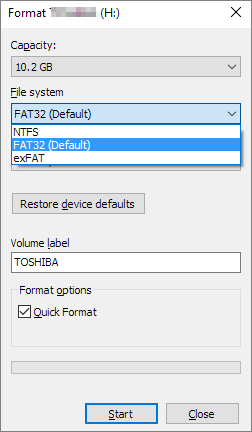
Step 2. Open File Explorer, locate and right-click on the iXpand USB drive, select "Format".
Step 3. Set the FAT32 as the target file system, tick "Quick Format" and click "Start" to start the formatting.
Fix 4. Format iXpand Flash Drive Using Command Prompt
Requirements: None
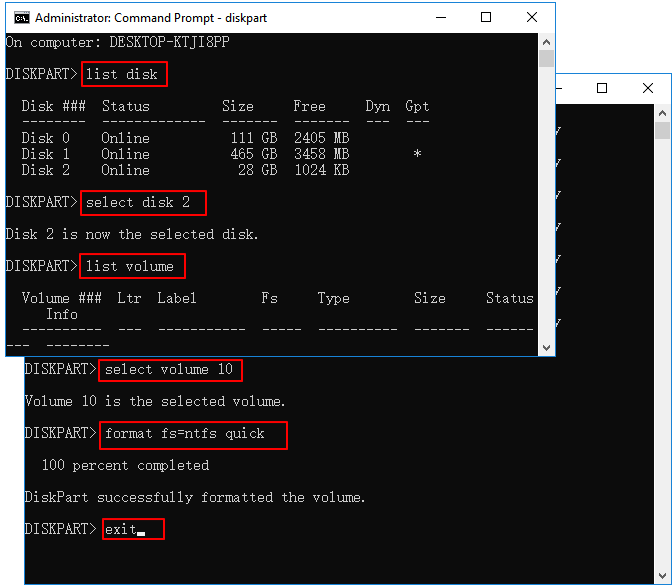
If you are very familiar with Command Prompt, this method is recommended. Follow the steps below to convert an iXpand USB flash drive to FAT32 by CMD.
Step 1. Right-click on the Windows icon, select "Search" and type cmd.
Step 2. Right-click it to run Command Prompt as an administrator, type diskpart, and hit Enter.
Step 3. Type below command lines and hit "Enter" each time:
list disk
select disk 2 (Replace 2 with your USB disk number)
list volume
select volume 10 (Replace 10 with the volume number of the USB drive that you want to format)
format fs=fat32 quick
Read Also:
After fixing the iXpand flash drive formatting issue, you may use this drive to transfer data between your phone and computer flexibly. For a step-by-step guide, you can turn to this page for more details: How to Transfer Photos from iPhone to SanDisk iXpand Flash Drive.
Extra Tip 1 - Common Errors Require You to Format SanDisk iXpand Flash Drive
Usually, you need to format SanDisk iXpand if you receive these error:
- iXpand flash drive uses an unsupported format
- iXpand flash drive needs to be formatted
- iXpand flash drive has a RAW file system
- iXpand flash drive is blank and says unrecognized format
- iPhone, iPad, etc cannot recognize or detect iXpand flash drive
Extra Tip 2 - How to Back Up SanDisk iXpand Flash Drive
Formatting iXpand flash drive will erase everything on the device, so make sure that you have backed-up all your important files. You can manually copy files to another drive, or use backup and recovery software. EaseUS Todo Backup makes it pretty easy to back up files to the wanted drive. Here are the steps:
Step 1. Start with selecting the backup contents.

Step 2. There are four backup categories, File, Disk, OS, and Mail, click Disk.

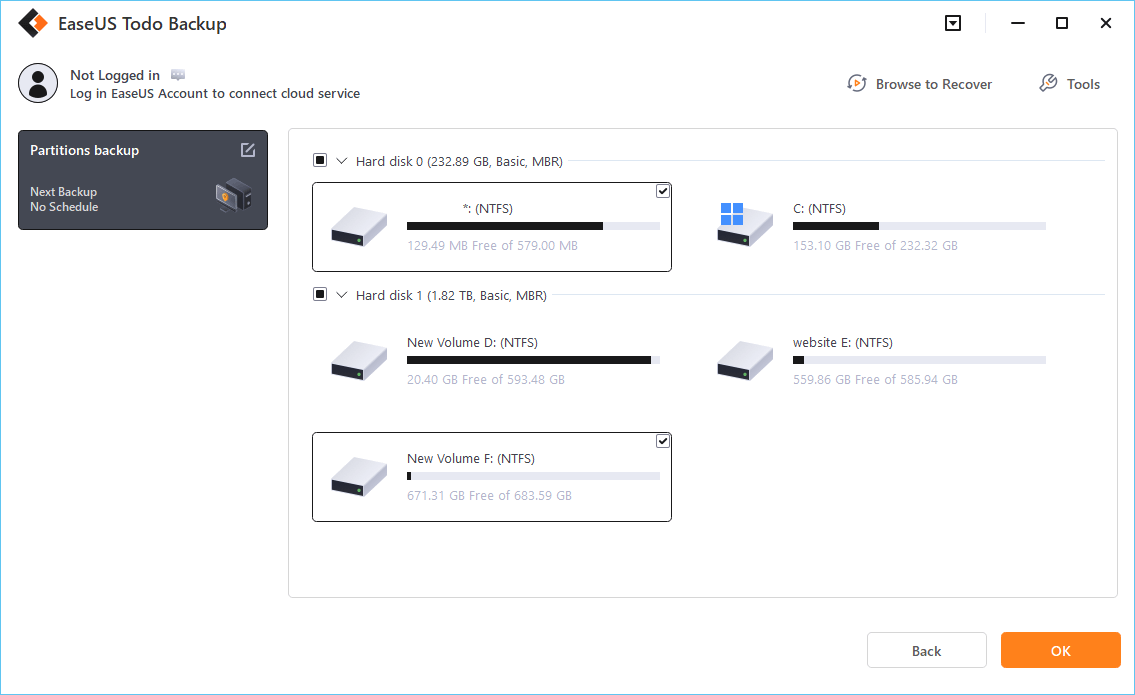
Step 3. It is available to back up a whole disk or a certain partition. Choose the one you need and click OK.
Step 4. Select the destination where you want to save the backup.
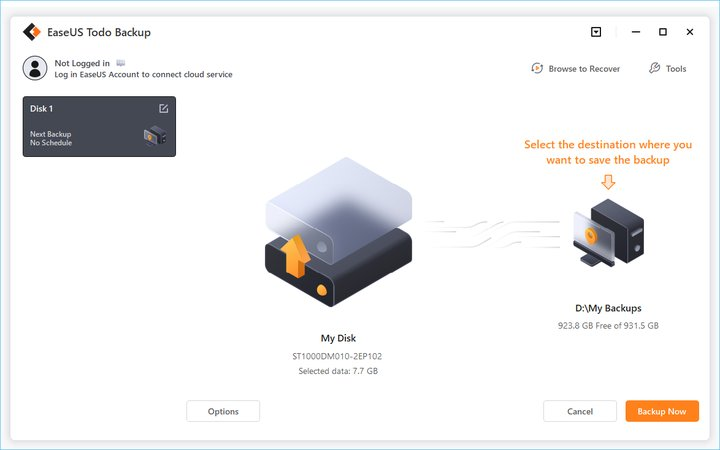
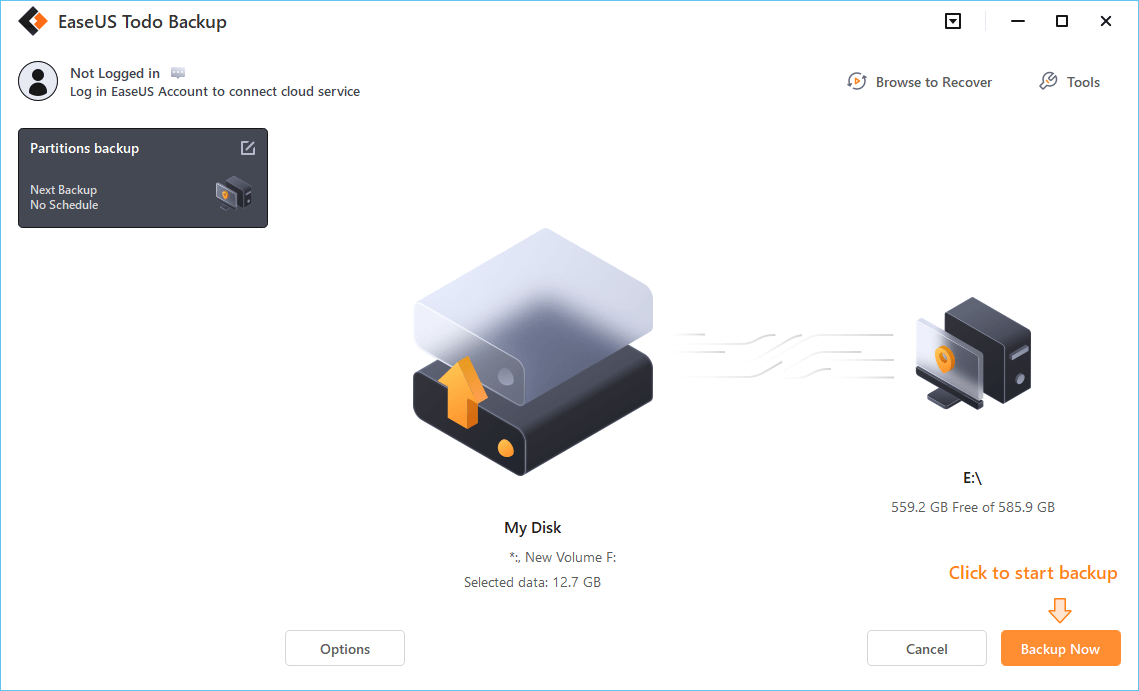
Step 5. For disk/partition backup, you can choose to save the backup to local drive or to NAS.

Step 6. After the backup process is completed, your task will be displayed at the left. Right-click any one of the task, you can further manage your backup such as recover it, create incremental backup, etc.
Conclusion
After iXpand format, you can fix the SanDisk iXpand unsupported format error. If you lost data after formatting, you can recover USB flash drive data with EaseUS free data recovery software. If you have a backup, you can restore your files from the backup easily.
SanDisk iXpand Flash Drive Troubleshooting (FAQs)
If you have additional questions about iXpand flash drive, you can read the following questions and answers.
1. How do I format my iXpand drive?
There are at least four ways to format an iXpand flash drive:
- Using a USB format tool
- Try Disk Management
- Run CMD command
- Use File Explorer
2. What is the difference between iXpand and Ixpand mini?
With the iXpand Mini, the company has changed the design of the device compared to its predecessor.
While the earlier iXpand has a hook-like construction at the end that houses the lightning connector, the iXpand Mini has a simple rectangular body.
3. Is SanDisk iXpand compatible with iPhone?
Yes. When used with the iXpand Flash Drive, the iXpand Drive app makes it easy to back up, transfer and manage photos, videos, and files between your iPhone, iPad, and computers.
How Can We Help You
About the Author
Sherly joined EaseUS in 2022 and she has always loved writing articles and enjoys the fun they bring. She receives professional training here, focusing on product performance and other relative knowledge. She has written over 200 articles to help people overcome computing issues.
Written by Tracy King
Tracy became a member of the EaseUS content team in 2013. Being a technical writer for over 10 years, she is enthusiastic about sharing tips to assist readers in resolving complex issues in disk management, file transfer, PC & Mac performance optimization, etc., like an expert.
Product Reviews
-
I love that the changes you make with EaseUS Partition Master Free aren't immediately applied to the disks. It makes it way easier to play out what will happen after you've made all the changes. I also think the overall look and feel of EaseUS Partition Master Free makes whatever you're doing with your computer's partitions easy.
Read More -
Partition Master Free can Resize, Move, Merge, Migrate, and Copy disks or partitions; convert to local, change label, defragment, check and explore partition; and much more. A premium upgrade adds free tech support and the ability to resize dynamic volumes.
Read More -
It won't hot image your drives or align them, but since it's coupled with a partition manager, it allows you do perform many tasks at once, instead of just cloning drives. You can move partitions around, resize them, defragment, and more, along with the other tools you'd expect from a cloning tool.
Read More
Related Articles
-
How to Clone OS from HDD to SSD Windows 11/10 Easily
![author icon]() Tracy King/2026/01/29
Tracy King/2026/01/29 -
Password Reset Disk Windows 7: How to Create and Use
![author icon]() Sherly/2026/01/29
Sherly/2026/01/29 -
What to Do with Corrupted Operating System
![author icon]() Tracy King/2026/01/29
Tracy King/2026/01/29 -
[Solved] Preparing to Delete Takes Forever Windows 11/10, Windows 11/10/8/7 is Slow to Delete Files
![author icon]() Brithny/2026/01/29
Brithny/2026/01/29
Hot Topics
EaseUS Partition Master

Version 20.0 is here - full exFAT support, easier disk partitioning, and PC performance optimization.


