
Content
Page Table of Contents
About the Author
Hot Topics
In recent years USB has mostly replaced optical media. It serves a variety of functions, including data transfer, operating system installation, and a boot USB that can be used on any PC. For the most part, a USB is utilized for installation. The task of installing a Windows server from a USB disk is easy.
People nowadays prefer to burn the server 2019 ISO on a USB device to create a bootable drive. The reason for this is you may need to upgrade system server 2019 to a different PC or have a new server at times. You can save server 2019 to a USB to use for installation purposes.
Second, if you have a portable server on a USB, you can transfer it to another computer without restarting over with the installation process.
We will look at how to make a bootable USB in this article. We will also look at a third-party tool that makes the task go faster and easier. Before we get into the details, we recommend you download the Windows Server.iso file from Microsoft official website. Go to the Microsoft website.
Once you click on the link, select ISO and fill in the requirement to download. You can download the trial version with some additional features of App Compatibility FOD. This feature improves the compatibility of the server as well as the troubleshooting and debugging.
Now let's take a look at the details.
| Workable Solutions | Step-by-step Troubleshooting |
|---|---|
| Fix 1. Create Windows Server 2019 Bootable USB from ISO | Insert the USB drive and run Command Prompt...Full steps |
| Fix 2. Create a USB Bootable for Windows Server Installation by Third-Party Tool (Easier) | Connect USB to PC and start to create bootable...Full steps |
How to Create Windows Server 2019 Bootable USB from ISO
You must complete the prerequisites before beginning the procedure. You must have the following factors ready ahead of time:
- You must be using a USB with an 8GB capacity. While burning, Windows Server 2019 consumes 4GB. Because the ISO image is divided into more than 3GB chunks, it requires extra space.
- The data is completely erased during the disk creation process. Always make a complete backup of your data. You will lose your important info if you don't create a backup.
By the way, you can click the buttons below to share this article on your social media to help more people.
We have already created the prerequisites for making a bootable USB for Windows Server 2019. If you obtained the ISO file from the company's official website, you can use the command line to boot a USB disk. Follow the steps outlined below in detail:
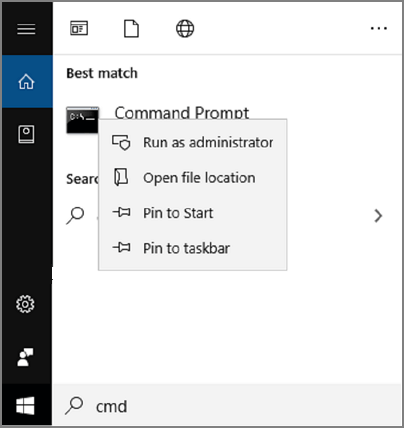
Step 1. Insert the USB drive on your PC. Go to Start and type cmd in the search box. Click on Run as administrator to open a command prompt.
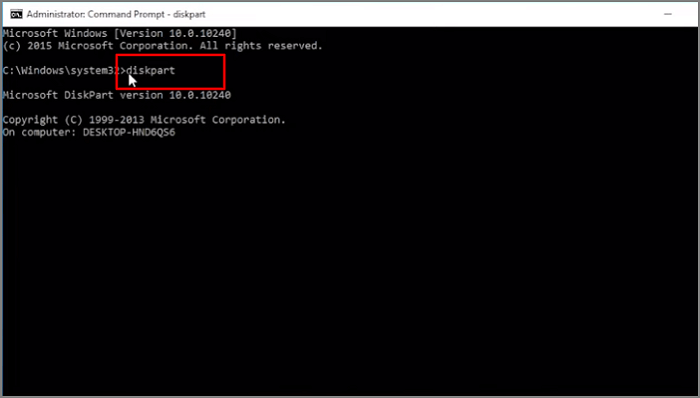
Step 2. Type command diskpart and press enter. The diskpart tool will appear.
Step 3. Type the following command one by one and press enter:
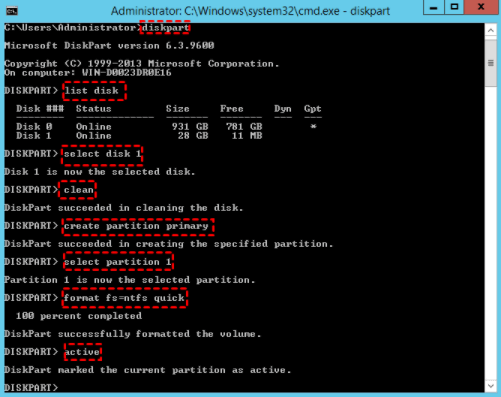
- list disk and press enter to appear disk list.
- select disk x
Here x denotes the number of your flash drive. You can enter the disk name which you want to make bootable.
Type the following commands one by one:
- clean
- create partition primary
- select partition 1
you will select the partition as per your own requirement
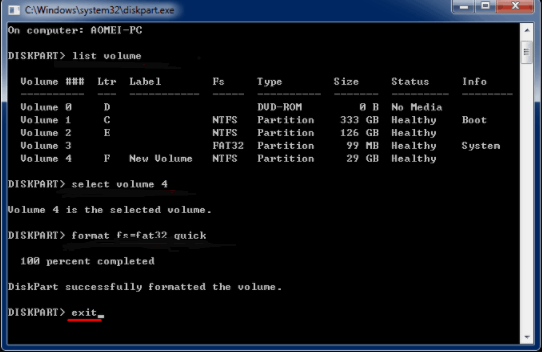
- format fs=ntfs quick (if you want to create UEFI bootable USB, type "format fs=fat32 quick").
- active
Step 4. Type Exit and press enter. It will close the diskpart command.
You have built a Bootable USB from ISO by following the steps outlined above. In the Windows Operating System, the command-line approach is a built-in feature. It is one of the simplest methods for creating a bootable USB. By typing a few commands you can make your USB bootable. The USB can be used on any other system.
We have now seen how to use the built-in feature. Now we will look at a third-party utility tool that can help make the task easy and quick.
Easier Solution: How to Create a USB Bootable for Windows Server Installation
Note: Before you begin the process make sure you back up your data and your USB has enough space of 8GB at least.
On Windows Server, Microsoft has not included a feature to generate bootable USB drives. We recommend using EaseUS Partition Master, a third-party utility. This software is a disk partition manager that is available for free. It can assist in the allocation of disk space to improve data storage. This software makes disk management convenient.
100% Secure
Free Inquiry
The following are the key features of EaseUS Partition Master:
- It supports converting NTFS to FAT32.
- It is capable of supporting split partition.
- It reduced the frequent restart requirement.
- By correctly assigning the disk space it maximizes system performance.
- Change partition label.
- Flexibly adjust partition size by entering the exact partition size.
- Prevent data loss.
- Safe and secure to use.
- Available for a free trial.
- It formats and deletes the partition HDD, SSD, USB, memory card, SD card so, the device must be reusable.
- To ensure security it entirely wipes out the data on the hard disk.
Steps to Create Bootable USB:
Step 1. To create a bootable disk of EaseUS Partition Master, you should prepare a storage media, like a USB drive, flash drive or a CD/DVD disc. Then, correctly connect the drive to your computer.
Step 2. Launch EaseUS Partition Master, and find the "Bootable Media" feature on the left. Click on it.
Step 3. You can choose the USB or CD/DVD when the drive is available. However, if you do not have a storage device at hand, you can also save the ISO file to a local drive, and later burn it to a storage media. Once made the option, click the "Create" button to begin.
- Check the Warning message and click "Yes".
Step 4. When the process finishes, you'll see a pop up window, asking if you want to restart computer from the bootable USB.
- Reboot Now: it means you want to restart the current PC and enter EaseUS Bootable Media to manage your disk partitions without OS.
- Done: it means you don't want to restart the current PC but to use the bootable USB on a new PC.
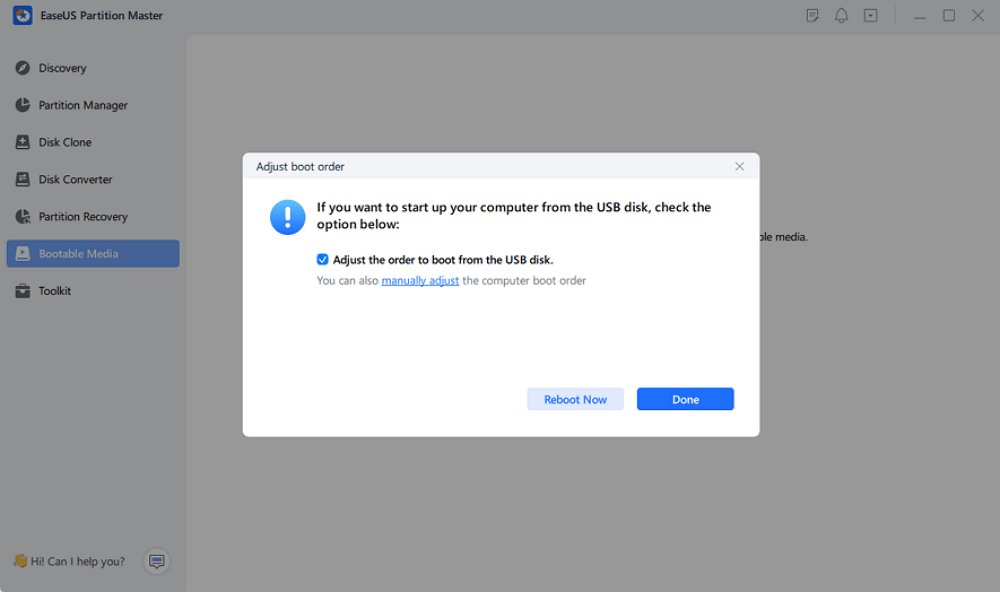
Note: To use the bootable disk on a new PC, you need to resart the target computer and press F2/F8/Del key to enter BIOS, and set the USB bootable disk as the first boot disk.
Wait patitiently and your computer will automatically boot up from the USB bootable media and enter EaseUS WinPE desktop.

To easily create a USB using a trusted third-party tool. The best solution is EaseUS Partition Master. It formats external devices, manages partitions flexibly, and efficiently allocates space.
EaseUS Partition Master Enterprise
Your trustworthy Windows Server disk manager.
- Extend System drive, combine/split partitions.
- Clone disk, migrate OS to HDD/SSD.
- Convert MBR to GPT, GPT to MBR, no data loss.
- 1-click adjust disk layout, create volumes at one time.
100% Secure
Free Inquiry
Conclusion
To summarise what has been said so far, creating a bootable USB for a Windows server is a simple process. However, we recommend using EaseUS Partition Master to make things easy and safer. This tool makes it simple to create a bootable USB drive. The bootable USB Windows Server has yet to be released by Microsoft. So, if you want to create a USB bootable for Windows Server 2019, you will need to use a safe alternative.
To make the USB bootable via the command line, we have included a full step-by-step guide above. You can use that method as well. Therefore, we recommend that you utilize EaseUS Partition Master, which has a free trial and does the task efficiently. Try it out and see if you can solve the USB bootable problem on your own!
How Can We Help You
About the Author
Sherly joined EaseUS in 2022 and she has always loved writing articles and enjoys the fun they bring. She receives professional training here, focusing on product performance and other relative knowledge. She has written over 200 articles to help people overcome computing issues.
Written by Tracy King
Tracy became a member of the EaseUS content team in 2013. Being a technical writer for over 10 years, she is enthusiastic about sharing tips to assist readers in resolving complex issues in disk management, file transfer, PC & Mac performance optimization, etc., like an expert.
Product Reviews
-
I love that the changes you make with EaseUS Partition Master Free aren't immediately applied to the disks. It makes it way easier to play out what will happen after you've made all the changes. I also think the overall look and feel of EaseUS Partition Master Free makes whatever you're doing with your computer's partitions easy.
Read More -
Partition Master Free can Resize, Move, Merge, Migrate, and Copy disks or partitions; convert to local, change label, defragment, check and explore partition; and much more. A premium upgrade adds free tech support and the ability to resize dynamic volumes.
Read More -
It won't hot image your drives or align them, but since it's coupled with a partition manager, it allows you do perform many tasks at once, instead of just cloning drives. You can move partitions around, resize them, defragment, and more, along with the other tools you'd expect from a cloning tool.
Read More
Related Articles
-
Fixed: Hard Drive Missing After Windows 11/10 Update🔥
![author icon]() Brithny/2024/08/26
Brithny/2024/08/26 -
How Do I Run Fdisk on Windows 10/11: A Beginner's Guide
![author icon]() Tracy King/2024/10/29
Tracy King/2024/10/29 -
How to Fix SD Card Not Showing Up on Windows 11/10
![author icon]() Jean/2024/10/29
Jean/2024/10/29 -
How Big Is Baldur's Gate 3: File Size on PC/PS5
![author icon]() Roxanne/2024/11/14
Roxanne/2024/11/14
Hot Topics in 2024


EaseUS Partition Master

Manage partitions and optimize disks efficiently