
Content
Page Table of Contents
About the Author
Hot Topics
Updated on Jun 17, 2026
Key Takeaways of Burn ISO to USB on Windows 11:
- An ISO file is a digital copy of an entire disc commonly used for distributing software or operating systems. By burning an ISO file to a USB drive, you can create a bootable drive that allows you to install or run the software.
- In this article, we'll learn how to burn ISO to USB in Windows 11 and invite you to follow the tutorial for a hands-on experience.
Discover how to utilize the built-in Windows USB/DVD Download Tool or different tools/software such as EaseUS Partition Master to successfully burn an ISO file to a USB drive in Windows 11.
Preparation: Get Everything Ready for Burning ISO to USB in Windows 11
Before you get started to burn ISO to USB in Windows 11, you should take a few necessary steps, and it's really crucial to prepare every required thing in advance.
Let me show you the exact preparation process.
1. Preparation:🪄
Here are a few necessary and crucial steps and arrangements before starting to burn ISO to USB in Windows 11:
- USB: Obtain an empty USB drive with a capacity of 64GB or larger. Ensure that it is formatted with the FAT32 file system format. This formatting step is important as it prepares the USB drive to receive the ISO file.
- Computer: Ensure that your computer is in good health, functioning properly, and has Windows 11 installed.
- ISO File: Download and save the Windows 11 ISO file in advance on your PC/Laptop. You can visit the official Microsoft website at to download the Windows 11 ISO file.
- ISO Burning Tool: Choose and install a reliable ISO burning software or tool on your computer. Various options are available, such as the built-in Windows USB/DVD Download Tool or third-party tools like EaseUS Partition Master.
2. ISO Burning Utility Recommend and Free Download⬇️
When it comes to reliable tools/software for burning ISO files to USB in Windows 11, just for your convenience, to make the process easier for you, we've sorted out four tools. Our top pick is EaseUS Partition Master, as the easiest tool for burning ISO image files to a USB drive.
Let's look at the table below for a better comparison of four tools that support burning Windows 11 ISO to USB.
| Tools🧰 | Duration⏱️ | Complexity🔢 |
| 2-5 Minutes | Easiest | |
| Windows Disk Image Burner | 5-10 Minutes | Easy |
| Windows Media Creation Tool | 10-20 Minutes | Medium |
| Rufus | 20-30 Minutes | Medium |
Among these tools, EaseUS Partition Master allows you to complete your task without any difficulty or challenges immediately. Burning ISO image files to a USB drive is not an easy task, but EaseUS Partition Master makes it easiest ever for you, whether you're an absolute beginner to this!
Please follow the respective guide to learn how to burn ISO to USB with Windows 11.
Guide 1: Burn ISO to USB in Windows 11 with EaseUS Partition Master
EaseUS Partition Master is a disk management software with a Bootable Media feature. This feature allows users to create a bootable USB or CD/DVD to perform disk partitioning and management tasks. EaseUS Partition Master includes a "Burn ISO" feature, allowing ordinary users to burn ISO files to a USB drive easily.
This simplifies tasks like creating bootable USB devices for OS installation or software deployment. Overall, EaseUS Partition Master's Bootable Media feature and ISO burning capability provide a user-friendly disk management and troubleshooting solution.
Pros and Cons of EaseUS Partition Master:
👍🏻Pros:
- Easy to use
- Provides complete disk management features
- It can be used for various purposes
👎🏻Cons:
- A bit confusing due to a lot of features.
💡Recommendation Reason: Easy to use, and offers countless valuable features.
Here's how you can burn ISO to USB in Windows 11 with EaseUS Partition Master:
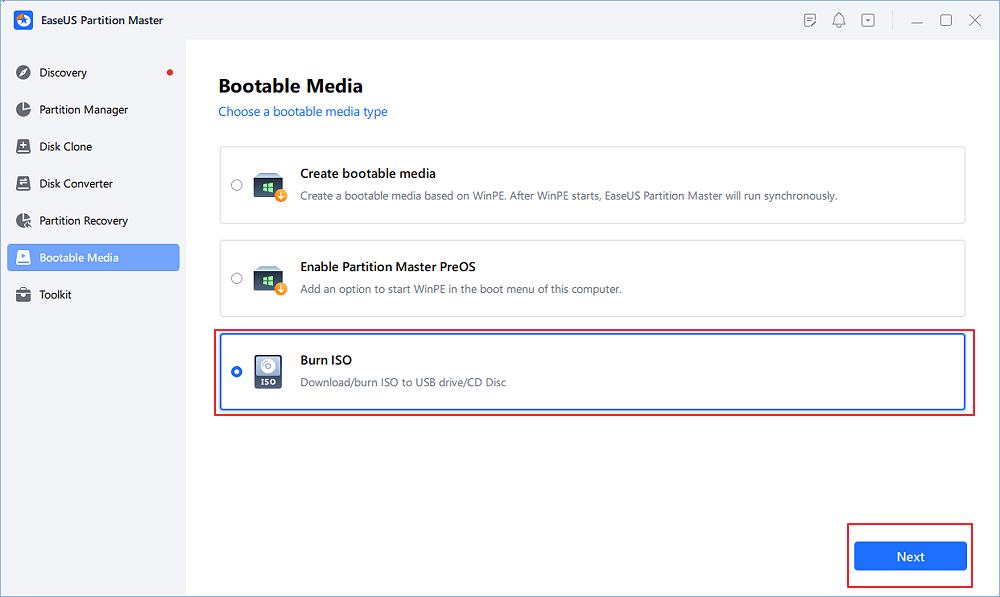
Step 1. Launch EaseUS Partition Master and go to the Bootable Media section. Click "Burn ISO" and click "Next".
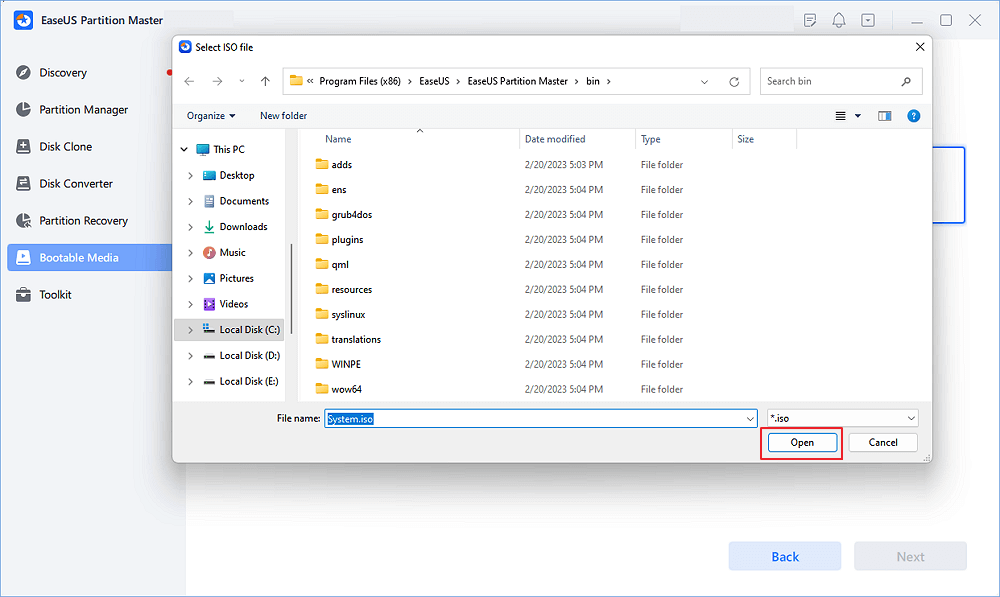
Step 2. Select the ISO image that you have downloaded on your PC, and click "Open".
Step 3. Click "Next" and select the target USB as destination and click "Burn" to execute the operation.
If this method helps easily get an USB bootable media with Windows 11 ISO image, feel free to share this method to help more of your friends online who are looking for a simple guide for creating Windows installation bootable media:
Guide 2: Burn ISO to USB in Windows 11 with Windows Disk Image Burner
Windows 11 has a feature named "Disc Image Burner," which allows you to burn ISO to USB. This is a bit tricky method. So, please read and understand each step with full attention.
Pros and Cons of Windows Disk Image Burner:
👍🏻Pros:
- Quick Backup OS.
👎🏻Cons:
- A bit tricky.
💡Recommendation Reason: This is a built-in feature in Windows 11 and it doesn't need any third-party app.
Here's how:
Step 1. Connect the USB drive to your computer. Make sure your USB should be 64GB or larger.
Step 2. Open File Explorer and find the ISO file on your PC that you want to burn.
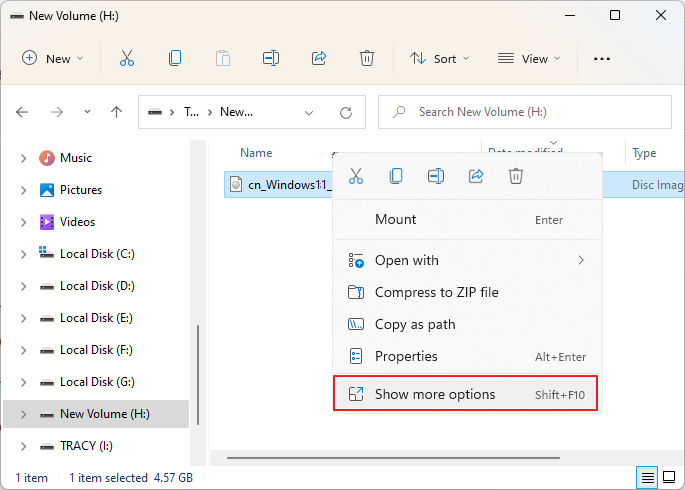
Step 3. Right-click on the ISO image that you want to burn. ISO images are identifiable by their file extension, which is ".iso."
Step 4. Select "Show more options" from the extended context menu that emerges when you right-click on the .iso image.
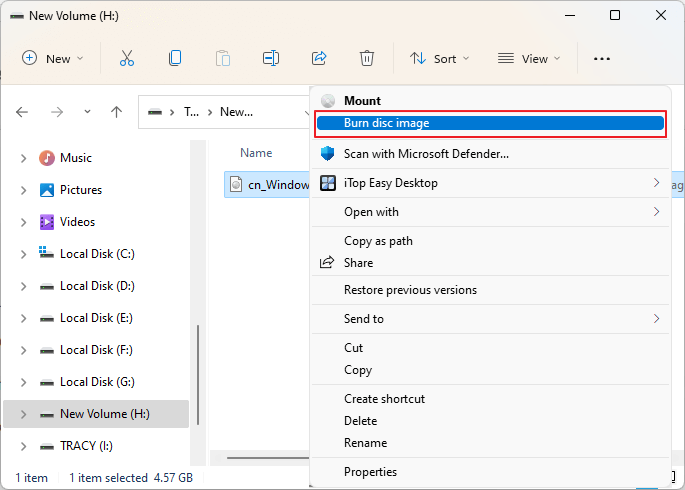
Step 5. Click "Burn disc image."
Step 6. In the pop-up window, choose the disc/drive/USB where you want to burn the ISO image.
Step 7. Finally, click the "Burn" button, and wait a few minutes until the burning process is completed. You'll see a loading bar. Let it be completed.
If you like this manual method, feel free to share this method to help more of your friends to get a Windows installation bootable media:
Guide 3: Create a Bootable USB with Windows Creation Media Tool
The Windows Media Creation Tool is also a Microsoft's built-in feature and a convenient way to make a USB drive that can be utilized to boot your computer and perform a fresh Windows installation.
Pros and Cons of Windows Creation Media:
👍🏻Pros:
- Convenient
- Offline Installation
👎🏻Cons:
- Time-consuming
💡Recommendation Reason: Creating a bootable USB drive using the Windows Creation Media Tool is highly recommended for individuals who frequently perform Windows installations or upgrades, IT professionals, or those who prefer offline installation methods.
Here's how to make a bootable USB drive using the Windows Creation Media Tool:
Step 1. Connect the USB drive to your PC/Laptop.
Step 2. Download the "Create Windows 11 Installation Media" from the Microsoft download center page. Just click "Download Now" under "Create Windows 11 Installation Media".
Step 3. To begin the process, execute the MediacreationtoolW11.exe file, and if prompted by (UAC), click "Yes." The tool may take a few moments to open, so kindly wait until the Setup wizard is displayed.
Step 4. Click on "Accept." By default, the Media Creation Tool will automatically select the appropriate edition and language based on your system configuration. If you wish to switch the language, uncheck the "Use the recommended options for this PC" box.
Step 5. Click "Next" after choosing your options.
Step 6. Choose "USB flash drive" in the pop-up window that shows you to "Choose which media to use," and click "Next."

Step 7. You must choose your USB drive from the list of available drives and click "Next."

Step 8. Finally, click "Finish."
This process takes time to download and create the Windows 11 installation media. Once you see the "your USB flash drive is ready" message, click "Finish" to close the setup wizard. Now you can utilize the USB drive to boot and troubleshoot or perform a clean installation of Windows 11.
Guide 4: Create a Bootable USB with Windows 11 ISO via Rufus
Rufus is a popular and reliable tool for making bootable USB drives. It offers you a free solution, but the process can be tricky and complex when creating a Windows 11 installation disk. Well, we're going to make the process easier for you by guiding you step-by-step. Please make sure to download the Windows 11 ISO image and Rufus.
Pros and Cons of Rufus
👍🏻Pros:
- Reliable
- Customization Features
👎🏻Cons:
- Complex
- Compatibility issue
💡Recommendation Reason: If you are comfortable with technical processes and prefer a customizable tool, Rufus can be an excellent choice for creating bootable USB drives.
Please follow the steps to create a bootable USB on Windows 11 via Rufus:
Step 1. Download and install Rufus on your PC or Laptop.
Step 2. Open the Rufus, and under "Device," you should choose your USB flash drive.
Step 3. Click the "Select" button from the right side in order to choose the Windows 11 ISO file you downloaded.
Step 4. In the "Image Option" section, select "Standard Windows Installation" from the drop-down menu. Choose "GPT" as the partition scheme. In the "Volume Label" field, enter a desired name for the drive.
Step 5. Leave other options/fields the same and click "Start."
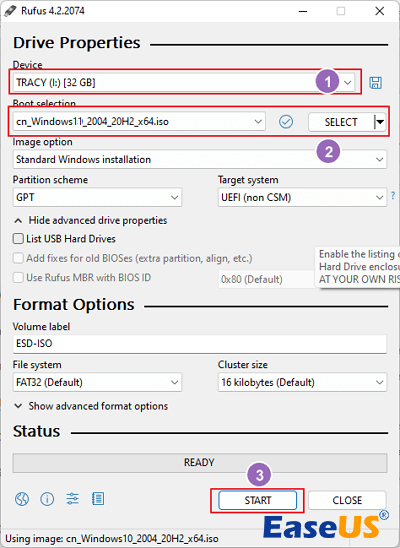
Step 6. You'll see a warning that "All data on the flash drive will be destroyed." But you don't need to care about it and click "OK".
Step 7. Now, wait and see the progress through the progress bar. Let it be completed.
If you think Rufus is indeed easy to use and love to share it with your friends, share this article to your social network to teach your mates how to get a Windows installation bootable media:
Conclusion
When it comes to creating bootable USB drives in Windows 11, there are several options available. The built-in Windows Creation Media Tool and Disk Burner offer a user-friendly approach with guided steps. Additionally, third-party software like EaseUS Partition Master offers advanced features and customization options, making it popular among tech-savvy users.
EaseUS Partition Master is especially suitable and very easy for beginners, but it doesn't matter. Whether you're a beginner or a skilled professional, you can use it to perform the task and get the desired results easily.
Regardless of the tool you choose, creating a bootable USB drive allows for offline installations, troubleshooting, and clean installations of Windows 11. It's a useful skill to have, especially when dealing with system upgrades or repairs.
We hope you find this article helpful and informative, we also invite you to share your experiences and insights on burning ISO files to USB drives in Windows 11. Your feedback and recommendations can help others in their journey of creating bootable media.
Thank you for reading!
FAQs About Burn ISO to USB Windows 11
Do you have more queries or questions about the burning ISO to USB Windows 11? Read the below frequently asked questions.
1. Which tool is the easiest I can use to burn ISO image to USB?
The EaseUS Partition Master is the easiest and most convenient tool that you can use to burn ISO images to USB quickly. Whether you're a beginner or an expert, it's very easy and reliable for everyone.
2. Any recommendation for the best ISO burner for Windows 10?
We can recommend two methods that are the best ISO burner for Windows 10. The first one is the EaseUS Partition Master, which is very easy for everyone, whether for a beginner or an expert, and it consumes less time than others. Our second recommendation is Windows Disk Image Burner, which is a built-in feature in Windows 11 and is used for burning ISO to USB.
3. Does Windows 11 have an ISO burner?
Yes, Windows 11 have an ISO burner called Windows Disk Image Burner.
How Can We Help You
About the Author
Updated by Tracy King
Tracy became a member of the EaseUS content team in 2013. Being a technical writer for over 10 years, she is enthusiastic about sharing tips to assist readers in resolving complex issues in disk management, file transfer, PC & Mac performance optimization, etc., like an expert.
Product Reviews
-
I love that the changes you make with EaseUS Partition Master Free aren't immediately applied to the disks. It makes it way easier to play out what will happen after you've made all the changes. I also think the overall look and feel of EaseUS Partition Master Free makes whatever you're doing with your computer's partitions easy.
Read More -
Partition Master Free can Resize, Move, Merge, Migrate, and Copy disks or partitions; convert to local, change label, defragment, check and explore partition; and much more. A premium upgrade adds free tech support and the ability to resize dynamic volumes.
Read More -
It won't hot image your drives or align them, but since it's coupled with a partition manager, it allows you do perform many tasks at once, instead of just cloning drives. You can move partitions around, resize them, defragment, and more, along with the other tools you'd expect from a cloning tool.
Read More
Related Articles
-
How Do I Open/Access Disk Management In Windows 11? All Methods You Can Get
![author icon]() Tracy King/2026/06/17
Tracy King/2026/06/17 -
Windows 10 File Transfer Stuck at 99%? Fixes Are Here!
![author icon]() Jean/2026/06/17
Jean/2026/06/17 -
Lenovo SSD Upgrade: 2026 Step-by-Step Tutorial on How
![author icon]() Sherly/2026/06/17
Sherly/2026/06/17 -
How to Convert MBR to GPT Without Losing Data in Windows
![author icon]() Tracy King/2026/06/17
Tracy King/2026/06/17


