
Content
Page Table of Contents
About the Author
Hot Topics
EaseUS noticed that many Windows 11 users have encountered that the "Extend Volume" option is grayed out, and there is a recovery partition error between the system partition and unallocated space. How can you move the recovery partition to expand the partition? This article provides you with details guide.
- Move Recovery Partition Windows 11 [on the Same Disk]
- Move Windows 11 Recovery Partition to External Storage Device
How to Move Recovery Partition Windows 11?
In order to move the Windows 11 recovery partition safely and quickly, you should use EaseUS Partition Master Professional. Its "Move/Resize partitions" feature allows users to move the Recovery partition to any location on the disk so that the target partition and unallocated space are adjacent.
Additionally, you can also use its cloning feature to move the recovery partition to a USB drive or other external device with one click. In this way, you can directly delete the Windows 11 recovery partition to get more free space.
Download EaseUS Partition Master and move the Windows 11 recovery partition to an external device or another location on the local disk according to your needs.
Guide 1. Move Recovery Partition Windows 11 [on the Same Disk]
Here are the steps on how to move the Windows 11 Recovery Partition to another location:
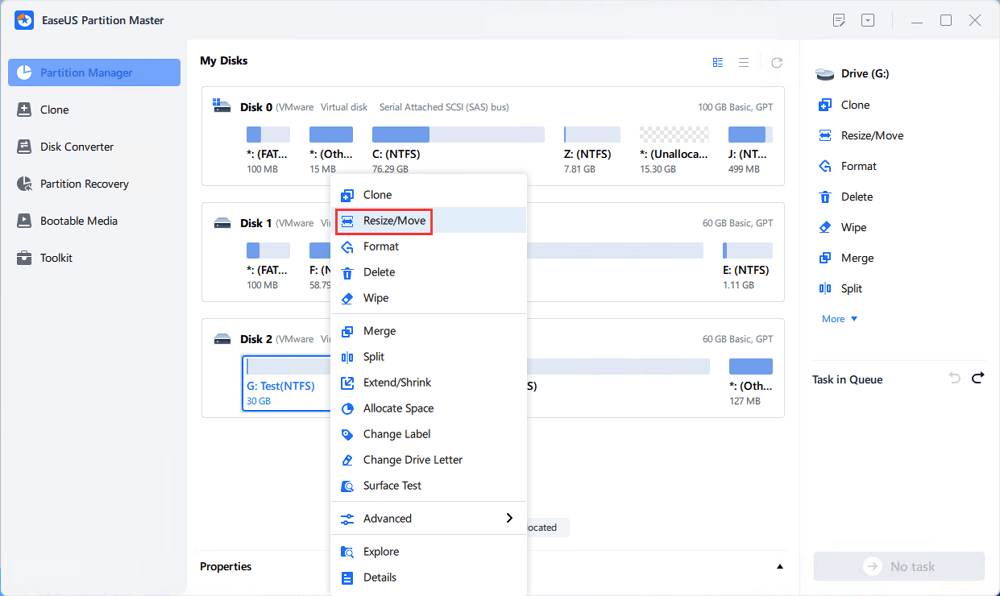
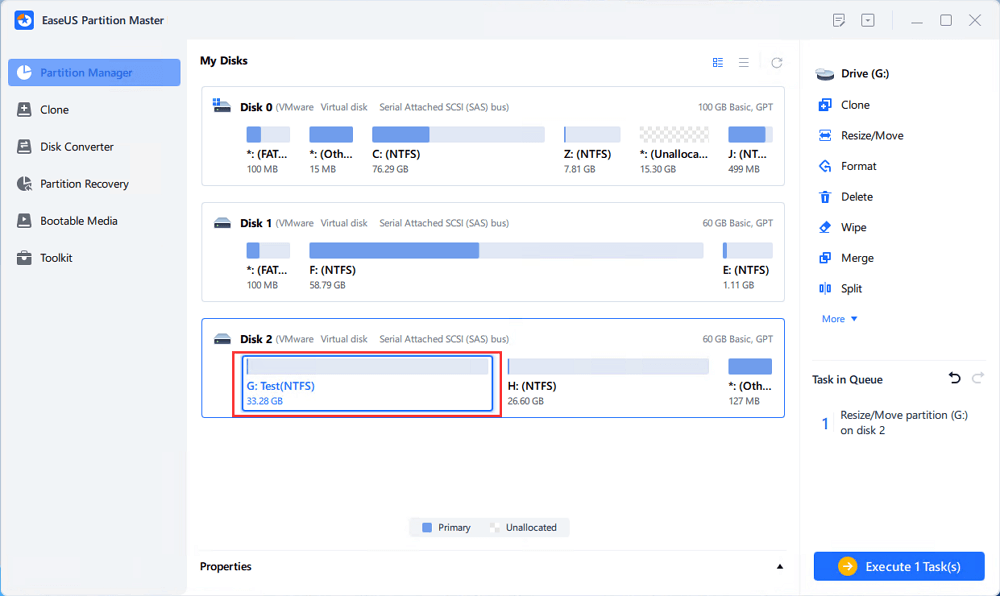
Step 1: Locate and select the target drive/partition
Launch EaseUS Partition Master and go to Partition Manager, select the target drive or partition you need to adjust its size, right-click on it and choose "Resize/Move".
Step 2: Resize or move the partition
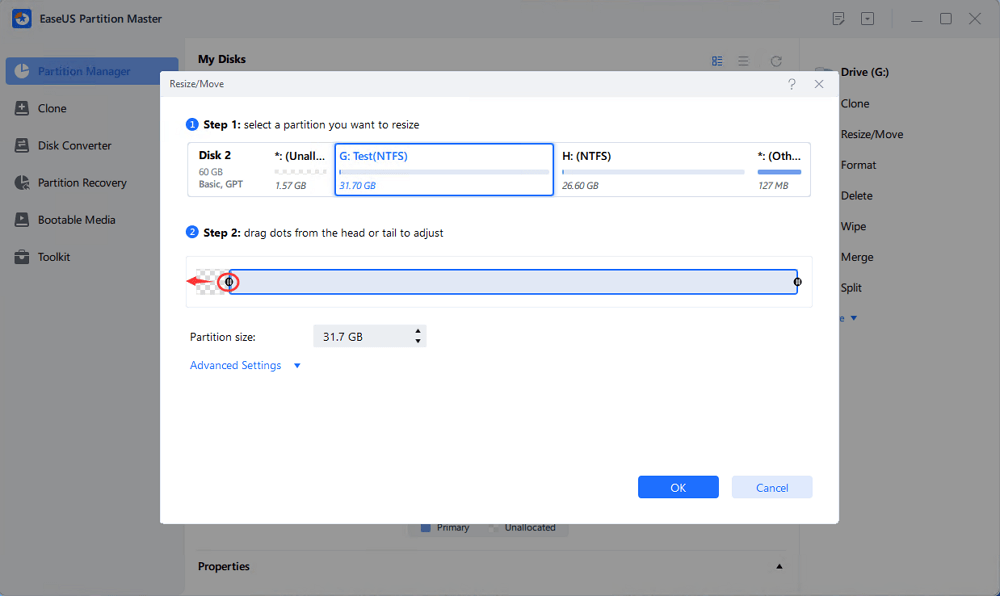
1.To shrink the partition, simply drag one of its ends to free up unallocated space. Once done, click "OK".
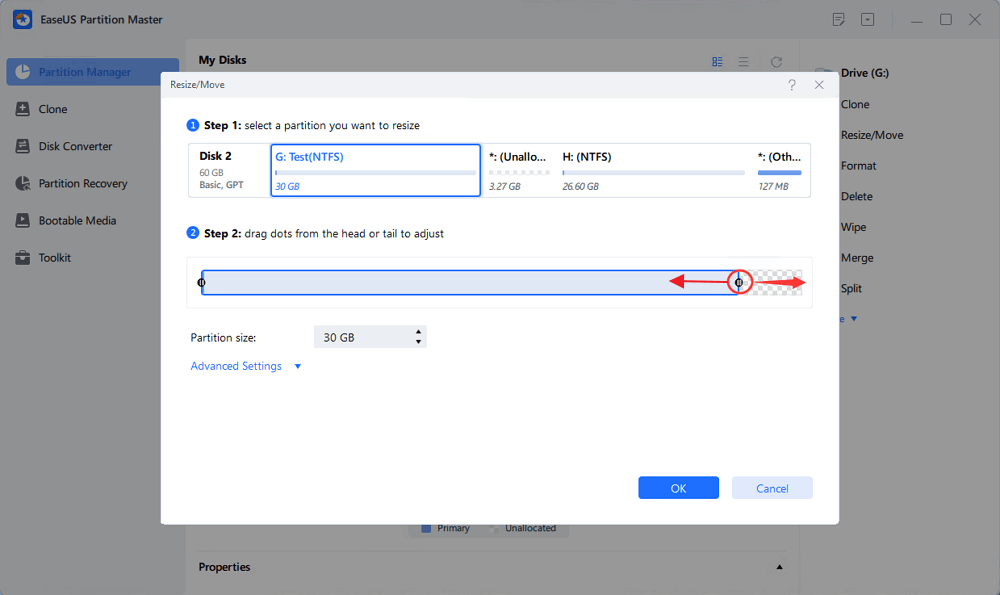
2. To extend the partition, make sure that there is unallocated space aside (if there isn't, follow the above steps to create some). In the same way, drag your mouse into the unallocated space. Click "OK".
3. To move a partition position, suppose you have created and left the unallocated space next to the target partition. If no, free up some unallocated space first.
Then, right-click the target partition, select "Reize/Move". Then drag the whole partition leftward or rightward to adjust its position. Click "OK" to confirm.
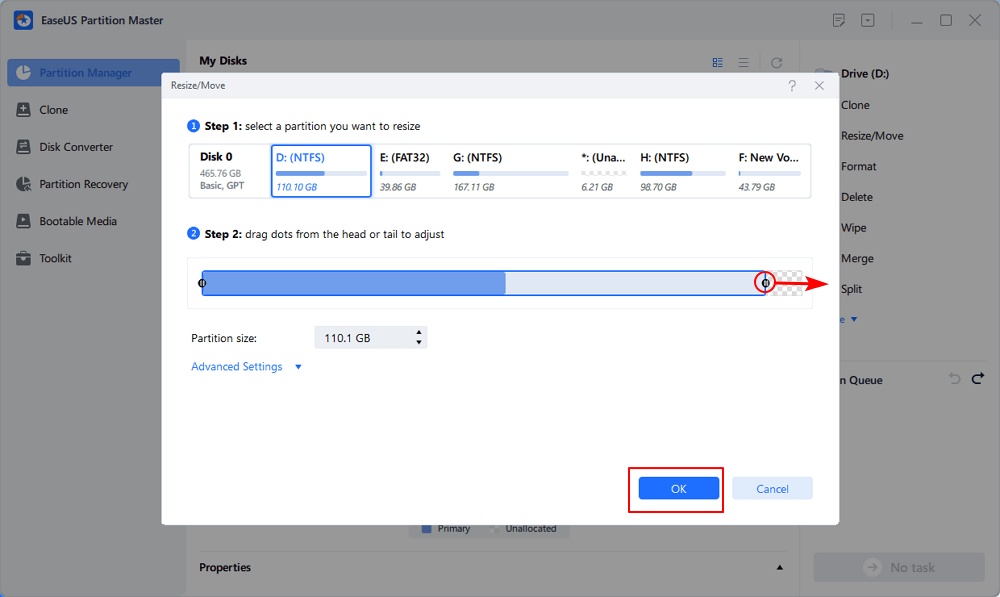
Step 3: Confirm the result and apply changes
At this step, you will see the new disk partition information & diagram.
To save changes, click the "Execute Task" button and then "Apply".

Now, you can see that the disk is insufficiently spaced adjacent to the unallocated space. You can directly expand the partition to use this adjacent unallocated space.
Guide 2. Move Windows 11 Recovery Partition to External Storage Device
If you really want to delete the recovery partition on Windows 11 but still have the recovery option, you can use EaseUS Partition Master's clone option to move the Windows 11 recovery partition to a USB flash drive/external drive and delete the recovery partition. Here is how:
Step 1: Locate and select the target drive/partition
Launch EaseUS Partition Master and go to Partition Manager, select the target drive or partition you need to adjust its size, right-click on it and choose "Resize/Move".
Step 2: Resize or move the partition
1.To shrink the partition, simply drag one of its ends to free up unallocated space. Once done, click "OK".
2. To extend the partition, make sure that there is unallocated space aside (if there isn't, follow the above steps to create some). In the same way, drag your mouse into the unallocated space. Click "OK".
3. To move a partition position, suppose you have created and left the unallocated space next to the target partition. If no, free up some unallocated space first.
Then, right-click the target partition, select "Reize/Move". Then drag the whole partition leftward or rightward to adjust its position. Click "OK" to confirm.
Step 3: Confirm the result and apply changes
At this step, you will see the new disk partition information & diagram.
To save changes, click the "Execute Task" button and then "Apply".
In this way, you have moved the Windows 11 recovery partition and all the critical system files that can help restore factory default settings to an external device, which allows you to safely delete the recovery partition on the device. Click the link to help if you can't delete the recovery partition.
Do not forget to share this article and let more users know about the recovery partition mover.
What Is Recovery Partition on Windows 11?
Recovery partition is the partition of your system that contains important files that help restore factory default settings. It is created automatically when you install the operating system on your computer (Dell, HP). When the operating system fails to start normally, you can enter the recovery partition to restore the failed computer to factory settings. Normally, this partition does not have a drive letter to prevent it from being accidentally deleted. You won't see it in Windows 11 File Explorer, and you'll find only a "Help" option in Disk Management.
Users often need to move the Windows 11 recovery partition for the following centralized purposes:
🔔The extended volume turns gray:
When you want to extend the system partition, but the Windows 11 recovery partition is located between the system partition and the unallocated space, the extended volume grayed out, and the user needs the system Windows 11 recovery partition.
📣Insufficient disk space:
The recovery partition often takes up 100-450MB of disk space. Users can move or copy the recovery partition to an external storage device such as USB to obtain more available space.
Conclusion
This article details how to use a reliable recovery partition moving tool to move the recovery partition to another location or other external storage device. EaseUS Partition Master is a professional and secure partition manager that can help you clone, delete, or move recovery partitions on Windows 10/11.
Move Windows 11 Recovery Partition FAQs
Do you know how to move the recovery partition on Windows 11 now? Check the following questions and answers to get more details.
1. Can you move partitions in Windows 11?
Sure, if you want to move the Windows partition, do it with a third-party software like EaseUS Partition Master. Its "move and resize" feature allows you to move a partition or adjust the size of a partition without losing any data.
2. How do I move the recovery partition in Windows 11?
Follow these steps to move the recovery partition on Windows 11:
Step 1. Download and install EaseUS Partition Master on your PC.
Step 2. Launch it and navigate to the "Partition Manager" sections and right click the recovery partition, and select "Resize/Move."
Step 3. Then, drag the entire partition left or right to adjust its position. Click OK to confirm.
Step 4. To save changes to the recovery partition location, click the "Perform Task" button and then click "Apply."
3. How do I unmount a recovery partition in Windows 11?
You can unmount or delete the recovery partition on Windows 11 by following these steps:
- Open the Disk Management tool.
- In Disk Management, locate the recovery partition you want to delete.
- Right-click on the recovery partition and select Delete Volume.
- In the confirmation dialog, click Yes.
But this deletion will cause data loss. If you still need the recovery partition, you need to back up it to an external storage device such as a USB drive.
How Can We Help You
About the Author
Sherly joined EaseUS in 2022 and she has always loved writing articles and enjoys the fun they bring. She receives professional training here, focusing on product performance and other relative knowledge. She has written over 200 articles to help people overcome computing issues.
Product Reviews
-
I love that the changes you make with EaseUS Partition Master Free aren't immediately applied to the disks. It makes it way easier to play out what will happen after you've made all the changes. I also think the overall look and feel of EaseUS Partition Master Free makes whatever you're doing with your computer's partitions easy.
Read More -
Partition Master Free can Resize, Move, Merge, Migrate, and Copy disks or partitions; convert to local, change label, defragment, check and explore partition; and much more. A premium upgrade adds free tech support and the ability to resize dynamic volumes.
Read More -
It won't hot image your drives or align them, but since it's coupled with a partition manager, it allows you do perform many tasks at once, instead of just cloning drives. You can move partitions around, resize them, defragment, and more, along with the other tools you'd expect from a cloning tool.
Read More
Related Articles
-
Top 8 Ways to Fix Attempted Write to Readonly Memory BSOD Error in Windows 11/10
![author icon]() Tracy King/2026/06/17
Tracy King/2026/06/17 -
How Can I Merge Disk 0 and Disk 1 in Windows 11/10
![author icon]() Brithny/2026/06/17
Brithny/2026/06/17 -
How Do I Run Fdisk on Windows 10/11: A Beginner's Guide
![author icon]() Tracy King/2026/06/17
Tracy King/2026/06/17 -
How to Perform Xbox Series S Internal SSD Upgrade💡
![author icon]() Cici/2026/06/30
Cici/2026/06/30


