- Video Recovery
- SD Card Recovery
- Recycle Bin Recovery
- Recover Data from USB
- Recover Deleted Emails
- Hard Drive Not Showing Up in Windows
- Recover Unsaved Word Documents
- Recover Deleted Files in Windows 10
- Recover Files from Virus Infected Hard Drive
- Best Free Photo Recovery Software
- Recover Files from Formatted Hard Drive
Where Are Mac Files Stored by Default
Before learning to find files on a Mac, it is important to know where they are stored by default. Normally, the files created on Mac will be stored in different folders regarding the file types and how you created them.
The documents, downloads, screenshots, and videos will be stored in different locations. Where are screenshots saved on Mac? When you take a screenshot on a Mac, the picture will be stored on the desktop by default. If you download items from the internet, these files will be saved in the Downloads folder. All the Mac files are stored on the Mac disk, and you can easily find them through multiple methods.
You can check the following table in advance to quickly learn how to find files on Mac:
| Methods | Editor's Review |
| It is easy to find lost or deleted files/folders on a Mac or MacBook. | |
| If you remember the file name, this method should be the quickest one. | |
| You can filter the files by tags in Finder, and all the folders can be found in Finder. | |
| The trash folder will help you find files and folders you recently deleted from your Mac. | |
| You'll need some command-line knowledge to use Mac Terminal, and this method is more difficult than others. |
Method 1. How to Find Files on Mac with Recovery Software
In some cases, finding files on a Mac with recovery software should be the best solution, especially if you are unsure whether the files are deleted. When you can't find files on Mac, you'd better scan the whole Mac disk with professional Mac data recovery software.
You won't waste time if you use EaseUS Data Recovery Wizard for Mac to help you find files on your Mac. This recovery product can filter the files by the types and paths, and you'll quickly locate lost files with this feature.
Freely download this software, and you can experience the trial version. Don't hesitate to click the following button. The link is safe, and so is the software.
This Mac recovery software can help you in many ways:
- 🖼️Recover deleted screenshots on Mac will be easier if you don't have any backups. You can recover lost PNG, JPEG, GIF, CR2, PSD, and other pictures from your Mac or MacBook.
- 📁Find documents on Mac when you cannot find them with other methods. This recovery tool supports DOC, XLS, PDF, PPT, HTML, and more file types.
- 📹Recover deleted AVI files on Mac and support other video formats, including MP4, MOV, M4V, 3GP, WMV, etc.
After installation, you can launch the software and back up your Mac first to avoid further data loss.
Step 1. Search for lost files
Select the disk location to search for lost files (it can be an internal HDD/SSD or an external hard drive) where you lost data and files. Click the "Search for lost files" button.
Note: Before data recovery, you'd better click "Disk Backup" from the left sidebar to create a backup of your HDD/SSD to avoid further data loss. After backing up, the software can recover data from your disk backup, and you can use the HDD or SSD again.

Step 2. Go through the scanning results
This software will immediately scan your selected disk volume and display pictures, documents, audio, videos, and emails on the left pane.

Step 3. Select the file(s) and recover
Click the data to preview, and click the "Recover" button to have them back.

Have you found missing files on your Mac? If so, you can share this page on Twitter or Facebook to inform more readers about this method!
Method 2. How to Search Files with Mac Spotlight
Like the Windows search box, Mac Spotlight can search files on Mac and also the Safari results. This built-in utility is super functional, and you can check the following information to learn how to search files with Spotlight.
Step 1. Wake up Spotlight with the Command + Space shortcut or click the magnifying glass icon from the menu bar.
Step 2. Type in the file name you want to find. If you are unsure of the full file name, try typing 1-2 words instead. Or you can type in the file type like .jpeg.
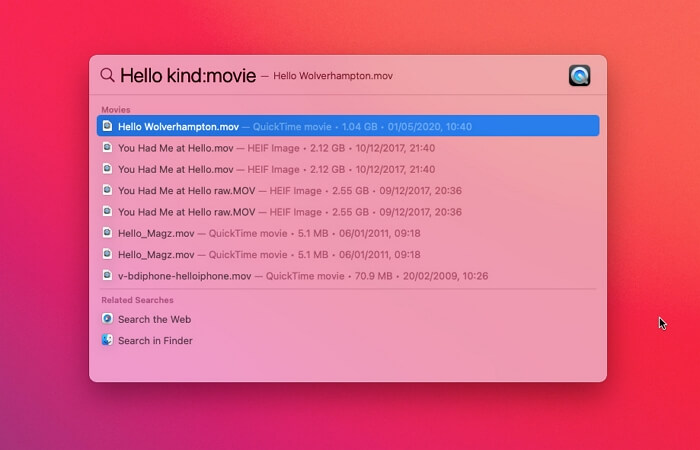
You can type in different keywords to find files; the best matches will be at the top of the result list. If you cannot find files with Spotlight, keep reading, and we'll teach you how to find files on Mac with Finder.
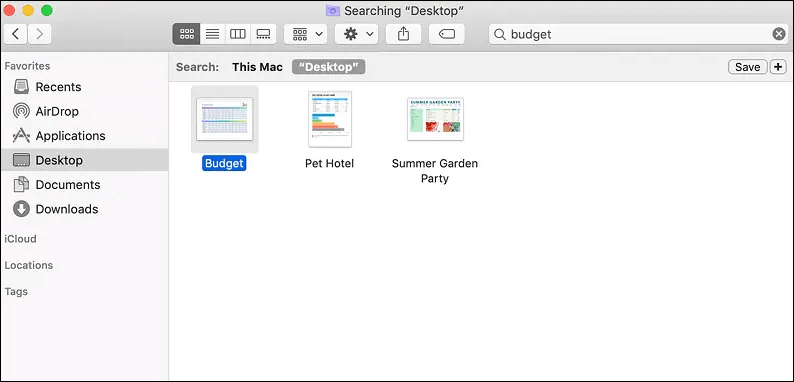
Method 3. How to Find Files on Mac with Finder
The best way to see and find all the files on Mac is using Mac Finder. This utility, just like File Explorer in Windows, can help you see all the files and folders on the computer. The detailed information on the files/folders will be displayed in Finder, including size, creation date, type, and more detailed parameters.
Let's see how to find wanted files on Mac with Finder:
Step 1. The Finder icon can be easily found on the Dock. Launch it by double-clicking.
![]()
Step 2. All the commonly used folders will be shown in the sidebar. You can go check every folder manually to find files on Mac. Like the second method, you can also use the search feature in Finder to locate target files faster.
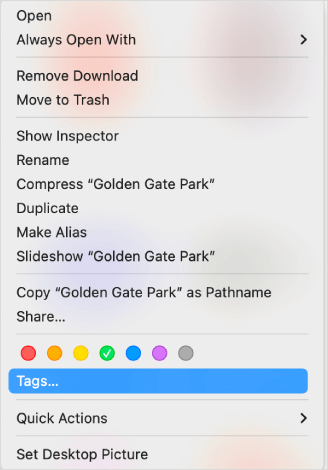
Step 3. If you want to find these files easily the next time, you can right-click the file to tag it. Or you can change a more detailed filename.
You'll help more people to find files on Mac or MacBook if you can share this page and all these methods on social media!
Method 4. How to View Files in the Mac Trash
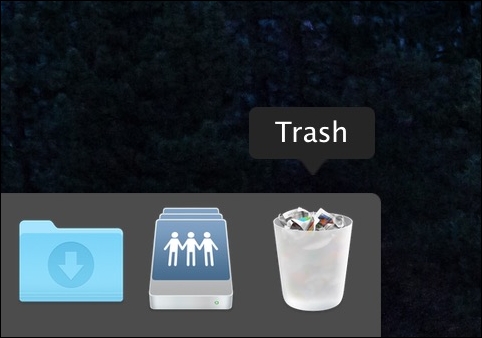
You can easily know the function of Mac Trash from its icon. A recycle bin folder temporarily stores files/folders deleted from your Mac. You don't have to worry about where is Trash on Mac, and you can easily find it after reading the following tutorial:
Step 1. You can quickly locate Trash on the Dock. Move the pointer to the icon, which will show "Trash". Double-click to open the Trash folder.
Step 2. Files/folders you deleted recently will be moved to the Trash folder, and you can also use the search tool to find files. If you want to restore them, right-click and choose "Put Back", which will make these files go back to their original place.
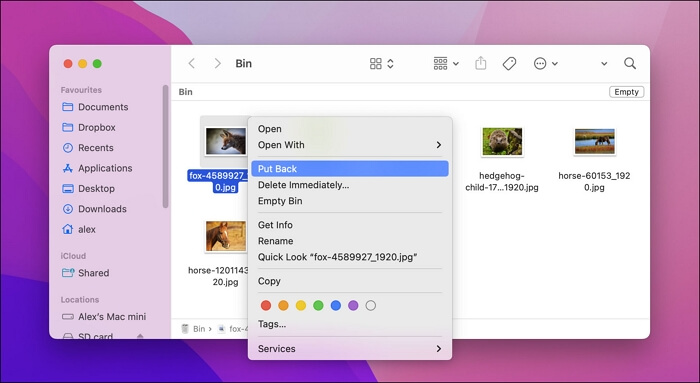
Step 3. We recommend you directly drag these files from the Trash folder to the desktop in case you can't find them again.
Note: If you accidentally empty the Trash, go back to Method 1 to perform Mac Trash recovery. Check the following passage to learn more details:

How to Recover Emptied Trash on Mac | The Complete Guide
Are you looking for free ways to recover deleted files from Trash on Mac? Follow to two Mac trash recovery methods in this guide. Read more >>
Method 5. Use Mac Terminal to Find Files on Mac
We put this method in the final place because it is the most complex one. It is easy to type in the wrong command line in Terminal and cause tricky issues. If you want to use Mac Terminal to find files on Mac, ensure you have copied the correct commands.
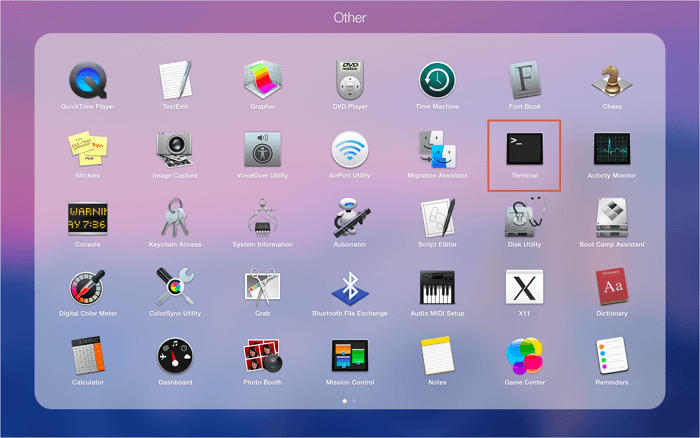
Step 1. Click the Launchpad in the Dock.
![]()
Step 2. Click the "Other" folder to open it and click "Terminal".
Step 3. You'll need to type in find / -name and follow with the correct file name to search the target file on the Mac disk.
If you encounter issues while operating the Terminal, like operation not permitted, you can find solutions in the following article:

Mac Terminal Operation Not Permitted?
Due to an operation not permitted error, unable to execute a command in Mac Terminal? Many Mac users experience this problem. Read more >>
How to Make Files Easier to Be Found on Mac
You can follow some tips to make your files or folders easier to find on Mac:
- ⭐Don't scatter the files on the desktop. Organize them into different folders.
- 📄Use descriptive file names instead of meaningless words or numbers.
- 🔖Adding specific tags to different files and folders can help you better categorize your files.
- 🗂️Creating a Smart Folder to gather files that meet certain criteria can be very helpful.
- 🗑️Delete useless files and folders on Mac frequently to keep folders tidy.
- 🏅Download third-party file organization software to help you organize the files and folders. Remember to choose a safe one.
Remember to download EaseUS data recovery software to recover deleted files from Mac effectively, and you'll find it's easier to find lost files on Mac with this functional tool.
How to Find Files on Mac FAQs
Gather more information about finding files on Mac in this FAQ part:
1. Where are files stored on a Mac?
On a Mac, where are files kept? Your files and folders are typically kept in the directories under your user's name folder (It is the primary folder). You can also change the file location by dragging the file to the target folder.
2. Why can't I find my folders on Mac?
You can open Mac Finder to view all the folders on Mac, or you can also use Spotlight search to find the target folders. It's better to check Mac Trash as well, and you can use EaseUS Data Recovery Wizard for Mac to recover deleted folders on Mac.
3. How can I make Finder find files on Mac?
After opening Mac Finder's window, utilizing the search bar at the top of the Finder window, you can locate files quickly. Click the View menu in the Finder and select Show Path Bar to be able to see the complete path of every file on your Mac. That will make the complete path for any file you choose visibly.
4. How do I search for all files with a red tag on Mac?
You can choose the following two methods to search for all files with a red tag in Finder:
- 1. Select the red tag from the suggested tags after entering the tag's name or color in the search form.
- 2. Click the red tag in the Finder sidebar to see all items with that tag.
Was This Page Helpful?
Dany is an editor of EaseUS who lives and works in Chengdu, China. She focuses on writing articles about data recovery on Mac devices and PCs. She is devoted to improving her writing skills and enriching her professional knowledge. Dany also enjoys reading detective novels in her spare time.
-
EaseUS Data Recovery Wizard is a powerful system recovery software, designed to enable you to recover files you’ve deleted accidentally, potentially lost to malware or an entire hard drive partition.
Read More -
EaseUS Data Recovery Wizard is the best we have seen. It's far from perfect, partly because today's advanced disk technology makes data-recovery more difficult than it was with the simpler technology of the past.
Read More -
EaseUS Data Recovery Wizard Pro has a reputation as one of the best data recovery software programs on the market. It comes with a selection of advanced features, including partition recovery, formatted drive restoration, and corrupted file repair.
Read More
Related Articles
-
Recover Deleted Files on MacBook Pro with 6 Proven Ways
![author icon]() Brithny/Jul 24, 2024
Brithny/Jul 24, 2024 -
How to Find Minecraft Folder Mac | Locate Minecraft Now
![author icon]() Dany/Jul 24, 2024
Dany/Jul 24, 2024 -
Upgrade to Mac OS X El Capitan 10.11.6, No Data Loss [2024 Tutorial]
![author icon]() Tracy King/Jul 24, 2024
Tracy King/Jul 24, 2024 -
Mac Users' Guide - Fix Mac Black Screen of Death with 6 Solutions
![author icon]() Jean/Jul 24, 2024
Jean/Jul 24, 2024