Mac command line is an intriguing tool. But what happens when you run into errors? One such error is operation not permitted in Mac's Terminal, as many users run into this issue. So, how do you deal with it?
| Workable Solutions | Step-by-step Troubleshooting |
|---|---|
| Fix 1. Unlock Home Directory | You might not have enough permissions to be able to use the Terminal with commands...Full steps |
| Fix 2. Disable SIP | The next method is to disable your System Integrity Protection. Since it's an important element...Full steps |
| Fix 3. Run Full Disk Access | The final method is to provide your Terminal utility full access to your storage device...Full steps |
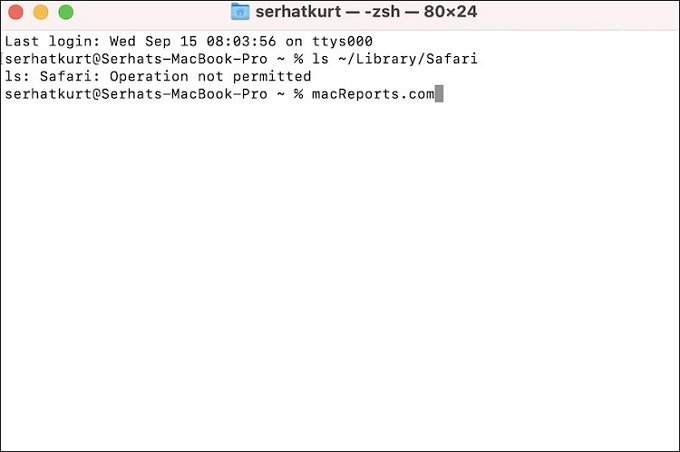
Mac's command line terminal is famous for putting the user in total charge of their mac device. It allows them to conduct great operations with a few simple commands and take full control of their device. However, despite being amazing, it's not free of issues like zsh operation not permitted.
More importantly, what causes it? This article will explore all the possible reasons your mac operation is not permitted to appear in Mac Terminal. So, let's dive right into it and find out.
Everything About Operation Not Permitted on Terminal
Mac's terminal command line is filled with intriguing commands and operations. It's a remarkable utility that puts the user in total command of their mac device. One such example is using the SIP (System Integrity Protection) commands.
However, sometimes, users run into issues like operation not permitted. It's important to understand that macOS is an operating system that goes through many upgrades, facelifts, and changes over a single annual. Now, this is a common issue that users face in macOS, including macOS Ventura, Monterey, Big Sur, Catalina, and Mojave.
So, the error "operation is not permitted", like another specific error zsh: Command not found, is a common thing that Mac users face. But worry not, as we'll explore why this error might occur.
More importantly, we'll also explore a few potential fixes for this. As always, macOS is very exclusive; each fix might work for some mac users, while others may have to try different things. But our general fix approach usually works for all Mac users.
What Causes the Operation Not Permitted Error on Mac Terminal
There are plenty of reasons when you're using the Terminal that may cause the "operation not permitted" to pop up. However, fixing the issue is just as important as understanding its reason. Therefore, before we dive into the fixes, we need to understand the reasons.
Mac's Terminal is a good utility, but it's also a complicated one. As mentioned before, it upgrades overnight; sometimes, older commands don't have much use anymore. That's why it's necessary to comprehend all the possible matters causing this issue.
In this section, we will scrutinize the three main reasons you might be getting the "operation not permitted" error. So, let's analyze each one.
Reason 1: File Lock Issue
One of the main reasons behind any terminal command line not working is the file lock issue. This issue occurs when the user doesn't have sufficient privileges to act on the command they're trying to use.
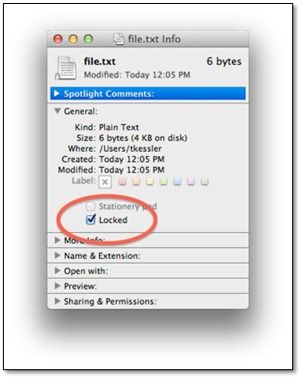
In other words, the files you might be trying to access, remove, replace, or mount may not have given you access. So, you have a file lock issue at hand. This is one of the main reasons that you might be getting the operation not permitted error.
Therefore, it's necessary to unlock any files before proceeding with the command you're trying to enter.
Reason 2: Operation Permission Issue
Another reason behind the inability to perform any task in Mac's Terminal could be the limited operational permission. In other words, you may not have the right privileges to act or use the command you're trying to execute.
That's why Apple suggests you take the file you wish to change and see if you can check it. In other words, head into the file's info and see the Sharing and Permission section to determine whether you can tinker with the file.
Reason 3: New Security Feature Full Disk Access
There are times when your Mac will update. Therefore, advanced SIP (System Integrity Protection) and TCC (Transparency Consent and Control) will protect older command lines and other important aspects of your Mac device.
So, older versions might allow users to conduct specific commands, such as High Sierra or previous ones. Whereas macOS Mojave, Catalina, Big Sur, or Monterey don't exactly allow the mac user to conduct these commands.
So, see if you need to turn off those security protocols before proceeding with the command you're trying to use.
[In Advance] Recover Your Data After macOS Updating
One of the major reasons behind the operation not being permitted is that your macOS has been updated. However, the other important thing Mac users need to worry about is the data loss they might suffer in an awry macOS update.
It's a common issue among mac devices, so the user must tend to it. Moreover, when a mac user uses the Terminal Command line and reinstalls macOS or fixes the hard drive, they need to ensure their data is protected at all costs. Hence, they need the services of capable and professional data recovery software, such as EaseUS Data Recovery Wizard for Mac
EaseUS Data Recovery Wizard for Mac
- Recover lost or deleted files before you try to use terminal commands.
- Recover permanently deleted files in case of data loss caused by bad macOS reinstallation or upgrade.
- Recover data in case of accidental deletion, partition loss, formatting, system crash, or repartitioning.
Therefore, it's important to use this tool to recover your important files before you move forward with the fix. Learning the steps will help you ensure that you won't lose any important files and that you recover your necessary files.
Step 1. Select the location to scan
Launch EaseUS Data Recovery Wizard for Mac and choose the hard drive, SSD, SD card, USB flash drive, or TF card where you lost data. Click "Search for lost files" to start scanning.

Step 2. Filter lost Mac data
The software will automatically scan for lost data on MacBook/iMac. When the scan completes, filter wanted data through the "Type" and "Path" buttons.

Step 3. Recover lost data or files
Double-click a file to preview it. Then, click the "Recover" button to restore the lost data to another place.

3 Ways to Fix Operation Not Permitted on Mac Terminal
In this section, we'll explore a few possible fixes to help you get rid of this issue. While they don't have to do anything directly with the terminal commands, they'll help you fix this issue and get rid of it once and for all.
So, in any macOS, you can apply these fixes. Here's how:
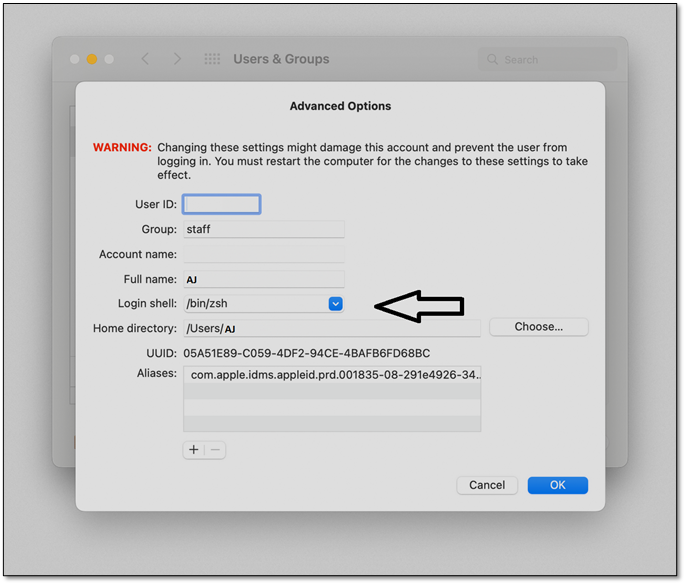
Method 1. Unlock the Home Directory
The first method is to unlock the home directory in your macOS. As mentioned before, you might not have enough permissions to be able to use the Terminal to tinker with commands that might give out an operation not permitted error.
So, here's how you can fix that:
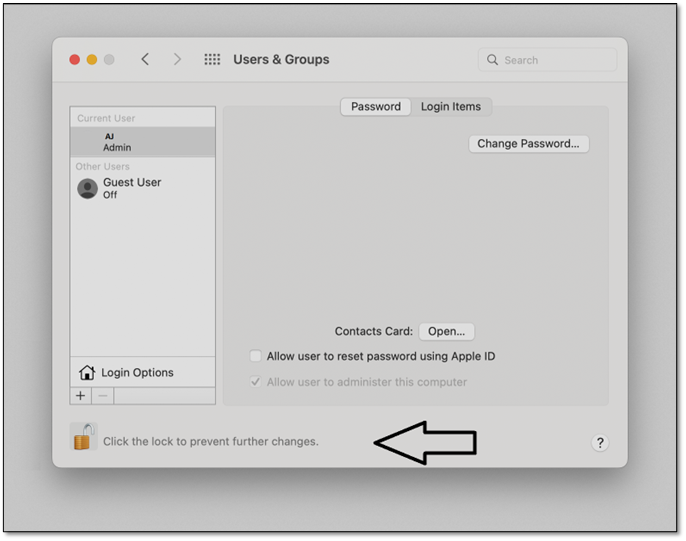
Step 1. Open your macOS.
Step 2. Head to System Preferences and explore user names.
Step 3. Click on "Click the lock to prevent further changes."
Step 4. Right-click on the user name and click on Advanced Options
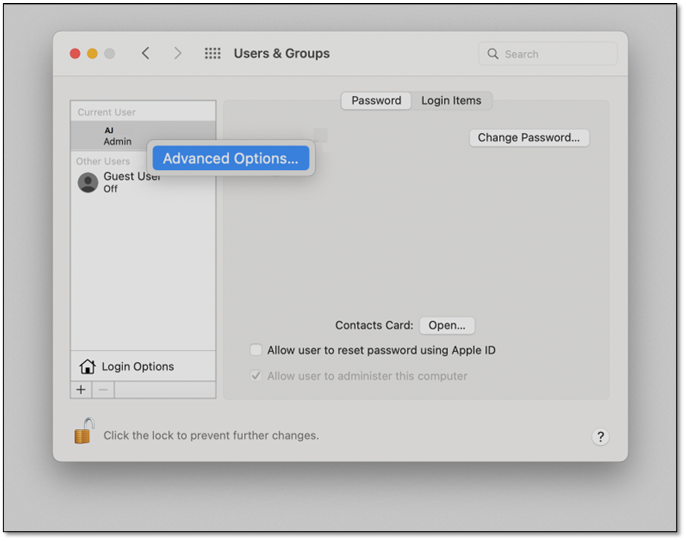
Step 5. Enable the login shell by selecting "/bin/zsh."
Once you've done this, you will have to change the home folder permissions on your Mac. Here's how you can do that:
- Select the Home Folder
- Head into File, then click on "Get Into"
- From there, click "Sharing and permission"
- Change the privilege setting for your user to Read & Write
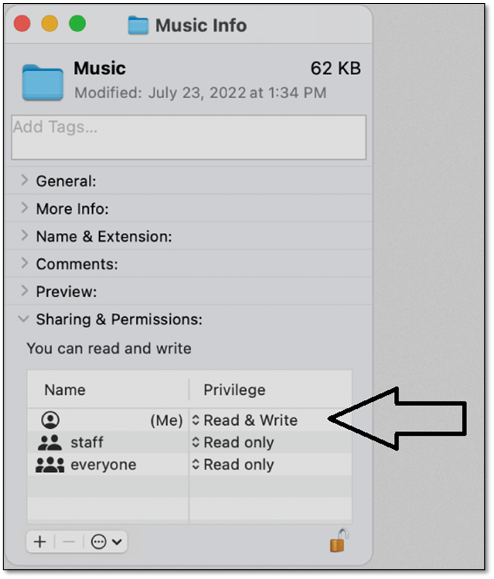
This will grant your Terminal access to the main folders within your computer. Hence, unlocking the home directory ensures you don't run into the error again.
Method 2. Disable System Integrity Protection
The next method is to disable your System Integrity Protection. Since it's an important element of your macOS, you'll need to be in recovery mode to be able to disable it. Therefore, boot your macOS Recovery. Then, follow these steps:
- Restart your Mac and head into Recovery mode.
- Launch the Terminal utility from Mac's Utilities menu.
- Type csrutil disable and press enter.
- Restart your Mac.
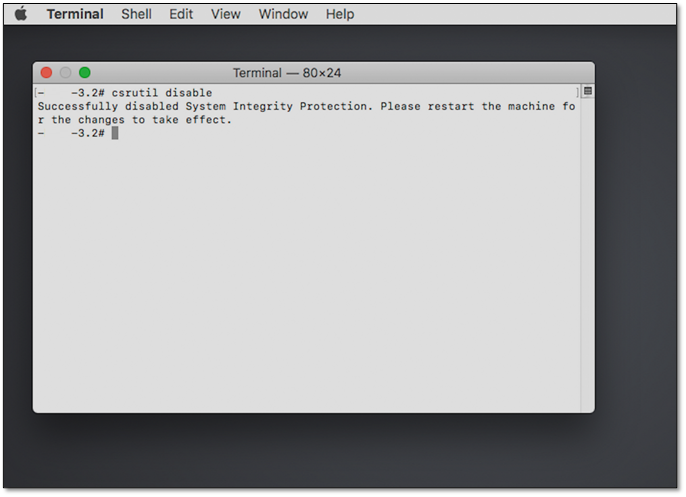
This will disable the SIP, allow your Terminal to access any restricted areas, and prevent it from showing the operation not permitted error again.
Method 3. Grant Terminal with Full Disk Access
The final method is to provide your Terminal utility full access to your storage device. To do it properly, you need to make sure you follow the steps thoroughly. So, here's how you can do that:
- Head into the System Preferences on your Mac device.
- Switch to "Security & Privacy".
- Head into the Privacy tab.
- Scroll the sidebar and find "Full Disk Access".
- Click on the "padlock" to unlock the options.
- Here, you will check the Terminal utility.
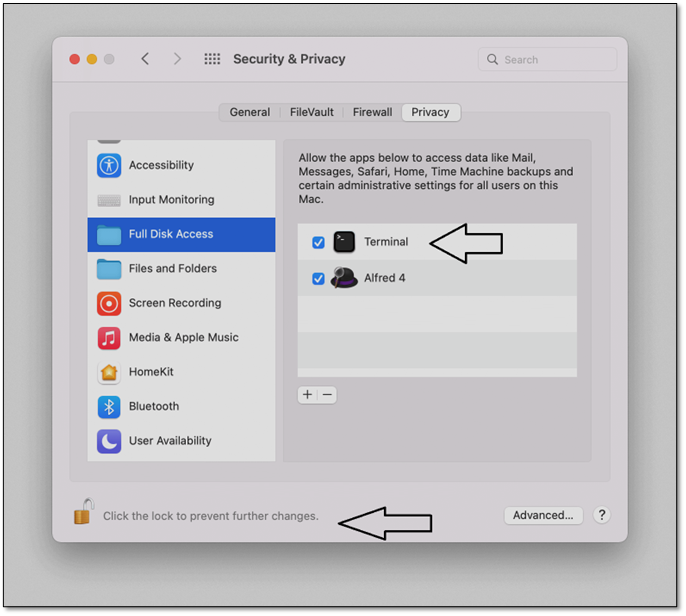
This will allow the Terminal to access your entire disk and not let any restrictions get in the way. Hence, allowing the Terminal to make changes without showing the dreaded error.
Final Thoughts
These are some of the ways you can fix your macOS issue of the operation not permitted error. It's important to understand that disabling SIP will leave some of your macOS aspects vulnerable. Therefore, make sure you enable it after you're done.
Then, it's important that you use the right data recovery tool, like EaseUS Data Recovery Wizard for Mac, for swift data recovery and restoration. So, follow these steps to ensure that it works fine and doesn't give you the error.
Operation Not Permitted FAQs
You might find your answers here if you've got further queries.
1. How do I fix permission denied Terminal Mac?
This article showed a fix where you can head into the folder's settings and allow full read and write permissions. So, ensure the file you're trying to change with Terminal on Mac is granted that access.
2. How do I reset permissions on my Mac?
Once you pick the home folder, go into File, then Get Info. There, you will find Sharing & Permissions at the bottom. Click it and then enable Read & Write privileges for your user.
3. What is full disk access on Mac?
Full Disk Access on Mac allows you to provide specific applications and software to fully access your disk and its data.
4. How do I give application permission on Mac?
In Method 3, we showed you how to access the Full Disk Access permission through system preferences. You can try that option to grant full application permissions on your Mac.
Was This Page Helpful?
Jaden is one of the editors of EaseUS, who focuses on topics concerning PCs and Mac data recovery. Jaden is committed to enhancing professional IT knowledge and writing abilities. She is always keen on new and intelligent products.
Related Articles
-
Accidentally Saved Over a Word Document, Recover Easily
![author icon]() Cedric/2024-11-22
Cedric/2024-11-22 -
(4 Solutions) How to Fix Windows 7 Startup Repair Not Working
![author icon]() Jerry/2024-01-11
Jerry/2024-01-11 -
Five Ways to Fix "Path Not Found C:Boot" Error in Windows
![author icon]() Cici/2024-08-12
Cici/2024-08-12 -
Fix Windows Taskbar Not Working | For Windows 11/10
![author icon]() Dany/2024-10-25
Dany/2024-10-25

EaseUS Data Recovery Services
EaseUS data recovery experts have uneaqualed expertise to repair disks/systems and salvage data from all devices like RAID, HDD, SSD, USB, etc.