Why does the macOS Sonoma Update Not Show Up
Is the macOS 14 Sonoma update not showing? While the latest operating system news is bound to cause excitement, several users have reported this issue. If you are wondering how to fix the macOS 14 Sonoma update not showing, you have come to the right place!
Before we proceed with the solutions to this particular problem, it is vital to know the reasons that cause the issue. Look at the reasons that cause the macOS 14 Sonoma update not to show.
- ⚔️Incompatibility: The Mac needs to be compatible with macOS 14 Sonoma. If that is not the case, the update will not show. For that, you need to look at the list of models compatible with Sonoma.
- 🎚️Beta updates turned off: If the beta updates option is turned off, you will not receive the updates on the system. In that case, you must check the software update section and ensure it is turned on.
- 🍎Not joined the Apple Developer program: Since the beta version released is not for the public, you need to sign up for the Apple Developer program. Lack of membership will lead to you not finding the Sonoma update.
- 🌐Poor internet connection: Though this reason might seem bizarre, unstable net connectivity can lead to the update not showing. Check the network connection and make sure it's stable and robust.
To help you out, we have added a video tutorial. Let's check it out –
- 00:35 - Important criteria before upgrading to macOS Sonoma.
- 02:55 - Go to Software Update.
- 04:09 - Upgrade to macOS Sonoma.
How to Fix macOS 14 Sonoma Update Not Showing
Are you wondering how to fix the macOS 14 Sonoma update not showing? Worry not! There are numerous solutions you can apply.
Here is a list of fixes you can try –
- 1. Check the macOS 14 Sonoma Supported Macs
- 2. Check and Correct Apple's Date & Time
- 3. Restart Your Mac Device
- 4. Check the Internet Connection on Mac
- 5. Verify the macOS Status to Fix the Update Not Showing
- 6. Update the macOS 14 Sonoma in Safe Mode
- 7. Disable Suspicious Applications on Mac
- 8. Update the macOS Sonoma from Bootable USB
1. Check the macOS 14 Sonoma Supported Macs
One of the easiest solutions for the macOS 14 Sonoma update not showing is to check the compatibility. You can easily check if your system is compatible with Sonoma or not.
For that, go to the Apple icon and click on it. Select the About This Mac option. Here, you will find information about your system.
Here is the list of models that are compatible with downloading macOS 14 Sonoma –
| iMac Pro (2017) |
| iMac (2019 or later) |
| Mac Mini (2018 or later) |
| MacBook Pro (2018 or later) |
| MacBook Air (2018 or later) |
| Mac Pro (2019 or later) |
| MacOS Ventura and the latest models |
| Mac Studio |
2. Check and Correct Apple's Date & Time
Sometimes, incorrect dates and times can cause issues with the update. Fixing it might resolve the problem.
For that, take a look at the steps you need to follow –
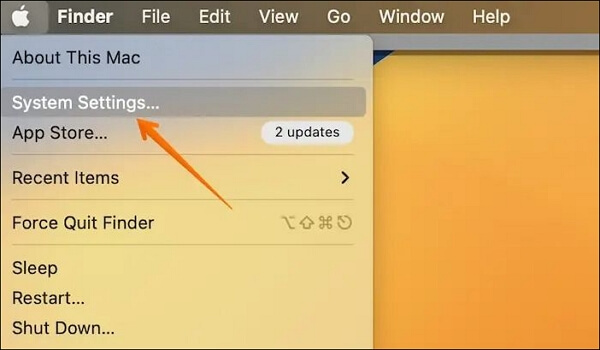
Step 1. Click on the Apple logo.
Step 2. Go to System Settings from the drop-down menu.
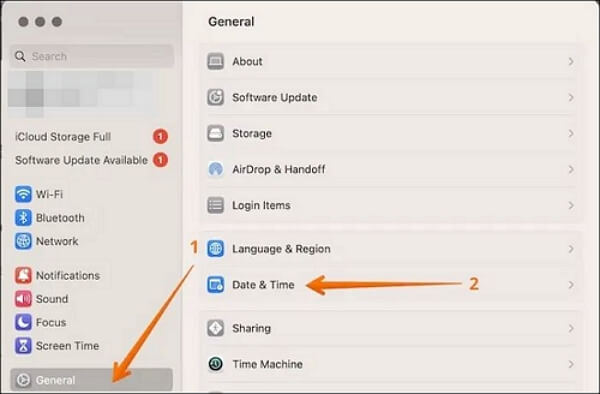
Step 3. Choose General from the left-hand side.
Step 4. From the right-hand side, click on "Date & Time".
Step 5. Turn on "Set time zone automatically using your current location".
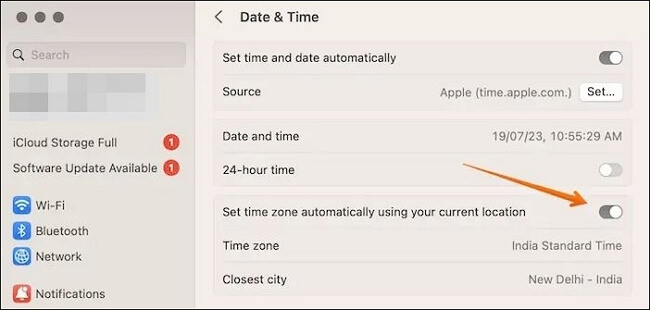
After that, you must check if you can update the system with macOS 14 Sonoma. If not, you can move to other solutions.
3. Restart Your Mac Device
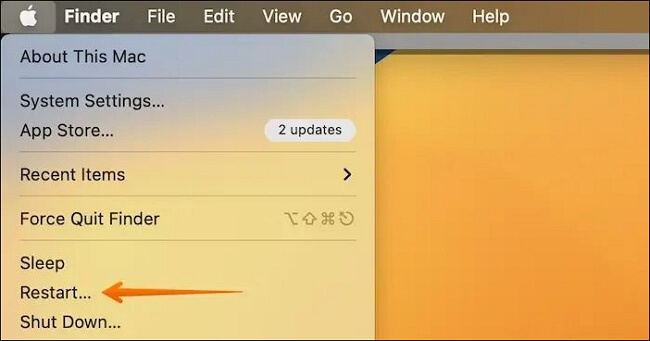
Another simple hack to fix the macOS Sonoma update issue is to restart the system. It will only take a few seconds and might resolve the problem. You should go to the Apple icon and click the Restart option from the drop-down menu. If the screen is frozen, you can force restart the system.
Press and hold the power button to force restart until the system is turned off. After a few seconds, press and hold the power button again to turn it on. Restarting the system can help the App Store identify the processes that need updating.
4. Check the Internet Connection on Mac
Another thing you need to check is the internet connection if you are having trouble updating it. The ideal way to check your net connectivity is to use Safari and visit a website. You need to check the internet connection if you can't do that.
Here are the steps to follow –
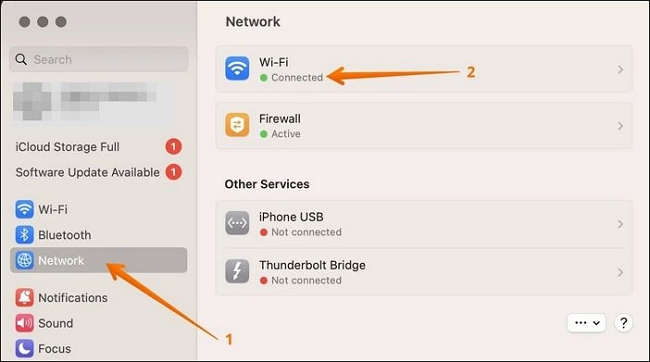
Step 1. Click on the "Apple" logo.
Step 2. Go to "System Settings".
Step 3. Choose "Network" from the left-hand side.
Step 4. You are connected to the Internet if you see a green dot under WiFi or Internet connection.
5. Verify the macOS Status to Fix the Update Not Showing
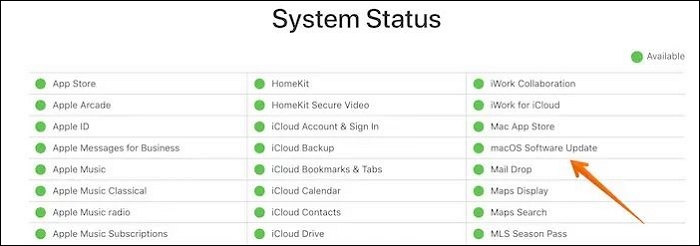
Have you checked the macOS Status from the Apple system status page? That might be the reason you can't install the update. Go to the Apple System Status page and look for the "macOS Software Update" option. If you see a green dot, it means everything is fine.
If one of the methods is helpful in resolving macOS 14 Sonoma update not showing issue, share it on Facebook, Twitter, Instagram, and other social media platforms!
6. Update the macOS 14 Sonoma in Safe Mode
You can also try updating the macOS 14 Sonoma in Mac Safe Mode. The steps differ based on the model you are using.
For Silicon-based Mac –
Step 1. Go to the Apple menu.
Step 2. Click on "Shut Down".
Step 3. Press the power button and hold it.
Step 4. Release it when you see "loading startup options."
Step 5. Press the Shift key and hold it.
Step 6. Choose "Continue in Safe Mode".
Step 7. Try to update the system.
For Intel-based Mac -
Step 1. Go to the "Apple" menu.
Step 2. Click on "Shut Down".
Step 3. Turn on the system.
Step 4. Press the Shift key and hold it.
Step 5. Log into the system.
Step 6. Try to update the system.

Apple Silicon Mac | Everything You Should Know
Advancing technology has enabled individuals to complete various tasks using a MacBook. Read more >>
7. Disable Suspicious Applications on Mac
Sometimes, malware or suspicious applications can interfere with updating the system. In that case, you can remove such apps from the login items. Check out these steps -
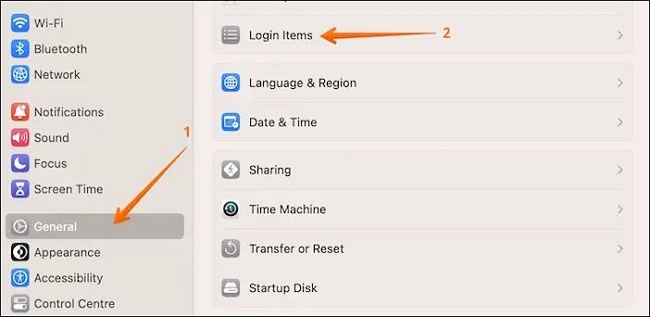
Step 1. Click on the Apple menu.
Step 2. Go to System Settings.
Step 3. Select General.
Step 4. Go to the Login Items tab on the right-hand settings.
Step 5. In this window, toggle off the apps you think are suspicious so they don't run in the background.
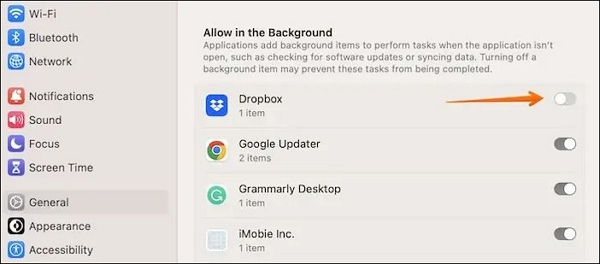
Step 6. Restart the system.
8. Update the macOS Sonoma from Bootable USB
You will first need to create a bootable USB drive using the macOS Sonoma installer and Disk Utility. Once you have done that, based on your Macbook type, you can install the OS on your Mac.
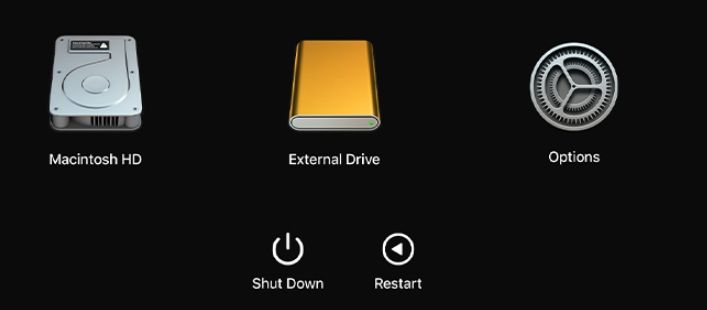
For Silicon Macs:
Step 1. Turn on the system, press the power button, and hold it until you see the startup options window.
Step 2. It will now display bootable volumes, which will include the USB.
Step 3. Choose the volume with the bootable installer, and click the Continue button.
Step 4. Follow the on-screen instructions to install macOS Sonoma
For Intel-based Macs:
Step 1: Power on your Macbook, and press and hold the Option key.
Step 2. It will then show the list of bootable volumes. You can not release the key.
Step 3. Select the USB, and press the Enter key.
Step 4. Choose Install macOS.
Step 5. Select Continue and follow the on-screen instructions.
How to Recover Data After macOS Sonoma Update
Are you worried about losing data after the macOS Sonoma update? That is an entirely natural thing to worry about! And data loss can occur. However, you can use professional data recovery software - EaseUS Data Recovery Wizard for Mac!
The EaseUS Data Recovery Wizard for Mac is an efficient data recovery tool. It is easy to use and aids in the restoration of photos, videos, documents, etc., with ease. Moreover, you can also retrieve data irrespective of the situation.
Here are some causes that can lead to data loss –
- Partition loss: Losing data due to partition loss can lead to panic. However, with this excellent Mac data recovery software, you can get it back.
- Human error: Despite best efforts, humans still make mistakes. Accidental data loss can easily be counteracted with this reliable data recovery tool.
- Virus attack: Protecting your system is of critical importance. Otherwise, you could lose crucial data due to malware.
- System crash: Bugs, glitches, or other errors can cause your Mac deletes everything. And with that comes data loss. You can use EaseUS Data Recovery Wizard for Mac to restore it.
If you are eager to use EaseUS Data Recovery Wizard for Mac, follow the steps listed below -
Note: You can create a backup by clicking the "Disk Backup" on the left first. When the disk is damaged or the data on the disk is accidentally deleted or lost, you can get the data back from the backup image.
Step 1. Select the location
Select the disk where you lost data after updating to macOS Sonoma/Ventura/Monterey/Big Sur. Then, click "Search for lost files".

Step 2. Find lost data after the scan
EaseUS Data Recovery Wizard for Mac will immediately scan your selected disk volume and display the scanning results on the left pane. Use the file type and file path to find wanted data on Mac.

Step 3. Recover data after macOS update
Select the target files that were unknowingly lost during or after the update and click the "Recover" button to get them all back.

Summary
Are you worried about the macOS 14 Sonoma Update Not Showing? Incompatibility, poor net connection, beta updates not on, etc., can cause the problem. However, you can solve it with multiple fixes. For instance, you can check if the system is compatible or restart the system.
Data loss can occur during the macOS 14 Sonoma Update Not Showing issue. In that case, opting for trustworthy data recovery software is a great idea. The software is user-friendly and helps users restore different types of data.
macOS 14 Sonoma Update Not Showing FAQs
To know more about the macOS 14 Sonoma Update Not Showing, read the questions and answers listed below -
1. Why isn't my Mac showing the latest update?
Various reasons explain why your Mac is not showing the latest update. It could be due to an unstable net connection. It can also be due to temporary glitches, system incompatibility with the software, etc.
2. How to install macOS 14 Sonoma?
To install macOS 14 Sonoma, go to System Settings and download the beta updates. Install macOS 14 Sonoma beta 1. Restart the system.
3. How to fix the requested version of macOS is not available?
The best way to the requested macOS version is not available is by rebooting the router or checking the Wi-Fi connection. Make sure the internet connection is stable before you update the system again.
4. How to download the macOS Sonoma developer beta?
To download the macOS Sonoma developer beta, follow these steps –
- Click on Account. Enter your Apple ID and password under "Sign in to Apple Developer"
- Accept the terms and conditions.
- Now, you can go to System Settings and download the beta updates.
Was This Page Helpful?
Jaden is one of the editors of EaseUS, who focuses on topics concerning PCs and Mac data recovery. Jaden is committed to enhancing professional IT knowledge and writing abilities. She is always keen on new and intelligent products.
Related Articles
-
Format FS=FAT32 Quick: Full and Comprehensive Guide on Use It
![author icon]() Sherly/2024-07-01
Sherly/2024-07-01 -
How to Repair Install Windows 10 in 3 Different Ways
![author icon]() Jerry/2024-01-11
Jerry/2024-01-11 -
How to Perform Windows 10 Factory Reset from Boot [Step-by-step with Pictures]
![author icon]() Jerry/2024-01-11
Jerry/2024-01-11 -
How Do I Format an SD Card in Linux? [100% Working Solution]
![author icon]() Tracy King/2024-01-11
Tracy King/2024-01-11

EaseUS Data Recovery Services
EaseUS data recovery experts have uneaqualed expertise to repair disks/systems and salvage data from all devices like RAID, HDD, SSD, USB, etc.