Have you encountered the frequently happening issue that the Mac update deletes everything? Don't worry. This page has solved the problem with four workable solutions:
| Workable Solutions | Step-by-step Troubleshooting |
|---|---|
| Fix 1. Recover Lost Data with Software | Download EaseUS file recovery software > select file lost location > scan...Full steps |
| Fix 2. Restore from Time Machine Backup | Step 1. Open up Launchpad on Mac and click "Others". Step 2. Find and enter Time Machine...Full steps |
| Fix 3. Recover from iCloud Backup | Open Cloud.com > Go to Settings > Select "Restore Files" under Advanced...Full steps |
| Fix 4. Recover from APFS Snapshot | Restart Mac and hold Command + R > Recovery Mode > Select "Restore from Time Machine Backup"...Full steps |
New Features of macOS Catalina 10.15
After Mojave, the latest version of macOS - Catalina is now available to download. Most Mac users have their macOS from Mojave 10.14 to Catalina 10.15. It’s free and worthwhile to upgrade your Mac and enjoy the new features of Catalina.
- 1. Remove iTunes: Beginning with Catalina, iTunes is expected to be replaced by Apple Music, Apple TV, and Apple Podcasts.
- 2. Support Second Screen: Catalina also offers second screen support for utilizing iPads as a companion second screen from Mac computers.
- 3. Sidecar - use your iPad as drawing tablet: After connecting the iPad through Sidecar, users can use Apple pencil to draw and annotate things to iPad.
- 4. Screen Time: Screen Time allows users to set App Limits across all their Apple devices, not just Macs.
- 5. Updated Photos App: The Photos app curates and features your best photos, removing poor-quality photos and duplicate shots.
However, during the upgrading process, you are faced with data loss problems. Back up your Mac data before you take action. If you have lost data, see the following part.
Mac Update Deleted Everything
"I updated my Mac to Catalina 10.15 and lost everything. My entire hard drive has been wiped. Nothing on my desktop, documents, mail, folders, etc. The applications are there, but that's it. My mail is gone, and my profile appears as though it has been newly created. Is there any way I can restore the lost files, or am I screwed..."
To most Mac users who lost data during a macOS update, they all have three questions on their minds: 1. Why does a macOS update delete everything? 2. Is lost data recoverable? 3. How to get the new features and get back lost data?
As a matter of fact, very few Mac users know the causes of data loss after macOS updates. To start Mac data recovery due to macOS update, check the causes first and learn why your data can be restored.
Why did the macOS update delete everything?
Generally, a subsequent major release of macOS won't erase or touch user data. Pre-installed apps and configurations will also be kept in the upgrade. However, you should be cautious and responsible for your data's sanity. Upgrades don't negate the possibility of going wrong, and in the unlikely case, you may lose access to data due to the following causes:
- Hard drive failure or file system error
- Unfinished macOS update, macOS update failure, or OS crash
- There is not enough space on the hard drive for an OS update
To prevent the inconvenience of losing important data, it is recommended that you back up your important files via EaseUS Data Recovery Wizard for Mac before installing or updating macOS.
Back Up Your Mac and Never Lose Data
Back up and restore your MacBook/iMac without Time Machine, iCloud, or external hard drives.
This software can also help you create a bootable installer safely so you won't lose any data. Follow the steps here:
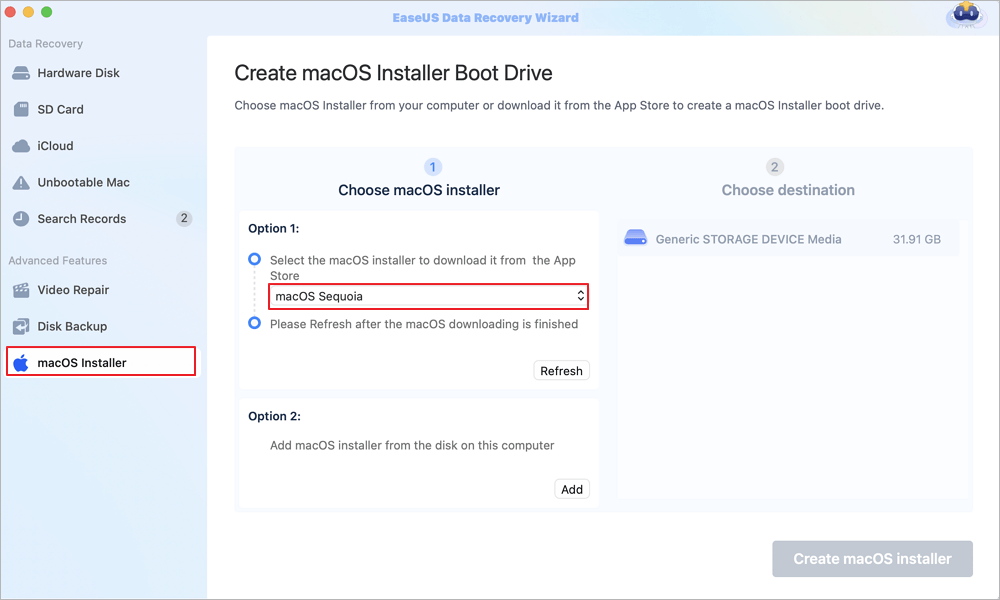
Step 1. Select a macOS version
Select a macOS version from the list, or click the "Refresh" option to get the downloaded macOS version. Or you can add a macOS installer from your disk by clicking the "Add" button. Insert a USB flash drive larger than 16 GB to save the macOS installer.
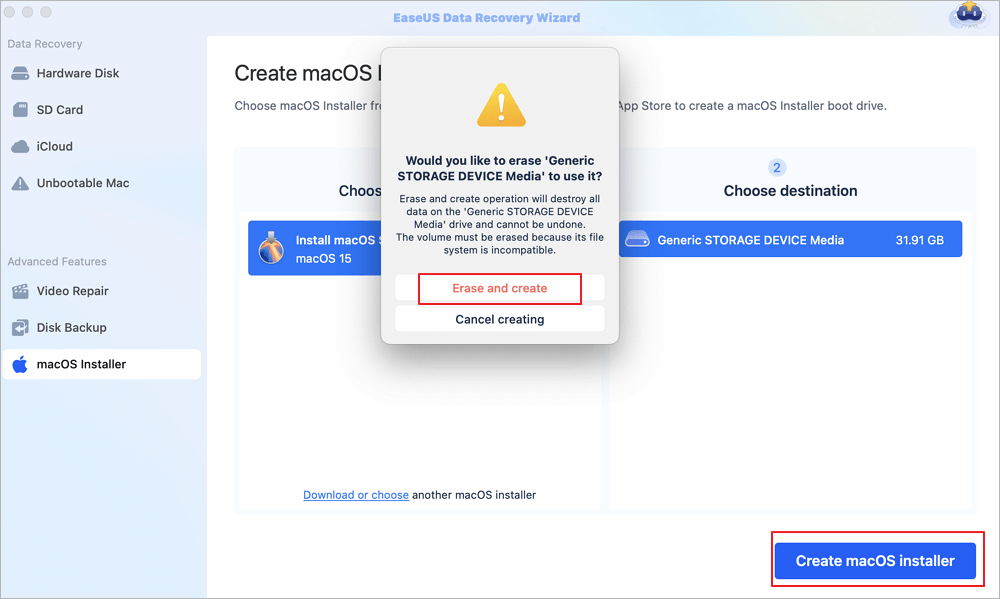
Step 2. Erase the USB flash drive
After choosing the USB flash drive, click the "Erase and create" option in the pop-up window to format your USB flash drive quickly, and then click the "Create macOS installer" button to continue.
- Note: This operation will delete all data on your USB flash drive, please back up important data in advance, or use EaseUS data recovery software to recover your data.
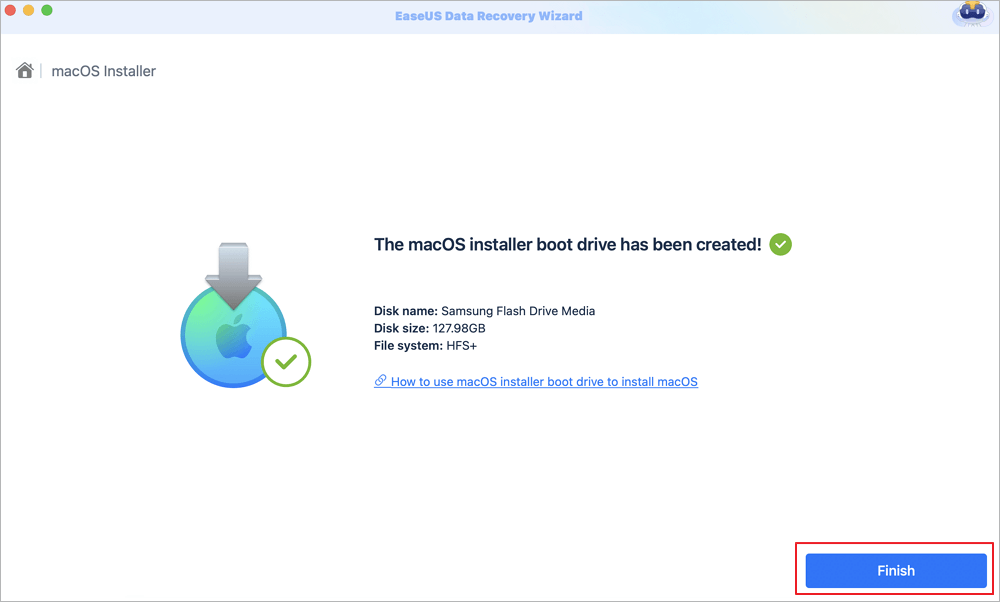
Step 3. Create the macOS installer boot drive
Wait for the process to complete, and click the "Finish" button. Your macOS installer boot drive has been successfully created!
Is lost data recoverable?
In fact, lost files can be recovered. When a file is accidentally or intentionally deleted from Mac, only the pointer to it is deleted, not the actual file. The data is not physically deleted from the system until it is overwritten with new data.
If you find your files missing after the Mac update, stop using the device to avoid writing any new data on the hard drive. Then, follow the solutions below to recover lost data on Mac after the macOS update.
Solutions to Recover Files After macOS Catalina/Mojave Update
When a Mac update deletes everything on your computer, try the following solutions to recover all missing files.
If you have backups, you can retrieve data from the backup. If you have no backup, you must use professional Mac data recovery software to get back data as soon as possible.
Solution 1. Recover Lost Data with EaseUS Data Recovery Software for Mac
EaseUS Mac data recovery software - Data Recovery Wizard for Mac can recover lost data after macOS 10.15 update. Besides, if you are faced with the following problem, you can also use this data recovery software to regain the deleted or missing data.

Let's see how to recover lost data and missing files after Mac update:
Step 1. Select the location
Select the disk where you lost data after updating to macOS Sonoma/Ventura/Monterey/Big Sur. Then, click "Search for lost files".

Step 2. Find lost data after the scan
EaseUS Data Recovery Wizard for Mac will immediately scan your selected disk volume and display the scanning results on the left pane. Use the file type and file path to find wanted data on Mac.

Step 3. Recover data after macOS update
Select the target files that were unknowingly lost during or after the update and click the "Recover" button to get them all back.

Solution 2. Restore macOS Catalina/Mojave Data from Time Machine Backup
This method works well only if you have Time Machine backups. You can easily get deleted, lost, or missing data back by following these steps:
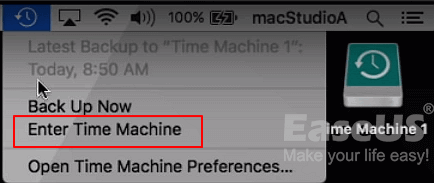
Step 1. Open up Launchpad on Mac and click "Others".
Step 2. Find the Time Machine icon and click it to enter Time Machine.
Step 3. Use the up and down arrow to scroll the timeline to browse the backups.
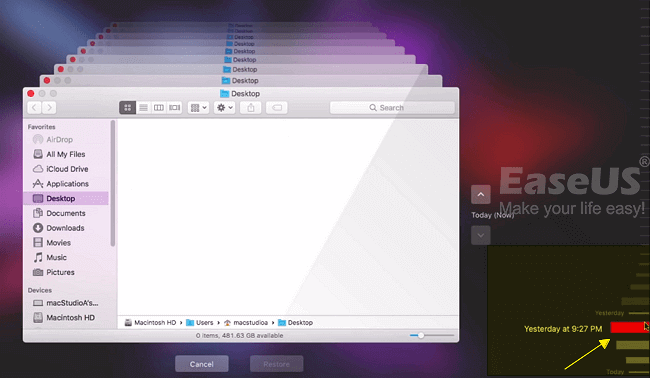
Step 4. After finding the files that you want to recover, click "Restore" to recover those lost data from Time Machine on macOS Catalina/Mojave.

Solution 3. Recover Missing/Lost Files from iCloud Backup
Some Mac users have the habit of backing up their data and files to iCloud. To these Mac users, it seems to be good news when their files are missing or lost after the macOS update.
Here are the steps to bring lost Mac files from iCloud backup:
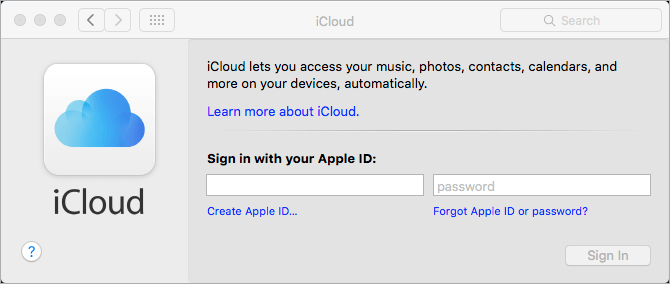
Step 1. Go to iCloud.com in your Mac browser and log in with your Apple ID.
Step 2. Go to Settings and scroll down to the bottom of the page.
Step 3. At the bottom left, click on "Restore Files" under Advanced.
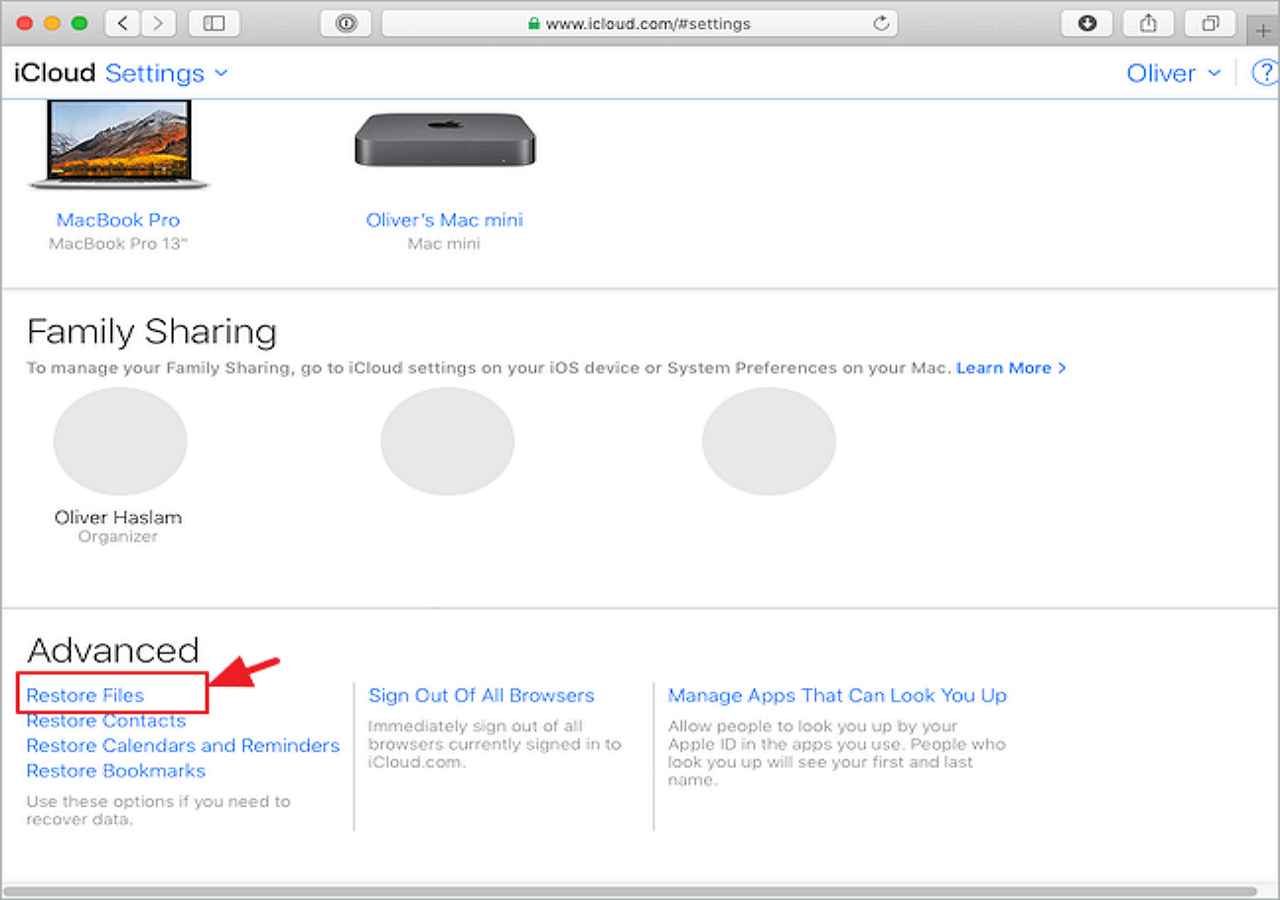
Tips: To restore contacts, bookmarks, calendars, and reminders from iCloud, click the corresponding option under Advanced.
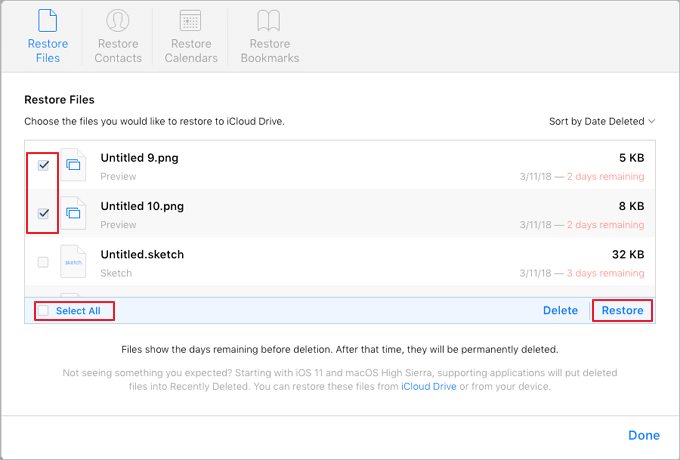
Step 4. Check the files you want to restore or click "Select All" if you really need to restore everything. Click the Restore button to recover them.
Solution 4. Restore Files from APFS Snapshot using macOS Recovery
Being similar to System Restore in Windows OS, macOS like High Sierra, Mojave, and Catalina also enable users to use the macOS Recovery feature to restore files from APFS snapshots. It only works on macOS Catalina, Mojave, and High Sierra.
A snapshot will automatically be taken once the installation or update of your macOS starts. You need to agree to the license terms so to enable snapshots to start. A snapshot contains the current state of the target disk, including files, macOS version, etc. Also, note that snapshots are a feature of APFS, and if the target drive is not formatted with APFS, no snapshot will be saved.
If you don't want to revert macOS Catalina or Mojave to the previous state, go back to solution 1 and let reliable Mac file recovery software help.
If your Mac hard drive is with APFS, you can accept the result of restoring files from APFS snapshot, bringing macOS to the previous state, follow the steps below:
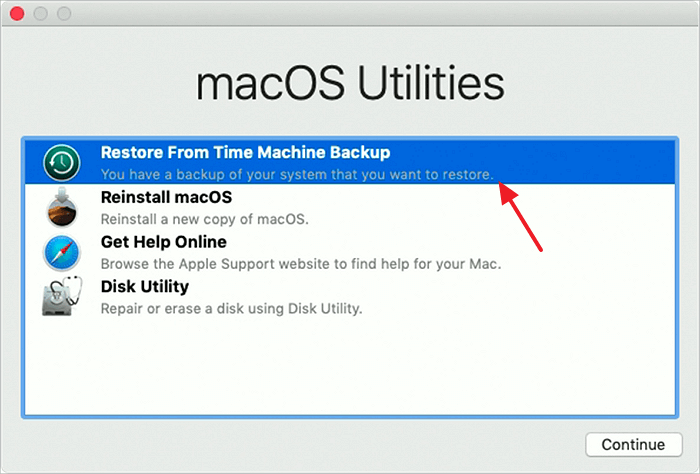
Step 1. Restart Mac and hold Command + R in the meantime to boot into Recovery Mode.
Release these keys when you see the Apple logo.
Step 2. Select Restore From Time Machine Backup and then click the Continue button.
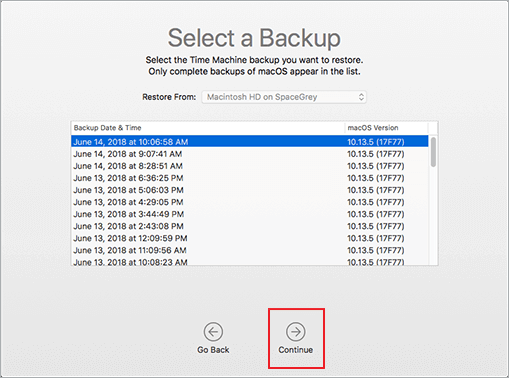
Step 3. Disks connected to your Mac that contain APFS snapshots will be listed. Select the Mac startup disk and click "Continue".
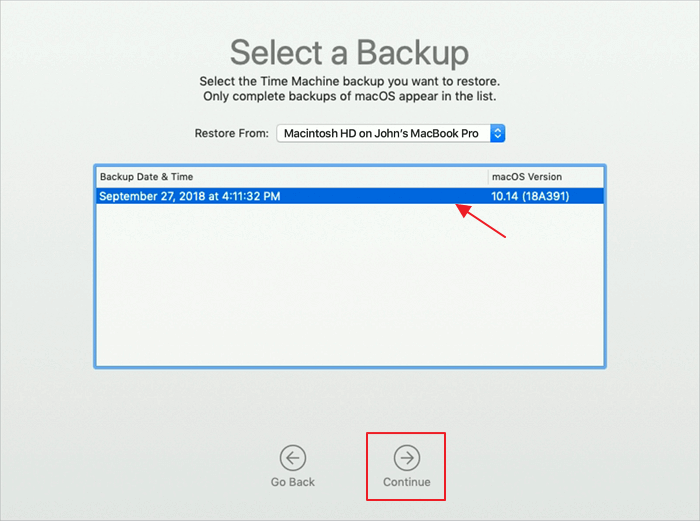
Step 4. A list of snapshots will be displayed, sorted by date with the created image of the macOS version. Select the snapshot you wish to restore from, then click "Continue".
You will see a process bar, and your Mac will reboot automatically when the recovery is over. After the Mac reboots, you can see and access your lost files on your Mac with the previous macOS. If you still want to update to the latest macOS, back up your Mac data and try again.
Conclusion
This page covers 4 practical files to help Mac users to restore missing or lost files due to macOS updates. If macOS Catalina or Mojave update deletes everything from your Mac, you can restore lost files from your backup:
Time Machine Backup, iCloud Backup, APFS Snapshot.
If you have no backup, don't worry. You still have a chance with the help of professional data recovery software, like EaseUS Data Recovery Wizard for Mac. It will fully scan and find all your lost Mac files deleted by the macOS update in only three steps.
Was This Page Helpful?
Finley is interested in reading and writing articles about technical knowledge. Her articles mainly focus on file repair and data recovery.
Brithny is a technology enthusiast, aiming to make readers' tech lives easy and enjoyable. She loves exploring new technologies and writing technical how-to tips. In her spare time, she loves sharing things about her game experience on Facebook or Twitter.
-
EaseUS Data Recovery Wizard is a powerful system recovery software, designed to enable you to recover files you’ve deleted accidentally, potentially lost to malware or an entire hard drive partition.
Read More -
EaseUS Data Recovery Wizard is the best we have seen. It's far from perfect, partly because today's advanced disk technology makes data-recovery more difficult than it was with the simpler technology of the past.
Read More -
EaseUS Data Recovery Wizard Pro has a reputation as one of the best data recovery software programs on the market. It comes with a selection of advanced features, including partition recovery, formatted drive restoration, and corrupted file repair.
Read More
Related Articles
-
Top 11 Tools to Recover Deleted Partitions on Mac
![author icon]() Daisy/Jun 17, 2026
Daisy/Jun 17, 2026 -
How to Fix MP4 Not Compatible with Quicktime on Mac? 7 Ways to Repair MP4 Video on Mac
![author icon]() Jaden/Jun 26, 2026
Jaden/Jun 26, 2026 -
How Can I Recover Formatted SD Card? Possible or Not?
![author icon]() Dany/Jun 30, 2026
Dany/Jun 30, 2026 -
How to Find Movies on Mac [Find, Delete, and Recover]
![author icon]() Dany/Jun 30, 2026
Dany/Jun 30, 2026