Quick Navigation:
| Workable Solutions | Step-by-step Troubleshooting |
|---|---|
| 1. Fix Black Screen of Death |
1. Disconnect All Peripherals...Full steps 2. Force Restart Your Mac...Full steps 3. Reset SMC Settings...Full steps 4. Change the Keyboard Sequence...Full steps 5. Reset NVRAM/PRAM...Full steps 6. Reinstall macOS...Full steps |
| 2. Recover Deleted/Lost Mac Data | Install and run EaseUS Data Recovery Wizard...Full steps |
Overview of Mac Black Screen of Death
When you turn on your Mac and wait a few seconds, it doesn't start up normally as before, but suddenly shows a black screen. When this happens, your first reaction may be to think that the computer is broken. In fact, there is no need to panic, there are many ways to help you solve this problem on your own. The first thing we need to do, however, is to figure out why your Mac suddenly goes black.
Like Mac computers, Windows computers will also have this problem, but Windows will appear blue screen in most cases. Excluding simple reasons such as low battery power, the two most common causes of Mac black screen are software/hardware incompatibility and poor firmware contact.
In the next parts, we will introduce a few self-troubleshooting solutions. Don't worry if you're not a computer guru. Just follow the guidelines step by step, you can manage to fix this Mac black screen of death issue.

Solution 1. Disconnect All Peripherals
As unbelievable as it may sound, certain external devices can indeed cause your Mac to go black. As a kind of hardware, an external device may be incompatible with some system settings and cause the computer to fail to boot up normally. So the first thing you have to do is to rule out this possibility, disconnect all peripherals, try to start the Mac again, and see if the black screen problem persists.
Solution 2. Force Restart Your Mac
This method sounds simple, but it is actually very useful. Most electronic products can be restarted to resolve unexplained failures. Many Mac users may not shut down the computer after each use, so the computer will stay in sleep mode for a long time, and a forced restart can help wake up your Mac.
Step 1. Hold down the Mac power button for 6-10 seconds.
Step 2. When your Mac powers down, wait 10 seconds.
Step 3. Press the power button to boot it again and see if it can work properly.
ExFAT vs Mac OS Extended: Which One to Choose?
Every external storage device has a file system format. On macOS, the compatible formats include FAT, ExFAT, APFS, and Mac OS Extended. For some users, it's difficult to choose between ExFAT and Mac OS Extended because they don't know about their pros and cons.

Solution 3. Reset SMC Settings
SMC means Systems Management Controller. It’s for Macs to control temperature, keyboard, lights for the keyboard and display, fans, and other processes. Simply put, it's something that controls your Mac's hardware. Resetting this setting can fix Mac black screens caused by poor firmware contacts.
Step 1. Shut down the Mac and connect the Mac to power (if it is not connected). Ensure to use your MagSafe adapter.
Step 2. While the Mac is off, press the Shift + Control + Option + Power keys together at the same time and hold down for a few seconds.
Step 3. Release all keys at the same time when the Mac booting up.
Solution 4. Change the Keyboard Sequence
This method is suitable for the Mac black screen shows after booting.
Step 1. Tap on the power button only once and wait for a dialog box to appear on the screen.
Step 2. Press the S key from the keyboard as it is the shortcut for Sleep.
Step 3. Then press and hold the power button for a few seconds to start a hard shutdown.
Step 4. Wait for about 15-20 seconds and press the Power button to turn on the Mac.
Solution 5. Reset NVRAM/PRAM
This is what Apple Support will suggest you try when you contact for help. And it mainly works for solving the unexplained problems of your Mac. Follow the steps below to reset NVRAM/PRAM.
Step 1. Shut down your Mac, then turn it on and press and hold these four keys together: Option, Command, P, and R.
Step 2. Hold these keys for about 20 seconds, during which your Mac might appear to restart.
- On Mac computers that play a startup sound, you can release the keys after the second startup sound.
- On Mac computers that have the Apple T2 Security Chip, you can release the keys after the Apple logo appears and disappears for the second time.

Solution 6. Reinstall macOS
If none of the above methods work, then you can try reinstalling macOS. Under normal circumstances, reinstalling macOS will not cause data loss, but we still recommend that you make a backup before reinstalling.
To reinstall macOS, you need to first boot into recovery mode. Here are the methods for different Mac computers to enter Recovery Mode.
For Intel Macs:
Step 1. Restart your Mac.
Step 2. Press the Command and R keys at the same time until you see an Apple logo or spinning globe appear.
Step 3. Choose from the Recovery Mode utility options.
For M1 Macs:
Step 1. Turn off your Mac.
Step 2. Press and hold the Power button.
Step 3. A message stating you'll be able to access startup options soon will appear. Keep holding the button down.
Step 4. Click Options > Continue to open up Recovery.
Now you can follow the steps to reinstall your system.
Step 1. Choose Reinstall macOS (your OS version name), and click Continue.
Step 2. Follow the on-screen guide to finishing the reinstalling process.
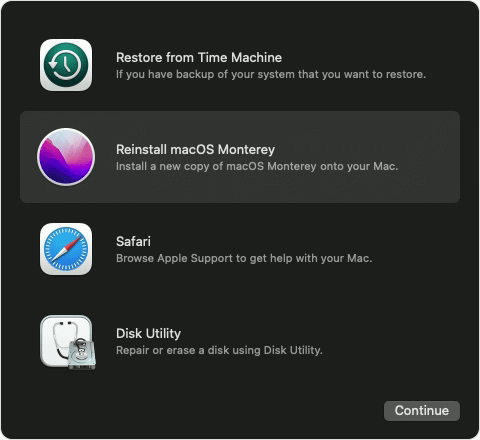
During the installation, your Mac might restart several times. You will see a progress bar or a black screen. Please don't close your Mac during the process.
Bonus Tip: Recover Deleted/Lost Mac Data & Prevent Data Loss after Erasing Disk
As mentioned above, when there is a problem with your Mac, one solution is to reinstall macOS. In recovery mode, you can see that in addition to reinstalling macOS, there is an option called erase the disk using Disk Utility. When your Mac is badly damaged, reinstalling macOS will require you to erase the hard disk first, and performing this step will cause data loss.
In order to prevent accidental data loss and recover lost data when needed, we suggest you try data recovery software - EaseUS Data Recovery Wizard for Mac. What makes it stands out is it supports users to recover data in the Recovery Mode, which enables users to enter the system and recover data when the Mac can't work properly.
Here are the detailed steps of how to recover data in the Recovery Mode for your Mac. If you are interested in this software, download it from the button below and have a try.
Remember to boot your Mac into Recovery Mode first and follow these guides:
Step 1. Launch EaseUS Software in Recovery Mode
Select "Utilities > Terminal" from the top menu, and enter the command sh <(curl https://d3.easeus.com/mac/boot.sh). Hit "Return". Wait for the application to open, and it will take several minutes.
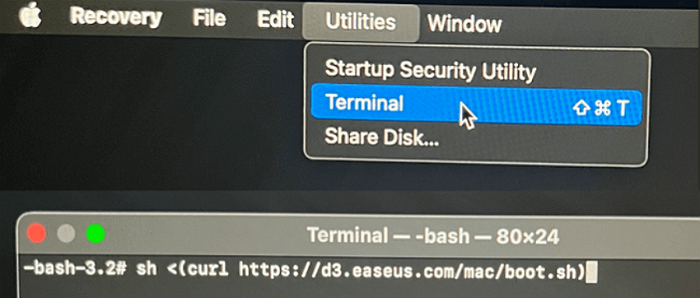
Note: If the Terminal displays either "No such file or directory" or "Could not resolve host," you should verify that the command line you entered is correctly spelled, ensure your Mac has a stable internet connection, and confirm that your macOS version is not lower than macOS 10.15.
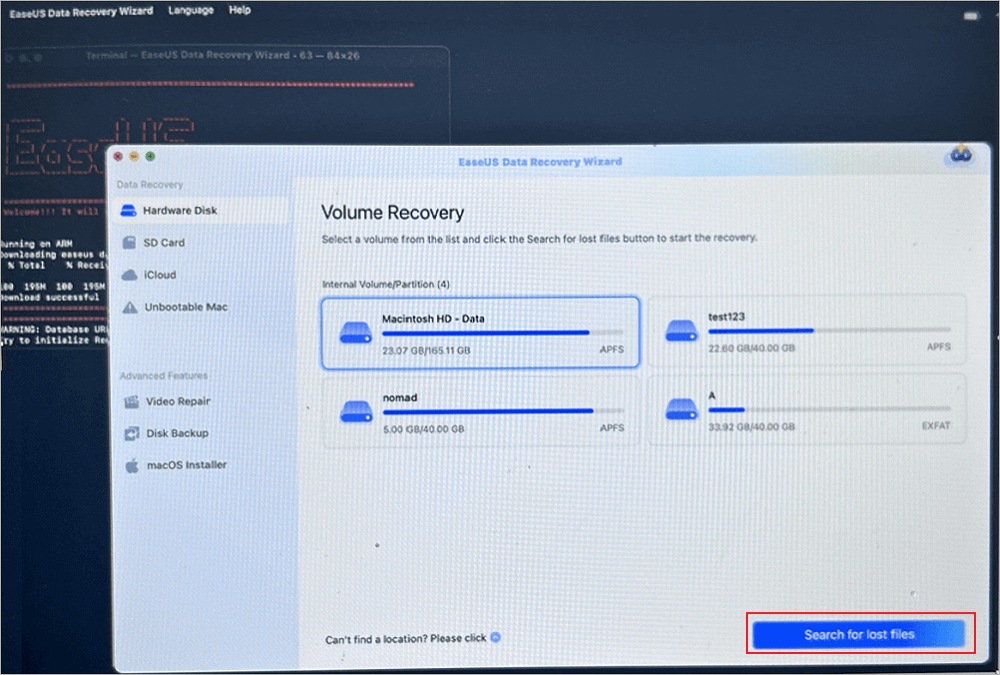
Step 2. Select the Volume on Your Mac Hard Drive
Select the volume where your lost data is stored, and click "Search for lost files". The EaseUS software will quickly locate all the recoverable data on the selected volume.
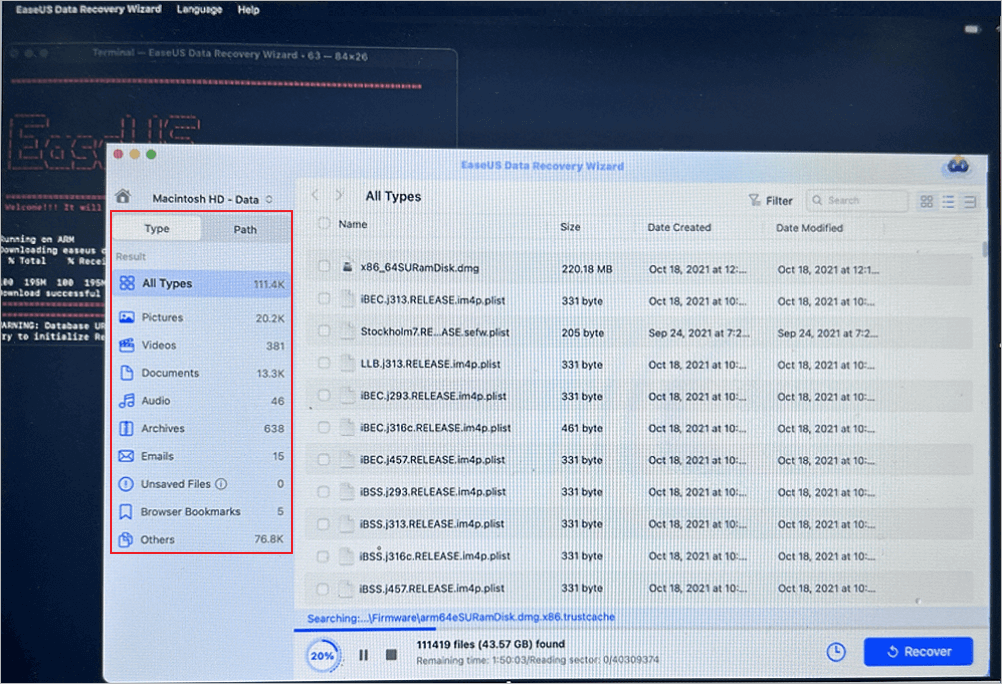
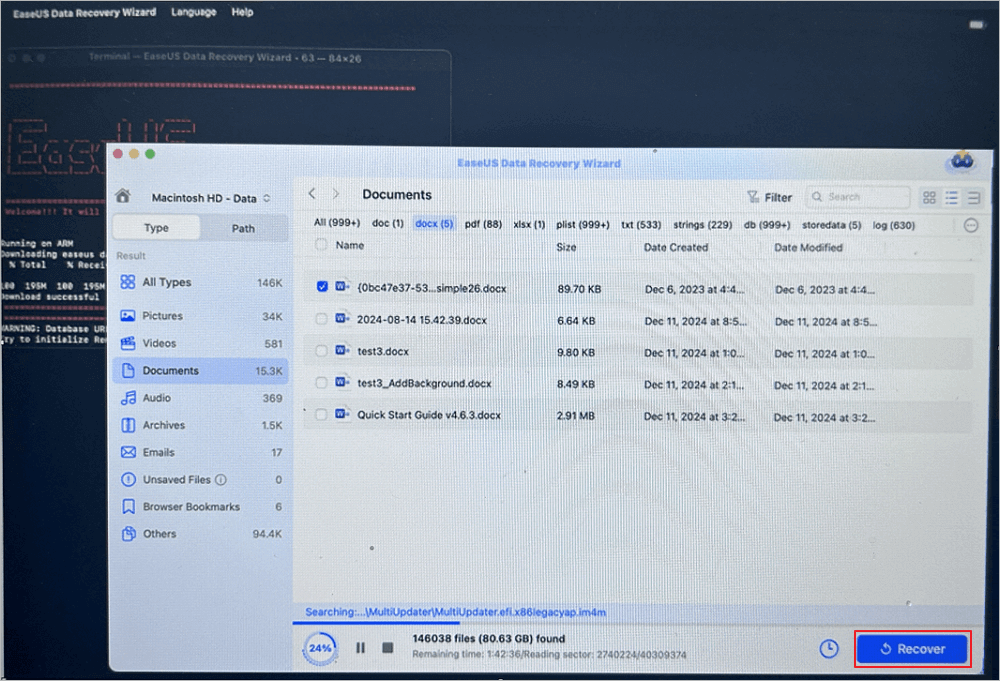
Step 3. Choose the Lost Data You Want
EaseUS software categorizes the scanned recoverable data by file type and storage path. Find the data you want by clicking "Type" or "Path" in the left panel. Then, check the boxes in front of the data you want to recover.
Step 4. Recover and Save Data on an External Disk
Click the "Recover" button, and a pop-up window will show up saying, "Please select a target location to save". Choose the external disk as the new storage location of your recovered data.
Was This Page Helpful?
Dany is an editor of EaseUS who lives and works in Chengdu, China. She focuses on writing articles about data recovery on Mac devices and PCs. She is devoted to improving her writing skills and enriching her professional knowledge. Dany also enjoys reading detective novels in her spare time.
Jean is recognized as one of the most professional writers in EaseUS. She has kept improving her writing skills over the past 10 years and helped millions of her readers solve their tech problems on PC, Mac, and iOS devices.
-
EaseUS Data Recovery Wizard is a powerful system recovery software, designed to enable you to recover files you’ve deleted accidentally, potentially lost to malware or an entire hard drive partition.
Read More -
EaseUS Data Recovery Wizard is the best we have seen. It's far from perfect, partly because today's advanced disk technology makes data-recovery more difficult than it was with the simpler technology of the past.
Read More -
EaseUS Data Recovery Wizard Pro has a reputation as one of the best data recovery software programs on the market. It comes with a selection of advanced features, including partition recovery, formatted drive restoration, and corrupted file repair.
Read More
Related Articles
-
![author icon]() Jean/Jun 17, 2026
Jean/Jun 17, 2026 -
Safari Bookmarks Disappeared? Recover with 3 Easy Methods
![author icon]() Dany/Jun 17, 2026
Dany/Jun 17, 2026 -
Your Complete Guide: How to Recover Unsaved Keynote Files on Mac
![author icon]() Tracy King/Jan 19, 2026
Tracy King/Jan 19, 2026 -
2026 Comparison: macOS Monterey vs Big Sur
![author icon]() Jean/Jun 17, 2026
Jean/Jun 17, 2026