-
![]()
-
![]() Dropbox Deleted Files by Itself, How to Recover Missing Files in Dropbox in 4 Ways
Dropbox Deleted Files by Itself, How to Recover Missing Files in Dropbox in 4 Ways February 12,2026
 6 min read
 -
![]()
-
![]() How to Recover Deleted Items in Outlook for Windows(2026)
How to Recover Deleted Items in Outlook for Windows(2026) February 12,2026
 6 min read
 -
![]()
-
![]()
-
![]()
-
![]() How to Recover an Unsaved Word Document When Computer Shuts Down
How to Recover an Unsaved Word Document When Computer Shuts Down February 12,2026
 6 min read
 -
![]() Does Updating to Windows 11 Delete Files? Here's the Answer
Does Updating to Windows 11 Delete Files? Here's the Answer February 12,2026
 6 min read
 -
![]() How to Recover Permanently Deleted Files from Google Drive [4 Proven Ways]
How to Recover Permanently Deleted Files from Google Drive [4 Proven Ways] February 12,2026
 6 min read
Page Table of Contents
PAGE CONTENT:
"Can I recover 2-year-old deleted photos? Today I found an old SD card that was used on my Canon camera. I checked the card and saw some old pictures, which made me so happy.
Then I noticed that I've deleted a majority of all the photos from the card. Perhaps, there is a way that can possibly recover the deleted pictures from 2 years ago?"
If you are experiencing the same issue or having below questions in your mind, don't worry. This page will include reliable and practical solutions to help you out of the following issues:
- Q 1. How do I recover deleted files a long time ago?
- Q 2. How can I recover deleted photos 2 or 3 years ago?
- Q 3. Can you restore sometime permanently deleted?
- Q 4. How can I recover permanently deleted photos from my phone?
This page includes three parts on helping you completely resolve this issue by analyzing the reason why a long time ago deleted data like pictures can be restored, offering solutions to restore years ago deleted photos on Windows PC, external storage devices, and cellphones, tips to protect valuable data.
First Aid: Recover Old Deleted Photos with Data Recovery Tool [3 Steps Only]
Applies to: Scan and restore deleted pictures years ago on Windows hard drive or external storage devices with no new data saved in.
Professional file recovery software like EaseUS Data Recovery Wizard will help recover deleted pictures of png, jpg, jpeg, tiff, BMP, and many more picture file formats after a long time on Windows PC, external hard drive, USB, or even SD card.
- Recover photos from emptied recycle bin, memory card, USB flash drive, SD card, digital camera, and camcorders
- Repair corrupted JPEG/PNG files automatically during data recovery
- Support photo recovery for sudden deletion, formatting, hard drive corruption, virus attack, system crash under different situations
- Restore photos from mobile devices, Windows and macOS computers
Here is how you can recover old photos using this powerful data recovery tool with just a few clicks:
🏆 EaseUS SD card recovery leverages patented video fragment reconstruction technology to deeply repair video files lost due to accidental deletion, formatting, or corruption. Explicitly designed for cameras, action cameras, drones, and dashcams, it accurately restores complete and playable precious footage.
Step 1. Open EaseUS Data Recovery Wizard. Find your SD card, camera, or hard drive partition where you deleted or lost pictures, then click "Search for Lost Data".
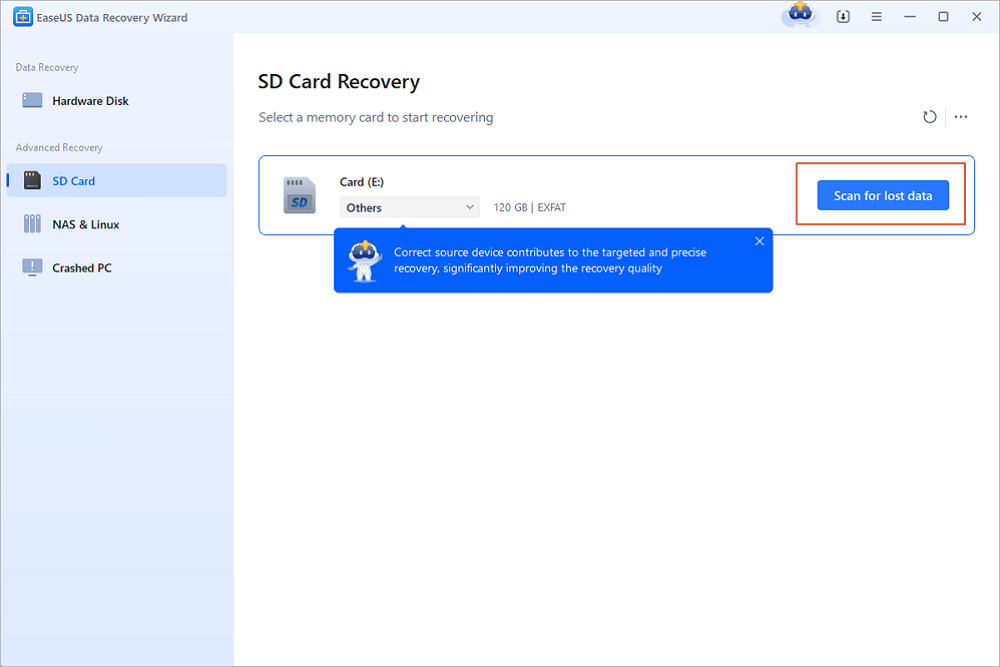
Step 2. After the scanning finishes, choose "Pictures" in the left panel to quickly filter photos.
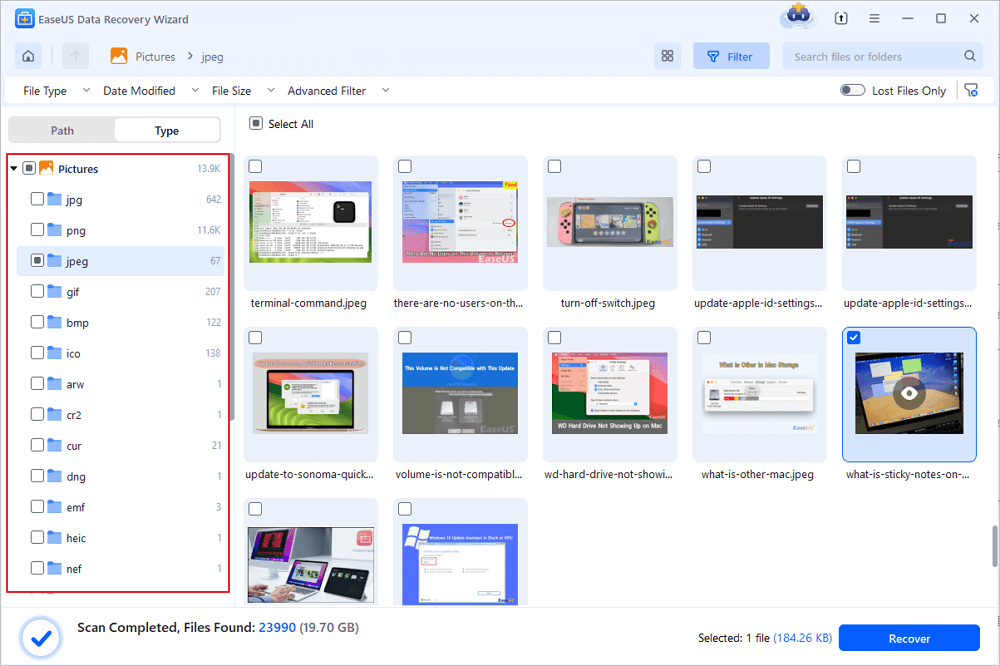
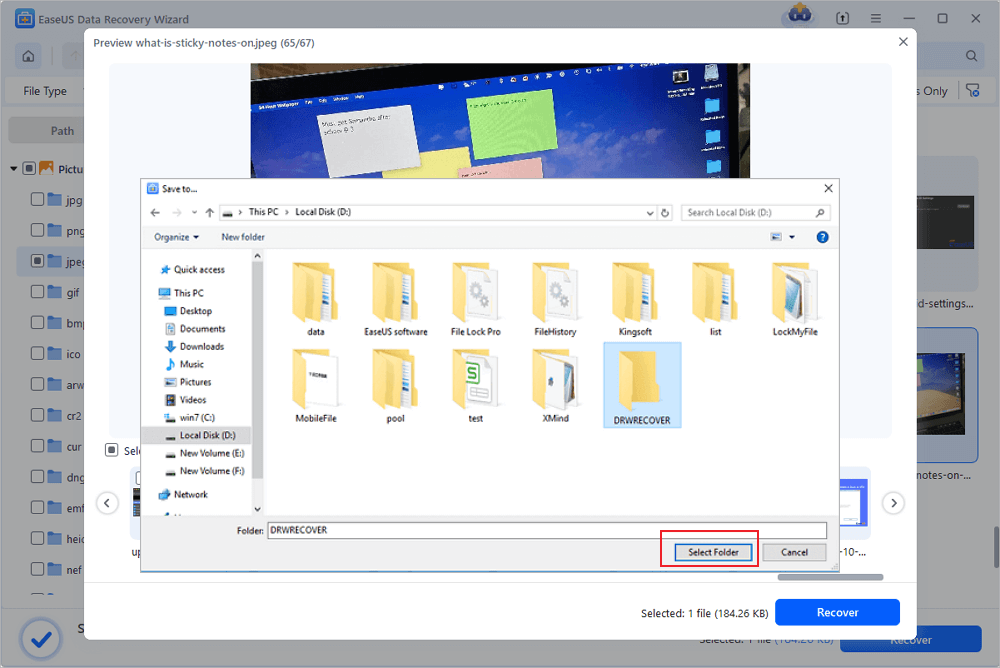
Step 3. You can preview the pictures you want to recover. Then, click "Recover" and choose another location to save the recovered data. The save location can either be your local drive or cloud storage like OneDrive, Google Drive ot Dropbox.
💡Want to know more about SD card data recovery? For example, what is the best SD card data recovery software? How to recover a damaged SD card? How to recover data from an unreadable SD card...Go for SD Card Data Recovery FAQs and restore your precious lost files.
You can first use the file recovery software to recover all lost picture files, and then upgrade to its full version to recover the rest. Android users who save their photos on an external SD card can also follow the steps below for help.

As for mobile phone users, it's impossible for them not using the camera or photos app to take new photos nor saving new images in iPhone or Android phones' internal storage. Therefore, you can't bring years ago deleted photos from iPhone or Android phone internal storage.
If you have created backups of those lost photos, you may follow the provided tips in Method 3 for help.
Recover Old Deleted Photos from Recycle Bin
Applies to: Simple clicks to bring years ago deleted photos from never emptied Recycle Bin on Windows 10/8/7.
Once again, the precondition of bringing your long time ago deleted files from Recycle Bin is that you have never emptied or cleaned them. Here are the detailed steps:
Step 1. Double-click on the Recycle Bin icon on Windows Desktop.
Step 2. Locate and right-click on the deleted photos, select "Restore".
Step 3. The deleted photos will be restored from Recycle Bin to its original locations.
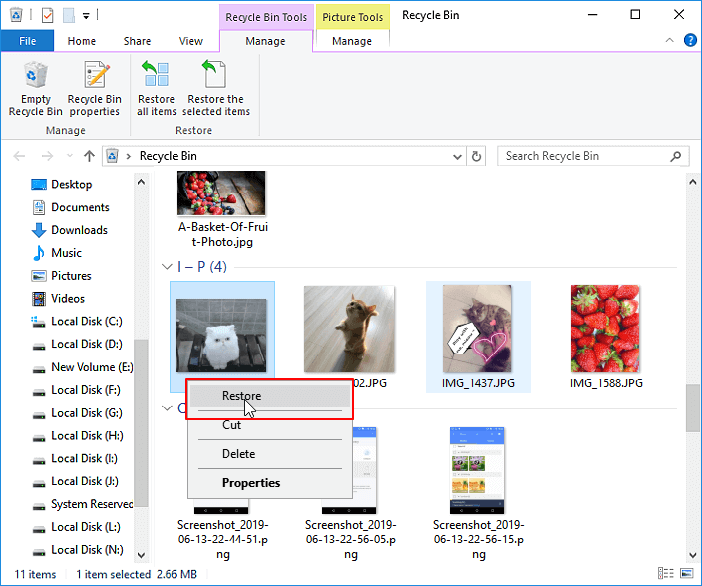
If you have emptied the recycle bin, your last chance is to apply professional file recovery software as recommended in Method 2 for help.
For a mobile phone user, you may refer to the below two links to bring lost photos on iPhone or Android phones:
- Recover Permanently Deleted Photos on iPhone
- Recover Permanently Deleted Files from Android Recycle Bin
Restore Years Ago Deleted Photos from Backup
Applies to: Immediately bring years ago deleted photos from personal backup, Windows or iPhone/Android backup.
# 1. Restore from Personal or Windows Backup
If you have copied or saved your deleted or lost photos, files in a storage device as a personal backup, you may directly connect the device to your PC. Then open File Explorer and find all your lost files there.
If you have created a Windows backup on computer, take the below steps and bring your lost files back:
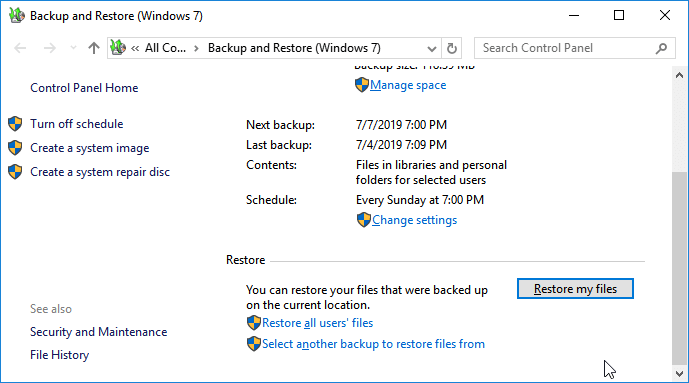
Step 1. Open "Control Panel", go to "System and Maintenance", select "Backup and Restore (Windows 7)".
Click "Restore my files" to continue.
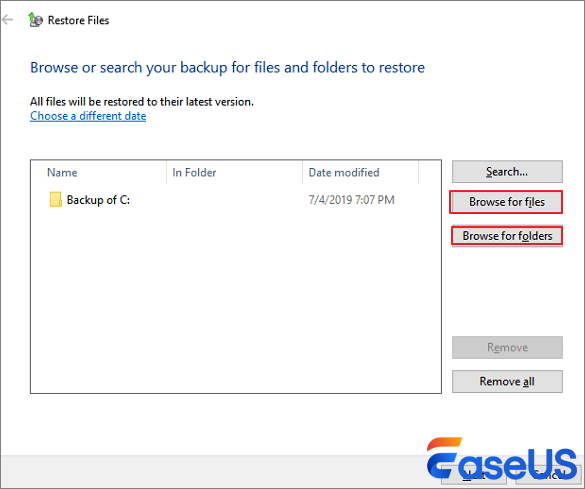
Step 2. Click "Browse for files" or "Browse for folders" to select the previously created backup.
Step 3. Navigate a location to save the backup - "In the original location" or "In the following location".
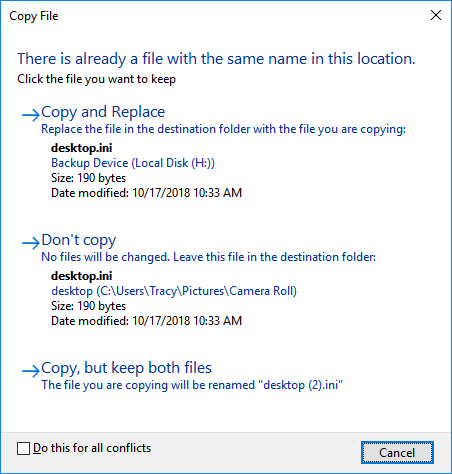
If there's a conflict, choose "Copy and Replace", "Don't copy" or "Copy, but keep both files" according to your needs.
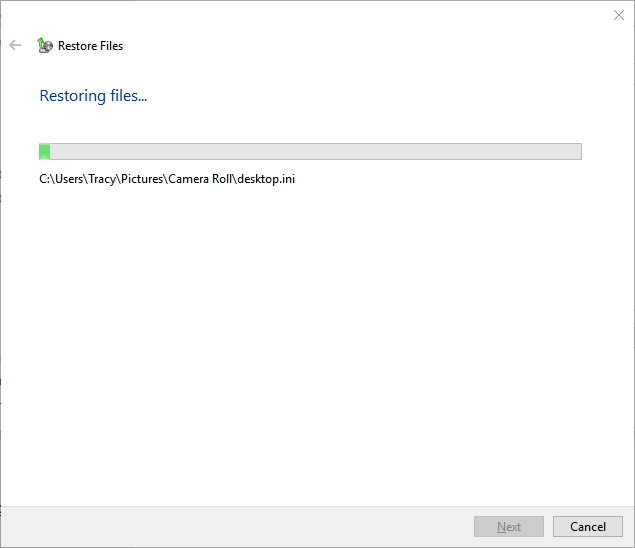
Step 4. Wait for the restoring process to complete.
# 2. Restore Pictures from iCloud backup
If you are an iPhone or iPad user, you may apply a reliable iOS data recovery software to bring your deleted photos back from iCloud backup with ease.
# 3. Restore Android Lost Photos from Android Backup
Open "Settings" on Android phone > Tap "Back up & restore" > Choose the backup of your long time ago deleted photos and click "Restore from Backup" to get all lost data restored.
Tips to Prevent Long Time Pictures Deletion
Note: If you have created a backup of all the lost files, lucky you. You can stop here and directly bring them back from your backup in a minute.
There are two important factors that may affect the recovery of a long time ago deleted files or pictures. Once you can meet either factor below, you can bring your years ago deleted pictures back:
# 1. Never Emptied Recycle Bin
Recycle Bin is designed to keep all your recently deleted items including documents, pictures, audio and video files for a while and even longer. As long as you don't empty the Recycle Bin, all deleted files will be permanently kept there.
However, there are some cases in which you cannot directly retrieve deleted files from there:
Case 1. Files too large for recycle bin, such as high definition photos and videos exceed the maximum size of Recycle Bin.
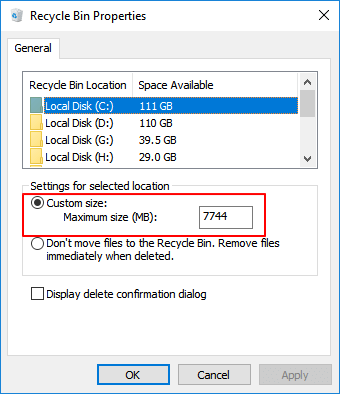
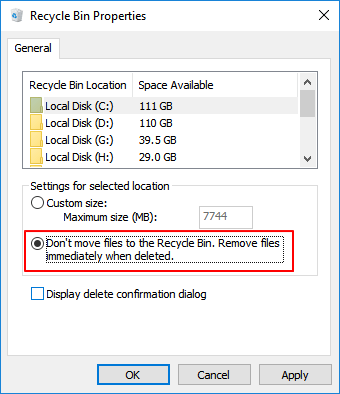
Case 2. Recycle Bin is set to remove files immediately once deleted, not recycling files.
# 2. No New Data Was Written to Storage Devices Where You Lost Files
If you didn't save any new files to a storage device where you deleted pictures or photos years ago, congratulations. You can simply run a reliable data recovery software to fully scan and bring all lost data back.
Warm Tip
Even though EaseUS Data Recovery Wizard with the above-provided methods allows you to recover pictures deleted a year or a couple of years ago, still some risks exist. For example, new data has overwritten the old, or files have been corrupted after data recovery.
Therefore, if some found photos are half greyed out or corrupted, you may still have to make efforts to repair corrupted data after recovery. The best method to prevent all these problems from happening is to create a full backup of all your valuable photos, pictures to another drive.
For a Windows user, you may use Windows backup or a reliable file backup software such as EaseUS Todo Backup to back up all desired photos to a local hard drive or an external storage device in 3 simple steps.
Final Words
This post from EaseUS has looked at how to recover old deleted photos and the easiest method is to get your old photos back is to use professional data recovery tool like EaseUS Data Recovery Wizard. You can easily get your precious memory back with the help of this excellent software.
Was this page helpful?
-
Dany is an editor of EaseUS who lives and works in Chengdu, China. She focuses on writing articles about data recovery on Mac devices and PCs. She is devoted to improving her writing skills and enriching her professional knowledge. Dany also enjoys reading detective novels in her spare time. …
-
Jean is recognized as one of the most professional writers in EaseUS. She has kept improving her writing skills over the past 10 years and helped millions of her readers solve their tech problems on PC, Mac, and iOS devices. …

20+
Years of experience

160+
Countries and regions

72 Million+
Downloads

4.9 +
Trustpilot Score


Free Data
Recovery Software
Recover data up to 2GB for free!
