Featured Articles
- 01 Why Computer Won't Turn On
- 02 Computer Won't Turn On Though Plugged In
- 03 Computer Won't Boot After OS Update/Rebuild
- 04 PC Not Turning On with Black Screen
- 05 Fix 1: Boot Device Not Found
- 06 Fix 2: Your PC Ran into a Problem and Needs to Restart
- 07 Fix 3: Laptop Screen Black but Still Running
- 08 Fix 4: Windows 11/10/8/7 Won't Boot from SSD
- 09 Fix 5: Recover Data from a PC/LaptopThat Won't Boot
- 10 Bonus Tip for Mac Won't Boot After Big Sur/Catalina Update
This page covers 5 fixes for Mac won't boot or start issue after macOS Big Sur, Catalina, Sierra or older macOS update issue. If you are with this issue, follow to make your Mac computer work now:
| Workable Solutions | Step-by-step Troubleshooting |
|---|---|
| Fix 1. Fix PRAM/NVRAM | Restart Mac > Hold Command+Option+P+R keys to turn on Mac...Full steps |
| Fix 2. Reset SMC | Shut down Mac > Unplug all cables > Plug in cables back after a few minutes...Full steps |
| Fix 3. Boot in Safe Mode | Start Mac > Hold "Shift" until the login window appears > Release the key when login in window appears...Full steps |
| Fix 4. Run Disk Utility | Turn of Mac > Hold Command + R keys and power Mac back up > Enter recovery mode...Full steps |
| Fix 5. Reinstall macOS | Download macOS Catalina, Mojave, or Sierra > Create bootable USB > Clean install macOS...Full steps |
macOS has now been updated to 11.0, and many Mac users are trying to upgrade to the newest version. While for most it's a usual pleasurable experience, for some this update had downsides. Some users complain that their Mac computers won't boot after installing new macOS Big Sur/Catalina. When Mac fails, it usually can't boot or start up properly. If you are faced with this situation, the most important thing should be recovering data from the unbootable Mac because:
- Your attempts to fix the Mac not booting issue may write new data on this Mac, which will overwrite the old data and make it irrecoverable.
- Recovering data before the complex fixes can avoid data loss.
EaseUS Mac data recovery software is able to recover data from unbootable Macs after update. It creates a bootable media that enables you to recover data from Mac hard drive (If you only have one Mac). What's more, it recovers data from failed internal Mac hard drive, APFS boot drive, and unmountable APFS boot volume, etc. If you have two Mac devices, take out the hard drive and connect it to the other Mac. Download EaseUS Data Recovery Wizard for Mac on that Mac device, and recover data from the hard drive.
Step 1. Search for lost files
Select the disk location to search for lost files (it can be an internal HDD/SSD or an external hard drive) where you lost data and files. Click the "Search for lost files" button.
Note: Before data recovery, you'd better click "Disk Backup" from the left sidebar to create a backup of your HDD/SSD to avoid further data loss. After backing up, the software can recover data from your disk backup, and you can use the HDD or SSD again.

Step 2. Go through the scanning results
This software will immediately scan your selected disk volume and display pictures, documents, audio, videos, and emails on the left pane.

Step 3. Select the file(s) and recover
Click the data to preview, and click the "Recover" button to have them back.

Then, you can read on and Fix the "Mac won't boot after update" issue after you have successfully got data from the drive.
1. Reset the PRAM / NVRAM
NVRAM refers to special memory sections on your Mac that store data that persists even when the Mac is shut off, such as volume settings and screen resolution. Resetting that data isn't harmful! In some cases, after performing this step, your Mac will restart normally.
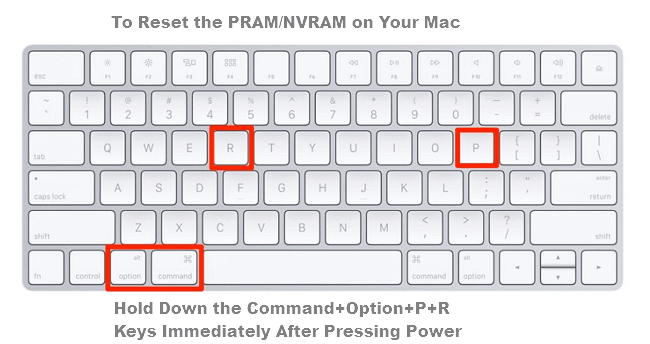
- Restart your Mac
- Hold down all of these keys: "Command", "Option", "P" and "R", and turn on the Mac. (It's the same keys to reset the PRAM).
- Keep holding the keys down until you hear the Mac restart again.
You may see a progress bar on startup. If the progress bar fills up and then the Mac starts up, you're probably good to go. If not, reset SMC.
2. Reset the SMC
In some situations, you may need to reset your Mac's SMC (System Management Controller).
- Shut the Mac down.
- Unplug all cables.
- Wait for a few minutes.
- Plug the cables back in and start up the Mac.
If you've got a Mac desktop, unplug it for 15 seconds and then plug it in and after five seconds press the power button.
3. Boot Mac in Safe Mode
Safe Mode is a stripped-down version of the Mac operating system that can be useful if you are trying to troubleshoot issues with your Mac.

- Start your Mac, press and hold the "Shift" key, and make sure your Mac has at least 9 GB of free space.
- When the login window appears to release the shift key and log in. You may be required to log in twice if you have FileVault turned on. Then restart the device.
Wait patiently till Mac computer finish the reboot process.
4. Run Disk Utility in Recovery Mode
If your Mac is booting but the operating system isn't loading up, you may have a corrupted drive. Luckily it is possible to fix this in Recovery Mode. In Recovery Mode you can restore from a Time Machine backup, use Disk Utility to verify and repair connected drives, check your internet connection, get help online using Safari, and install or reinstall macOS.

- Make sure the Mac is off. If it's stuck on a grey, blue or white screen, just hold down Mac's power button for several seconds until it shuts off.
- Hold down the "Command" and "R" keys, and power the Mac back up again. Keep pressing "Cmd" + "R" while your Mac is booting up.
- Once your Mac starts in Recovery Mode you can have access to "Utilities". Click "Disk Utility", locate the icon for your Mac's drive, and click "Verify Disk".
5. Reinstall macOS Big Sur/Catalina/Sierra
The last method to fix macOS Big Sur, Catalina or Sierra fails to boot after update error is to reinstall macOS.
- You can download wanted macOS Big Sur/Catalina/Sierra and create a bootable USB drive to clean install macOS Big Sur/Catalina/Sierra on your computer again.
- You can also boot into Recovery mode (Solution 4), and then click to install the latest OS and follow the onscreen prompts. Our article onresetting a Mac to factory settings has more information on reinstalling macOS.
If your Mac does not respond after trying these tips, contact Apple Support or a certified Apple Repair Center. It’s likely there is a problem with your logic board or other internal hardware.
Was This Page Helpful?
Cedric Grantham is a senior editor and data recovery specialist of EaseUS. He mainly writes articles and how-to tips about data recovery on PC and Mac. He has handled 10,000+ data recovery cases and is good at data recovery of NTFS, FAT (FAT32 and ExFAT) file systems, and RAID structure reorganization.
Written by Tracy King
Tracy became a member of the EaseUS content team in 2013. Being a technical writer for over 10 years, she is enthusiastic about sharing tips to assist readers in resolving complex issues in disk management, file transfer, PC & Mac performance optimization, etc., like an expert.
Related Articles
-
How to Fix MacBook Pro/Air/iMac Won't Turn on with Black Screen [6 Solutions]
![author icon]() Jaden/Apr 08, 2024
Jaden/Apr 08, 2024 -
Elden Ring Shadow of the Erdtree Save File Location - How to Find & Backup?
![author icon]() Jerry/Jun 24, 2024
Jerry/Jun 24, 2024 -
RAM Test: How to Check RAM for Errors in Windows
![author icon]() Daisy/Jan 11, 2024
Daisy/Jan 11, 2024 -
[FIXED] Terminal Operation Not Permitted in macOS Ventura/Monterey
![author icon]() Jaden/Jan 11, 2024
Jaden/Jan 11, 2024