RAM plays a vital role in the operation of your computer. RAM is the short-term memory that your computer uses to operate the task at hand. Even the most fantastic RAM might malfunction like any other computer part, so you will need to know how to check to see if your memory is stable.
Blue screens of death are one of the first indications that your memory is failing (BSODs). Memory problems frequently stand out. The system may crash sometimes, but it will still be functional. But before you know it, the machine will crash while starting up. Therefore, it is critical to pinpoint the issue as soon as possible.
There are several ways to check the RAM on your computer. Today, we will discuss a couple of them.
Test RAM with Windows Memory Diagnostic Tool
If Windows suspects any failure signs of your RAM, you can use the Windows Memory Diagnostic tool in Windows 10 and 11 to check for defective physical memory. Check out the steps given below:
Step 1. Press Win + R to open the Run dialogue box and type mdsched. Press OK.
Step 2. Depending on your convenience, choose any of the options displayed in the dialogue box. The tool will launch and perform the memory test after the computer restarts.
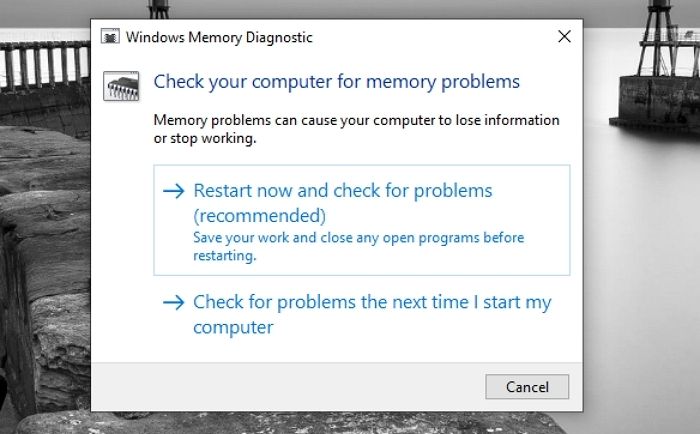
The test run may take 20-30 minutes, depending on your memory configuration. Windows will restart after the test is complete, and a pop-up with the test results will appear.
If the test result does not appear, here is how you manually search for it:
Step 1. Go to Start, type Event Viewer, and open it.
Step 2. Click Windows Logs > Systems on the left pane. Then click Find on the right pane.
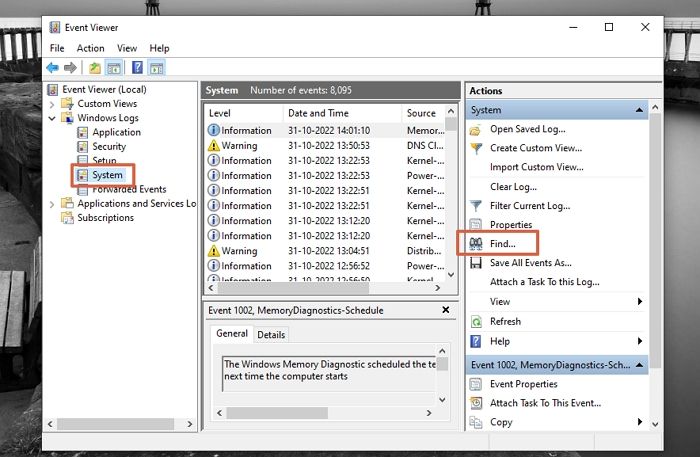
Step 3. In the find box, type MemoryDiagnostic and click Find Next. At the bottom of the window, you will see the outcome and other information about your RAM.
If there are any errors listed, your RAM might be damaged. Compressed air works well for cleaning memory and associated slots after reinserting them, but if the problems linger, it could be time to replace your RAM.
Test RAM With Memtest 86+
Memtest86+ is a standalone memory tester for x86 and x86-64 architecture PCs. Compared to BIOS memory tests, it offers a more thorough memory check. It runs a broader variety of tests and might uncover problems that the built-in Windows test misses. The free version of the tool should suffice. Since MemTest86 is Microsoft-signed, it will function even on systems with Secure Boot turned on.
- Warning
- MemTest86's data will be deleted when written to a USB drive. So, ensure you have backed up any crucial files on the drive first.
Check out the following steps to get started.
Step 1. Download Memtest86+ and create a bootable Memtest86+ USB Drive. Connect a regular USB drive with a FAT32 format, download and run the Windows USB Installer, and then follow the quick instructions. Select the USB Drive from the Boot Menu after restarting your computer.
Step 2. Restart your computer after creating bootable media, and boot into the BIOS or UEFI. Then direct it to start from the USB drive you copied the memory test tool.
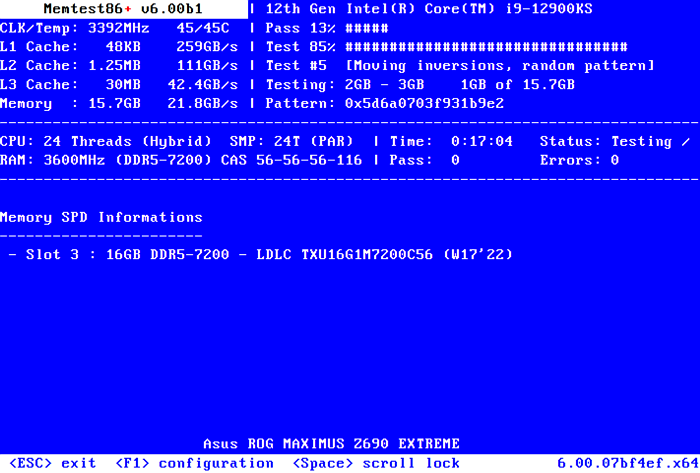
Step 3. When the tool boots up, it will immediately begin analyzing your memory, performing test after test, and alerting you of any issues it discovers. It will keep running tests until you choose to stop it, allowing you to test how the memory behaves over an extended period. Your screen will display details if any issues exist (If errors are found during testing, you will see red lines.)
Step 4. Restart your computer by pressing the Esc key after it's done.
What To Do If Errors Are Found
If there are errors found in your RAM, check out the following methods to fix the issue:
Method 1
The first thing you need to do is remove the dust. Next, check for dust and damage. If there are signs of mechanical damage, you may need to replace the memory with a new one. Once you have cleaned the memory, reinsert it into the slot and turn on the computer to test it again. If the error is found again, you can try to repair the memory or replace a new one.
Method 2
If your memory tests produce errors, it is likely that at least one of your RAM sticks is defective and needs to be replaced. If your computer is still under warranty, it is best to contact your PC manufacturer for service.
Method 3
You can try swapping out your present RAM sticks with some more RAM if you have any lying around to check whether your PC still functions properly. Alternatively, if your computer has numerous RAM sticks, you can try removing one to see if it helps; if it does, you may be able to identify the problematic RAM component and replace it.
After making the modifications, you can re-run the RAM test to check for issues.
Conclusion
After ruling out RAM issues, continue troubleshooting to identify any further potential causes of crashes using Memtest86+. If errors do appear, you have identified the cause of your problems. Most of the time, replacing the RAM is the only solution to memory problems. If you have more than one RAM kit, try each separately to see whether one is malfunctioning and send it for warranty. Fortunately, most RAM kits these days come with a lifetime warranty.
I hope this article helped!
Was This Page Helpful?
Daisy is the Senior editor of the writing team for EaseUS. She has been working at EaseUS for over ten years, starting as a technical writer and moving on to being a team leader of the content group. As a professional author for over ten years, she writes a lot to help people overcome their tech troubles.
Related Articles
-
4 Proven Ways to Fix Zsh Permission Denied in Terminal on macOS Ventura/Monterey
![author icon]() Dany/2024-01-11
Dany/2024-01-11 -
How to Factory Reset Xbox One | Detailed Guide for Xbox One Users
![author icon]() Dany/2024-05-22
Dany/2024-05-22 -
MySQL Workbench Crashes on macOS Sonoma! What Should I Do
![author icon]() Brithny/2024-05-28
Brithny/2024-05-28 -
Fixed: Windows Could Not Prepare the Computer to Boot [New]
![author icon]() Sherly/2024-01-11
Sherly/2024-01-11

EaseUS Data Recovery Services
EaseUS data recovery experts have uneaqualed expertise to repair disks/systems and salvage data from all devices like RAID, HDD, SSD, USB, etc.