Mac users often have reported this error: "Erase Assistant is not supported on this Mac". This Erase Assistant is essential when resetting your MacBook to factory settings for trading or selling your Mac. Another reason to use Erase Assistant is to wipe your Mac before reinstalling the macOS again. This inbuilt tool on your Mac allows you to:
- Eliminate and clear the user accounts along with the data preserved by them.
- Erase content, applications, and settings on Mac devices, or erase Mac.
- Toggle off Activation Lock and Find My on your Mac to prevent the Mac from being deleted from the iCloud service.
- Delete every volume on your Mac, not just the one that contains macOS.
You're not alone if you encounter an "Erase Assistant is not supported on this Mac" error. If you face this error while trying to factory reset, you have come to the right place! This article will assist you in understanding these issues and the possible ways "how to fix Erase Assistant is not supported on this Mac". So, let's get started!
Why Do I Encounter 'Erase Assistant Is Not Supported on This Mac'
This inbuilt Erase Assistant tool is available on Intel-based and Apple Silicon Macs. It's also important to know if you own a macOS Monterey or later versions with an Apple T2 security chip, then only you will have this Erase Assistant feature. If your Mac cannot fulfill the software or hardware needs, you can't use Erase Assistant tool.
In other words, if you obtain this "Erase Assistant is not supported on this Mac" error on macOS Monterey or Ventura, the system doesn't have the required T2 or Apple Silicon chip. This is why the error happens on the older macOS versions, which are incompatible with the chips.
To ensure that your MacBook has a T2 or M1 & M2 chip, these are the leading steps to check:
Step 1. Hit the Mac Spotlight shortcut, Command + Space, and type "System Information".
Step 2. Hit the System Information to launch it.
Step 3. Opt for iBridge or Controller located on the left side.
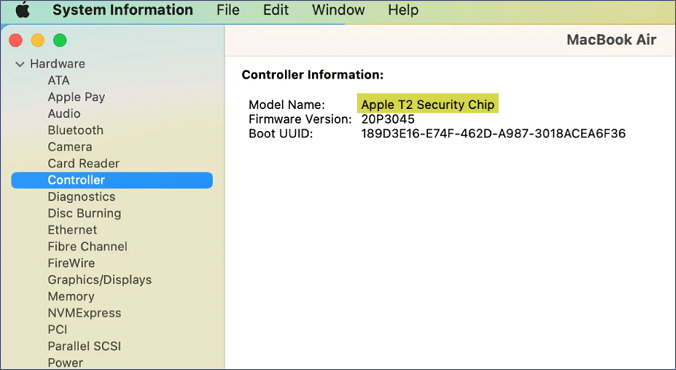
If you can't see "Apple M1 chip or M2 chip" or "Apple T2 Security Chip," it's impossible to use Erase Assistant on your Mac.
How to Fix 'Erase Assistant Is Not Supported on This Mac' Error
This error "Erase Assistant Is Not Supported on This Mac" is standard. But you can get past this if you erase your Mac in the Recovery Mode. As mentioned earlier, the Erase Assistant tool is available on the Intel Mac or Apple Silicon Mac with a T2 chip as long as these MacBooks operate on Monterey or higher.
If you have an outdated macOS version or own an incompatible device, you will never use this tool to factory reset your MacBook Pro or Air. Therefore, in those situations, the best way to wipe your Mac is by using macOS Recovery. The steps are shown below:
In the case of Apple Silicon Macs:
Step 1. Power your Mac off to boot it into macOS Recovery. You can do it by clicking the Apple logo from the menu bar, which is located at the top left side of your Mac. Selecting "Shut Down".
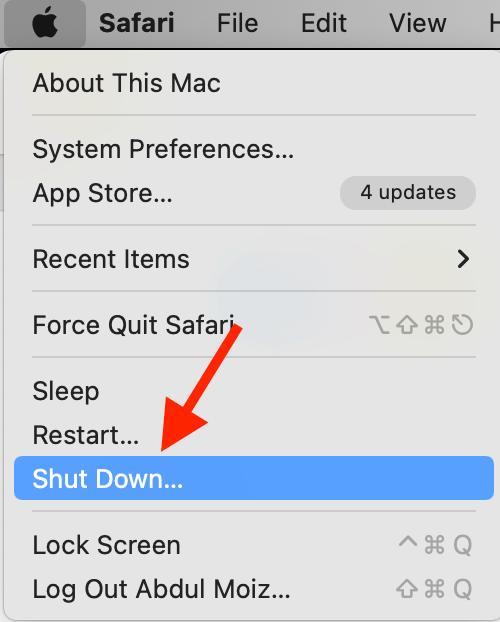
Step 2. Give your Mac a few minutes to shut it off completely. After it's switched off, the screen will be black.
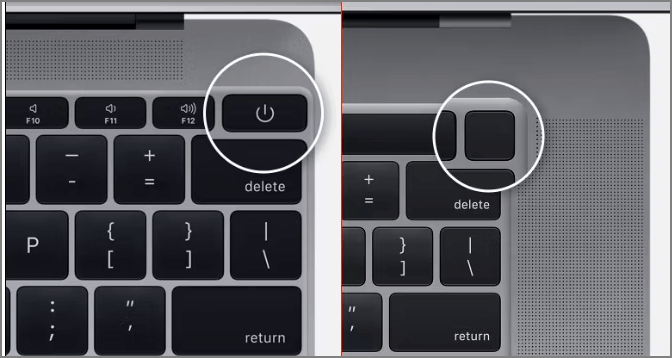
Step 3. Press and hold Mac's power button to move into macOS Recovery on the Apple Silicon Macs.
In the case of Intel-based Macs:
Step 1. To dive into macOS Recovery on Intel-based Macs, you need to press and hold Command + R button on your keyboard.
Step 2. Keep holding the particular keys until you notice the Loading startup options screen.

Step 3. Select "Options," then hit the "Continue" button in the startup options window.
Step 4. Opt for a volume you will be asked to choose on the next screen. If so, select one you want to retrieve and hit "Next".
Step 5. Choose the administrator account, and hit "Next".
Step 6. On the next screen, you will be asked to type the account's password.
Step 7. Hit the "Continue" button after entering the password.
Step 8. Launching macOS Recovery on your Mac was successful.
How to Factory Reset Mac in Recovery Mode When Erase Assistant Not Working
After learning how to boot your Mac into Recovery Mode on Intel-based and Apple silicon Mac, you can start to erase your Mac without Erase Assistant.
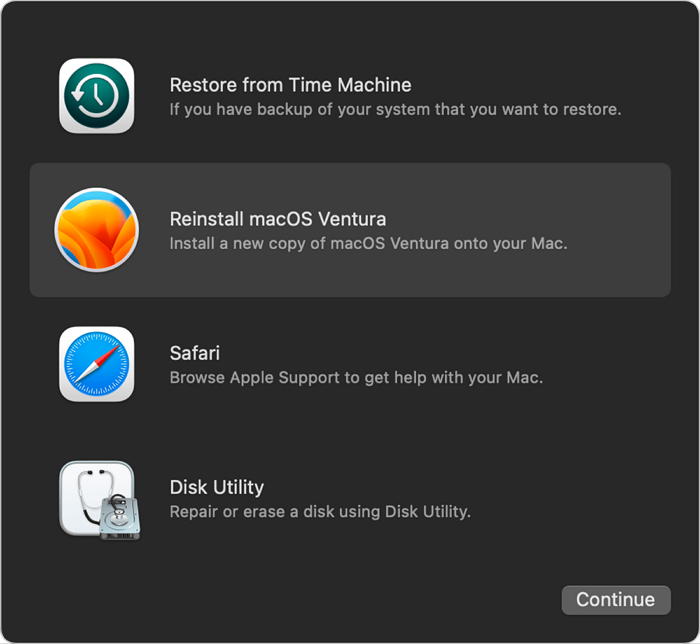
Step 1. Boot Mac into Disk Utility and click "Continue".
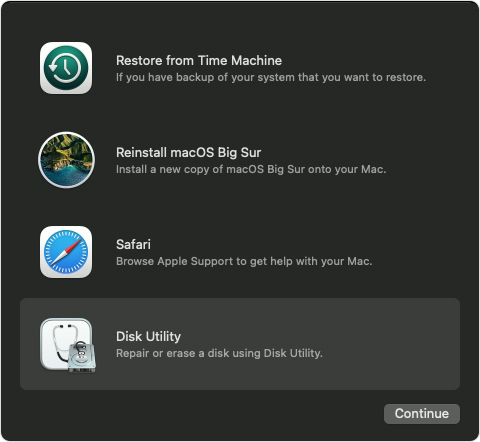
Step 2. Choose the internal hard drive from the sidebar, and erase it. The internal hard drive is usually named Macintosh HD.
Step 3. After erasing all the data on Macintosh HD, you need to reinstall macOS to boot.
That's all! This is how you can fix the 'Erase Assistant Is Not Supported on This Mac' error. Share this passage with your friends to follow the steps mentioned here to eliminate this error.
Why Can't I Find My Erase Assistant on Mac
Erasing All Content and Settings on Mac is a vital option to help users eliminate their Mac devices and retrieve them to factory settings. You can only find this setting if you have T2 or M1 &M2 chip on your MacBook Monterey. But don't worry! In this section, you will know the steps to find Erase Assistant on macOS Monterey and Ventura. We will also inform you how to use this Erase Assistant to reset your MacBook.
Steps to find Erase All Content and Settings on macOS Monterey:
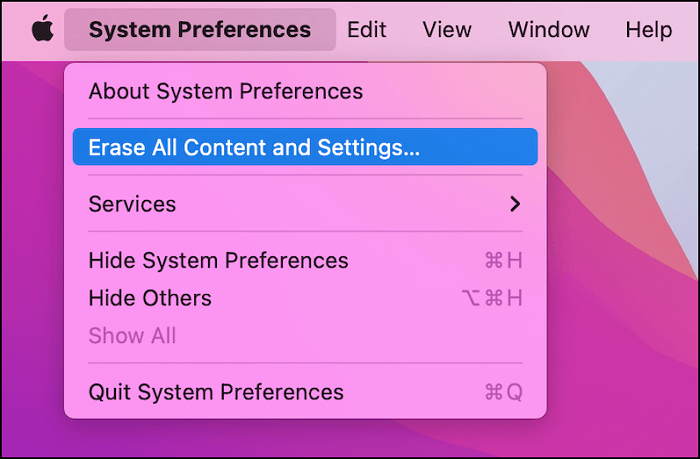
Step 1. Select the Apple menu, and opt for System Preferences.
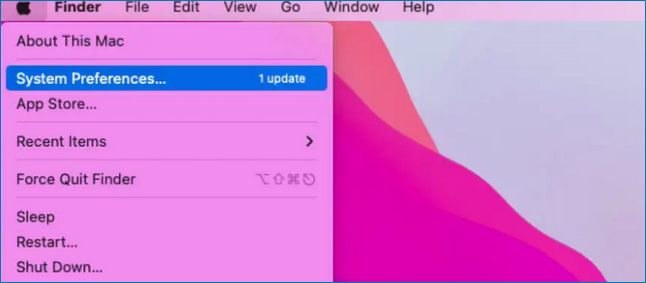
Step 2. Under System Preferences, you will see "Erase All Content and Settings".
Steps to find Erase All Content and Settings on macOS Ventura:
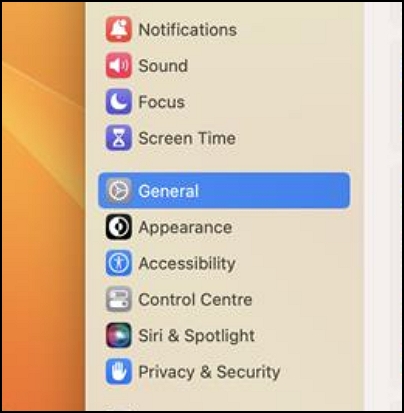
Step 1. Hit the Apple menu, and select System Settings.

Step 2. Opt for "General".
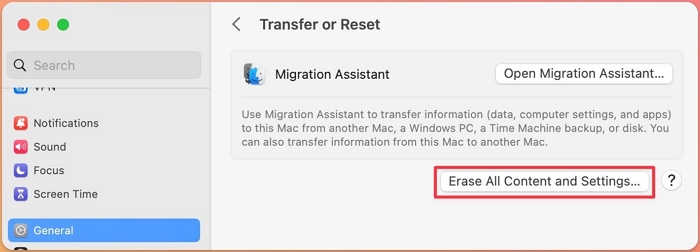
Step 3. Select "Transfer or Reset".
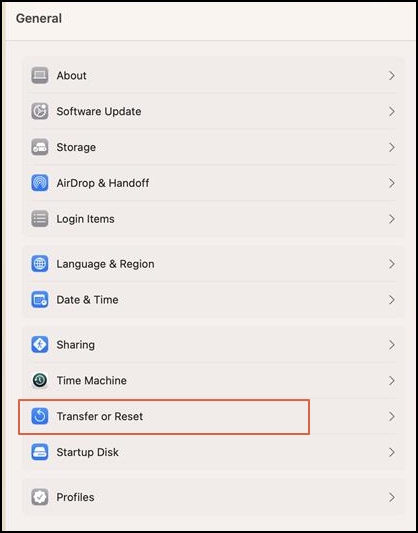
Step 4. Here you will see the "Erase All Content and Settings" tab.
How to Erase All Content and Settings on macOS Ventura/Monterey
As you have already learned how to find this setting on macOS Monterey or Ventura, it's time to get into the steps to format your MacBook.
Step 1. Click on the "Erase All Content and Settings" button.
Step 2. Type your administrative password to confirm your function.
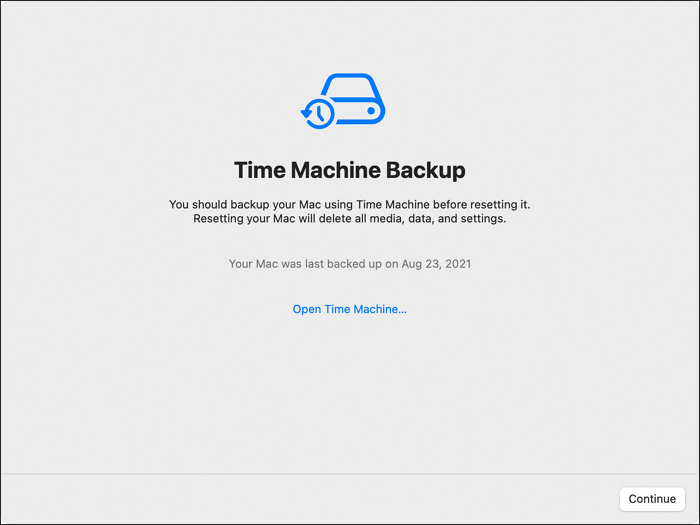
Step 3. Opt for a Time Machine backup. You may either partake in this step or skip this one by hitting Continue.
Step 4. Every data, setting, and media will be eliminated from your MacBook. Hit the Continue button to confirm your choice.
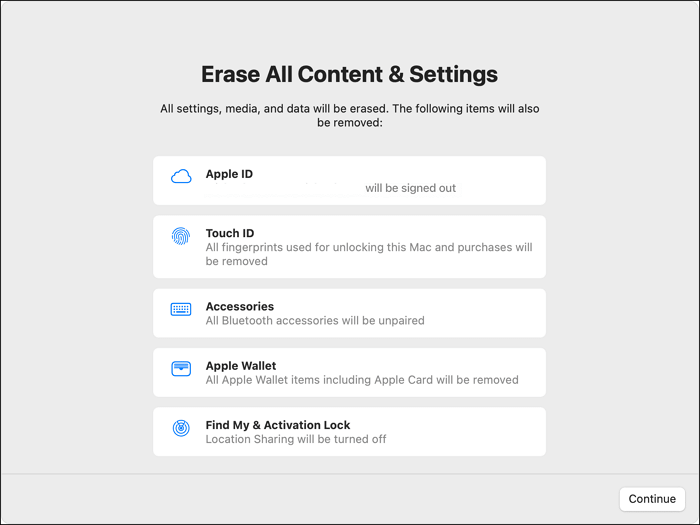
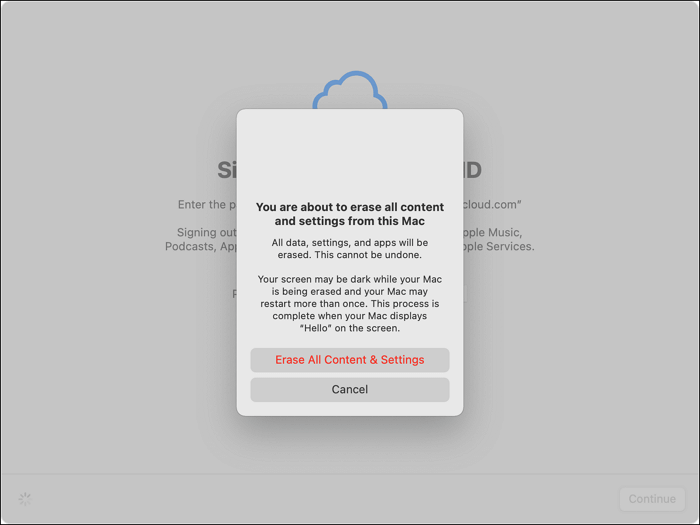
Step 5. Make sure to sign out of the Apple ID by typing the password.
Step 6. Your MacBook will reset entirely after hitting the button with red words.
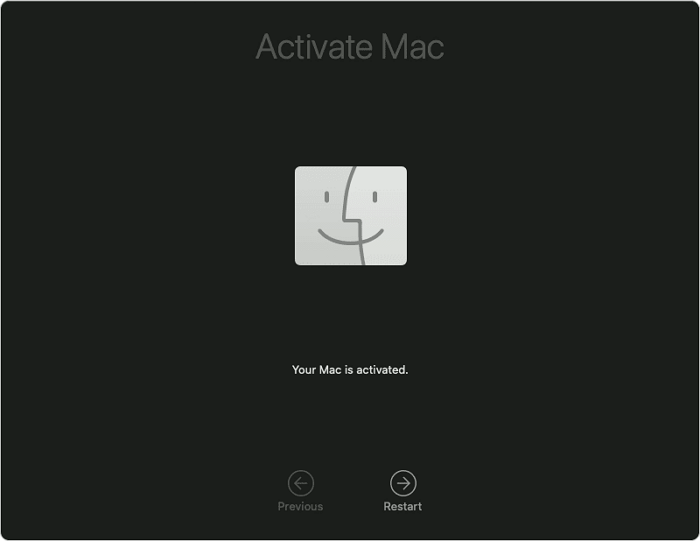
Step 7. Wait a few times to get the process done. Hit the "Restart" button, adjust the settings, and start using your MacBook.
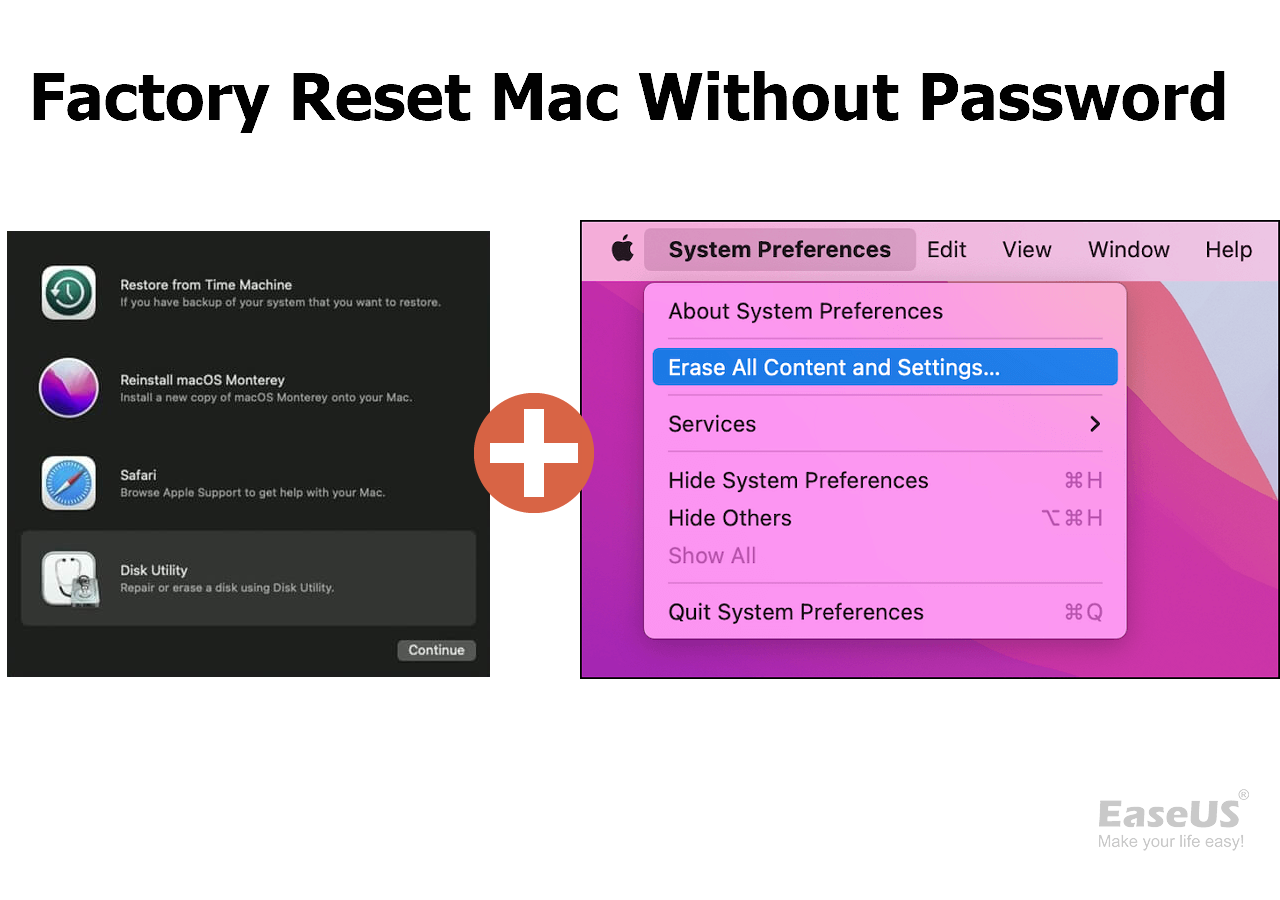
If you want to factory reset your Mac without a password, you can read this article to get the detailed tutorial:
Factory Reset Mac Without Password [for macOS Ventura/Monterey]
It is possible that you have an old Mac device and forgot the password. You can factory reset your Mac without a password with this tutorial!
How to Restore Files After Using the Erase Assistant on Mac
Data loss scenarios may ensue anytime when erasing all content and settings on your macOS Ventura or Monterey. So, it's unavoidable! Have you lost a crucial file lately while fixing the "Erase Assistant Is Not Supported on This Mac error"? Don't be puzzled! With a professional data retrieval software named EaseUS Data Recovery Wizard for Mac, you can quickly regain every lost data with a simple click.
This tool helps you recover every type of data and facilitates the data retrieval process in several aspects:
- ?️Employ it to recover deleted files on your Mac. Users of Macs are permitted to retrieve documents, audio, photos, etc.
- ?Handles a variety of file formats, including FAT (FAT16, FAT32), APFS, HFS+, HFS X, exFAT, NTFS, and others.
- ?Strong enough to assist you in securely recovering data from plenty of devices and support Mac USB recovery.
Download this professional tool today to recover files after factory reset Mac using the Erase Assistant!
Step 1. Search for lost files
Select the disk location to search for lost files (it can be an internal HDD/SSD or an external hard drive) where you lost data and files. Click the "Search for lost files" button.

Step 2. Go through the scanning results
This software will immediately scan your selected disk volume and display pictures, documents, audio, videos, and emails on the left pane.

Step 3. Select the file(s) and recover
Click the data to preview, and click the "Recover" button to have them back.

Summary
What happens if, despite being familiar with the macOS fundamentals, you run into an error notice that states, "Erase Assistant is not supported in this Mac?" Inevitably, if you have an Intel-based Mac without a T2 Security Chip, there is no way to correct this issue.
Yet, you may still delete all the files and preferences on your Mac. Hopefully, this article has demonstrated the possible ways to fix this error and how to utilize Erase Assistant. If you have lost data while fixing this error, download EaseUS Data Recovery Wizard for Mac to obtain data quickly.
Erase Assistant Is Not Supported on This Mac FAQs
Go through the FAQs below to understand the topic in a better way:
1. How to factory reset MacBook Big Sur without Erase Assistant?
You should know that there is no Erase Assistant on macOS Big Sur. Follow the steps to factory reset MacBook Big Sur without Erase Assistant:
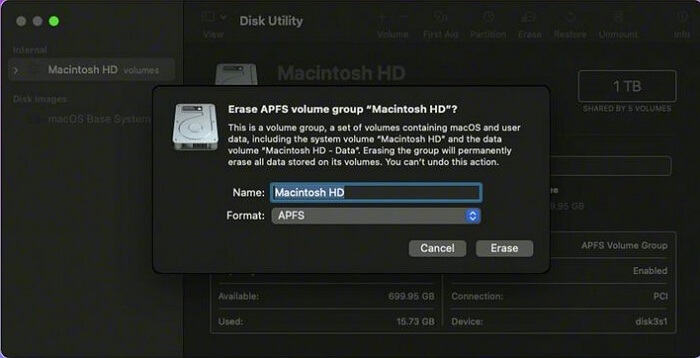
- Boot MacBook into Disk Utility. Select Disk Utility and continue.
- The drives are kept in the left-hand column inside the Disk Utility app.
- Opt for the internal drive, which is known as Macintosh HD. Select Erase with the disk highlighted.
- After erasing the Macintosh HD, you should reinstall macOS Big Sur.
2. Why is the Erase Assistant not supported on this Mac?
This Erase Assistant is not supported on this Mac error because your macOS doesn't have Apple Silicon or it's not an Intel-based Mac with a T2 security chip. Another reason is that it doesn't support Erase Assistant.
3. How to find Erase All Content and Settings on macOS Monterey?
In the case of macOS Monterey, you can find this setting from the Apple menu in the screen's corner. After that, select System Preferences. Under that setting, you will see "Erase All Content and Settings."
4. Can I recover data after using the Erase Assistant on Mac?
It's possible to retrieve your MacBook data with the help of a professional data recovery software named EaseUS Data Recovery Wizard for Mac after using this Erase Assistant.
Was This Page Helpful?
Dany is an editor of EaseUS who lives and works in Chengdu, China. She focuses on writing articles about data recovery on Mac devices and PCs. She is devoted to improving her writing skills and enriching her professional knowledge. Dany also enjoys reading detective novels in her spare time.
Related Articles
-
2.5 HDD vs 3.5 HDD: What Are Differences Between 2.5 and 3.5 Hard Drive?
![author icon]() Jerry/2025-09-04
Jerry/2025-09-04 -
DiskPart Clean vs Clean All: Which One to Choose
![author icon]() Finley/2025-07-04
Finley/2025-07-04 -
How to Update macOS [Detailed Written and Step-by-Step Tutorials]
![author icon]() Dany/2025-09-17
Dany/2025-09-17 -
[Quickly & Easily] How to Update BIOS with USB in 2025
![author icon]() Jerry/2025-07-04
Jerry/2025-07-04
EaseUS Data Recovery Services
EaseUS data recovery experts have uneaqualed expertise to repair disks/systems and salvage data from all devices like RAID, HDD, SSD, USB, etc.