You will want to factory reset your MacBook Pro, Air because either you are selling it, your MacBook is performing unexpectedly, or there is a bug taking too much internal disk space. Resetting a MacBook Air or MacBook Pro can be a little overwhelming if you are new to macOS or have never factory reset your MacBook Air or MacBook Pro. A factory reset can erase all contents and settings on your MacBook Pro and MacBook Air, some essential data may lose during this process. You don't have to worry about it! We have prepared a backup plan and a detailed guide to teach you how to get back your data in this article. You can download EaseUS data recovery software to back up your files first, and we'll provide the recovery plan later:

Back Up Your Mac and Never Lose Data
Back up and restore your MacBook/iMac without Time Machine, iCloud, or external hard drives.
We will also thoroughly teach you what to do before you sell or trade your MacBook Pro or MacBook Air, and how to factory reset your MacBook Pro/Air. Continue reading!
Preparations Before You Sell or Trade Your MacBook Pro, Air
If you are upgrading your MacBook or selling an old one, here are a few things you should manually turn off before you separate from your MacBook. They are:
- iCloud
- iMessage
- And unpair Bluetooth devices
Sometimes before you sell or trade your MacBook Pro, you may suddenly find your MacBook cannot turn on. Some users may also need to know MacBook Pro resetting SMC when their MacBook has some issues, like the keyboard's backlight not performing normally. You can figure out the detailed solutions by clicking the links.
Preparation 1. Sign out of iCloud
OK, so here's how to turn off iCloud:
Step 1. Open "System Preference".
Step 2. Click on "Apple ID," then click on "Overview", and then select "Sign out".
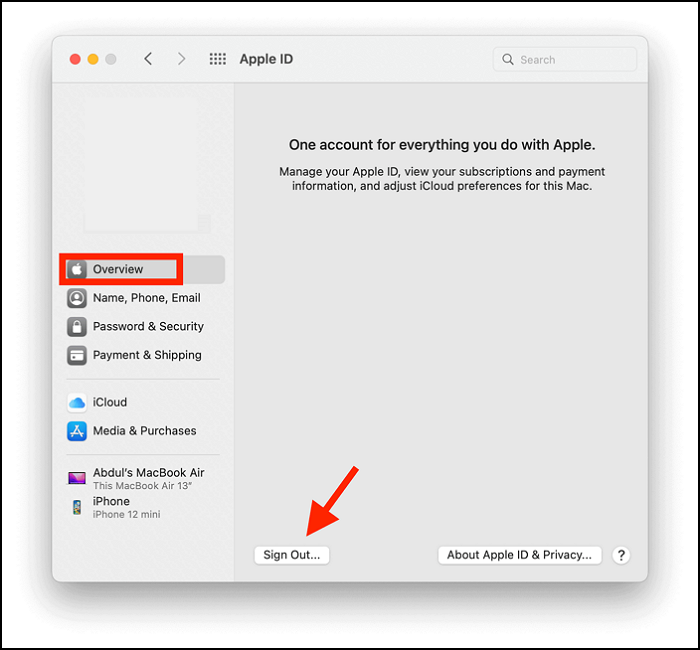
Step 3. Untick the selection and then click on "Continue".
Step 4. You will sign out of iTunes on your MacBook.
Preparation 2. Sign Out of iMessage
Step 1. Open "Messages".
Step 2. Then click on "Messages" in the menu bar on top.
Step 3. Select "Preferences".

Step 4. Click on the "@" icon that reads "iMessage" below it.
Step 5. Now click on "Sign out".
Optional Preparation: Unpair Bluetooth Devices
Step 1. Open "System Preference" and then select "Bluetooth".
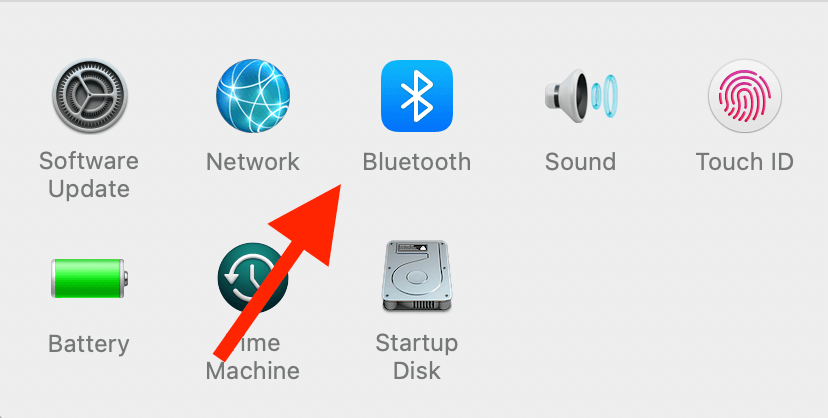
Step 2. Under "Devices", hover over the paired Bluetooth devices and click on the "X" button.
Step 3. Do this to as many devices as they are paired with your MacBook.
How to Factory Reset MacBook Pro, Air Without Losing Data
If you are going to factory reset macOS, it is possible to lose valuable files after the reset. This section will teach you how to factory reset your Macbook without losing essential data. Now let us start with the tutorial on how to factory reset MacBook Pro and Air.
How to Factory Reset MacBook Pro, Air [2 Proven Plans]
You may want to know how to format the MacBook Pro or factory reset it when you are facing an unsolvable bug, trading your MacBook, or selling it off.
Resetting your MacBook is not straightforward if you are a new Mac user. Instead, it is hidden under the "System Preferences" menu bar, instead of being in it. But we've decided to help you factory reset your MacBook Air and MacBook Pro.
But before we dive into the different ways you can reset your MacBook Pro and MacBook Air, we have a video that'll make things easier for you to understand.
To make it even easier, we are mentioning the timeline that we think will be helpful for you, and you can check it out easily.
- 00:30 Backup your data
- 01:22 Turn off Find My
- 02:35 Reinstall Mac
Factory Reset MacBook Pro, Air with Erase All Content and Settings Option
Now here's how to reset your MacBook Air or Macbook Pro:
Step 1. Open "System Preferences" and then click on "System Preferences" on the menu bar.
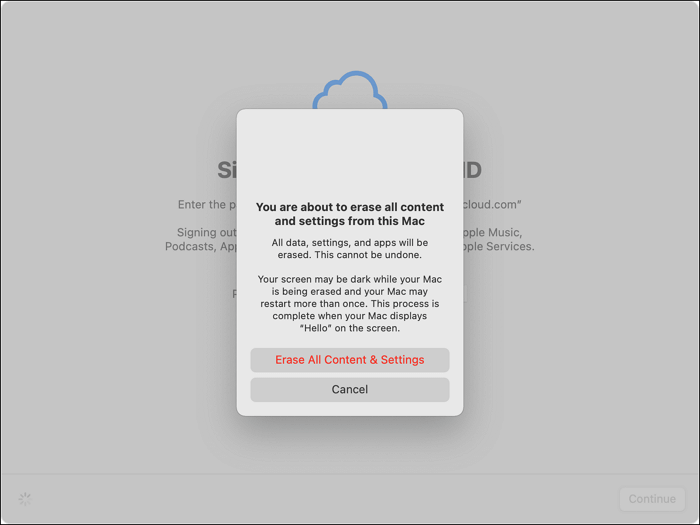
Step 2. Now, select "Erase All Content and Settings".
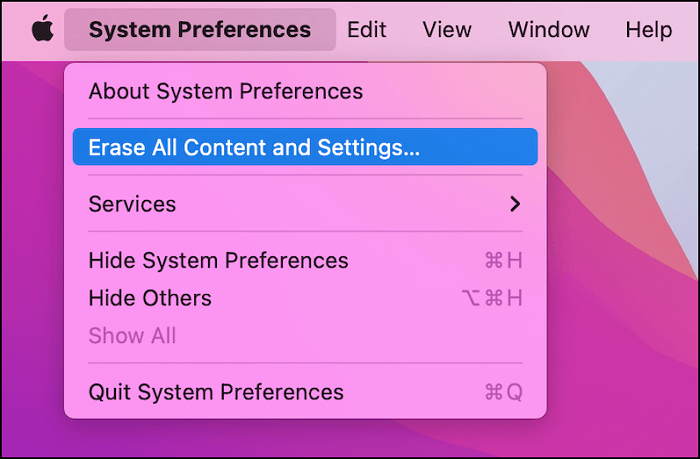
Step 3. Enter your MacBook's password and click on "OK".
Step 4. Now follow the prompts accordingly.
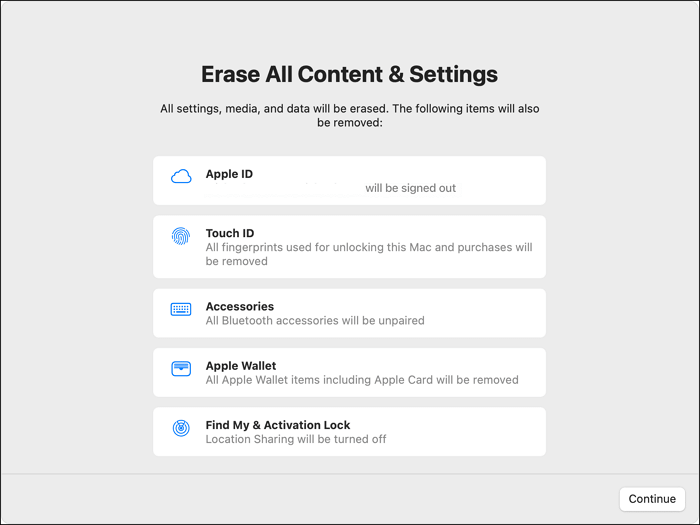
Step 5. Once the prompts have been selected and confirmed for resetting, your MacBook will restart.
Step 6. After the MacBook restarts, click on the Apple logo on the menu bar.
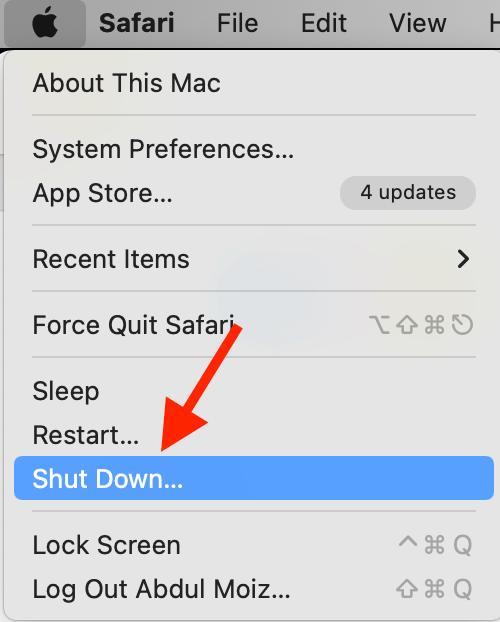
Step 7. Click on "Shut Down".
We also shut down your MacBook, and if you don't, it will go into standby mode and draw power. By shutting down your MacBook, you don't only stop all the background processes but also completely shut down your MacBook.
Factory Reset MacBook Pro, Air in Recovery Mode
Now, here's an alternate way to factory reset your MacBook by entering recovery mode. Here's how:
Step 1. Click on the Apple logo on the menu bar and click on "Shut Down."
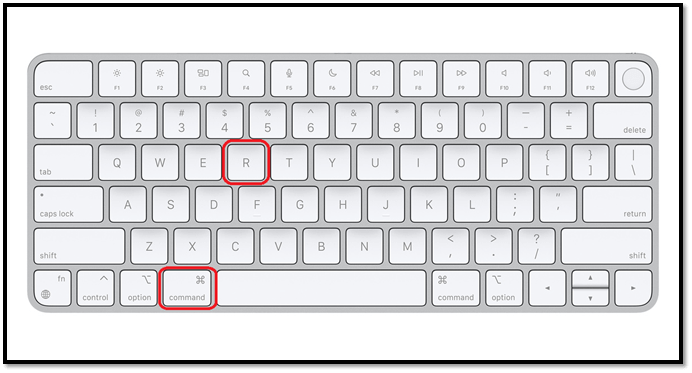
Step 2. Turn on your Mac now, press and hold Command + R and leave it when you see the Apple logo.
Step 3. On M-series Macs, it's quite different; just press the power button and hold it until the startup option window opens. Now click on "Options" and "Continue" to open the utility window.
Step 4. Under the MacOS utility window, select "Disk Utility", click on "Continue", and choose "internal disk/startup disk".
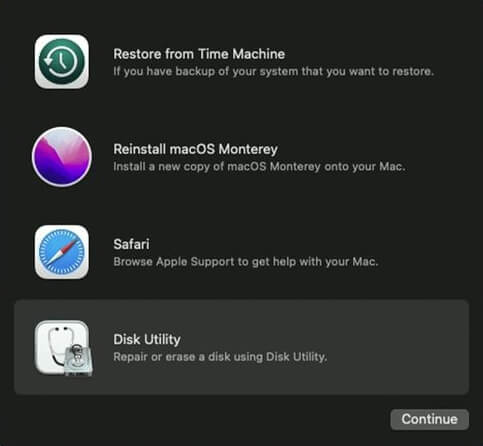
Step 5. Click on the "Erase" option at the top of the Disk Utility window.
Step 6. Give the disk a new name and select the format as APFS.
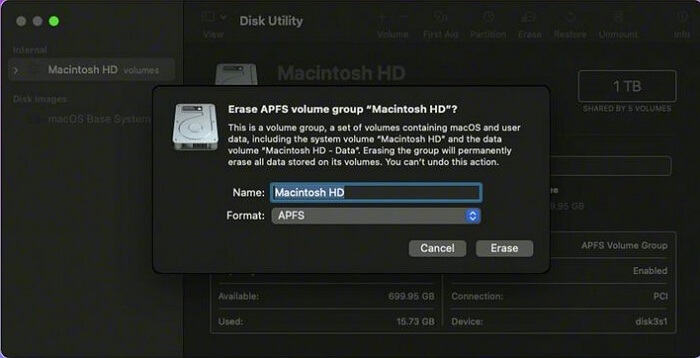
Step 7. Now, click on "Erase Volume Group" and allow a few minutes for Disk Utility to finish resetting the drive.
Step 8. Once done, you will be redirected to the macOS utility window. If you weren't redirected, restart your computer and press CMR+R again to launch your MacBook in recovery mode.
Step 9. Under the utility window, click on "Reinstall macOS" and follow the instructions to install macOS.
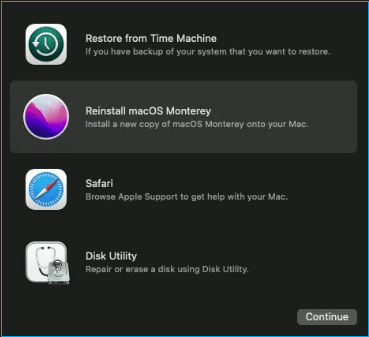
Step 10. After the macOS has been installed, the "Setup Assistant" will open. Quit the Setup Assistant and turn off your Mac.
Get Back Erased Data After Factory Resetting MacBook Pro, Air
The easiest method to get back files on a Mac is by backing them up using Time Machine and recovering files after resetting Mac. If you set up a backup on your Mac using Time Machine, here's how to restore your data after factory resetting your Mac:
Step 1. Open Spotlight, and search for "Time Machine".
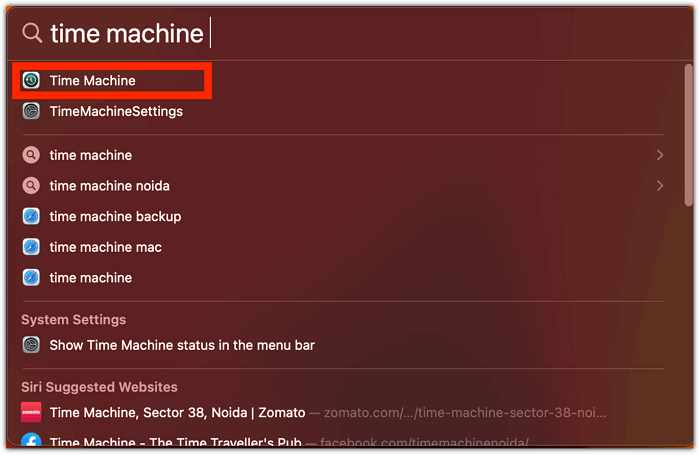
Step 2. Browse your backup by scrolling through the timeline using the up and down arrows.
Step 3. Locate the backup you want to restore and click "Restore".
Step 4. You will restore the data from that backup.
Step 5. Now restart your computer after restoring the backup to complete the process.
While Time Machine can help you recover your data, it is not ideal. Also, to set up Time Machine, you will need to plug in an external hard drive or a USB drive.
Unfortunately, users who didn't set up Time Machine initially cannot restore their data after factory resetting their MacBook. But with the EaseUS Data Recovery Wizard for Mac, you can quickly recover all your data.
Download Data Recovery Software and Recover Lost Files
EaseUS Data Recovery Wizard for Mac has proven to recover your data higher than 90%. Data recovery typically costs hundreds to thousands of dollars and takes several weeks. With tools like EaseUS Data Recovery Wizard for Mac, you can save on costs and get your data back in a few minutes.
What can EaseUS Data Recovery Wizard for Mac do? Let us find out:
- Recover deleted pictures on Mac. Actually, you can retrieve not only photos but also music, videos, audio, and documents from your MacBook.
- Recover lost partitions on Mac. It is also a useful Mac partition recovery tool, it can help you recover your lost/deleted partitions with one click.
- Recover data from dead MacBook Pro. It is a bootable data recovery tool, you are allowed to retrieve data from a dead MacBook Pro. Click this link to learn more about how to make a bootable USB on Mac.
How to use this data recovery program? Check the following steps:
Step 1. Search for lost files
Select the disk location to search for lost files (it can be an internal HDD/SSD or a removable storage device) on macOS Sierra, High Sierra, Mojave, Catalina, Big Sur, Monterey, Ventura, and the latest Sonoma. Click the "Search for lost files" button.

Step 2. Go through the scanning results
EaseUS Data Recovery Wizard for Mac will immediately scan your selected disk volume and display the scanning results.

Step 3. Select the file(s) and recover
In the scan results, select the file(s) to preview and click the "Recover" button to have them back.

Factory Reset MacBook Pro FAQs
For even more questions about factory resetting and others, we've compiled a list of questions we think you will be interested in learning about.
How can I wipe my MacBook Pro to factory settings?
We recommend you use the Erase Assistant to factory reset your MacBook Pro.
- 1. Open "System Preferences" and then click on "System Preferences" on the menu bar.
- 2. Now, select "Erase All Content and Settings".
- 3. Enter your MacBook's password and click on "OK".
- 4. Now follow the prompts accordingly.
- 5. Once the prompts have been selected and confirmed for resetting, your MacBook will restart.
- 6. After the MacBook restarts, click on the Apple logo on the menu bar.
- 7. Click on "Shut Down".
We also shut down your MacBook, and if you don't, it will go into standby mode and draw power. By shutting down your MacBook, you don't only stop all the background processes but also completely shut down your MacBook.
How do I factory reset my MacBook Air and delete everything?
Factory resetting your Macbook Air, Macbook Pro, iMac, and Mac mini, requires you to follow the steps mentioned below.
- 1. Open "System Preferences" and then click on "System Preferences" on the menu bar.
- 2. Now, select "Erase All Content and Settings".
- 3. Enter your MacBook's password and click on "OK".
- 4. Now follow the prompts accordingly.
- 5. Once the prompts have been selected and confirmed for resetting, your MacBook will restart.
- 6. After the MacBook restarts, click on the Apple logo on the menu bar.
- 7. Click on "Shut Down".
What happens if I erase Macintosh HD on my MacBook Pro?
You will lose all your data. But you can use EaseUS Data Recovery Wizard for Mac to recover the files despite deleting them permanently.
- 1. Scan the target disk.
- 2. Preview the lost files.
- 3. Recover them.
How can I reset my MacBook Pro to factory settings without passwords?
You can do that by factory resetting your MacBook Pro in recovery mode.
- 1. Click on the Apple logo on the menu bar and click on "Shut Down".
- 2. Turn on your Mac now, press and hold Command + R and leave it when you see the Apple logo.
- 3. On M-series Macs, it's quite different; just press the power button and hold it until the startup option window opens. Now click on "Options" and "Continue" to open the utility window.
- 4. Under the macOS utility window, select "Disk Utility", click on "Continue", and choose "internal disk/startup disk".
- 5. Click on the "Erase" option at the top of the Disk Utility window.
- 6. Give the disk a new name and select the format as APFS.
- 7. Now, click on "Erase Volume Group" and allow a few minutes for Disk Utility to finish resetting the drive.
- 8. Once done, you will be redirected to the macOS utility window. If you weren't redirected, restart your computer and press CMR+R again to launch your MacBook in recovery mode.
- 9. Under the utility window, click on "Reinstall macOS" and follow the instructions to install macOS.
- 10. After the macOS has been installed, the "Setup Assistant" will open. Quit the Setup Assistant and turn off your Mac.
Was This Page Helpful?
Dany is an editor of EaseUS who lives and works in Chengdu, China. She focuses on writing articles about data recovery on Mac devices and PCs. She is devoted to improving her writing skills and enriching her professional knowledge. Dany also enjoys reading detective novels in her spare time.
Related Articles
-
Fix Blue Screen of Death Error on PC and Restore All Lost Files
![author icon]() Tracy King/Mar 14, 2025
Tracy King/Mar 14, 2025 -
How to Factory Reset Windows 7 [Follow Detailed Guides]
![author icon]() Brithny/Feb 07, 2025
Brithny/Feb 07, 2025 -
[Fixed] Right Click Not Responding or Working on Windows 10
![author icon]() Brithny/Jan 24, 2025
Brithny/Jan 24, 2025 -
[Too Slow!] How to Fix USB 3.0 Transfer Speed Pretty Slow
![author icon]() Brithny/Jan 24, 2025
Brithny/Jan 24, 2025