If you have a slow USB 3.0 drive, follow the methods to speed up your device.
| Workable Solutions | Step-by-step Troubleshooting |
|---|---|
| Fix 1. Use the Device Manager | Right-click on the Windows icon and select "Device Manager ". Expand Disk Drives in Device Manager and find your USB device, right-click on your USB device...Full steps |
| Fix 2. Convert USB 3.0 to NTFS | If the file system on your storage device is FAT32, you can convert it to NTFS to speed up the USB 3.0 drive. Before converting, you'd better back up your USB...Full steps |
USB 3.0 is Slow on Windows 10
Case 1. "I have bought a new USB 3.0 thumb drive and noticed that it gained surprisingly slow read/write speeds. A new USB 3.0 drive should at least have a write speed of 15–20 MB per second. But mine is no more than 50KB every second."
Case 2. "I tend to copy a lot of stuff to my Kingston USB 3.0 drive to put into my media player in the living room. Since having updated to Windows 10, I get a very slow transfer rate. I used to get around 20-30MB/s in Windows 7, but now the drive gets an extremely slow transferring speed on Windows 10! The copy speed is near 0 bytes!"
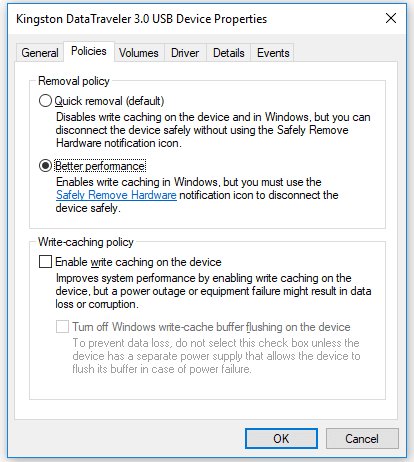
Method One. Use the Device Manager to Optimize USB 3.0
1. Right-click on the Windows icon and select "Device Manager ".
2. Expand Disk Drives in Device Manager and find your USB device, right-click on your USB device or hard drive and choose "Properties".
3. Go to the Policies tab and select "Better performance", click "OK" to make sure that you want to optimize and improve your USB transfer speed.
You will probably be prompted to restart the computer, and after you do, you should start to see substantially faster transfer speeds!
Method Two. Convert USB 3.0 from FAT32 to NTFS
If the file system on your storage device is FAT32, you can convert it to NTFS to speed up the USB 3.0 drive. Follow the two steps below now:
Part 1. Export and Restore Your Data from USB
Before converting your USB 3.0 to NTFS, you'd better backup your USB data to a new device to avoid data loss.
Here we’d like to recommend you try EaseUS data recovery software - Data Recovery Wizard which supports you to thoroughly scan and find all existing and even lost files on the USB and extract to another safe location by simple clicks:
Step 1. Run EaseUS Data Recovery Wizard. Choose the drive where you lost files and start scanning by clicking "Search for Lost Data". This software allows you to recover lost data from all devices, including HDD, SSD, USB drive, SD card, pen drive, camera, etc.

Step 2. Browse the full scan results. You can choose the file type you need by clicking on the file type filter. EaseUS data recovery software supports 1000+ file types like photos, videos, documents, emails, audio files, and many more.

Step 3. Select the files you want to preview. Click "Recover" and set a storage location or Cloud drive to save the recovered data.

Part 2. Convert USB from FAT32 to NTFS
EaseUS Partition Master Free provides USB owners a fast and seamless feature 'Convert to NTFS' to switch the file system of storage devices without formatting or causing any data loss issues.
Step 1. Run EaseUS Data Recovery Wizard. Choose the drive where you lost files and start scanning by clicking "Search for Lost Data". This software allows you to recover lost data from all devices, including HDD, SSD, USB drive, SD card, pen drive, camera, etc.
Step 2. Browse the full scan results. You can choose the file type you need by clicking on the file type filter. EaseUS data recovery software supports 1000+ file types like photos, videos, documents, emails, audio files, and many more.
Step 3. Select the files you want to preview. Click "Recover" and set a storage location or Cloud drive to save the recovered data.
After the process, you can check your USB drive and use it for file transfers to see the changes. If this method doesn't work well, you can also apply EaseUS Partition Master as the best USB format tool to format your USB as fresh as new for file transferring. Do remember to back up your USB to avoid unnecessary data loss.
Was This Page Helpful?
Daisy is the Senior editor of the writing team for EaseUS. She has been working at EaseUS for over ten years, starting as a technical writer and moving on to being a team leader of the content group. As a professional author for over ten years, she writes a lot to help people overcome their tech troubles.
Brithny is a technology enthusiast, aiming to make readers' tech lives easy and enjoyable. She loves exploring new technologies and writing technical how-to tips. In her spare time, she loves sharing things about her game experience on Facebook or Twitter.
Related Articles
-
FIXED: PC Won't Boot to BIOS - 4 Ways Included
![author icon]() Jerry/2025-07-04
Jerry/2025-07-04 -
2.5 HDD vs 3.5 HDD: What Are Differences Between 2.5 and 3.5 Hard Drive?
![author icon]() Jerry/2025-12-31
Jerry/2025-12-31 -
[Solved!] How to Fix Windows 10 Activation Key Not Working
![author icon]() Jerry/2025-07-04
Jerry/2025-07-04 -
How to Fix the System Cannot Find the File Specified
![author icon]() Brithny/2025-12-12
Brithny/2025-12-12
EaseUS Data Recovery Services
EaseUS data recovery experts have uneaqualed expertise to repair disks/systems and salvage data from all devices like RAID, HDD, SSD, USB, etc.