What can factory reset do on Mac? Factory reset is also called hard reset and master reset. This option on Mac can help you restore your Mac to the original operating system and erase all the data stored on your Mac.
When will you need the factory reset on macOS Sonoma, Ventura, Monterey, or Big Sur? We list some situations you may choose to factory reset your Mac.
- A virus has attacked your Mac, and you wonder how to format the MacBook Pro or other Mac devices to remove the virus.
- Your Mac runs very slowly, and you want to make it run faster.
- Too many bugs frequently occur on Mac, and your Mac cannot solve the bugs automatically.
- You will buy a new MacBook or iMac and sell your old one to someone.
- When you need to downgrade macOS Ventura to Monterey, you can factory reset the Mac and reinstall the operating system.
You must notice that it is possible to lose essential data after factory reset macOS Big Sur. You should back up data in advance with EaseUS Mac data recovery software, this all-in-one tool can help you back up and restore your macOS effectively:
Back Up Your Mac and Never Lose Data
Back up and restore your MacBook/iMac without Time Machine, iCloud, or external hard drives.
You may need to factory reset your Mac on macOS Ventura, Monterey, or Big Sur in different situations. We will give you a short video guide first, and you can skip to the essential parts, refer to the time nodes below:
- 00:13 Use an external hard drive to back up your data
- 00:24 How to factory reset 2018 and newer Macs
- 01:24 How to factory reset older Macs
Keep Your Data Safe After macOS Big Sur Factory Reset
If you have read the video we offered, you may know one of the methods to avoid data loss – back up your data to an external hard drive. Forget to create a backup on an external hard drive? It is Okay. We have another way to help you recover lost data after factory resetting your Mac on macOS Ventura, Monterey, and Big Sur.
EaseUS Data Recovery Wizard for Mac is a professional and handy Mac data recovery tool, and even computer novices can operate this software easily. Even if you erase all the contents and settings after factory resetting your Mac or you already lost some essential data before factory resetting, this tool can help you recover important files.
If the deleted videos and photos are damaged or corrupted, EaseUS Data Recovery Wizard for Mac is also a Mac video repair and photo repair tool.
EaseUS Data Recovery Wizard for Mac
- Retrieve lost data after factory resetting your Mac or during a macOS upgrade, including recover unsaved Word document on Mac.
- Recover deleted files Mac: documents, graphics, videos, music, audio, etc.
- Get back files with different file systems: APFS, NTFS, FAT, HFS X, exFat, etc.
Step 1. Select the drive to be scanned
In the main EaseUS Data Recovery Wizard window, there will be a list of the drives connected to your Mac. Select the drive you need to recover lost/deleted files from, and click the "Search for lost files" button.

Step 2. Select your lost data/files
EaseUS Data Recovery Wizard for Mac will immediately scan your selected disk volume and display the scanning results on the left pane. You can sort the results to find the wanted files if you are looking for certain files.

Step 3. Recover lost/deleted data
Once you have found the desired files, preview the files and then click "Recover" to begin the recovery of your deleted/lost Mac files.

What to Do Before macOS Big Sur Factory Reset
If your macOS is older than Monterey and you plan to sell the Mac, before factory resetting your Mac, it would help protect your privacy by logging out of your accounts, disabling iCloud, and unpairing Bluetooth devices.
Tip: If you unluckily forget the login password and find your keyboard backlight is abnormal. You need to reset Mac password and need MacBook resetting SMC.
Preparation 1. Log out Accounts on macOS
If you have accounts in Apple TV, Music, or other apps, remember to log out of your accounts:
Step 1. Open the app you have an account in it.
Step 2. Click "Account" in the options bar.
Step 3. Click "Authorisations" and then choose "De-authorise This Computer".
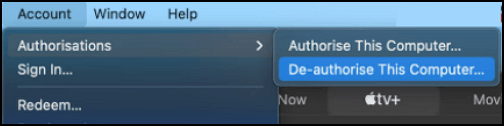
Step 4. You can log out of your account by entering your Apple ID.
Preparation 2. Disable iCloud on macOS Ventura/Monterey/Big Sur
Your iCloud will sync the notes, reminders, photos, bookmarks, and other personal information to different Apple devices. How to disable iCloud:
Step 1. Choose the Apple menu and click "System Preferences" or "System Settings".

Step 2. Click "Apple ID".
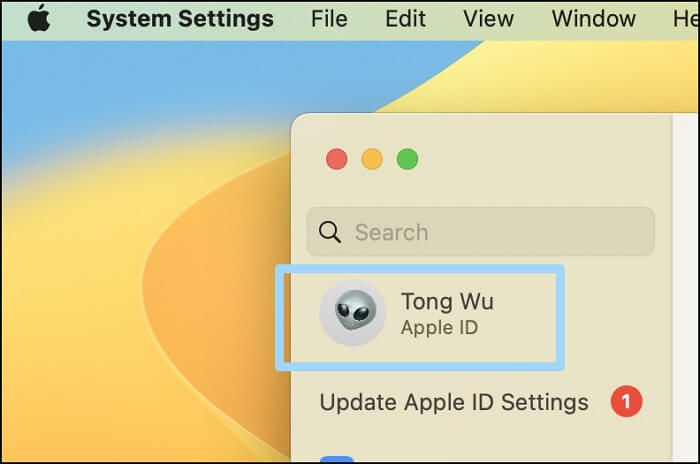
Step 3. Click "Sign Out ", and your iCloud is disabled on this Mac.
Preparation 3. Unpair Bluetooth on macOS
If you give your old Mac to your siblings, we advise you to unpair your Bluetooth devices in case you accidentally connect to the old Mac.
Step 1. Choose the Apple menu and click "System Preferences" or "System Settings".
Step 2. Click "Bluetooth".
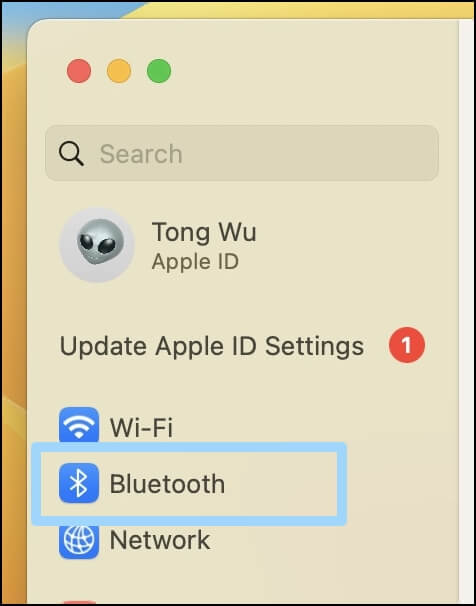
Step 3. Hit the cross icon to unpair your Bluetooth devices.
We hope you are ready to factory reset macOS Ventura, Monterey, or older versions, and you should share this tutorial with your friends!
How to Factory Reset Mac Big Sur/Ventura/Monterey
Suppose you want to factory reset your Mac on macOS Ventura and Monterey. You need to use the Erase All Content and Settings option on Mac and do not need manually log out. If your Mac device runs macOS Big Sur, you can download macOS Ventura or Monterey to use this method. You can factory reset your Mac on macOS Ventura and Monterey by following the prompts.
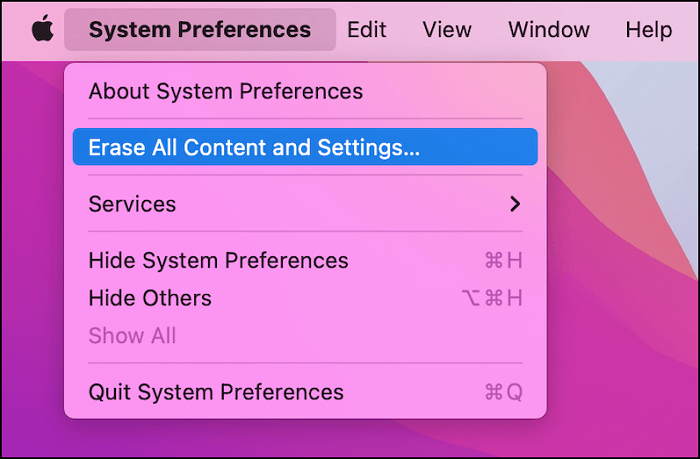
Step 1. Choose the Apple menu and click "System Preferences".
Step 2. Click "Erase All Content and Settings".
Step 3. Enter the password and click "OK".
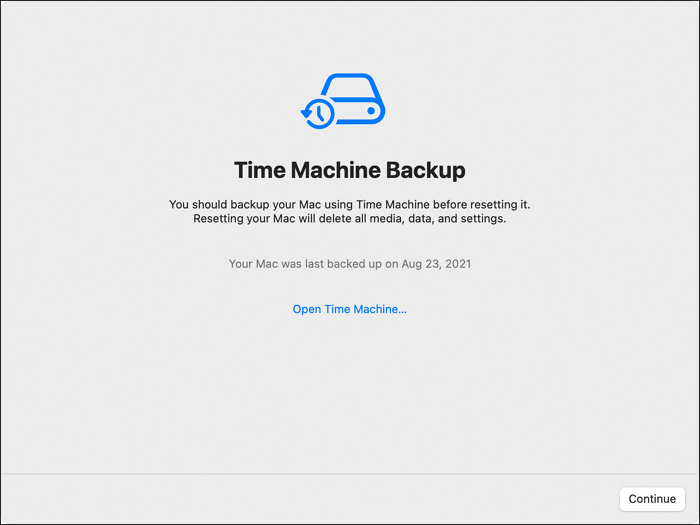
Step 4. You will be asked to back up data with Time Machine. If you don't want to back up, click "Continue".
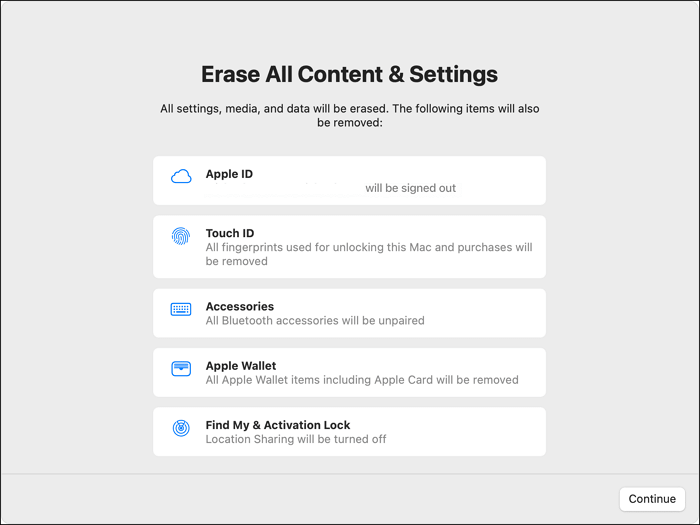
Step 5. Click "Continue" to erase the following items.
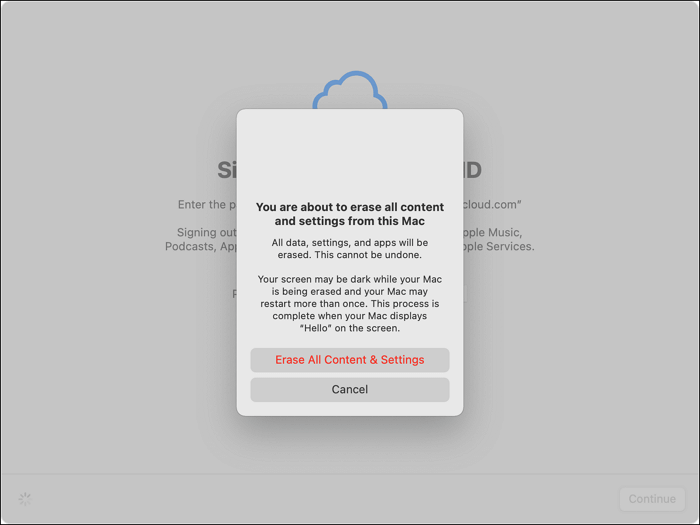
Step 6. Confirm your request.
How to Factory Reset Mac Big Sur or Earlier Version
If you want to factory reset your Mac on macOS Big Sur or an earlier macOS version, the method will be a little harder than on macOS Ventura and Monterey. Don't worry! We will show you the full tutorial below:
The first step is entering the Recovery Mode on Mac.
On Apple Silicon Macs:
Step 1. Shut down the Mac and hold the power button until you see options on the screen.
Step 2. Click "Continue" and enter your password.
Step 3. You will see the macOS Utilities now.
On Intel Macs:
Step 1. Restart the Mac and hold both Command and R keys to enter Recovery Mode
Step 2. Enter your admin password to confirm the operation.
Step 3. You will see the macOS Utilities now.
If your Mac won't boot into Recovery Mode, click the anchor text to fix it.
Then, we will tell you how to erase the Hard Drive:
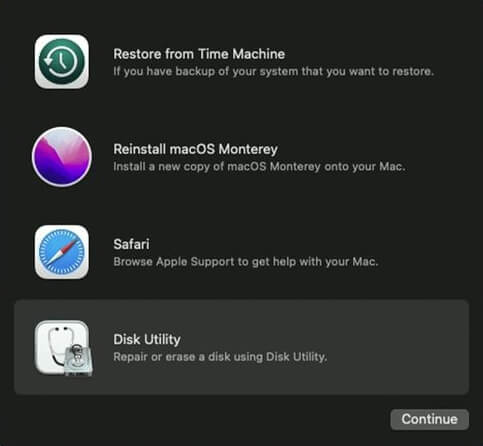
Step 1. Choose "Disk Utility" first.
Step 2. Then choose the disk which you start up with.
Step 3. Choose "Erase".
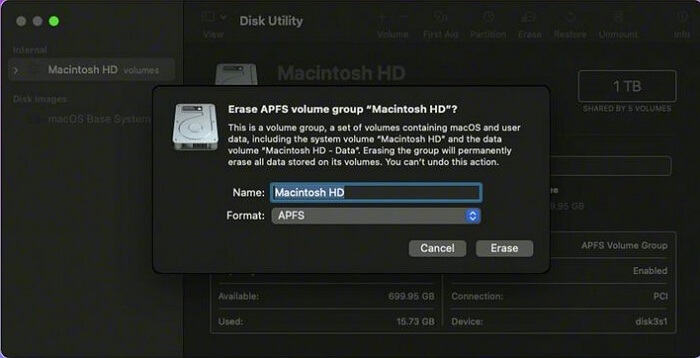
Step 4. Select the Journaled version of Mac OS Extended from the menu and click "Erase".
Step 5. Quit the Disk Utility.
Step 6. You will be asked to confirm to reinstall macOS. You can follow the prompts to reinstall macOS.
How to Factory Reset MacBook Big Sur FAQs
We list three questions below to help you learn more about factory resetting Mac on macOS Ventura/Monterey/Big Sur.
How do I factory reset my Mac with Monterey?
It is simple to factory reset Mac with Monterey using the Erase All Content and Settings option.
- 1. Choose the Apple menu and click "System Preferences".
- 2. Click "Erase All Content and Settings".
- 3. Enter the password and click "OK".
- 4. Your Mac will remind you to back up data with Time Machine. If you don't want to back up, click "Continue".
- 5. Click "Continue" to erase the items.
- 6. Confirm your request.
How to factory reset MacBook Big Sur?
It is more challenging to wipe Mac to factory settings on macOS Big Sur than on Monterey and Ventura.
- 1. Shut down your Mac and enter the Recovery Mode.
- 2. Choose "Disk Utility" first.
- 3. Then choose the disk which you start up with.
- 4. Choose "Erase".
- 5. Select the Journaled version of Mac OS Extended from the menu and click "Erase".
- 6. Quit the Disk Utility.
- 7. You will be asked to confirm to reinstall macOS. You can follow the prompts to reinstall macOS.
How do I erase All content on my MacBook in Ventura?
You can erase all content on your MacBook in Ventura with the following tutorial:
- 1. Choose the Apple menu and click "System Settings".
- 2. Click "Erase All Content and Settings".
- 3. Enter the password and click "OK".
- 4. Your Mac will remind you to back up data with Time Machine. If you don't want to back up, click "Continue".
- 5. Click "Continue" to erase the items.
- 6. Confirm your request.
Was This Page Helpful?
Cedric Grantham is a senior editor and data recovery specialist of EaseUS. He mainly writes articles and how-to tips about data recovery on PC and Mac. He has handled 10,000+ data recovery cases and is good at data recovery of NTFS, FAT (FAT32 and ExFAT) file systems, and RAID structure reorganization.
Dany is an editor of EaseUS who lives and works in Chengdu, China. She focuses on writing articles about data recovery on Mac devices and PCs. She is devoted to improving her writing skills and enriching her professional knowledge. Dany also enjoys reading detective novels in her spare time.
Related Articles
-
Top 7 Ways To Fix A Disk Read Error Occurred in Windows 10/8/7
![author icon]() Tracy King/Jul 04, 2025
Tracy King/Jul 04, 2025 -
How to Recover Unsaved/Lost/Corrupted Adobe Acrobat Files on Windows PC
![author icon]() Cedric/Dec 12, 2025
Cedric/Dec 12, 2025 -
How to Fix Asus Laptop Black Screen with 11 Efficient Ways
![author icon]() Cici/Jul 07, 2025
Cici/Jul 07, 2025 -
How Long Does It Take to Format an External Hard Drive [Full Guide]
![author icon]() Sherly/Jul 06, 2025
Sherly/Jul 06, 2025