
Have you ever encountered data loss? In recent years, more and more people have become aware of the importance of data protection. And they have also tried various methods to back up their data. In the following passage, I will present two ways for Windows Server 2012 backup to NAS.
Why Windows Server 2012 Backup to NAS is Important?
Windows Server 2012 has a lot of important information as a Server operating system. So it's necessary to protect the data. And the primary purpose of backup is to protect data and recover data quickly in case of data loss and ensure the continuity of work. As network storage, NAS allows people to backup Windows Server 2012. If we can back up Windows Server 2012 to a NAS device, we will enjoy the following benefits:
- Protect data better
- Access data remotely
- Increase data storage
- Share data with others
- Save storage costs
- Stream media on different computers
As we can see, it is so convenient for data management after Windows Server 2012 backup to NAS. After knowing the importance of Windows Server 2012 backup to NAS. It's time to understand how to perform it.
How to Do Windows Server 2012 Backup to NAS?
Before we know how to back up, we need to figure out what Windows Server 2012 is. And Windows Server 2012 is the Windows operating system. So if you want to backup it, you can also backup the Windows Server folder. And the Windows Server folder is the local folder of the computer.
Besides, you have many choices to save your backups. For example, you can save Windows Server backup to a network share. NAS is the best choice for your Windows Server. There are two ways for your Windows Server 2012 backup to NAS: EaseUS Todo Backup Enterprise and Windows Server Backup. Both have some pros and cons.
Follow the table and find the most convenient method:
| Comparison | EaseUS Todo Backup | Windows Server Backup |
|---|---|---|
| Backup content | All backup contents will be retained. | It can only keep one full backup. |
| Backup type | Full, differential backup, and incremental backup | Only full backup |
| Backup process | Easy | Complex |
If we want to backup OS files, although it is possible to do it with Windows Server Backup, the operation is more complicated, and the failure rate is high. Therefore, you can use EaseUS Todo Backup, which can comprehensively backup and prevent data corruption.
EaseUS Todo Backup is professional software for rapid data backup and recovery. With EaseUS Todo Backup, you can:
- Set up automatic backup weekly and monthly.
- Perform incremental or differential backups to save space.
- Backup safely with the compression and encryption options.
- Backup all endpoint devices from one central machine
- Support local, offsite data backup, and Cloud backup.
- Support system clone, hard drive clone, and partition clone.
- Backup multiple SQL databases in a single procedure.
EaseUS Todo Backup is a comprehensive data software to simplify your data backup and recovery. It can reduce risks and business costs. Next, let's continue to explore it.
Windows Server 2012 Backup to NAS with EaseUS Todo Backup
EaseUS Todo Backup can meet all your needs. And it is powerful to it supports all kinds of windows, such as Windows Server. Here are the steps for Windows Server 2012 Backup:
Step 1. Open EaseUS Todo Backup Enterprise. Then click "New Task" to set a new backup.
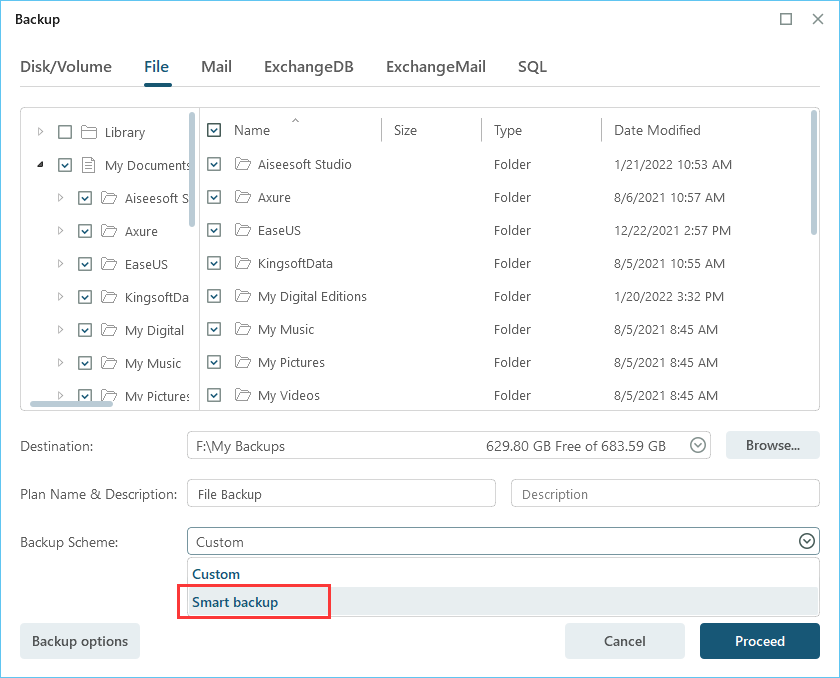
Step 2. Choose "File" as the target among the options at the top. Then select the specific files you want to back up.
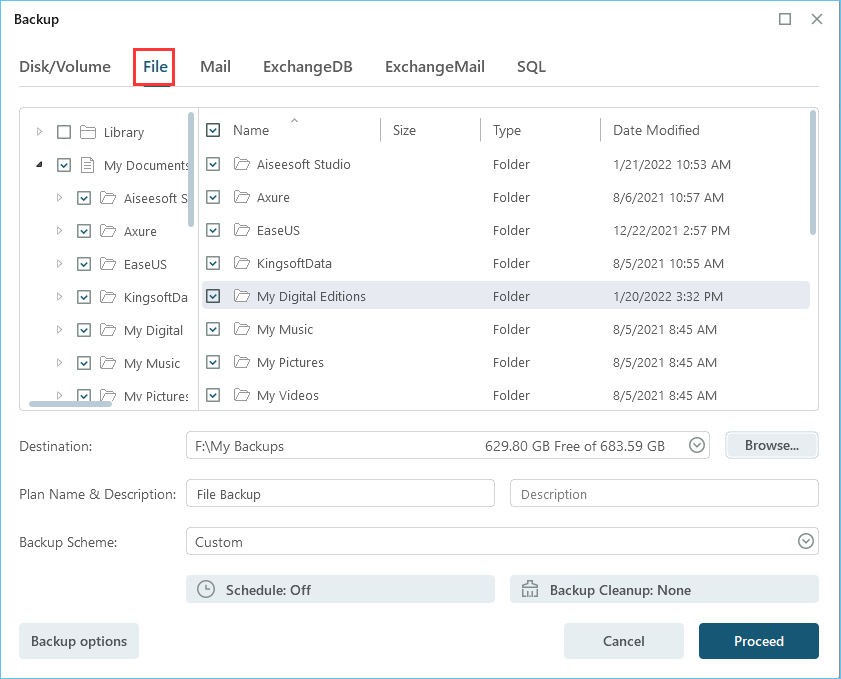
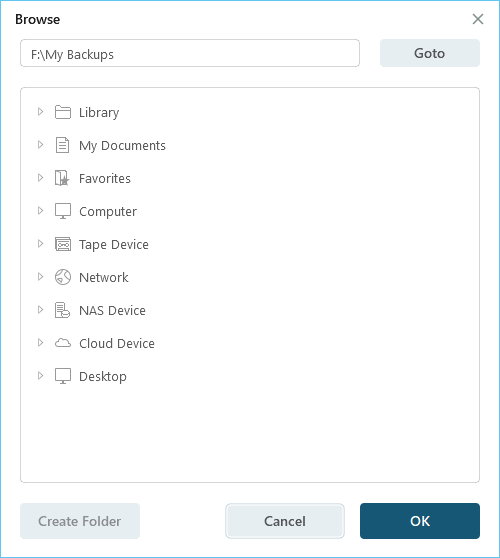
Step 3. Then click "Browser" to choose the destination where you want to put the backup.
Step 4. You can customize your backup scheme by clicking "Schedule: Off". Here you can see "Schedule", "Backup cleanup" and "Adcanced Settings". Click "New" under the "Schedule" catalog.
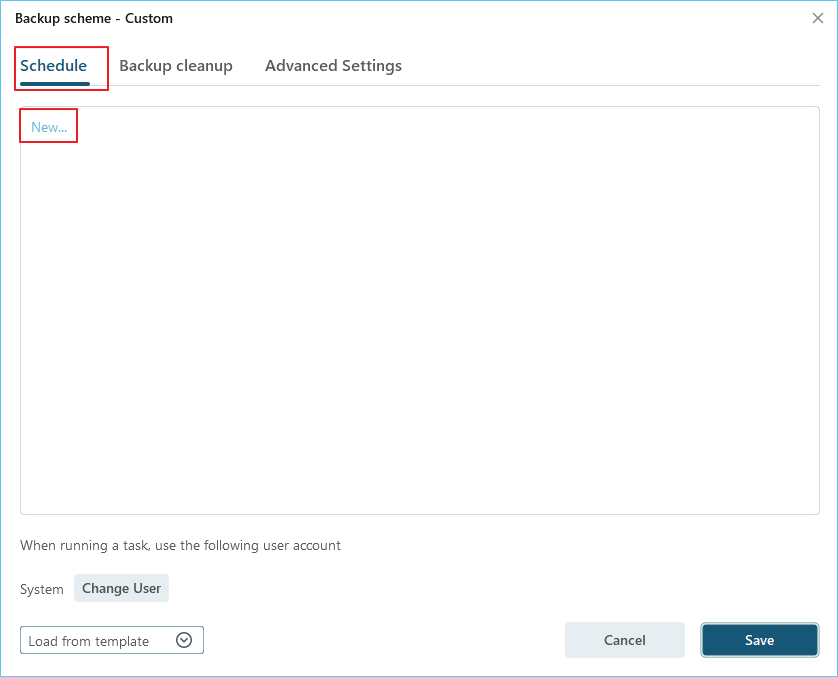
Then set the backup frequency based on your needs.
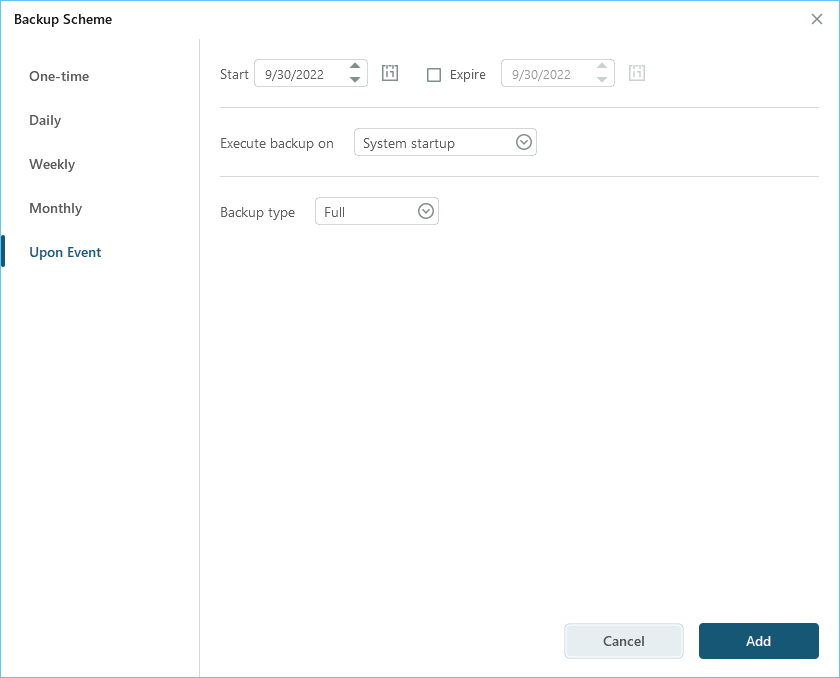
Or, you can choose the "Smart backup" under the Backup Scheme, which will monitor the selected file changes and backup sutomatically.
Step 5. Click "Backup options" on the bottom-left corner of the interface.
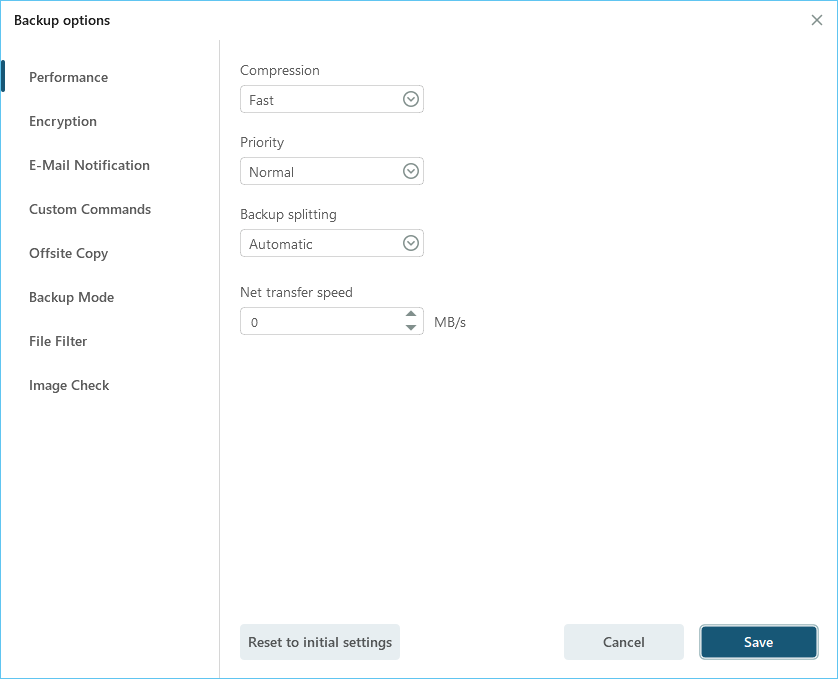
You can change the performance, encryption, e-mail notification, and other options here according to your preferences. When finish, click "Save" to return to the main interface.
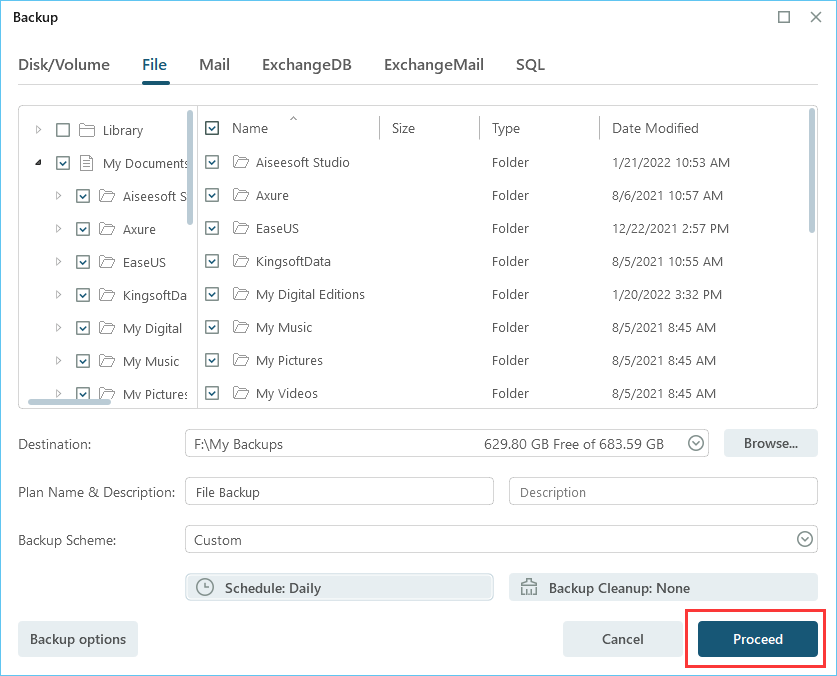
Step 6. When you finish all settings, click "Proceed" to start backing up files.
Windows Server 2012 Backup to NAS with Windows Server Backup
Windows Server backup is a tool that comes with Windows for backing up entire disks, folders, or files. This tool is turned off by default. So before using it, you need to install it first.:
Step 1: Open "Server Manager" on your computer. And choose "Features."
Step 2: Click "Add Features" on the right and find " Windows Server Backup."
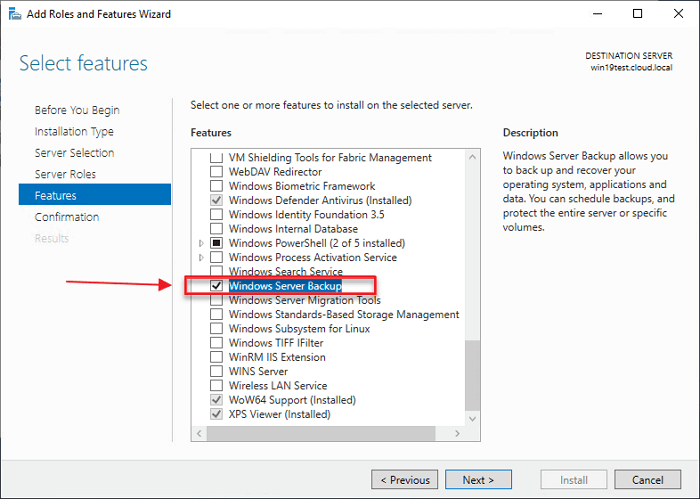
Step 3: Click "Next" and "Install" to finish the process.
After we installed Windows Server Backup, let's look at the backup operation step by step:
Step 1: Click "Windows Server Backup" and choose " Backup Once Wizard " to start the Windows Server 2012 Backup to NAS.
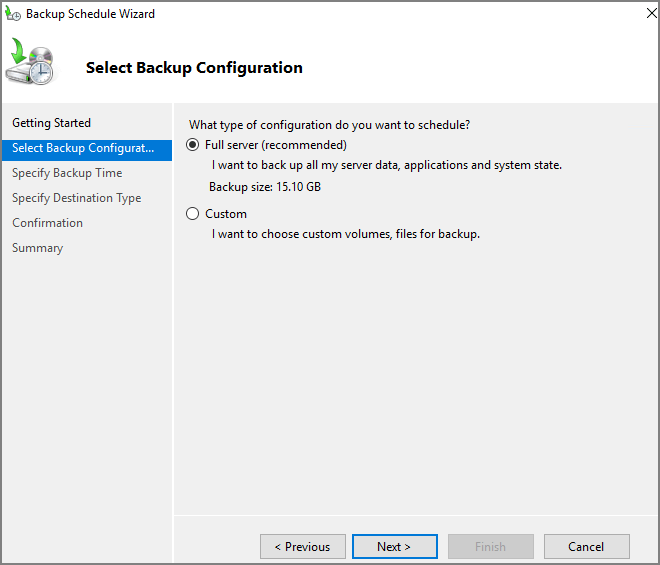
Step 2: Select the corresponding backup option and click "Next."
Step 3: Select the backup target and click "Next." You can select the whole server a specific directory to backup. The options include: "Full Server: back up all Server data, applications and system state" and "Custom: choose custom volumes, files for backup."
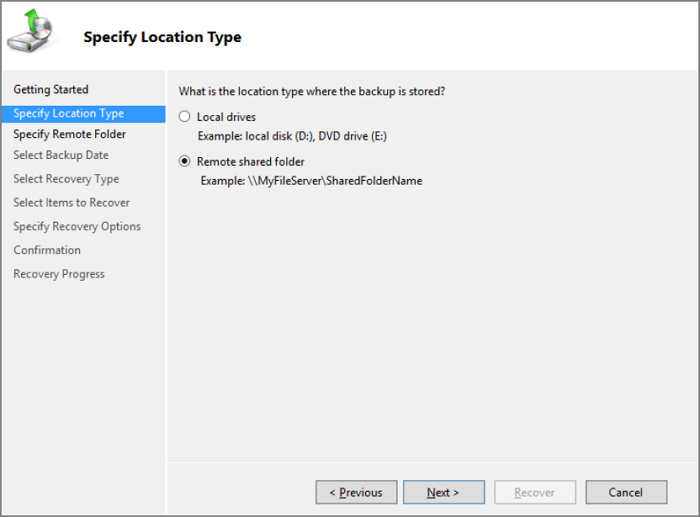
Step 4: In the specify destination type tab, select "remote shared folders" and click "Next."
Step 5: In the Specify remote folder tab, specify the location of the remote folder, and click "Next." And the place here is a directory on the NAS.
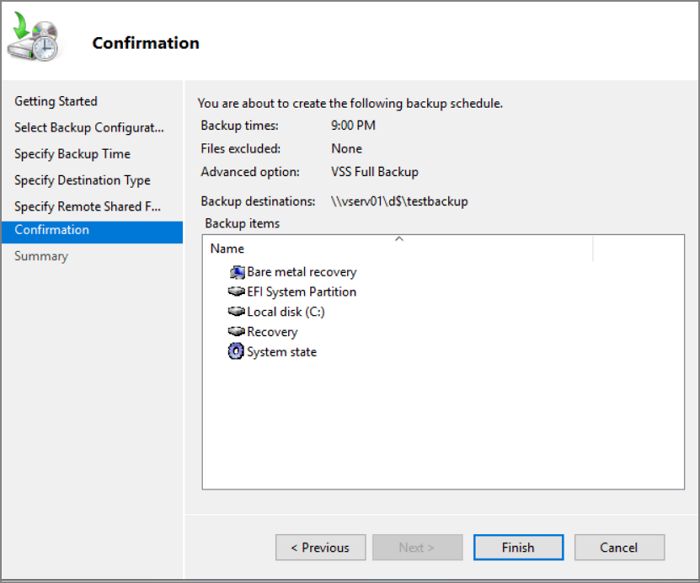
Step 6: After confirming the backup settings. Then click "Backup" to start Windows Server backup.
After the backup is completed, you can view the backed up contents in the backup directory of the NAS.
Conclusion
NAS is a very efficient way to store data and supports more work sharing. And it is very simple for Windows Server backup to NAS with EaseUS Todo Backup. Moreover, this software is reliable and you can do a rapid recovery or clone system. Besides, there are many other functions that you can enjoy as well as you download EaseUS Todo Backup.
FAQs of Windows Server 2012 Backup to NAS
We have learned above that backing up to NAS can be extremely helpful in our work. And we already know how to operate the backup process. There are some frequently asked questions we can use as a reference for Windows Server 2012 backup to NAS.
1. How do I backup my server to a NAS?
There are two ways to backup your server to a NAS. One method is to use Windows Server Backup. However, before you use it, you need to install it in the Server Manager. And a more efficient way is to use EaseUS Todo Backup. It is professional software and easy to use.
2. How does NAS backup work?
The NAS backup relies on backup agents that allow the server to access storage. And the storage is on a NAS device. The data will be delivered to the backup server across the network.
3. Is NAS safe for backup?
It has many benefits for your data. However, there is still a risk. Because you will send your data through the internet, your data may be attacked by hackers.
Was This Page Helpful?
Jean is recognized as one of the most professional writers in EaseUS. She has kept improving her writing skills over the past 10 years and helped millions of her readers solve their tech problems on PC, Mac, and iOS devices.
Cici is the junior editor of the writing team of EaseUS. She accepted the systematic training on computers at EaseUS for over one year. Now, she wrote a lot of professional articles to help people resolve the issues of hard drive corruption, computer boot errors, and disk partition problems.
-
Taking everything into consideration, we can say that EaseUS Todo Backup Home can offer you a little extra sense of security with a set of advanced tools. The interface provides quick adaptation, every process guiding you all the way through so you don't get stuck or further damage your system rather than keeping it safe.
Read More -
EaseUS Todo Backup Free lets you create backups of your important files or your entire computer through its streamlined interface. Just choose the backup type you'd like to get started, and let the program do the reset.
Read More -
EaseUS includes all the features I expect from backup software like versioning, incremental backups, and scheduling. For more advanced users, EaseUS allows you to install a pre-boot environment onto your hard drive so you can use it to restore files without burning a CD or putting it on an external USB drive.
Read More
Related Articles
-
Best Cloud Backup Solutions for Small Business
![author icon]() Gap/2024/06/11
Gap/2024/06/11 -
Active Directory Backup Best Practices
![author icon]() Gap/2024/06/06
Gap/2024/06/06 -
Virtual Machine Backup Software
![author icon]() Gap/2024/07/16
Gap/2024/07/16 -
How to Convert a Physical Machine to Hyper-V
![author icon]() Gap/2024/06/26
Gap/2024/06/26
![]()
EaseUS Todo Backup
Smart backup tool for your files and entire computer in Windows 10/8/7.
Install Windows on Multiple Computers at Once? No Problem!
Learn how to install Windows 11/10/7 and special programs/software on a batch of computers. Use 10 minutes to do the 10 hours work without making a single mistake!
Get Free Solution!