-
![]() Solved: The Volume Does Not Contain a Recognized File System
Solved: The Volume Does Not Contain a Recognized File System February 12,2026
 6 min read
 -
![]() Solved: Windows 11 Safe Mode Not Working | 5 Solutions
Solved: Windows 11 Safe Mode Not Working | 5 Solutions January 29,2026
 6 min read
 -
![]() Fixed: Windows Update Troubleshooter Stuck on Resolving Problems [5 Methods]
Fixed: Windows Update Troubleshooter Stuck on Resolving Problems [5 Methods] January 29,2026
 6 min read
 -
![]() Preparing Automatic Repair Loop Windows 10 [Quick Fix]
Preparing Automatic Repair Loop Windows 10 [Quick Fix] February 08,2026
 6 min read
 -
![]() Windows 11 Won't Wake from Sleep | Stuck in Sleep Mode
Windows 11 Won't Wake from Sleep | Stuck in Sleep Mode February 12,2026
 6 min read
 -
![]() How to Fix Invalid Media or Track 0 Bad - Disk Unusable Error in 8 Ways
How to Fix Invalid Media or Track 0 Bad - Disk Unusable Error in 8 Ways January 29,2026
 6 min read
 -
![]()
-
![]() How to Fix Service Registration Is Missing or Corrupt
How to Fix Service Registration Is Missing or Corrupt January 29,2026
 6 min read
 -
![]() How to Restore Computer to Earlier Date [Windows 11/10]
How to Restore Computer to Earlier Date [Windows 11/10] February 12,2026
 6 min read
 -
![]() Fix Error Code 0xc000001d on Windows [Quick & Safe]
Fix Error Code 0xc000001d on Windows [Quick & Safe] February 12,2026
 6 min read
Page Table of Contents
When a major update is rolled out, it is done in a staggered way. That means the updates become available to PCs slowly. Sometimes, the wait becomes longer, especially if someone with a similar PC configuration has already received the update. If you have waited long enough, it's best to do a force update to Windows 11 at least to clear out if there is anything else apart from waiting in the queue.
| Workable Solutions | Step-by-step Troubleshooting |
|---|---|
| Upgrade to Windows 11 via Settings | Left-click the Windows main menu and search for the "Settings" option...Full steps |
| Use Installation Assistant | Open Microsoft's Download 11 website. Click the "Download Now" button under...Full steps |
| Create Windows 11 Installation Media | Open the official Microsoft support website. Click the "Download Now" button present...Full steps |
| Download Windows 11 ISO | Open the Microsoft official support website. Now access the Download Windows 11 ISO section...Full steps |
Check Windows 11 System Requirements Before You Begin
Windows 11 is now rolled out completely with updated versions. It offers a smooth user experience along with advanced features and stability. If you never experience Windows 11, it's time to upgrade to this new operating system. Before updating your system to Windows 11, it's necessary to understand the minimum system requirements and Windows 11 size. For better clarity, we have created a table showing the system requirements for the Windows 11 update.
Minimum System Requirements Table
| Processor | 1 GHz or faster with two cores on a 64-bit processor or system on a Chip (SoC) |
| RAM | 4GB |
| Storage | 64 GB or larger storage device |
| System Firmware | UEFI, Secure Boot capable |
| TPM | Trusted Platform Module (TPM version 2) |
| Graphics Card | Compatible with DirectX 12 or later with WDDM 2.0 driver. |
| Display | 720 Pixel High-definition display more significant than 9” diagonally, 8 bits per color channel. |
| Microsoft account | Compulsory |
4 Ways to Force Update Windows 11 to the Latest Version
This part will discuss the four most effective and easiest ways to force update Windows 11 to the latest version. So, let's get started with more details.
Method 1. Upgrade to Windows 11 via Settings
You can easily access the "Settings" option to upgrade to Windows 11. Follow the guide below to understand the complete process.
Step 1. Left-click the Windows main menu and search for the "Settings" option.
Step 2. Now click the Windows Update option from the left side panel. It will open the Windows update page, where you must click the "Check for updates" option.
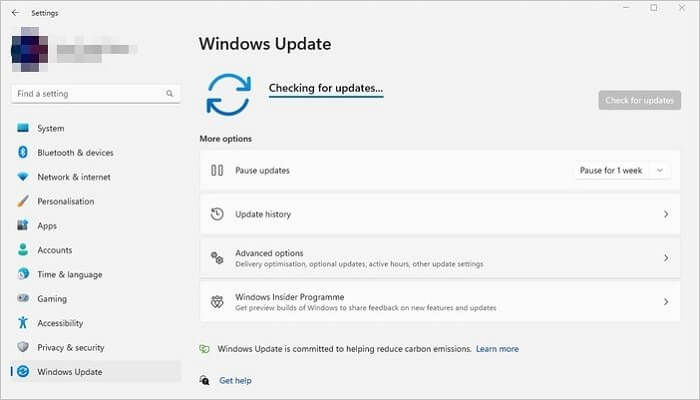
Step 3. Now click the "Download and install" button, then the restart now button.
After completing these steps, the Windows 11 latest version will proceed to install on your PC.
Method 2. Force the Windows 11 Upgrade with the Installation Assistant
With the help of Microsoft's installation assistant tool, you can quickly force the Windows 11 upgrade. Follow the steps below to process the complete method.
Step 1. Open Microsoft's Download 11 website.
Step 2. Click the Download Now button under the "Windows 11 Installation Assistant" section.
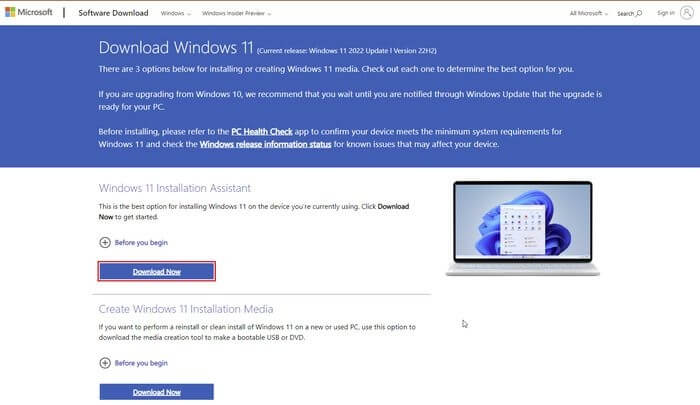
Step 3. After downloading the file, double-click on the Windows 11 InstallationAssistant.exe file. It will launch the tool; now click the accept and install button.
After completing these steps, you will download the latest Windows 11 on your PC without changing your previous files' settings and apps.
Method 3. Create Windows 11 Installation Media to Upgrade to Windows 11
With the help of the Windows 11 media creation tool, you can easily create a USB bootable media, which can help you to upgrade to Windows 11 latest version. Follow the guide carefully to perform this process.
Step 1. Open the official Microsoft support website. Click the "Download Now" button present under the Create Windows 11 Installation Media section.
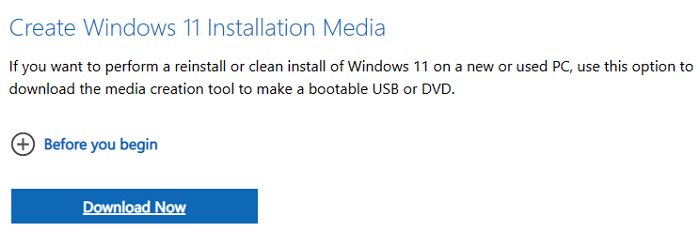
Step 2. After completing the download double, click the "Mediacreationtool.exe" file to launch it, click the "Accept" button, and again click the "Next" button.
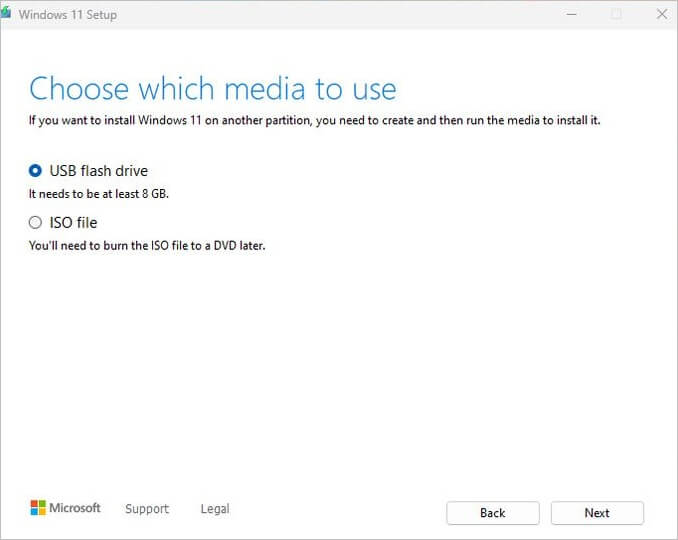
Step 3. On a new window, you will have two options to choose but select the USB flash drive option and click the "Next" button.
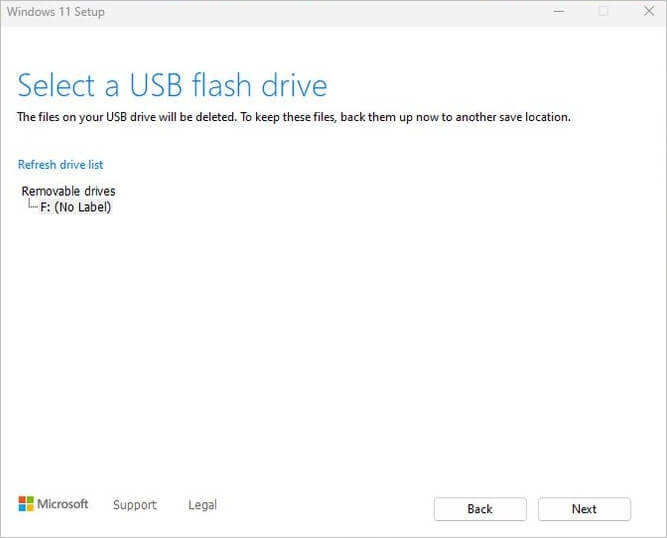
Step 4. Select the USB flash drive from the list. Again, click the Next button and click the "Finish" button.
Step 5. Open the downloaded setup file from File Explorer and double-click on the setup.exe file.
Step 6. It will open a new window where you must click "Next". Now you must agree to all the terms and conditions and click the "Install" button.
After completing these steps, your PC will be upgraded to the latest version of Windows 11.
Method 4. Download Windows 11 ISO File to Upgrade to Windows 11
With the help of Microsoft's official ISO file, you can easily upgrade to Windows 11. Let's learn how to complete the process correctly.
Step 1. Open the Microsoft official support website. Now access the Download Windows 11 ISO section, choose Windows 11(multi-edition ISO for x64 devices), and click the Download button.
Step 2. Select the ISO product language from the dropdown list and click on Confirm button.
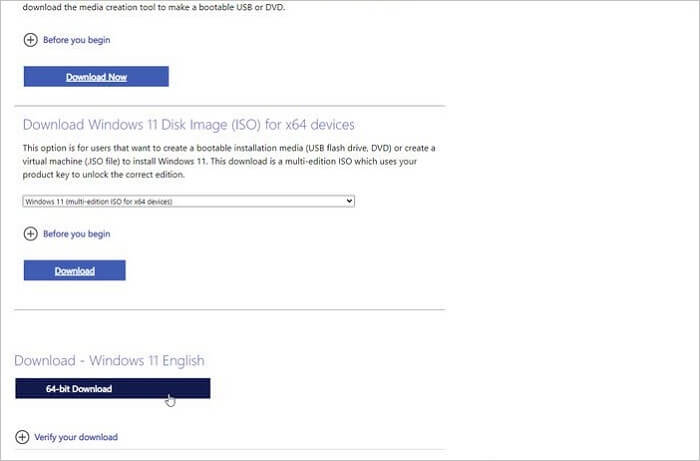
Step 3. Click the 64-bit download button to save the ISO file on your PC.
Step 4. Right-click the image file and select the Mount option; now, on the left navigation panel, select the virtual drive and double-click the setup.exe file to launch the file manually.
Step 5. Click the Next, Accept, agree to all the terms and conditions, and Install buttons.
After completing these steps, your PC will upgrade to the latest version of Windows 11.
Bonus Tip: Recover Lost Data After Windows 11 Update
After Windows 11 force update, if you lost any data, we recommend using EaseUS Data Recovery Wizard. Remember always download the tool only from the official website for safety reasons. There are undoubtedly several data recovery tools available on the internet, but the advanced features and easy-to-access interface make EaseUS hard drive recovery software stand out. Let's know more details regarding its features and functionality.
Key Features
EaseUS Data Recovery Wizard is one of the most reliable and advanced all-in-one data recovery tools, which comes with several unique features like
1] Deleted File Recovery
- This tool can quickly recover deleted files like documents, videos, music, and other files with simple clicks.
2] Partition Recovery
- You can quickly recover deleted files from hard drives, deleted partitions, memory cards, external hard drives, and many more.
3] RAW Drives Recovery
- EaseUS RAW drive recovery software can quickly recover files from inaccessible storage devices safely and efficiently.
4] Damaged Hard Drive Recovery
- This tool will assist you if you want to recover your essential files from any damaged hard drive.
Download this file recovery software to your Windows 11 PCs and recover lost files after Windows 11 update:
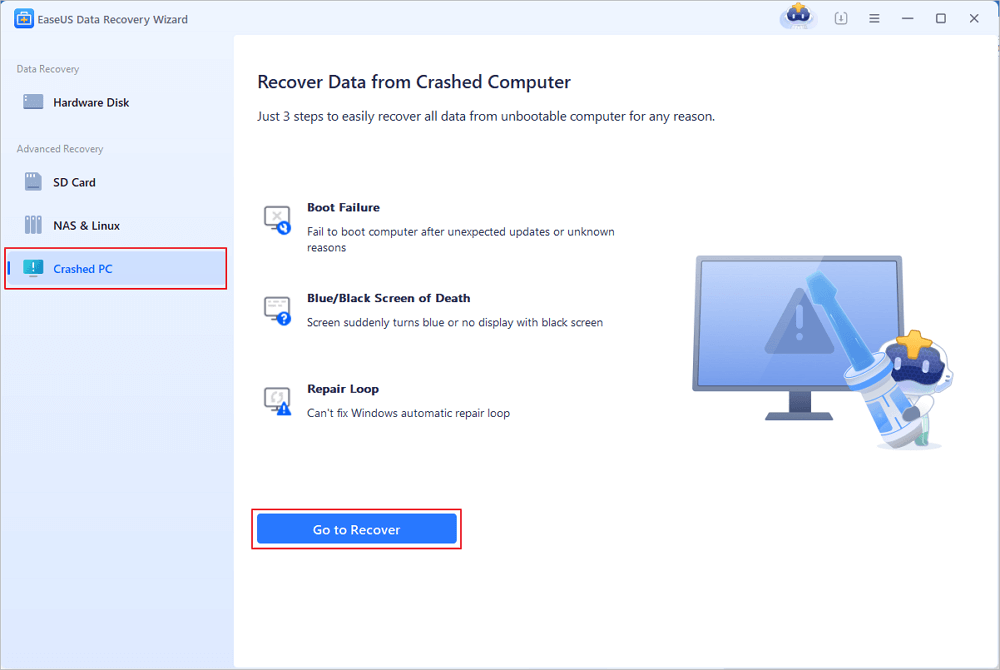
Step 1. Create a bootable disk
Launch EaseUS Data Recovery Wizard, choose "Crashed PC" and click "Go to Recover".
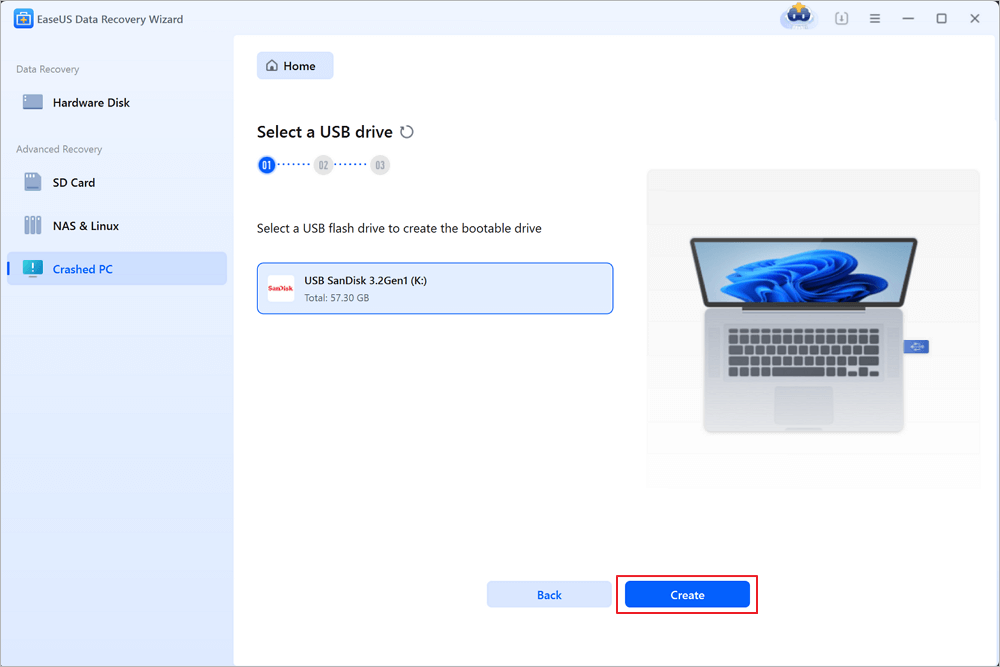
Select an empty USB to create the bootable drive and click "Create".
⚠️Warning: When you create a bootable disk, EaseUS Data Recovery Wizard will erase all data saved in the USB drive. Back up important data beforehand.
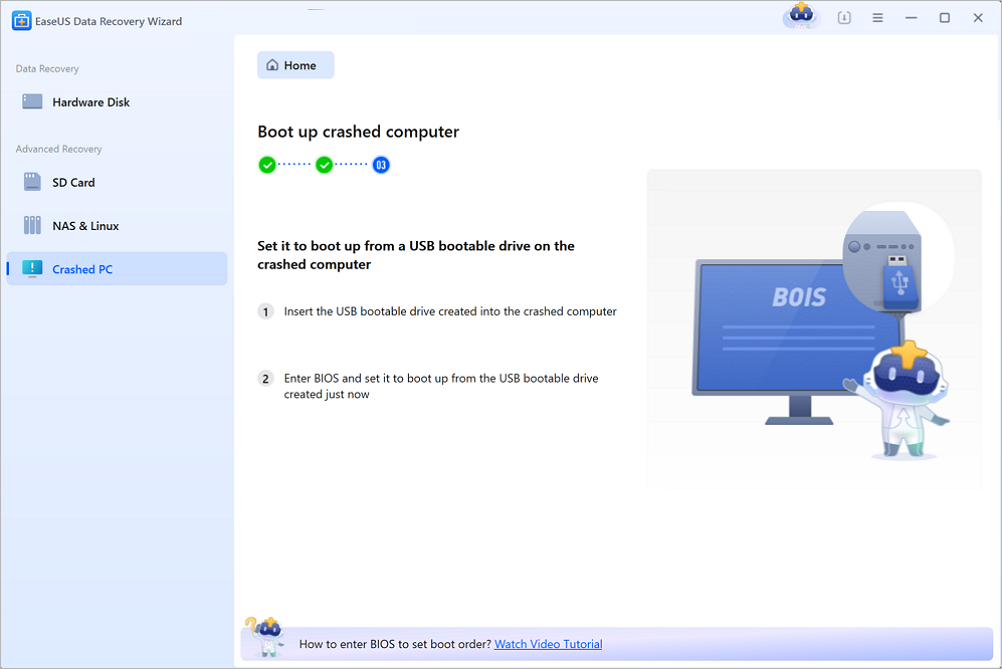
Step 2. Boot your computer from the bootable USB
Connect the bootable disk to the PC that won't boot and change your computer boot sequence in BIOS. For most users, it works well when they restart their computer and press F2 simultaneously to enter BIOS.
Set to boot the PC from "Removable Devices" (bootable USB disk) beyond Hard Drive. Press "F10" to save and exit.
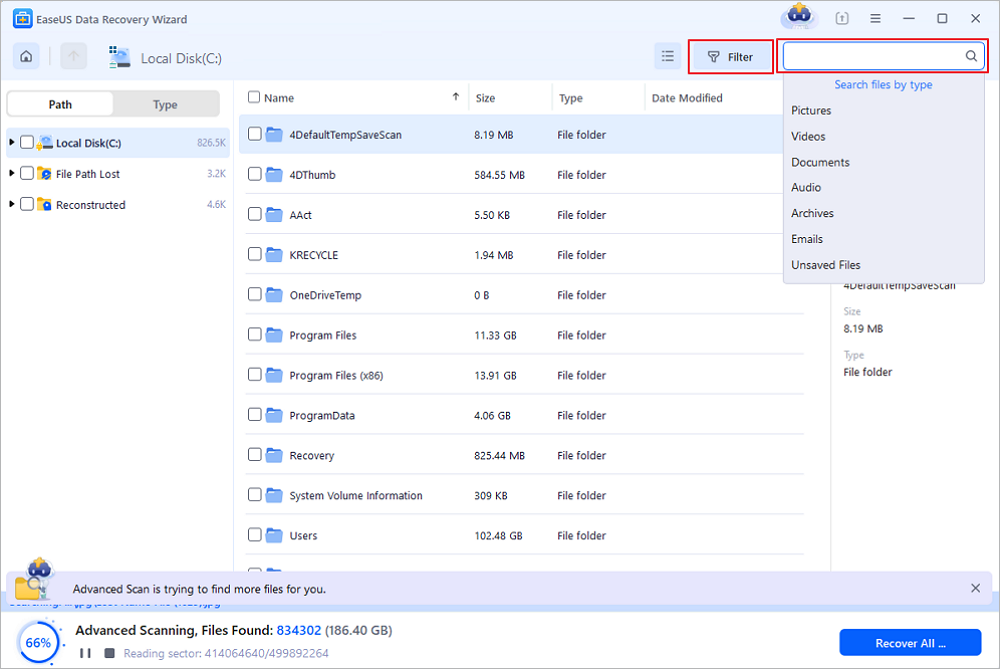
Step 3. Recover data from a crashed system/PC
After booting from EaseUS Data Recovery Wizard bootable disk, select the drive you want to scan to find all your lost files. Preview and recover the files you need to a safe location.
💡Tip: You can restore data on the local disks, external hard drives, and also the cloud storage.
Conclusion
In this post, we have shared the four easiest and most effective ways to force update Windows 11 to the latest version in detail. Hopefully, it will significantly help you update your system to the new version of Windows 11. Try all the methods to understand which one works better for you.
After the update, install EaseUS free data recovery software, which will help you recover deleted files from your PC efficiently. Feel free to ask us in the comment section; we will respond soon with appropriate answers.
Force Windows 11 Update FAQs
Here, we will answer some frequently asked questions that might clear your doubts regarding the force Windows 11 update, so follow this section carefully.
1. How do I force unsupported hardware to upgrade to Windows 11?
You can quickly install Windows 11 on unsupported hardware by creating a portable Windows 11 USB drive. With the help of this portable USB drive, you can boot your PC, and there is no need for the internal hard drive of your PC.
2. Can I force my PC to install Windows 10?
Yes, you can force update Windows 10 in several ways, like manually downloading the latest version from the Microsoft website and forcing updates. You can also force update Windows 10 on your PC with the help of a command prompt. You must run CMD as administrator for the command prompt method, type wuauclt.exe/updatenow on the CMD window, and press the enter key. It will force Windows 10 to check for updates and starts downloading the latest version automatically.
3. Why is there no option to update Windows 11?
Suppose you need the option to update to Windows 11. In that case, it may be because you are running an older version of Windows, your PC doesn't meet the standard requirements for the Windows 11 installation, or maybe because of the issue with the Windows update service.
4. How do I manually push Windows updates?
If you want to push Windows updates manually, follow the steps below.
- Open the Start menu and search for the Settings option.
- Now, from the left side panel, click on the Windows Update option from the left panel.
- Click on the Check for updates option from the Windows Update page. If any updates are available, it will show you, and from there, choose to install them.
Was this page helpful?
-
Brithny is a technology enthusiast, aiming to make readers' tech lives easy and enjoyable. She loves exploring new technologies and writing technical how-to tips. In her spare time, she loves sharing things about her game experience on Facebook or Twitter.…

20+
Years of experience

160+
Countries and regions

72 Million+
Downloads

4.9 +
Trustpilot Score


Free Data
Recovery Software
Recover data up to 2GB for free!
