Page Table of Contents
Reviews and Awards
You can transfer files from HDD to NVMe SSD in Windows 11. NVMe is a communications and driver interface that uses PCI's greater bandwidth. It aims to boost productivity and efficiency, making operating different clients and enterprises challenging.
If you are running an OLD PC with Windows installed on an HDD, I am sure your experience will not be that good compared to modern PCs. The real reason is that HDDs are not only, but they also age with time. Hence, switching to a faster-performing drive such as SSD or NVMe.
This post will share how you can transfer files from HDD to NVMe SSD. The methods will ensure you don't have to install the OS, and all your programs will stay intact, including the data.
How to Transfer Files From HDD to NVMe SSD in Windows 11
We will discuss two methods to transfer files from HDD to NVMe SSD on a Windows PC using professional PC file transfer software - EaseUS Todo PCTrans or manual file transer tool - Copy & Paste.
The two solutions are suitable for different situations, you can choose according to your needs:
| Solutions | EaseUS Todo PCTrans | Copy and Paste |
|---|---|---|
| Suitable for | Bulk transfer a huge number of files, folders, media content, and more | 3-5 minutes (depending on the file size) |
| Duration | Transfer only a few files or documents | This method will cost more time and energy. |
| Difficulty | Easy for all | Easy but complex |
In short, EaseUS Todo PCTrans can be applied to more scenarios. It provides more powerful migration features, especially for transferring files from HDD to NVMe SSD.
The manual method, though simple, does not apply to file and data migration between hard disks. If you only have a small number of files, you can opt for this method.
Method 1: Use NVMe Data Transfer Software - EaseUS Todo PCTrans
The File Migration Feature and Backup and Restore Feature in EaseUS Todo PCTrans can help users efficiently transfer files from HDD to NVMe SSD in Windows 11. The process is calculated by a secure algorithm, and no data is lost.
And the tool is easy to operate and can effectively accept your time and effort:
Option 1: Transfer Files from HDD to NVMe SSD
If users wish to have their operating system and games on SSD and the rest of the files on HDD, they can use the EaseUS PC files transfer software to shift large and small files from an SSD drive to an HDD drive. Below are the detailed steps on how to transfer using the EaseUS Todo PCTrans tool.
Step 1. Create a backup file of the source hard drive
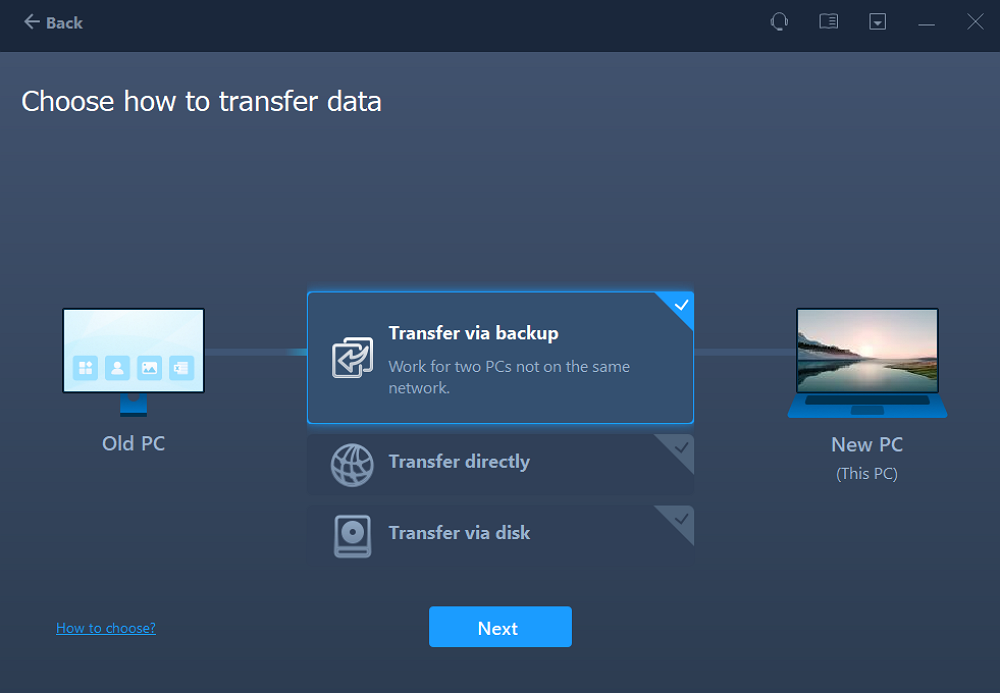
Launch EaseUS Todo PCTrans on your Windows computer. Click "data transfer" and select "Transfer via backup."
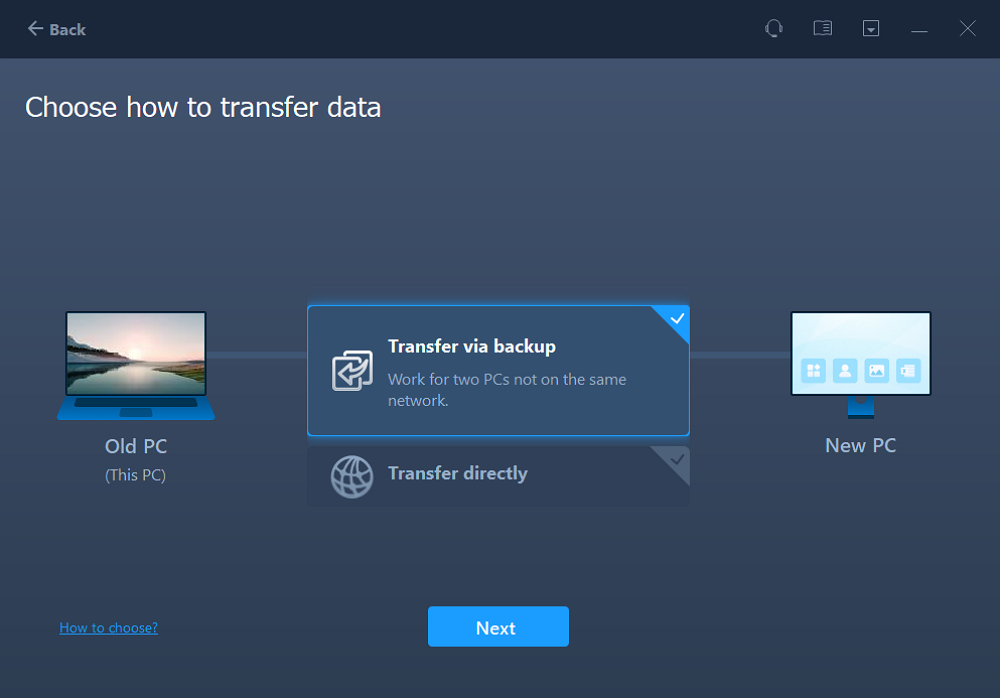
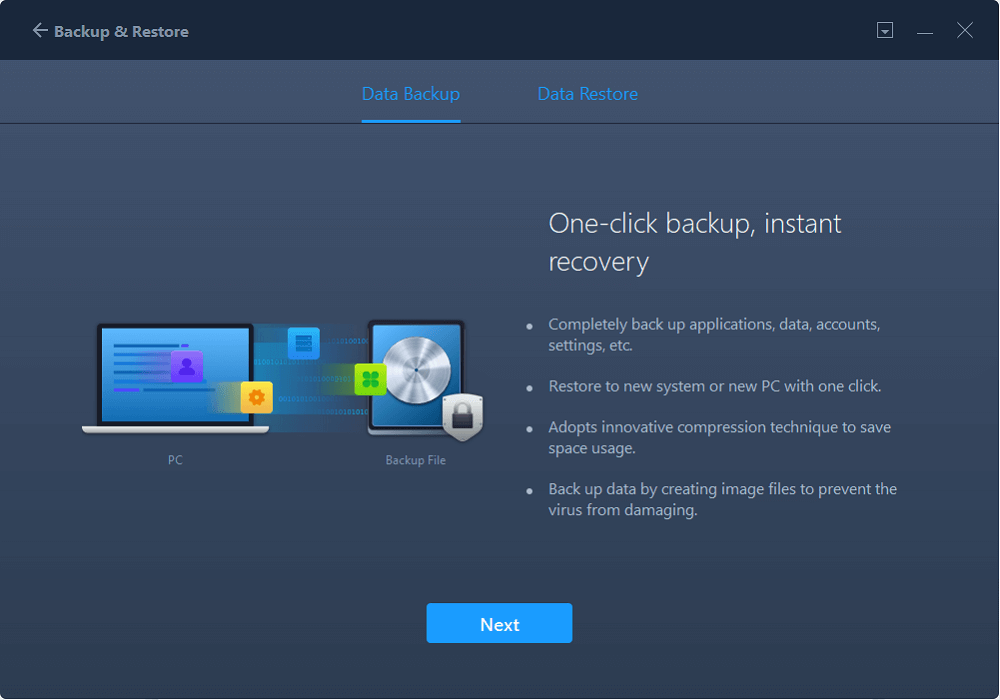
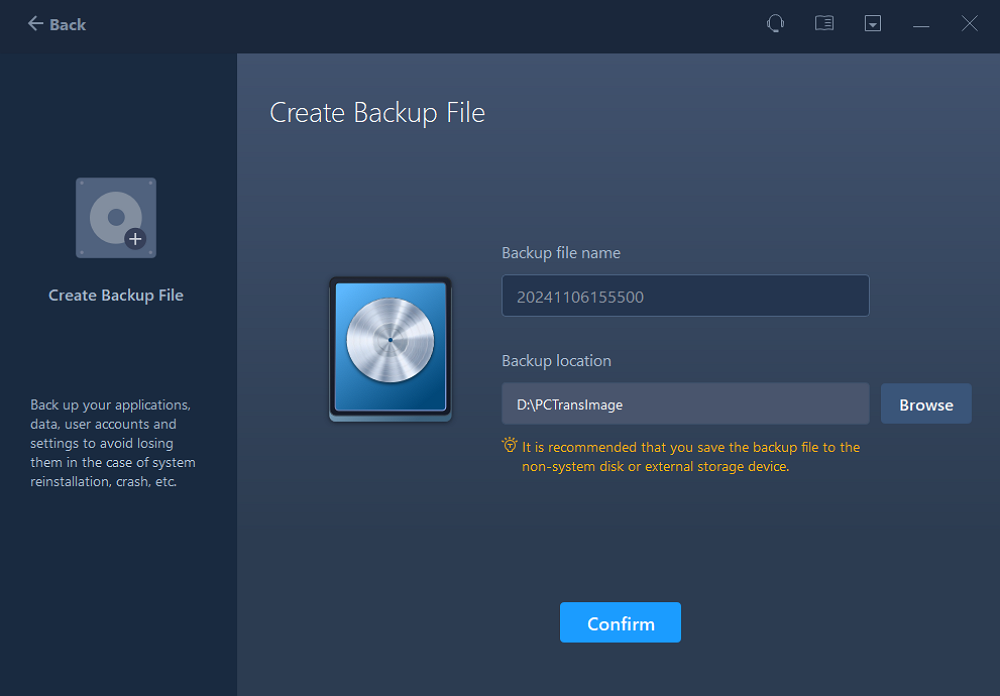
Hover your mouse over "Data Backup", and click "Next". Later, confirm the default settings of the file name and file path, or you can customize the settings on your own.
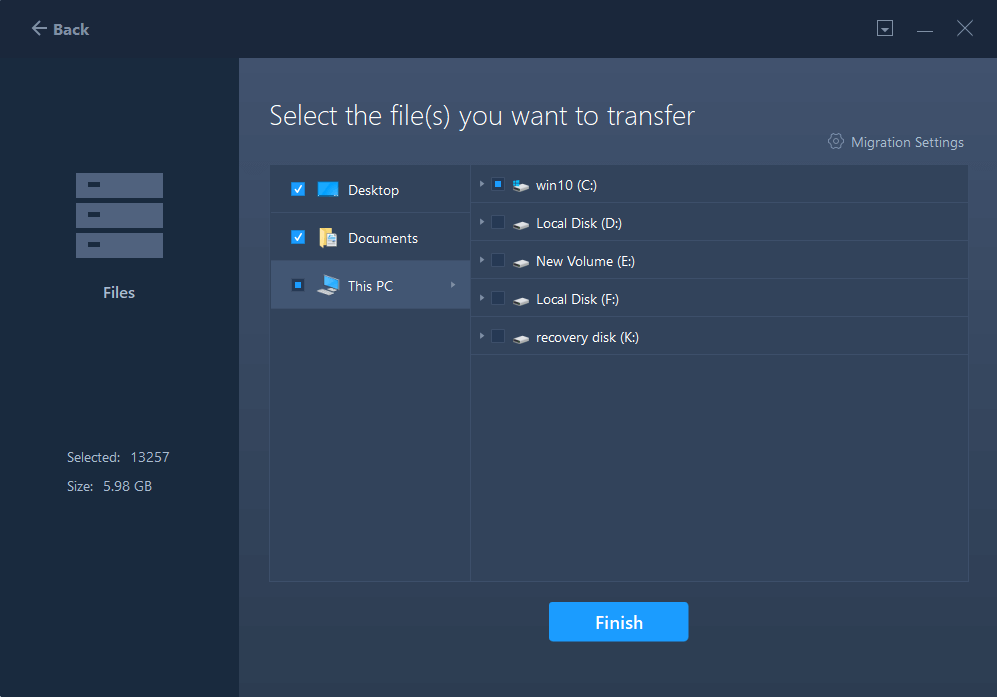
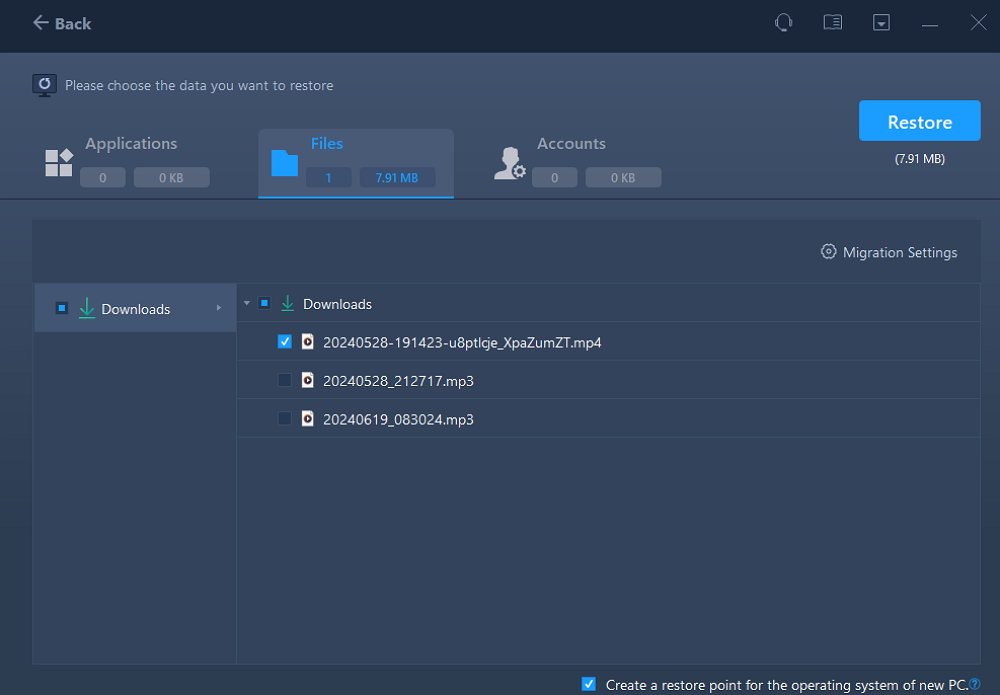
Now select the items you want to transfer to the other hard drive. EaseUS Todo PCTrans allows users to create backup files of multiple file types, including applications, personal data, and user accounts. To transfer files from one drive to another, deselect the "Applications" and "Accounts", hover your mouse over "Files", and click "Edit".

This is where you need to select files on the source drive. Expand the drive so you can selectively choose desired files, after then click "Finish". In the end, click "Backup". Wait for the process completes.
Step 2. Restore the file to the destination drive
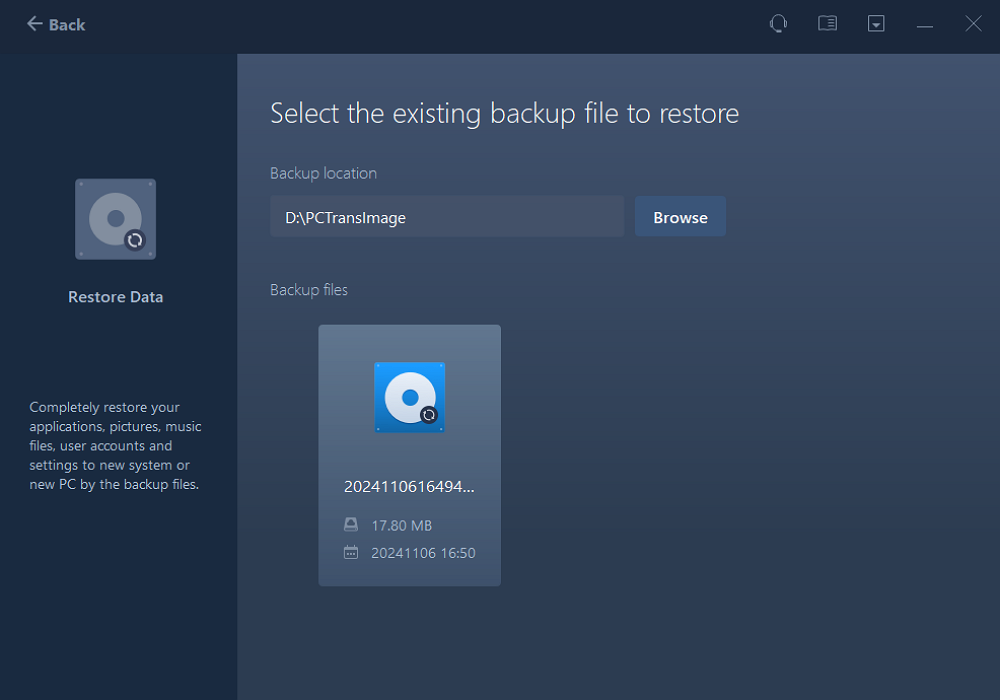
Launch EaseUS Todo PCTrans and follow the same way to reach the step of selecting a transfer method. This time choose "Data Restore" and click "Next".
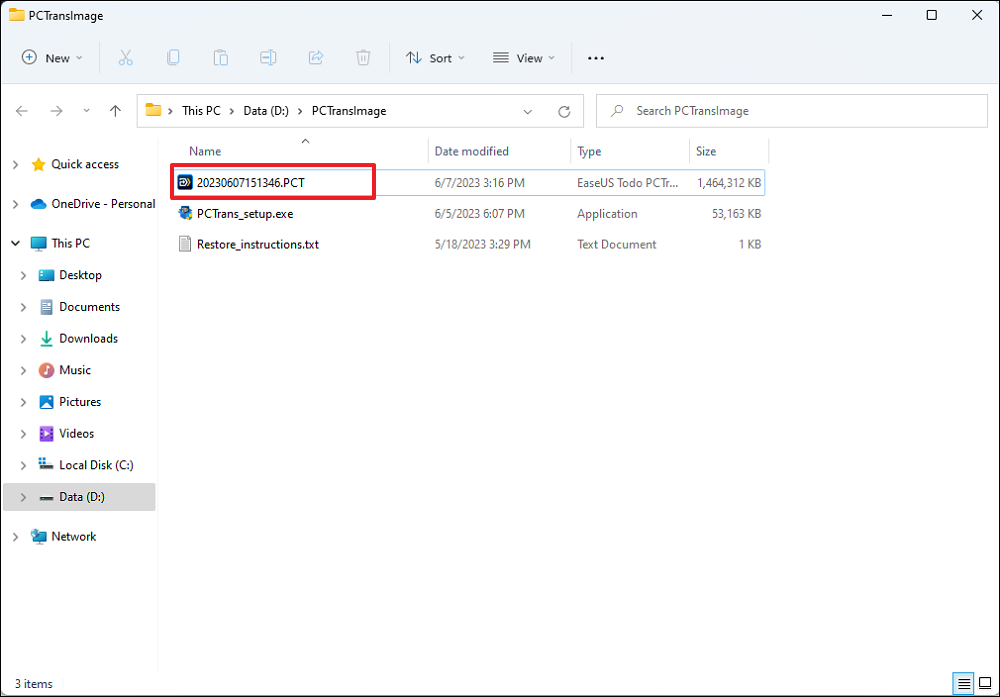
Choose the existing backup file presenting on the interface, or navigate to the exact file path where the backup file is, click "Restore".
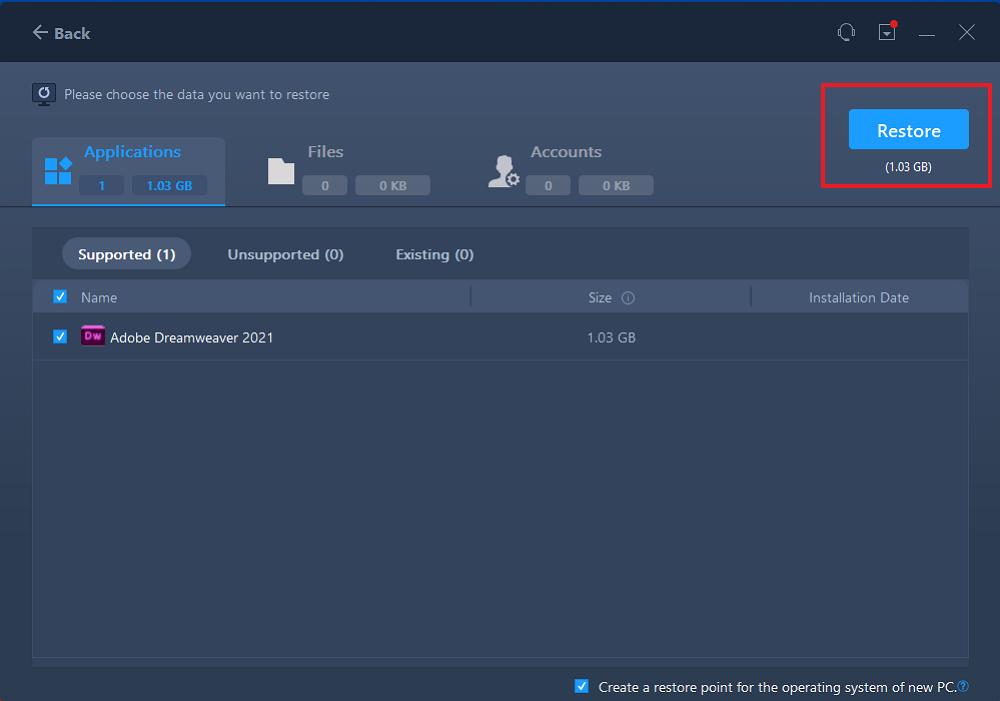
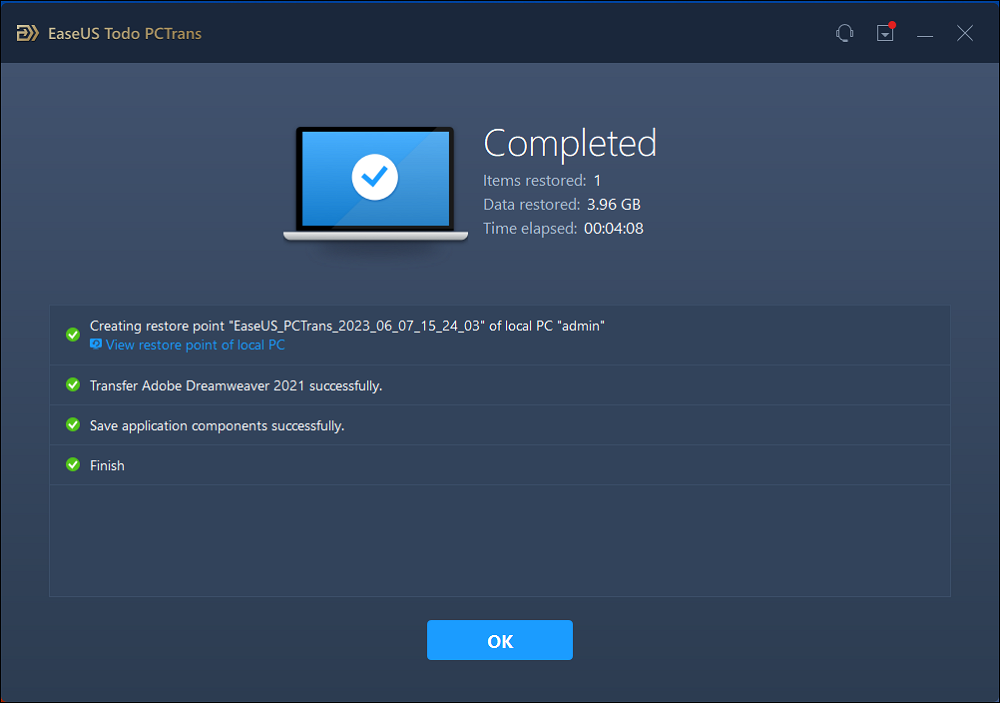
You're back to the "Files", click "Edit" to get in. The backup file is viewable here. You need to click the pencil icon to set the target location, which is the other hard drive, and submit the change. After the basic settings, click "Finish" and finally "Restore". Wait patiently until the transfer process is over.
Option 2: Bulk Backup and Restore Files from HDD to NVMe SSD
Using the backup and restore feature, you can make an exact copy of the HDD and store it in NVMe. It is also called cloning, allowing one to switch storage devices containing Windows installation quickly.
On the old PC:
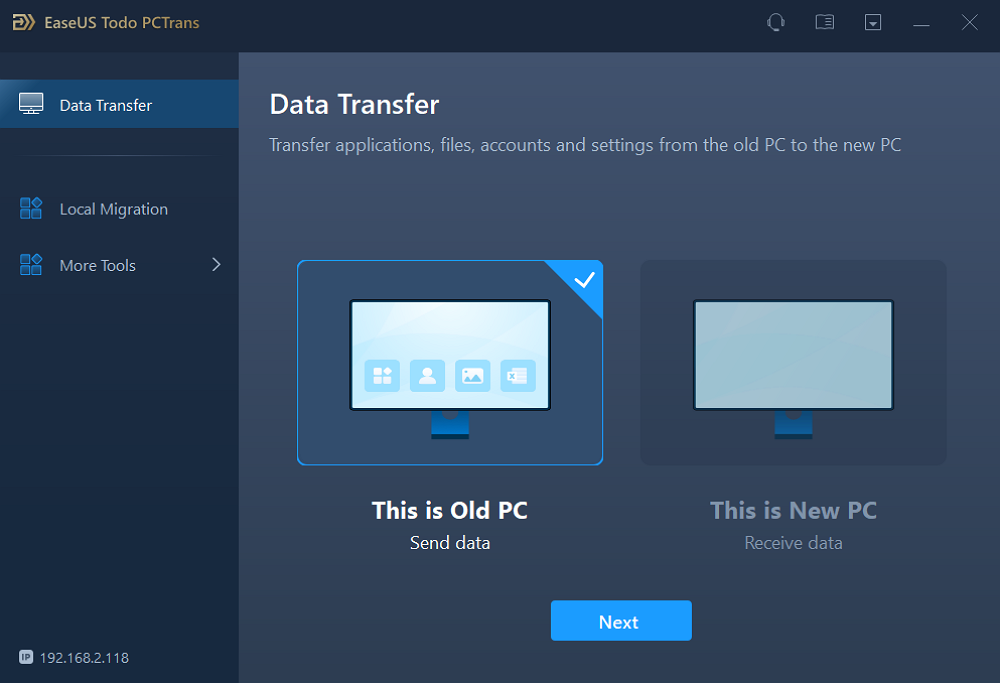
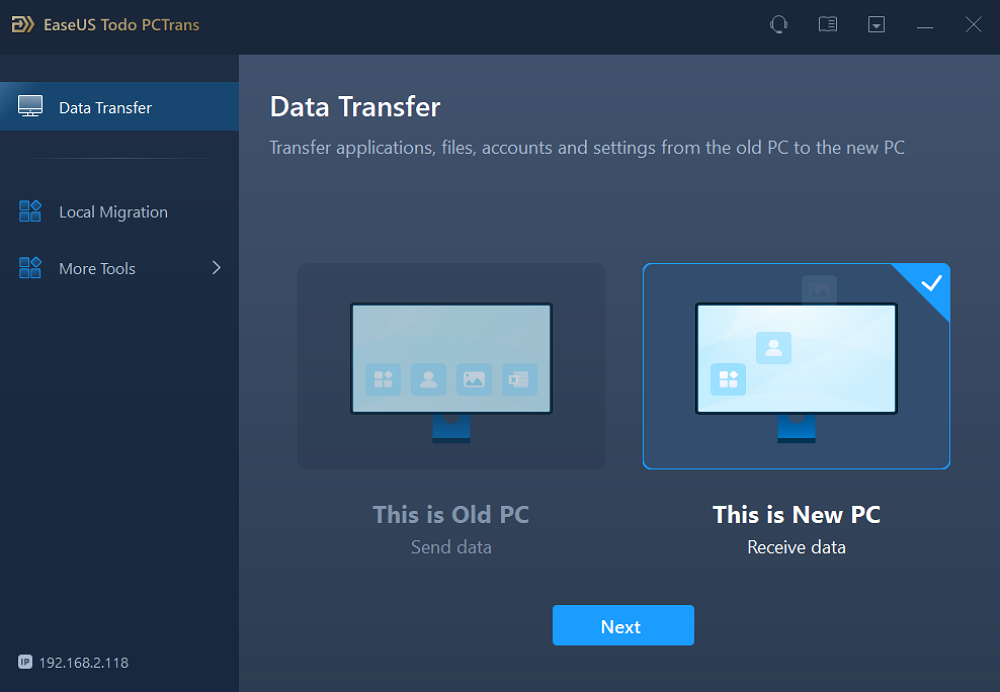
Step 1. Launch EaseUS Todo PCTrans and click "Data Transfer" on the main screen. Select "This is Old PC" and click the "Next."
Step 2. Choose the "Transfer via backup" method and click the "Next."
Step 3. Confirm the backup file name and backup location (Please save your files to a location where the new PC can access, like an external hard disk or shared network location.)
Step 4. Tick the Applications, Files, and Accounts that you wnat to backup. Click the "Backup" option to execute the process.

On the new PC:
Step 1. Lauch EaseUS Todo PCTrans on your new PC, and choose "This is New PC" in the "Data Transfer" section.
Step 2. Selcet "Transfer via backup" and click "Next."
Step 3. Browse the "Backup location" of your existing backup files.
Step 4. Select the wanted Applications, Files , and Accounts to "Restore."
Other Features of EaseUS Todo PCTrans You May Also Like
EaseUS Todo PCTrans is a multipurpose PC data transfer solution for various file transfer needs. The main data transfer features are listed below.
- Data Transmission Between Two PCs: Transfer apps, data, accounts, and settings to another computer using a network connection. Windows makes it possible for two computers to share files over WiFi.
- Transfer Local Apps Without Reinstallation: You can include the most popular and local apps such as Microsoft Office, Adobe software, Google Chrome, etc. You can also allow moving installed software between hard drive partitions. For instance, move programs from C drive to D drive.
- Moving Files Using Backup and Restore: When there is no internet connection, use backup and recovery to move files from the source PC to the target PC. You can also make copies of your accounts, programs, and files.
Download EaseUS Todo PCTrans for free:
Method 2: Via Copy and Paste
This method requires more time and steps than the first method. Refer to the first method if you need to transfer large files or folders.
This is also one of the simplest ways to transfer files from an HDD to an SSD in Windows 11. The computer can have two drives installed simultaneously, and copying and pasting allow for simple file propagation between them.
Follow the instructions given below:
Step 1. Open the specific folder on your HDD drive that you have to transfer. Using your mouse, select each one, then use the right-click menu to choose Cut or Copy.
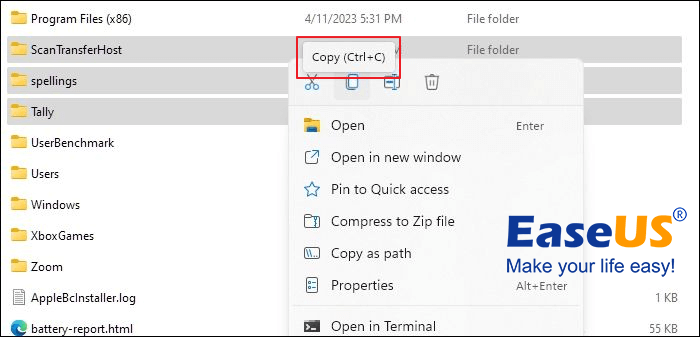
Step 2. Go to the NVMe SSD drive the computer has identified, select the proper location, and use the right-click menu. Choose Paste.

Step 3: You should see a copy progress window depending on the file size. This will successfully transfer the chosen files from your discs. Use this technique for every file you want to transfer.
If these methods successfully switched all the files from your HDD to NVMe SSD on your PC, feel free to share this method to help more friends online:
Extended Reading: Why NVMe SSD Surpasses HDD
Now, moving on, what are the advantages of transferring files from HDD to NVMe SSD? Given below are its six significant advantages:
- Faster speed: The speed difference between HDDs and NVMe SSDs is the most apparent when copying huge files. HDDs allow you only to get a maximum speed of 30 to 150 MB/second. On the other hand, you can easily reach peak rates of 3 to 4 GB/second with NVMe SSDs. An HDD is limited, slow, and fragile because every part of it is mechanical. It is not designed to integrate easily with modern technology and has technological restrictions. On the other hand, NVMe SSD is a next-generation technology that works with various form factors, including M.2, U.2, and PCIe card slots.
- Less energy consumption: NVMe drives are more sustainable and power-efficient. NVMe SSDs significantly reduce power usage by accessing and storing data on semiconductor modules. While an SSD only requires between 2 and 5 Watts of electricity, a standard HDD requires between 6 and 15 Watts.
- More practical sizes/form factors: HDD uses old form factors. The mechanical components make it incredibly challenging to construct smaller HDDs. The NVMe protocol uses more compact form factors, including the M.2, U.2, and PCIe bus, which reduces the overall size of the SSDs.
- Better user experience: The NVMe SDXC can deliver lightning-fast read, write, and I/O speeds, improving performance and lowering power consumption. On the other hand, an HDD generates higher temperatures because it has moving parts, thus hindering performance and increasing power consumption. So the user experience with an NVMe SSD is better than an HDD.
- More dependable and durable: An NVMe SSD has a significantly greater lifespan than an HDD. HDDs typically last for a few years, whereas SSDs can survive ten years or more. This is because HDDs include spinning discs that might degrade over time, but SSDs have no moving parts.
- Less weight and no noise: SSDs weigh less than larger HDDs because of their smaller size, absence of metallic discs, and magnetic heads. So, due to its small size, NVMe SSDs are perfect for laptops, tablets, and other small electronic devices. The mechanical discs that revolve in an HDD generate a lot of noise and vibration. When managing larger files, these issues become noticeable. An NVMe drive, on the other hand, makes no noise.
Conclusion
The proper procedures for transferring your files fast from HDD to NVMe SSD have been covered in detail in the article. By following the strategies, learn to use EaseUS Todo PCTrans to transfer files from an HDD to an SSD in Windows 11. Such procedures would make the operations appear simple and effective to carry out.
To move and backup files between two disc formats when using the first method, you can use an easy-to-use program like EaseUS Todo PCTrans. The manual copy-and-paste method, on the other hand, is simple but time-consuming. Overall, EaseUS Todo PCTrans is the easiest way to transfer files in Windows 11 from an HDD to NVMe SSD.
Transfer Files From HDD to NVMe SSD in Windows 11 FAQs
If you have more questions regarding how to transfer files from HDD to NVMe SSD, check out the following frequently asked questions and their answers.
1. How to transfer system files from HDD to NVMe SSD?
There are two ways to transfer files from HDD to NVMe. The first uses the cloning method, while the second is manually copying files. However, the only method would be cloning.
The cloning method, using professional software, creates a sector-by-sector copy of the HDD to SSD. It means if your HDD were a bootable storage, with Windows and system files installed, you would be able to can instantly replace and boot from the NVMe SSD without reinstalling anything.
2. Can I transfer OS from HDD to SSD without formatting?
You can do it, but only when using a professional tool. Windows methods will format the destination drive, but some professional tools allow you to transfer the OS without formatting.
That said, we highly recommend not transferring without formatting. Any traces of the previous OS will only create issues.
3. How do I move Windows from HDD to NVMe SSD?
You can move Windows from HDD to NVMe SSD by cloning Windows using the EaseUS disk cloning software. Here is how you clone Windows to move it to NVMe SSD:
- Step 1. Connect your NVMe SSD.
- Step 2. Download EaseUS disk cloning software, install and open it. Then select the Clone option.
- Step 3. Choose the NVMe disc as your destination disc after selecting the source disc.
- Step 4. To begin copying the SSD to NVMe, click Proceed.
About the Author
Sherly joined EaseUS in 2022 and she has always loved writing articles and enjoys the fun they bring. She receives professional training here, focusing on product performance and other relative knowledge. She has written over 200 articles to help people overcome computing issues.
Written by Tracy King
Tracy became a member of the EaseUS content team in 2013. Being a technical writer for over 10 years, she is enthusiastic about sharing tips to assist readers in resolving complex issues in disk management, file transfer, PC & Mac performance optimization, etc., like an expert.
Reviews and Awards
-
EaseUS Todo PCTrans Free is a useful and and reliable software solution created to serve in computer migration operations, be it from one machine to another or from an earlier version of your OS to a newer one.
Read More -
EaseUS Todo PCTrans is by the folks at EaseUS who make incredible tools that let you manage your backups and recover your dead hard disks. While it is not an official tool, EaseUS has a reputation for being very good with their software and code.
![]() Read More
Read More
-
It offers the ability to move your entire user account from your old computer, meaning everything is quickly migrated. You still get to keep your Windows installation (and the relevant drivers for your new PC), but you also get all your apps, settings, preferences, images, documents and other important data.
Read More
Related Articles
-
9 Best PC to PC File Transfer Methods 2026 (Infographic Poster)
![author icon]() Tracy King/2026/01/29
Tracy King/2026/01/29 -
How to Move Epic Games to Another Drive or PC in 3 Ways
![author icon]() Tracy King/2026/04/19
Tracy King/2026/04/19 -
[Solved] Windows Easy Transfer 7 to 11/10 [Step-by-Step]
![author icon]() Tracy King/2026/01/29
Tracy King/2026/01/29 -
Windows Installer Cleanup Utility Download (Free for Windows)
![author icon]() Cici/2026/06/21
Cici/2026/06/21