Page Table of Contents
Reviews and Awards
This page contains 9 ways to assist you in transferring files from PC to laptop or vice versa. Using the easiest way, we recommend you use the PC transfer software to finish data moving in 3 steps. Except for the third-party software, you can now get 8 solutions to move files to your new computer effectively. All Provided solutions can be applied to transfer files on all Windows PCs and laptops in Windows 11/10/8.1/8/7/Vista and XP.
View the Necessary Information to Transfer Files from PC to Laptop:
| ⏱️Duration | 2-7 minutes (depending on your method) |
| 💼Preparations |
Windows PC, laptop |
| 🧑💻Systems | Windows 11/10/8.1/8/7/Vista and XP |
| ✍️Required Software | PC transfer tool - EaseUS Todo PCTran |
| 👣Methods |
✔️Transfer Files from PC to Laptop Using Software [Free & Fast] ✔️Sharing Files between PC and Laptop with Windows Built-in Tools - [4 Tools] ✔️Transfer Files to Laptop via Transfer Cable or External Storage Device - [2 Ways] ✔️Transfer Data from Laptop to PC via Cloud or Email - [2 Ways] |
How Can I Transfer Files Between Laptop and PC Wirelessly
Question 1: How do you connect a laptop to a desktop PC? What is the fastest file transfer tool?
Question 2: Is there a way that I can connect the laptop to PC via wifi and share files between two devices?
Question 3: Is there special software that will make the whole thing easier for file sharing from PC to laptop?
When it comes to transferring files between a computer and a laptop, many people have questions about this issue. If you are the one and having one of the following questions, read on and find solutions on this page.
Part 1. Transfer Files from PC to Laptop Using Software - [Free & Fast]
Pros: Applicable for all levels of users, easy and practical, 100% secure
Cons: Payment required, cost a few bucks (Charge for advanced features: rescue data, find product key, etc.)
Difficulty: ☆
There are many file transfer software and tools available online for you to try. To save your time, we'll only present you with one outstanding software that works efficiently in file transferring.
Transfer Files from PC to Laptop via Free PC Transfer Software
If you are going to transfer files from desktop to laptop once, using wifi, professional PC transfer software - EaseUS Todo PCTrans Free can help. Even if you are a novice, you can transfer files to laptop quickly and easily. Download this transfer tool and free to use:
It is free to transfer folders, files (including music, documents, videos, photos, etc), and programs along with settings from PC to PC in Windows 11/10/8/7 over the internet or by creating an image file with simple clicks.
Step 1. Set Up the Old PC
- First, install and launch EaseUS Todo PCTrans and select Data Transfer on the left panel of the main interface.
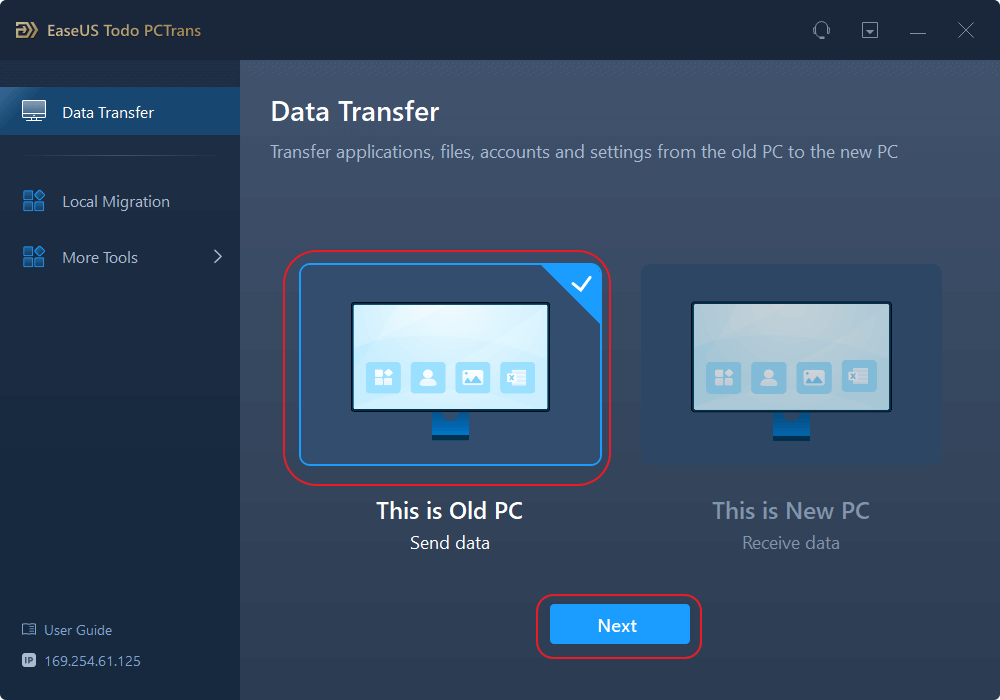
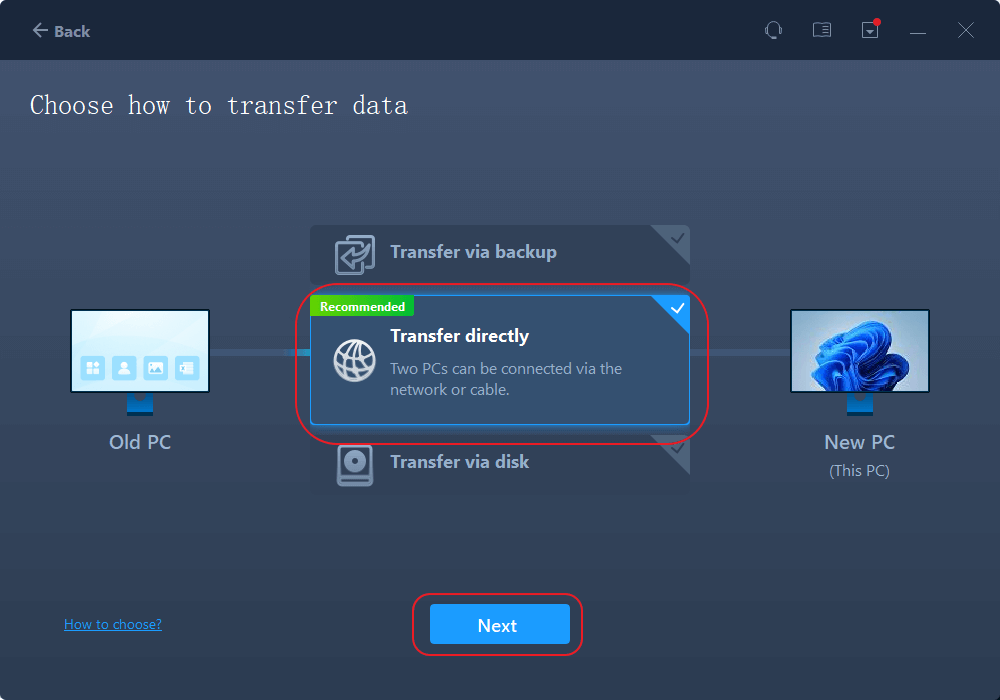
- Select "Transfer Directly" and click "Next" to continue.
Step 2. Set Up the New Laptop
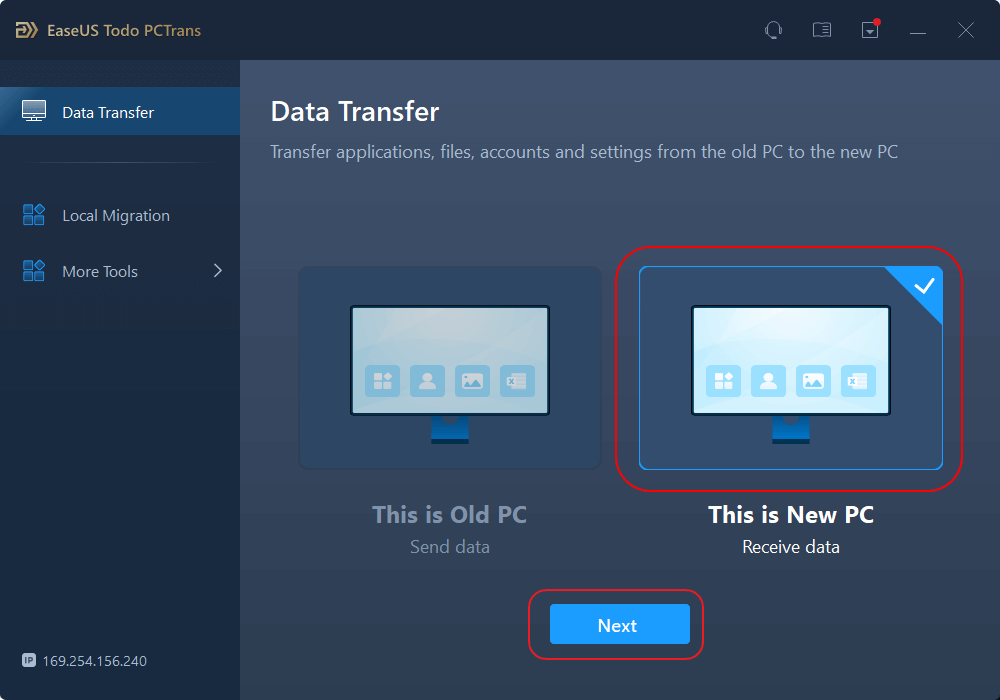
- Download and launch EaseUS Todo PCTrans on the new laptop; select "This is New PC" and click "Next".
- Select "Transfer directly" and click "Next" to continue.
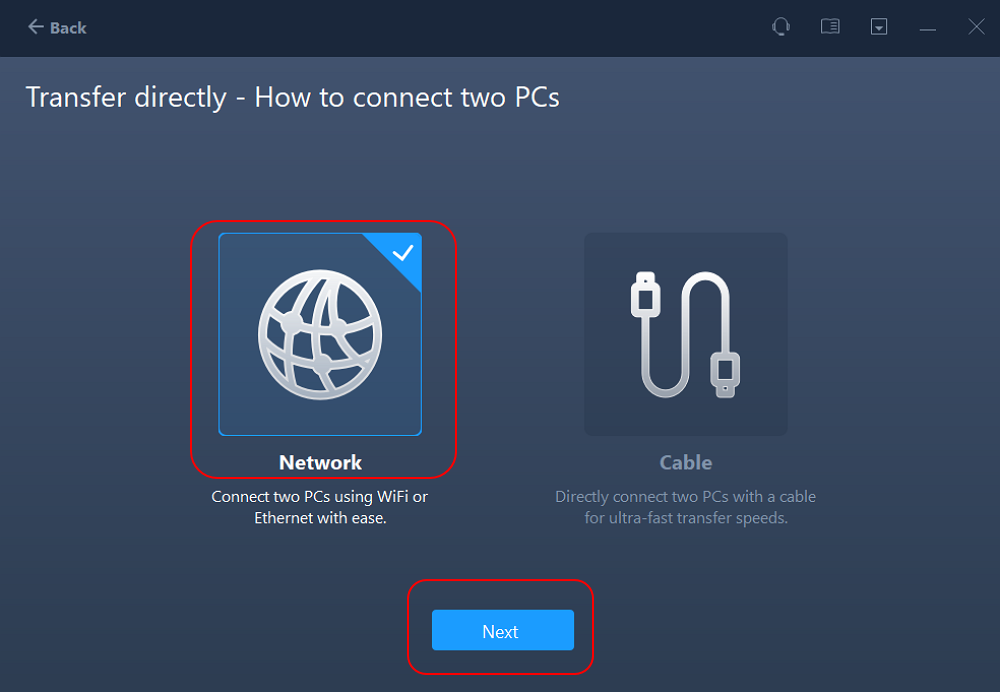
- Select "Network" and click Next to continue. This will automatically scan the old PC. (Make sure the two PCs are connected to the same LAN.)
- Select the target PC and click Connect. Then, it will take some time to scan and analyze the data in old PC.
Step 3. Select Files to Transfer from PC to Laptop
- Now, choose "Files" to select files to transfer. By default, PCTrans will transfer and save data to the same location on the target computer. But you can click the "Edit" icon to customize the storage path as you need.
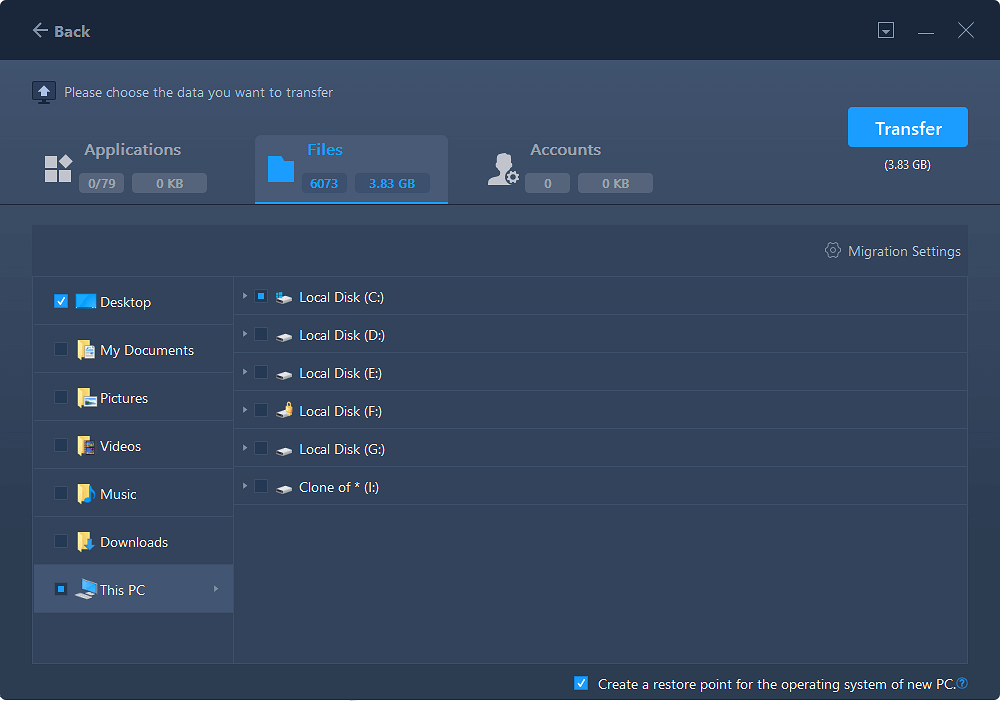
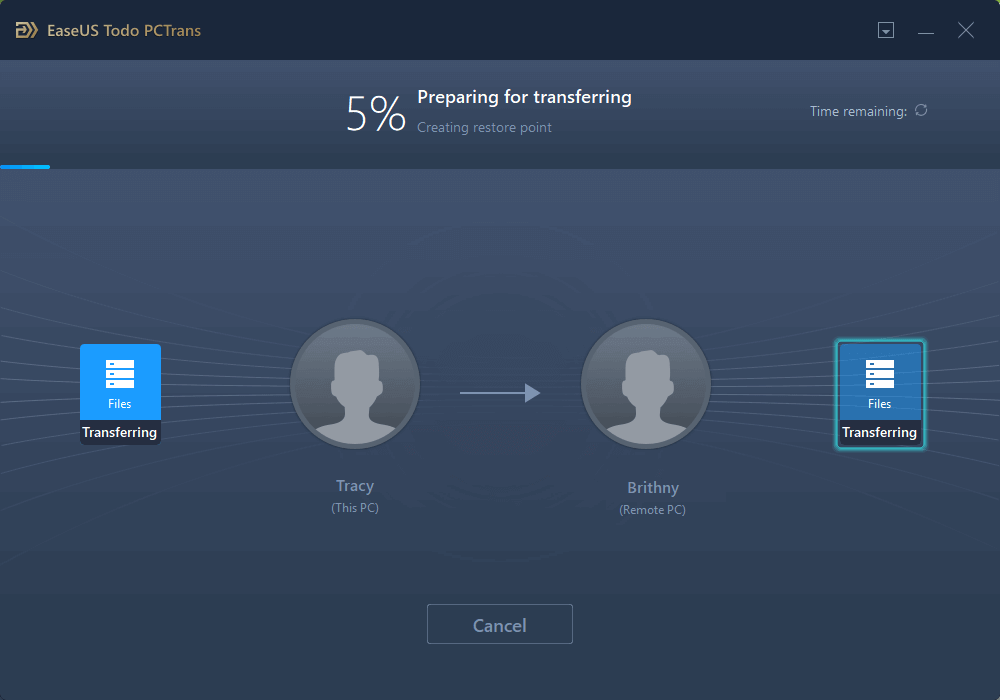
- Now, click "Transfer" to start to transfer files from PC to laptop at a fast speed.
For offline file transfer between PCs with EaseUS Todo PCTrans, follow this video for help:
If you need to transfer programs and apps into a new drive in one PC, please refer to Transfer installed programs, apps to a new hard drive.
[One-for-All Guide] Transfer Files from PC to PC in 2022
Part 2. Sharing Files between PC and Laptop with Windows Built-in Tools [4 Ways]
Pros: Free
Cons: Complex for new or inexperienced computer users
Difficulty: ☆☆☆☆☆
Microsoft added file sharing feature in all Windows systems. As a result, any Windows user can transfer files on their PCs via Network shared drive, network shared link, home group, and nearby sharing.
Let's check the detailed steps for sharing files between PCs and laptops with Windows built-in sharing tools.
🚩Read Also: Laptop to Laptop Data Transfer
# 1. Share Files between PC to Laptop via Network Link
Step 1. Map a network drive on the source computer:
1. Right-click on This PC/Computer and select "Map network drive".
2. In the Drive box, click the drive letter you want to use.
Note: The drive should be big enough for saving the files and folders that you want to share.
3. In the Folder box, type \\server\share, where you can type the IP address of the drive to be mapped. Click "Finish" to cotinue.
For example, if the IP address is 192.168.6.xxx, you can type \\192.168.6.xxx.
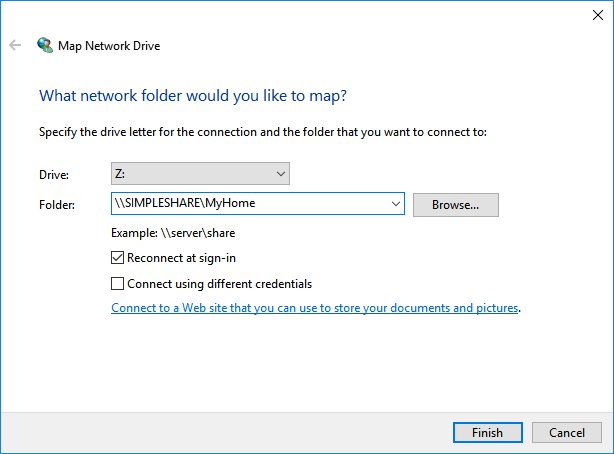
Step 2. Save files and folders to the mapped drive.
Step 3. One the target PC, open File Explorer and type the IP address of the mapped network drive, e.g: 192.168.6.xxx
Step 4. Hit Enter and access the shared files. You can copy and save the files to your local PC.
# 2. Create Network Shared Link and Sharing Files between Two PCs
Step 1. Open Network & Sharing Center and change advanced sharing settings on the source PC
1. Right-click the Windows icon, click Search and type: network and sharing center, click to open it.
2. Click "Change advanced sharing settings", check the boxes below and save changes:
- Turn on network discovery
- Turn on file and printer sharing
- Turn on sharing so anyone with network access can read and write files in the public folders
- Turn off password protected sharing
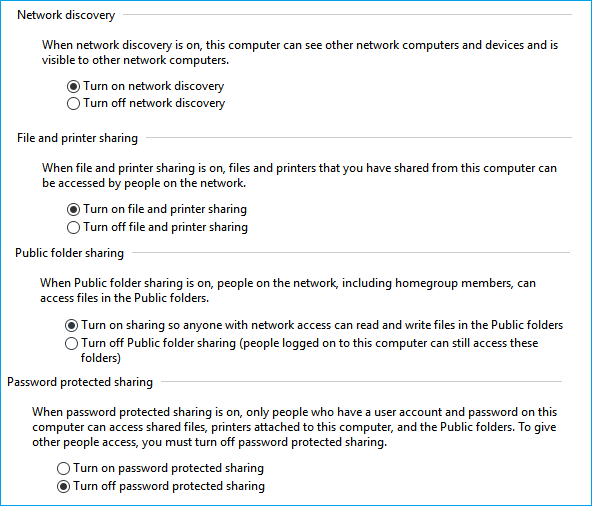
Step 2. Create a shared link for the files that you want to share
1. On the source computer, open drives in File Explorer and select files that you want to share.
2. On Windows File Explorer, go to the Share tab at the top pane, click "Share" and select "Specific people...".
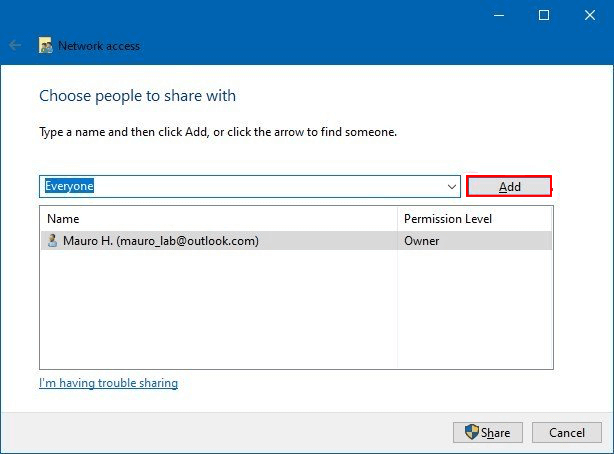
3. Click the expand button and choose "Everyone" as the share mode, click "Add" to confirm.
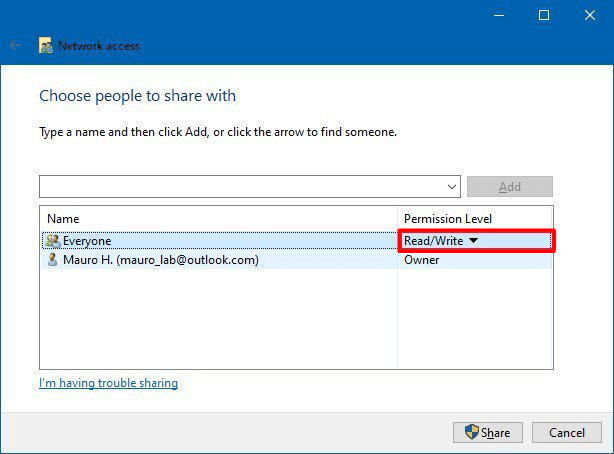
4. Click "Everyone", and specify the access privilege as "Read/Write" under the Permission Level. And click "Share" to confirm.
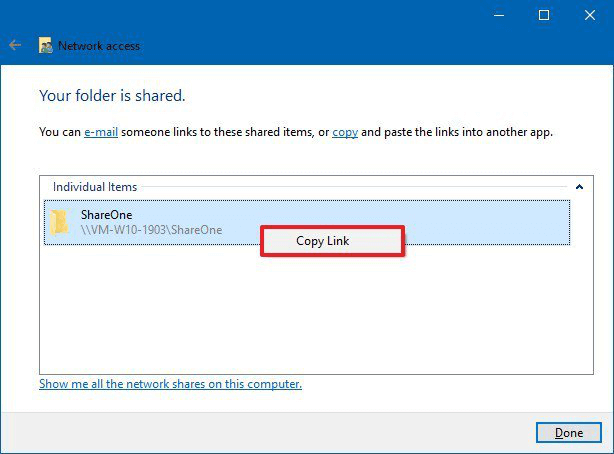
5. Right-click the shared folder path and select "Copy Link" as shown below:
6. Send the shared link to the target PC via Email or other ways.
Step 3. Share and copy files to target PC via the network drive
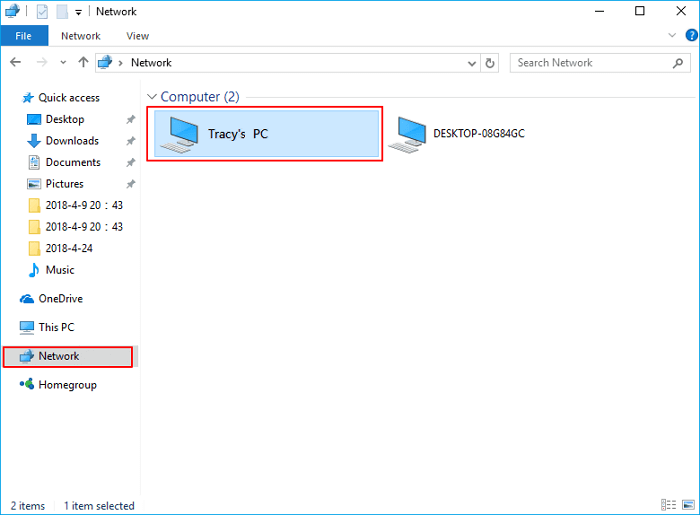
1. Open File Explorer on the target computer and click "Network".
2. Find the source computer name and double-click to open it, access the shared files. There, you can view, copy and save these files to a local drive on your target PC.
# 3. Transfer Files to New PC via Home Group
Note: This feature is only available for Windows 11/10 users before 1803 version and Windows 8/7, etc users.
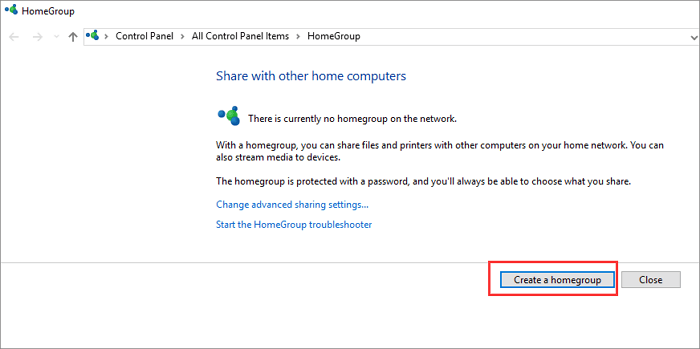
Step 1. On the source computer, type and search for a homegroup in the Search box. Click to open it.
Step 2. Choose "Create a homegroup" > "Next", and follow the instructions.
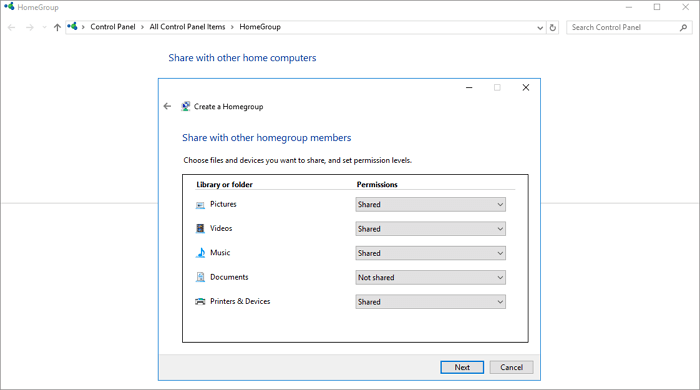
Step 3. Select files and folders that you want to share and switch the Permissions buttons to "Shared", and click "Next".
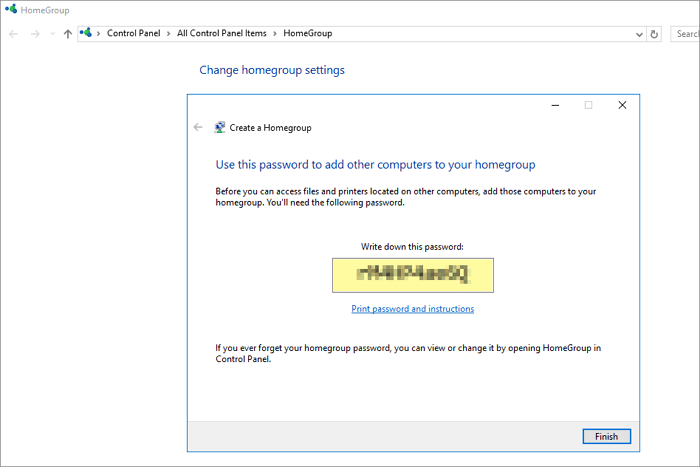
Note: Remember the password shown on-screen.
Step 4. Go to the target computer and open HomeGroup: Control Panel > All Control Panel Items > HomeGroup.
Step 5. Join the existing Homegroup and enter the password you got earlier and click "Finish".
Step 6. There, you can access the shared files on the new PC and save them to a local drive.
If the simplified guide is not clear to you, you can follow the tutorial of how to transfer files from laptop to laptop(8 Ways) in this video:
# 4. File Sharing between Windows 11/10 PC and Laptop via Nearby Sharing
Note: This method is only available for Windows 11/10 1803 and newer versions of Windows users.
Step 1. Enable nearby sharing on both computers: Go to Settings > System > Shared experiences > Nearby sharing. Turn on it.
Step 2. Under "Nearby sharing," select "Everyone nearby".
Everyone nearby — Your PC will be able to share and receive content from all nearby devices, including those you don't own.
Save files I receive to — Your PC will receive content to the target path on your drive.
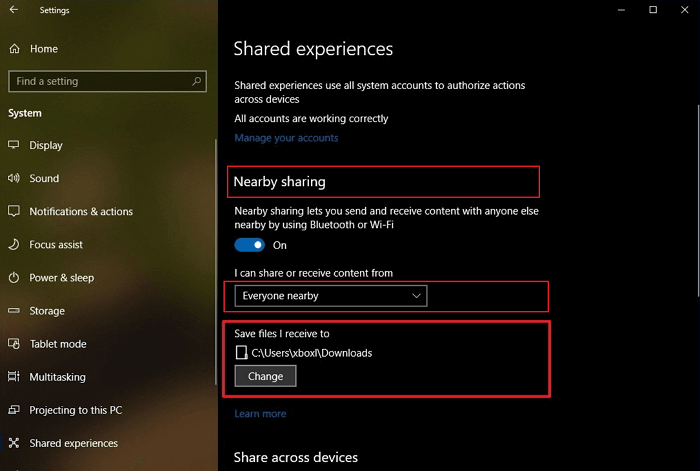
By default, transfers will be stored in the Downloads folder, but you can specify another folder or another drive very easily. Under "Nearby sharing," using "Save files I receive to" option, click the "Change" button. Select a location to save transfers.
Step 3. Start file sharing between the two laptops.
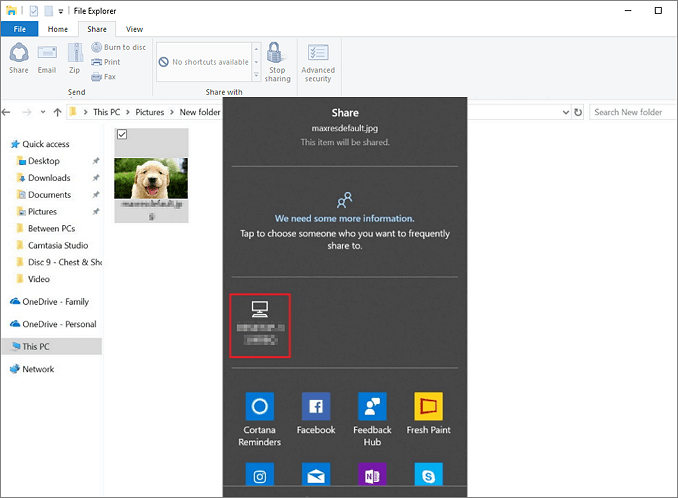
Open "File Explorer". Right-click the file you want to share. Click the "Share" option. Select the device from the list.
Do you like the four ways to transfer files to a laptop? If you think it is helpful, click the social buttons and share it with other friends.
Part 3. Transfer Files from PC to Laptop via Transfer Cable or External Storage Device
Pros: Simple & easy, applicable by all users
Cons: Cost a few and even a hundred bucks for purchasing a new external hard drive or a transfer cable
Difficulty: ☆☆
Many users prefer a manual solution to transfer files between computers. To do so, you have two options to move files between PC and laptops - using a USB transfer cable or an external hard drive.
# 1. Transfer Files between PC and Laptop via USB 3.0 Transfer Cable
Note: To transfer files from PC to PC via USB transfer cable also requires you use software to help complete the process.
- For Windows 8.1/8/7/ users, you can use Windows Easy Transfer with a USB transfer cable to execute the task.
- For Windows 10 users, you may use a third-party transfer cable with embedded software to complete the job.

Here are the steps:
Step 1. Start both PC and laptop and connect two computers via the Transfer USB cable.
Step 2. Run the transfer software like Windows Easy Transfer on both computers.
Step 3. On the source computer, on transfer software, select the transfer method and select files you'd like to move to the target computer.
Confirm the operation and wait for the process to complete.
# 2. Use External Hard Drive to Copy and Transfer Files
To do so, you need to prepare an empty external hard drive first. Then follow the steps here to copy and transfer files from your old computer to the new laptop:
Step 1. Connect your external hard drive to the source computer.
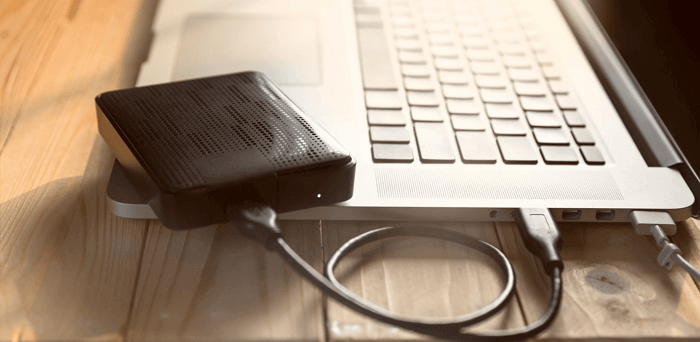
Step 2. Select files you'd like to transfer and copy them to the external hard drive.
Step 3. Unplug the external hard drive and connect it to the target laptop. Open the drive and copy files to the new laptop.
Part 4. Transfer Data from Laptop to PC via Cloud and Email
Pros: Available and easy
Cons: Payment required, cost a few bucks
Difficulty: ☆
# 1. File Transfer between PC and Laptop with Cloud Storage
Cloud services like OneDrive, Dropbox, Google Drive, etc. all supported file sharing between two different devices. All you need is to install a Cloud service application on the target new computer, sign in with your cloud account, and redownload the files.
Here we'll take OneDrive as an example for you to follow:
Step 1. Upload files from the source computer to OneDrive.
Open OneDrive > Sign in with your OneDrive account > Click "Add" or "upload" to add the file to your OneDrive cloud account.
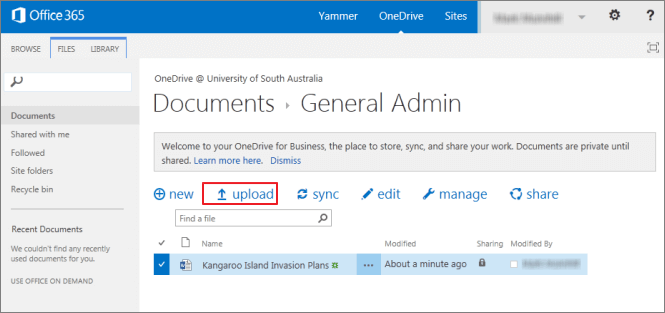
Step 2. Download wanted files to the target PC.
On the other laptop, open the "OneDrive" app, sign in with your account and right-click on the uploaded files, and select "Download".
Wait patiently till the downloading process finishes.
# 2. Transfer Files to New PC via Email
Almost all Email service applications support file sharing via attachment. Email users can effortlessly transfer files to different users on two computers. Outlook, Windows Mail, Gmail, Mozilla Thunderbird, Hotmail, etc. can all do the job.
Step 1. Open your email application on the source computer, sign in with your email accounts.
Step 2. Go to Index, input the email addresses - From: your email address on the source PC, To: email address on the target PC.
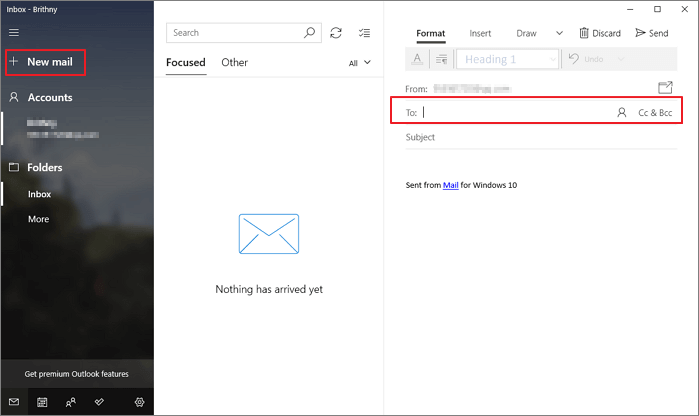
Step 3. Click the Attachment icon, select the files that you want to share on your current PC. Click "Send" to start sending files to the target PC.
Step 4. On the target PC, open any email application and sign in. Go to Inbox, check, and download the received attachment files.
Conclusion
This page includes 9 ways to assist you in transferring files from PC to laptop or vice versa.
- For an easy and effective solution, transfer software like EaseUS Todo PCTrans is your best shot.
- For a free method, using a network shared drive or link will be better.
- As for a manual way, using an external hard drive to copy and move files to the new computer will be the right choice for you.
- For Cloud and Email users, using these two ways to transfer files from PC to laptop.
If you have more questions about file transfer, migrating installed programs, or moving games to another drive, use the Search option on the EaseUS website or go to the PC-Transfer page to find more answers.
How to Transfer Files from PC to Laptop FAQs
Do you know how to transfer files from PC to laptop? 9 ways are provided in the guide. If you still have other confusions related to today's topic, keep reading.
1. Which is the fastest way to transfer files to another PC?
There are several ways to transfer files from to laptop. This article covers all the possible methods, including using software, Windows built-in tools, transfer cables, and e-mail. One of the fastest and most convenient ways is to use the software - EaseUS Todo PCTrans. It provides powerful transfer algorithms to transfer files easily.
2. How to transfer files from PC to PC using a USB cable?
Here is a simple idea for transferring files using a USB data transfer cable: boot both computers to the operating system and connect the USB through the appropriate port. Then use the cable's built-in software to transfer the files. And you can view the full guide in this passage.
3. How can I transfer files to a laptop wirelessly?
You can transfer files wirelessly to your computer via network sharing in Windows: Open Windows Settings, select Network and Internet and click the Sharing option. Then under Private, select Open Network Discovery and Open File Sharing. This article provides detailed steps on this option, please expand to view.
About the Author
Updated by Tracy King
Tracy became a member of the EaseUS content team in 2013. Being a technical writer for over 10 years, she is enthusiastic about sharing tips to assist readers in resolving complex issues in disk management, file transfer, PC & Mac performance optimization, etc., like an expert.
Brithny is a technology enthusiast, aiming to make readers' tech lives easy and enjoyable. She loves exploring new technologies and writing technical how-to tips. In her spare time, she loves sharing things about her game experience on Facebook or Twitter.
Reviews and Awards
-
EaseUS Todo PCTrans Free is a useful and and reliable software solution created to serve in computer migration operations, be it from one machine to another or from an earlier version of your OS to a newer one.
Read More -
EaseUS Todo PCTrans is by the folks at EaseUS who make incredible tools that let you manage your backups and recover your dead hard disks. While it is not an official tool, EaseUS has a reputation for being very good with their software and code.
Read More
-
It offers the ability to move your entire user account from your old computer, meaning everything is quickly migrated. You still get to keep your Windows installation (and the relevant drivers for your new PC), but you also get all your apps, settings, preferences, images, documents and other important data.
Read More
Related Articles
-
Can I Transfer Installed Programs to SSD without Reinstallation in Windows 11
![author icon]() Tracy King/2026/01/29
Tracy King/2026/01/29 -
How to Transfer Files from iCloud to Google Drive Step by Step
![author icon]() Tracy King/2026/01/29
Tracy King/2026/01/29 -
Transfer Files From HDD to NVMe SSD in Windows 11 in 2 Ways
![author icon]() Tracy King/2026/01/29
Tracy King/2026/01/29 -
How to Move Microsoft Teams to Another Drive - 3 Quick Ways
![author icon]() Tracy King/2026/01/29
Tracy King/2026/01/29